

Tutorial : Analyzing Reviews using Google Sheets and Cloud Natural Language API
source link: https://rominirani.com/tutorial-analyzing-reviews-using-google-sheets-and-cloud-natural-language-api-240ec8f3090c
Go to the source link to view the article. You can view the picture content, updated content and better typesetting reading experience. If the link is broken, please click the button below to view the snapshot at that time.
Tutorial : Analyzing Reviews using Google Sheets and Cloud Natural Language API
You have definitely heard about Sentiment Analysis over the last few years. In this tutorial, we shall look at how you can analyze reviews saved in Google Sheets and use a combination of Apps Script, Cloud Functions and Google Cloud Natural Language API to analyze the sentiments and indicate the results in the Google Sheet itself.
There is a lot to cover over here but first up, let’s see what we plan to create by the end of this tutorial. A sample Google Sheet is shown below:


The first row indicates the columns (attributes) for each review. We have an id, the user who submitted the review, the date time that the review was submitted, the review text and finally the last column sentiment that we are going to calculate.
Shown below is the same Google Sheet with a custom menu option added to analyze the sentiment across each record.

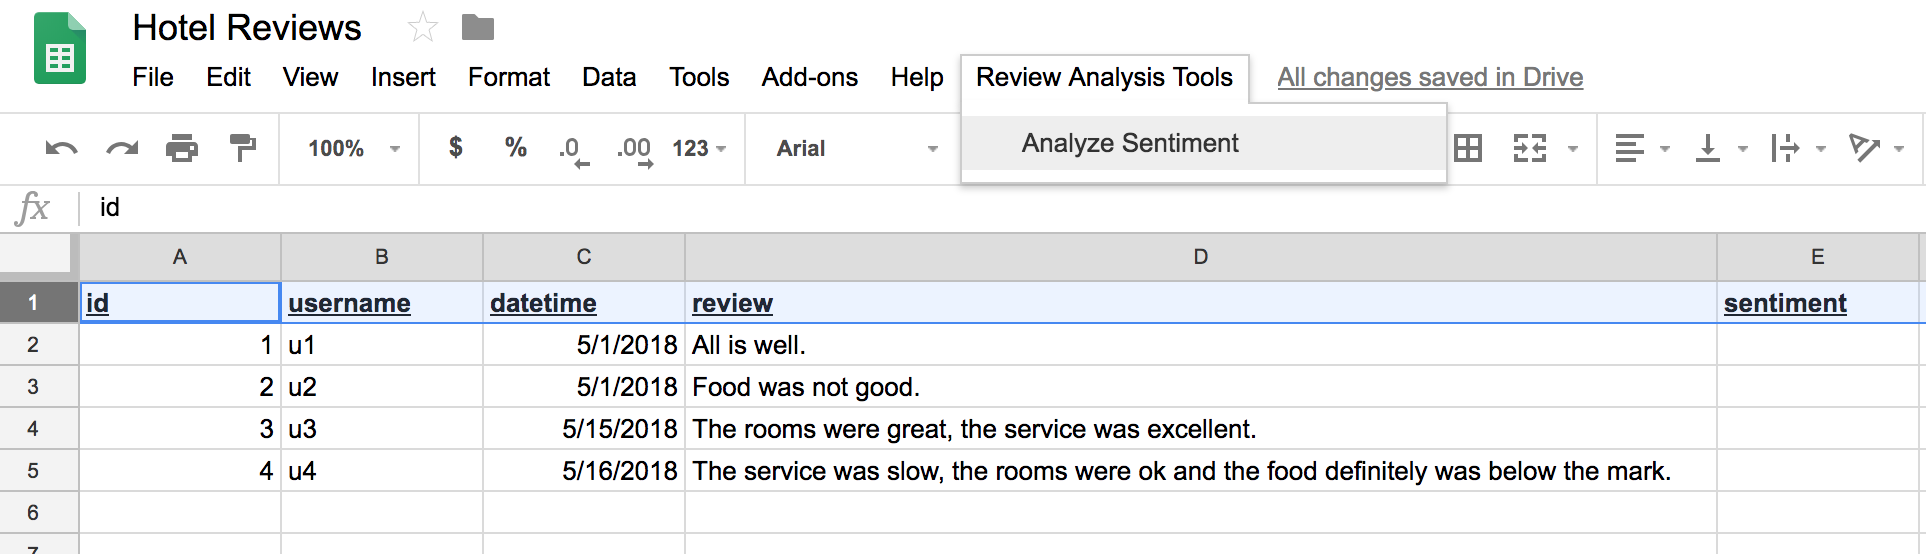
On clicking that, some magic happens and we have a positive (green), negative (red) or a neutral (yellow) color inserted in the column values for sentiment as shown below:


What has happened behind the scenes is the following:
- On clicking the Analyze Sentiment menu option, we write a bit of Apps Script (a scripting language based on JavaScript that allows you to do cool things with the GSuite family i.e. Docs, Sheets, Slides, etc).
- The Apps Script code will invoke a function that will make a call to the Google Cloud Natural Language API. This API, available just a REST call away helps you make sense of natural language. In addition to language analysis, it can help us understand the entities that are being referred to in the text and most importantly, the sentiment of the text. A powerful feature of the API is its sentiment analysis not just for the entire text but also for each of the entities that it finds in the text.
- Depending on the value of the sentiment i.e. negative or positive or zero, we color code the cells accordingly.
Sounds good? Let’s go. I agree that its not a terrible lot of things that we are doing here and definitely this should be your version 0.1 of a reviews solution powered by Google Sheets and Cloud Natural Language API. I will provide a ton of enhancements that you can do over this version as suggestion towards the end of the article. My goal here is for you to see how all the pieces fit together and I am sure that you can then take this and build multiple other apps with this foundation.
First up, let’s dig a bit deeper into the Cloud Natural Language API and how we can use it for Sentiment Analysis.
Cloud Natural Language API basics
As mentioned earlier, Google Cloud Natural Language API is one of its suite of Machine Learning (ML) APIs that exposes powerful models that are just a REST call away. These ML APIs can do stuff like analyzing images, videos, text, speech to text, text to speech and much more.
The Cloud Natural Language API helps us with text analysis. It can help us identify the entities in the text, sentiment analysis on the whole text and individual entities found in the text, syntax analysis, text content classification and more. Our focus in this tutorial will be on Sentiment Analysis.
The best way to understand the beauty of this API is to actually see it in action via the “Try the API” feature. Visit https://cloud.google.com/natural-language and scroll this feature as shown below:

You can use the pre-populated text as a demo and click on ANALYZE button. This will give you the breakdown feature wise as shown below (I have selected the Sentiment tab of the results, since that is what we are interested in.)

Notice, how the Sentiment is available for the entire document, each sentence and then for each entity found in the document. The Entity Level Sentiment is actually a combination of identifying not just the entities in the document but also their individual sentiment. This is very powerful because it makes a lot more sense in some use cases to look at individual entity sentiments.
For e.g. if I provide you a movie review that goes like this : “The script was great but the songs were uninspiring”, it can get a bit tricky. The overall sentiment might just be neutral because the movie sentiment seems positive, the songs sentiment seems negative and simple math seems to cancel each one out. However, what if you wanted to understand at a more granular level, what worked in the movie? In that case, it would be great to identify each of the entities being spoken about in the review i.e. script and songs. And then look at the individual sentiment around them. That’s exactly what the entity level sentiment feature does in the Cloud Natural Language API.
Note: Movies and Songs ….??? Bollywood … right !
Now, let’s talk about another neat feature of the API. You must have noticed that there is no such thing as a Sentiment value that I am talking about in the previous paragraph. The API returns the Sentiment as a set of 2 values : score and magnitude.
The score is a value between -1.0 and 1.0, with -1.0 indicating very negative and +1.0 indicating very positive. A value of 0.0 is a neutral sentiment. But that’s not all. Associated with each score is the magnitude value. A higher value of magnitude indicates that the strength of the sentiment. Refer to the documentation to understand things a bit better. I also reproduce from the official documentation, a table that indicates how you could use the two values together to interpret the sentiment in a more meaningful and actionable manner.

Let’s look at another example that shows the power of the Natural Language API vis-a-vis Entity Level Sentiment Analysis. Here is an actual review that I have taken from a local restaurant:
To start with the good things about this place:
1. The ambience: nice well spaced restaurant with proper cooling available across.
2. The service: Service was not delayed and the staff was courteousEnding up with the negative things about this place:
THE FOOD: We ordered for fresh line soda (sweet), butter garlic chicken and prawns chilly for starters.
Fresh lime soda was bitter in taste
The chicken was chewy and the butter garlic sauce was sticky.
The schezwan chutney the had served on our table was stale and had a foul smell.
Though we had planned for dinner here, we changed our mind post tasting the food.
Go ahead and put the above text in the “Try the API” feature. You will find that it was able to analyze the sentiment for each sentence, each entity and does a great job with both positive and negative sentiments for respective entities in the review. A snippet of the same is given below:

You will find that some results look a bit off but that is expected, so do plan for that. The current ML APIs can be used to assist to a large extent but don’t expect to run some mission critical stuff off it in an automated fashion based on the response you get from them.
Important Note
For the purpose of this tutorial, we will keep things simple and look at only two things:
- The overall Document Level Sentiment and not individual entity sentiment.
- We will just look at the score value to determine if the sentiment is positive (>0), neutral (=0) and negative (<0).
Invoking the Sentiment Analysis API
Now that we have a basic understanding of how the Sentiment Analysis works in Cloud Natural Language API, let us see what we need to do to invoke it and get back some results.
First up, keep in mind that it is a REST API, so you can invoke it via HTTP if you want to or you could use one of the many client libraries that are made available to hide the details away from the networking and managing the HTTP request/response. But it’s good to understand the same at the Protocol Level.
We need to send a POSTrequest to the documents:analyzeSentiment method in the REST Endpoint as shown below:
https://language.googleapis.com/v1/documents:analyzeSentiment
To this endpoint, we need to provide a JSON object in the data as shown below:
'document': {
    'type': 'PLAIN_TEXT',
    'content': '--YOUR TEXT HERE--'
  }
This will give back the following JSON Response.
Note, we have to take care of security i.e. pass in some authorization details but we can keep this simple for now and once we get to the actual implementation a bit later, we will explain how to set that up.
{
  "documentSentiment": {
    "magnitude": 0.8,
    "score": 0.8
  },
  "language": "en",
  "sentences": [
    {
      "text": {
        "content": "--YOUR TEXT HERE--",
        "beginOffset": 0
      },
      "sentiment": {
        "magnitude": 0.8,
        "score": 0.8
      }
    }
  ]
}
The values being returned for magnitude and score are just sample values.
Note:
- You can pass in a
document.languagevalue in the JSON request to indicate which language the text is in. If it is not provided, the API will auto detect it from the multiple languages that it currently supports. - Instead of
document.contentin the JSON Request, you can usedocument.gcsContentUriwhich can point to an existing document that you have stored in Google Cloud Storage.
Now that we have learnt a bit about the Google Cloud Natural Language API, let us get going to putting it in action.
Setting up our Google Cloud Platform Project
The first thing to do is to set up a new Google Cloud Platform Project and enable a few APIs.
I will assume the following:
- You have a Google Cloud Platform Account with Billing enabled. Remember there is an always free tier too.
- You have created a new project in GCP using the web console. Note that the
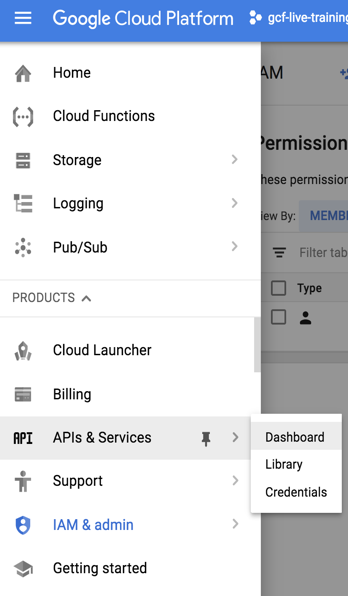
projectidfor the same. - We need to enable a couple of APIs in our Google Cloud Platform project: Cloud Functions API and Cloud Natural Language API. From the Cloud Console, click on the Main Menu in the Top Left corner and navigate to Menu → APIs and Services → Dashboard as shown below:
Click on Enable APIs and Services. This will bring up a screen as shown below, where you can enter Cloud Functions in the search field.
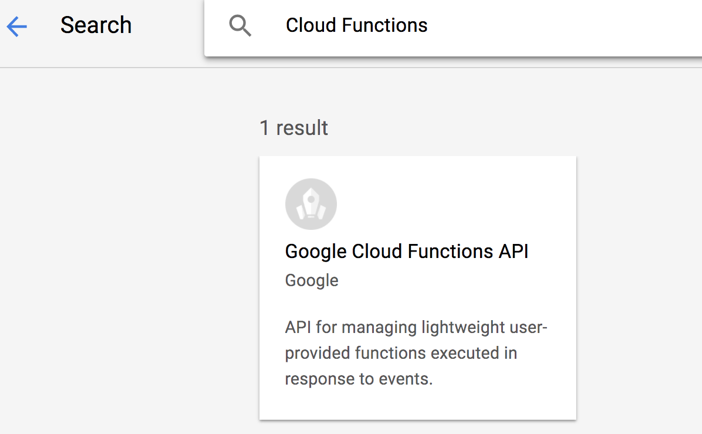
Click on Google Cloud Functions API and then click on Enable. This will enable the API for use in your Google Cloud Platform project.
Repeat the same process i.e. enable the Google Cloud Natural Language API.

Let us move on now to create our Google Sheet.
Our Google Sheet
Here is the sample sheet that you can view and use in your Google account:
The sheet is similar to the one that we saw in an earlier section on what we are going to build.
Powering it with Apps Script and Cloud Natural Language API
In this section, we shall be invoking the Cloud Natural Language API from within Apps Script code in our sheet.
To invoke the Cloud Natural Language API from an external application, we need to take care of authenticating to the Cloud Natural Language API. By we, it is the Google Sheet. We shall be using an API Key that will allow us to invoke the API.
To generate an API Key, we need to visit our Cloud Console for the project again. Visit the Console and go to APIs and Services → Library as shown below.

Go ahead and type Cloud Natural Language API in the Search box and select it. You should see the API enabled as shown below:

Click on MANAGE and then click on Credentials.

In the Credentials screen, select API Key as shown below:

This will generate an API Key. Just copy that value safely for now. We will refer to this as API_KEY later in the document.
Now that we have the API Key available , let us work on our Google Sheet.
Assuming that you have made a copy of the Google Sheet referenced above, open the Sheet. You should have something like this open for you:
Feel free to add in your own review text instead of the samples provided.
We will now be writing some Apps Script that will take each review text, invoke the Cloud Natural Language API for the text and depending on the sentiment score value, we will change the background color for the sentiment column in the sheet above.
Go to the following option (Script editor) from the main menu as shown below:

This will bring up the Code Editor as shown below:

Replace this code with the code shown below:
Let us dissect the code a bit:
onOpen function
This function is invoked when the document is opened. We are creating a new main menu option titled Review Analysis Tools and inside that we are adding a menu item titled Analyze Sentiment. This results in the following additional menu item as shown below (Pay attention to the right of the Help menu item):
If you click on the menu item, it will invoke a function named analyzeSentiment.
analyzeSentiment function
The first thing that this function does is to retrieve the object for the current Active Sheet in the Google Sheet. We then setup a few variables that tells us start and the end of the rows and columns that contain data. Note that the variable startRow is set to 2 since the first row contains header columns i.e. names only.
We then use the getRange method to get the sheet data. The data returned is a two-dimensional array, where you have the row index and then for each row, you have an array of values that represent each cell value. We are only interested right now in the cell value for the column titled review , because that is the text that we will be passing on to the Cloud Natural Language API and retrieving in return the sentiment score and magnitude for the entire text.
So, for each cell data that represents the review text, we invoke the retrieveSentiment function that returns us a score. The score as we know from our understanding of Cloud Natural Language API ranges from -1.0 to 1.0 i.e. from negative to positive.
Finally, the function sets the background color for each cell depending on the value of the sentiment score → Red (less than 0), Yellow (equal to 0) and Green (greater than 0). I have commented out the score value from being populated into the cell too, but I leave that to you.
retrieveSentiment function
This function is primarily responsible for making a REST Call to the Cloud Natural Language API. We had earlier studied the mechanics of making a REST call and had touched upon the Request JSON object and Response JSON object that are involved with the Cloud Natural Language API.
Apps Script has a nifty UrlFetchApp class that does all the heavy lifting with invoking the REST API. Notice that you will have to use the API_KEY for Cloud Natural API that you generated earlier and use that value for the variable apiKey in the code.
Try it out and you should see an output that looks like this:
If you have noticed so far, Apps Script makes it dead simple to integrate with any REST API out there and not just Cloud Natural Language API. One thing that I would ideally like is to not use the API_KEY in the code like this. Ofcourse there can be other ways to compartmentalize your code and keep that out, but I thought of using Cloud Functions here too. This would give me additional flexibility to maybe remove all that Cloud Natural Language API code from Apps Script and just substitute it with a REST Call to my HTTP Trigger based Cloud Function. I could potentially make richer Cloud Functions that keep the concerns separate.
So let’s see how we can change things a bit here to use Cloud Functions. If you are new to Google Cloud Functions, I suggest my tutorial series on Cloud Functions.
Note: If you are fine with just Apps Script and do not want to use Cloud Functions for now, we are actually done with the tutorial, so you could skip the next section.
Throwing in Cloud Functions
What we are going to do over here now is to do the following:
- Write a Google Cloud Function that will be responsible for taking as input some text and then returning back the sentiment score. Internally, the Cloud Function implementation will invoke the Cloud Natural Language API for us.
- Once we have deployed the Cloud Function, we will then modify our Apps Script code. The
analyzeSentimentmethod was invoking theretrieveSentiment(review)method. We will replace it with the following line of code :retrieveSentimentCF(text) - We will code out the
retriveSentimentCF()method in Apps Script.
Let’s get going.
Google Cloud Function to invoke Cloud Natural Language API
Assuming that you are logged into the cloud console, visit Cloud Functions from the main menu. This will bring up a screen as shown below:
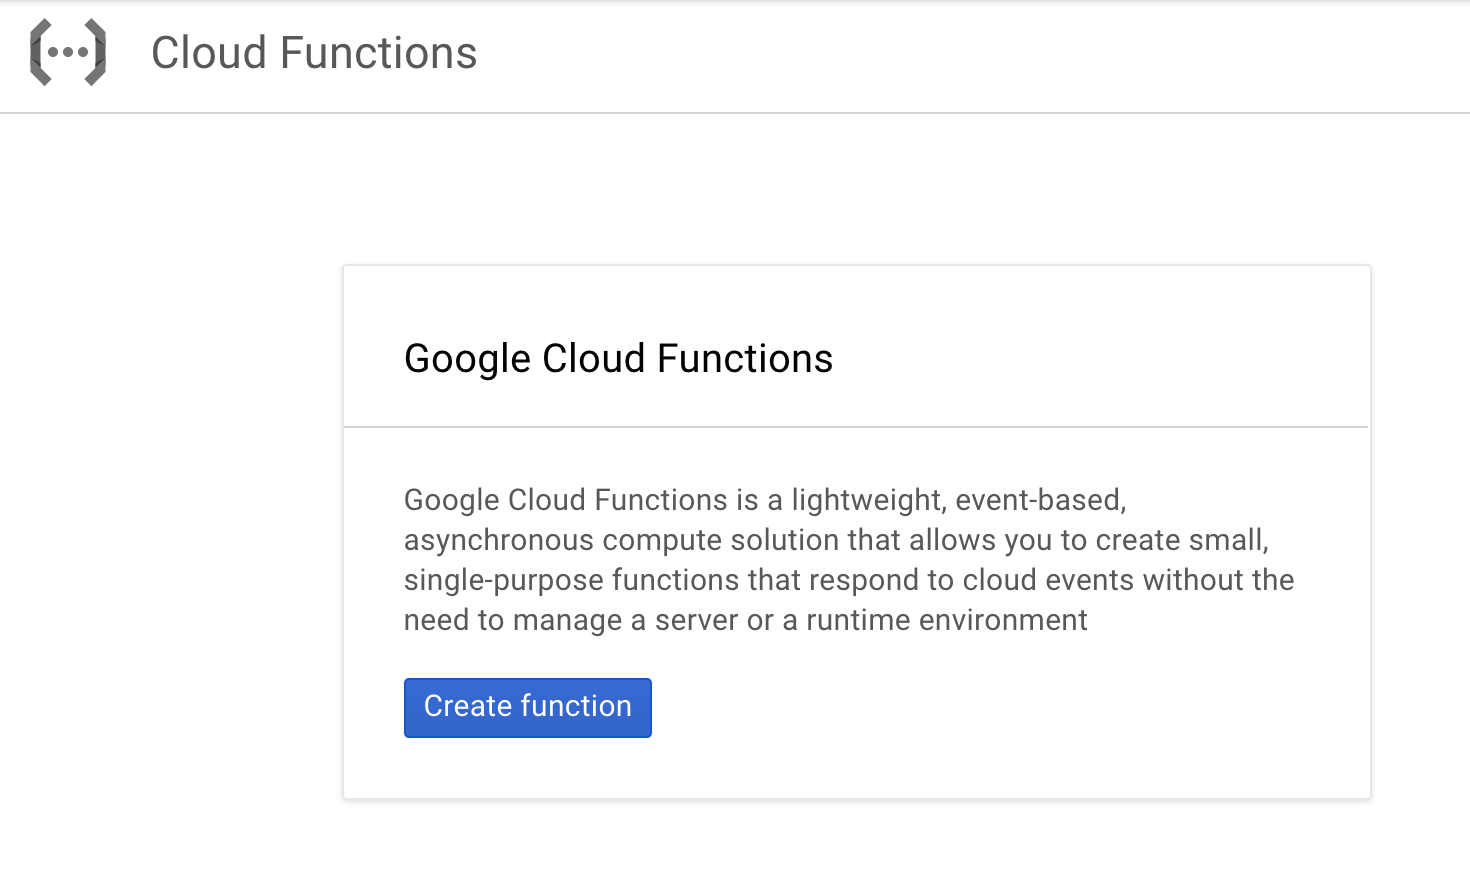
Click on Create function.
You will see an intimidating form come up next as shown below:
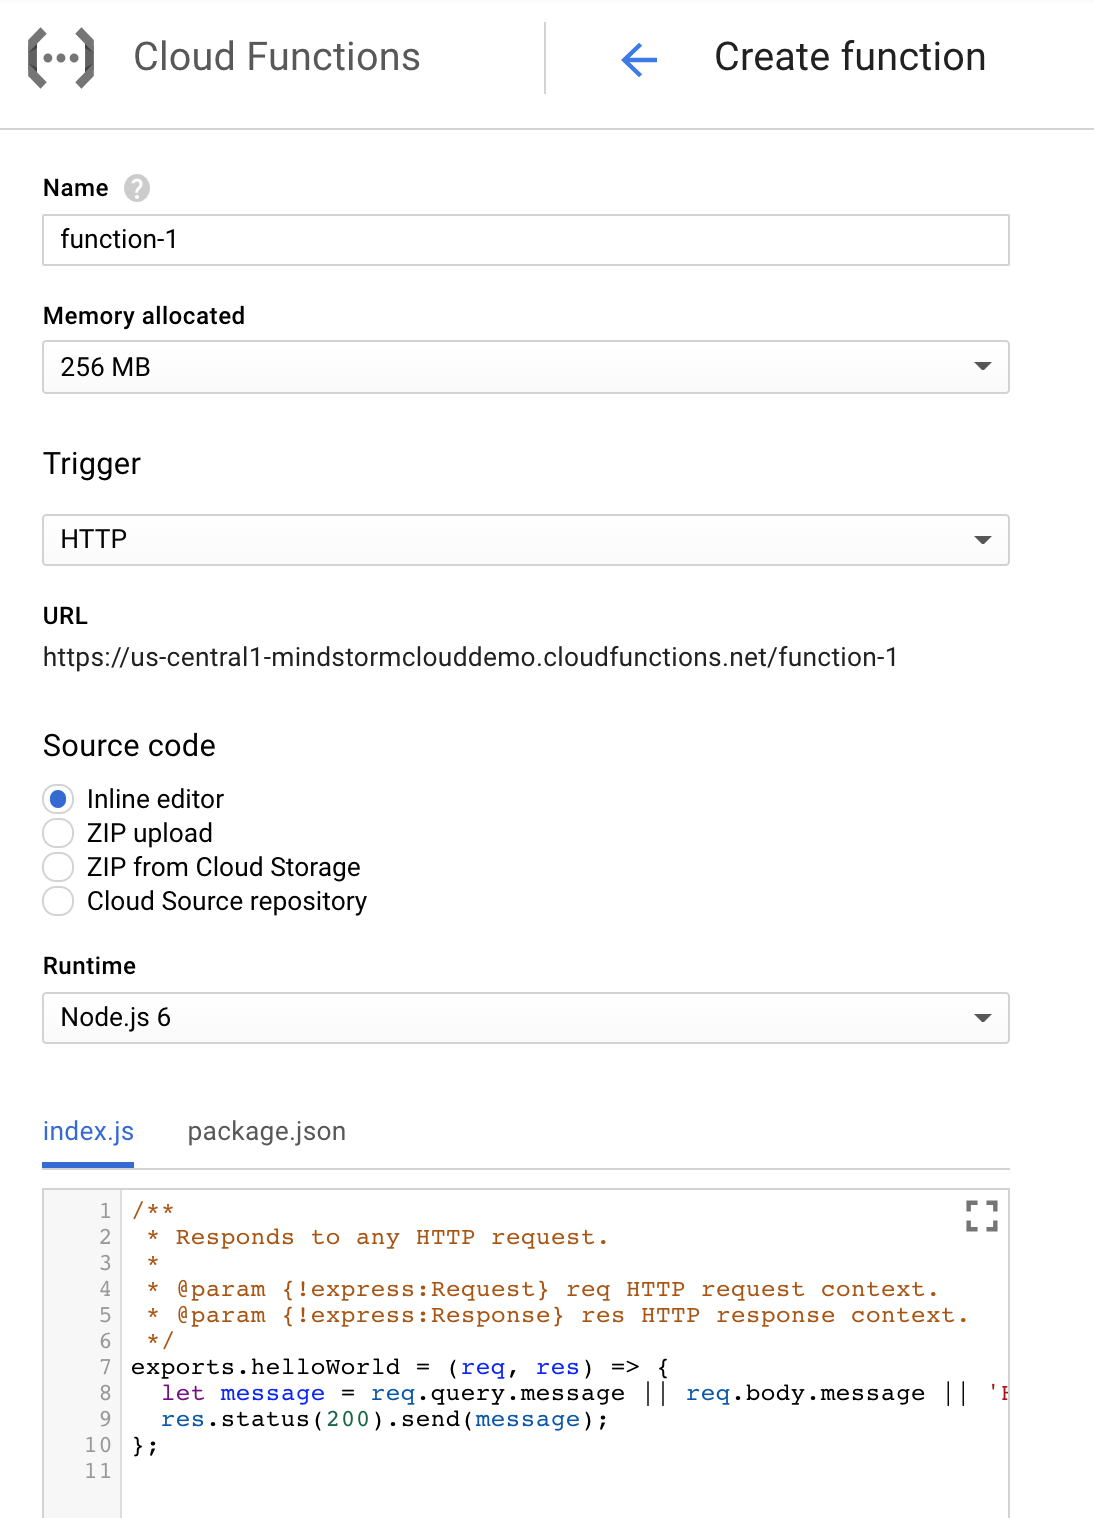
Fill out the details as given below.
- Name : Give a name to your function. Let us name it
analyzeSentiment - Memory : Go with 256MB for now, which is the default value.
- Trigger: We are going to go with the HTTP Trigger since we want to invoke it directly via a HTTPs endpoint. Go ahead and select HTTP Trigger. Note the unique URL that it generated.
- Runtime: This will currently have all the runtimes that are either in General Availability (GA) or Beta. For our case, select Node.js 6.
- Source Code : We can paste our source code here. A default template is provided to you. Replace it with the code shown below:
The code is straightforward and we are utilizing the Node.js npm package for Google Natural Language API to make things easier for us. We simply instantiate and get the client. We can construct the same request JSON object that we have been seeing till now, invoke the Natural Language API endpoint and parse out the results. We are not taking into consideration individual sentence sentiments (hence commented) and just taking the overall document sentiment score and magnitude. That is the response object emitted by our Cloud Function.
Go to package.json tab and use the following snippet of code:
{
 “name”: “sentiment-api-example”,
 “version”: “0.0.1”,
 “dependencies”: {
 “@google-cloud/language”: “1.2.0”
 }
}- In the
index.jsfile, notice the function that we are exporting via theexports.analyzeSentimentstatement. - In the field for function to execute, it will need to match the
exportsstatement, hence this value will beanalyzeSentiment.
Click on Create to create the function. This will take a while at times, so please be patient.
Once the operation is successful, you will see your function listed in the list of functions as shown below:

Click on the function name i.e. analyzeSentiment above to proceed further. This will bring up the function details as shown below. You can do several things from here. You can manage your source code, edit your function details, test your function, view your logs, view metrics and more.
Go to the Testing tab as shown below and provide the JSON text as shown below. Click on Test the function. This will invoke the function for you and you can see the output appear in the Output section. Nice .. isn’t it ?

Cloud Function HTTP Trigger URL
In the Trigger tab, you will find the HTTPS endpoint for your Cloud Function. What this means is that we can invoke this URL directly from anywhere. Note down this trigger URL since we will be using that in the Apps Script code next.
We will refer to this URL:
YOUR_CLOUDFUNCTIONS_HTTPS_ENDPOINT
Apps Script code changes
Now return back to your Apps Script code and go to the analyzeSentiment function first. Replace the following line:
var score = retrieveSentiment(review);
var score = retrieveSentimentCF(review);
Add a new function retrieveSentimentCF in the Script Editor as shown below:
Nothing major here except that instead of directly calling the Cloud Natural Language API, we have invoked our Cloud Functions HTTPS endpoint.
Do check if everything is working fine like before.
Money , Money, Money !
Now that we have seen how it all works, what about the costs of this solution. We are looking at 2 specific services here:
- Cloud Functions
- Cloud Natural Language API
Remember that we have the Always Free Tier available on Google Cloud Platform and here are the free usage limits for a variety of services.
Now coming specifically to Cloud Functions, the following are available in the free tier:

This is something that you should try to work out. You will have to understand from the basic metrics provided to you by Cloud Functions around not just number of invocations but the average time that your function takes to run and the kind of environment that you have chosen to execute your Cloud Function in. Check out https://rominirani.com/google-cloud-functions-tutorial-pricing-9cc6dc47f7c0 for a tutorial on Pricing with a working example.
Now, let’s look at the pricing for Cloud Natural Language API. In the free tier, we get :

What does a unit mean? If you dig deeper into the Pricing for Cloud Natural Language API, you will find that a unit is defined as a text record. I reproduce the following text from the official documentation since that explains it best:
A text record corresponds to a Document provided as input to a Natural Language API request, containing up to 1,000 Unicode characters (including whitespace characters and any markup characters such as HTML or XML tags).
If a Document contains more than 1,000 characters, it counts as one text record for each 1,000 characters. For example, if you send three requests to the Natural Language API that contain 800, 1,500, and 600 characters respectively, you would be charged for four text records: one for the first request (800), two for the second request (1,500), and one for the third request (600).
Having understood that, “the table below provides the price per 1,000 text records based on the total number of text records analyzed during the billing month.”

Focus on the 2nd row i.e. Sentiment Analysis. This should give you a good idea of the amount that the Cloud Natural Language API will cost you since you will know the number of requests that you will make and the approximate size for each request in terms of units (1000 characters).
Adding more features
This brings us to a close but this is not the end of it. You might have noticed or have already starting thinking that there is a lot that you could still do. My goal here is to throw some suggestions to you here to help to push further in your journey. Here we go:
Individual Entity Sentiment
You noticed that we restricted this tutorial to the overall document sentiment and score. This is good but you would probably gain a lot more if you investigated into using individual entity sentiments. So instead of invoking just the analyzeSentiment call in the Cloud Natural Language API, how about experimenting with analyzeEntitySentimentmethod. Check out the documentation.
Visualization
This tutorial restricted you to just coloring the cells depending on the sentiment score. You can definitely do a lot better than me. How about some charts that average out the score, average by week or month. This would definitely need a lot more data but you get the picture. In fact, if you do a Entity Sentiment analysis, you can even highlight entities that are having a bad review more than the others. For e.g. in a hotel reviews analysis, this would be a good way to categorize your feedback into food, rooms, service, facilities, transportation and more. Check out the blogs that I have referenced at the end. They do a great job to show how you can do further analysis, draw some charts and make it more easy to get insights into the data.
Populate the Review Sheet automatically
I provided the Sheet to you with auto-filled data. But in a real system, you might need a way to get the review data into the sheet in the first place. This might require an integration with your current reviews system or from popular review sites. But keep in mind that you can do that and can populate the sheet via Google Sheets APIs too. You could even create a web-hook powered by Google Cloud Functions, that can receive a review as it comes into the system and then populates the Google Sheet.
Process multiple Review Files
What if you had multiple review sheets coming in from different sites. One good option would be to store all these files into Google Cloud Storage and then combine them with Google Cloud Functions to create a serverless data processing pipeline. Look at one such possibility in the flow below:

Useful Links
This tutorial would not have been possible if not for a few excellent resources available on the web. I strongly suggest that you take a look at them since they go deeper, have great visualizations and analysis that is sure to give you some ideas.
Check out this blog post by Alicia Williams, a Cloud Advocate at Google.
Check out this blog post by Ivan Kutil, Google Developer Expert on Apps Script.
There is a great code lab from Google on a similar technique to use the Natural Language from Google Docs. Very useful to check the tone of your document, etc.
Github project
Get all the source code here.
Hope you found the blog post useful. Do let me know what you build with it. Cheers.
Recommend
About Joyk
Aggregate valuable and interesting links.
Joyk means Joy of geeK