

Building GitHub Pull Requests using Jenkins Pipelines
source link: https://www.kabisa.nl/tech/building-github-pull-requests-using-jenkins-pipelines/
Go to the source link to view the article. You can view the picture content, updated content and better typesetting reading experience. If the link is broken, please click the button below to view the snapshot at that time.

Building GitHub Pull Requests using Jenkins Pipelines
 Posted by Pascal Widdershoven on 17-8-2016
We’ve written about building Github Pull Requests with Jenkins back in 2013. Three years later we’re still strong Jenkins users here at Kabisa, even though Jenkins changed quite a bit. Most notably Jenkins introduced the notion of Pipelines.
Jenkins Pipelines allow you to describe your entire CI/CD pipeline in code and version it together with your production code. Additionally the whole Jenkins Pipelines ecosystem allows for many powerful setups, including building jobs in Docker containers and built-in support for building Github Pull Requests.
In this post I’m going to show you how to configure Jenkins 2.0 with Pipelines to setup a complete CI/CD pipeline with builds running in Docker containers for isolation and ease of environment setup.
Setup Jenkins
Technically Jenkins Pipelines have been available in Jenkins 1.x already, but since Jenkins 2.0 Pipelines are bundled with Jenkins itself. This means that the only prerequisite for getting started with Jenkins Pipelines is installing Jenkins 2.0!
For the remainder of this post I’m going to assume you have:
- Some basic knowledge of Jenkins
- A running Jenkins 2.x instance
- A GitHub organisation
- A GitHub user in said organisation that has API access to list and clone repositories (either via SSH or HTTPS), as well as administer your organisation (used to configure webhooks)
After following this tutorial you’ll end up with the following job structure in Jenkins:
Github
|--- Project 1
  |- master
  |- PR 1
  |- PR 2
  |- ...
|--- Project 2
  |- master
  |- ...
All GitHub projects will be nested under a GitHub namespace. Jenkins will build all master branches and any Pull Requests.
To get started navigate to the New Item page in Jenkins and configure as follows:
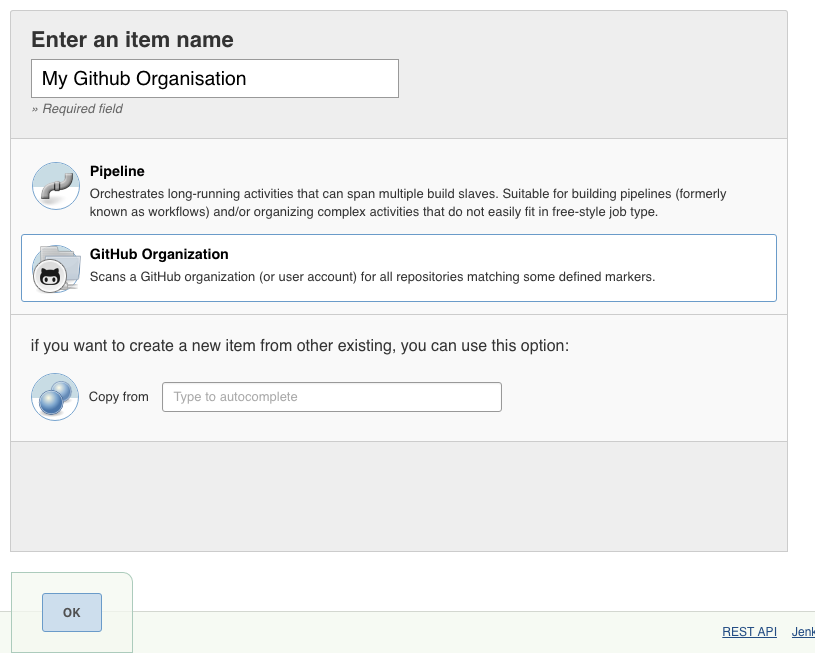
On the next screen some details about your GitHub organisation have to be configured:
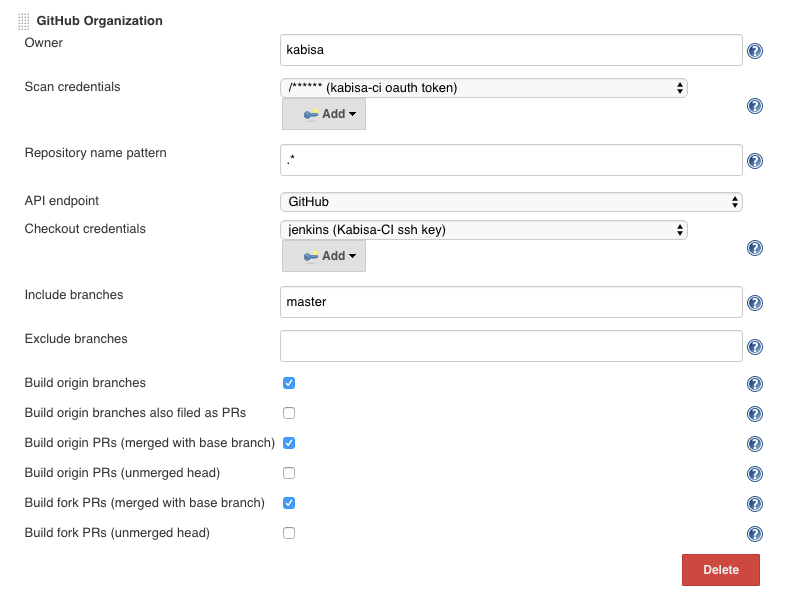
- Owner: enter the name of your GitHub organisation here
- Scan credentials: select or create credentials that should be used to communicate with the GitHub API. You should use a GitHub OAuth token here that has permissions to access all repositories you’d like to build in Jenkins.
- Checkout credentials: Configures which credentials should be used to clone repositories. By default HTTPS will be used with the same OAuth token used for scanning; Alternatively you can use SSH.
Adapt the other fields to your own taste. With the configuration shown in the screenshot Jenkins will build only the master branch of each project and all Pull Requests.
Hit the save button and Jenkins will start scanning your GitHub account for repositories supporting Pipelines. Jenkins detects this by looking for a file named Jenkinsfile in the root of a project. If this is your first interaction with Jenkins Pipelines you probably won’t have any projects that have a Jenkinsfile so read on to learn how to create one.
Jenkins is now fully setup to build any project in your GitHub organisation, provided it has a Jenkinsfile. Contrary to Jenkins 1.x no further interaction with Jenkins web UI is required to enable and configure new projects. Simply add Jenkinsfiles to your projects and Jenkins will automatically start building your project!
Creating a Jenkinsfile
A Jenkinsfile tells Jenkins how to build your project. Jenkinsfiles are very powerful as you’ll have the full power of Groovy at your fingertips. I won’t go into detail about the Jenkinsfile syntax as that’s beyond the scope of this post. Here’s some documentation to get you started. Read on for a simple example.
The most basic Jenkinsfile looks like this:
1
2
3
node {
    echo 'Hello from Pipeline'
}
Obviously this doesn’t do much useful, but bear with me. Put this in a file named Jenkinsfile in the root of a Github project, commit and push. With this your project can now be built by a Jenkins pipeline, however Jenkins doesn’t know about this project yet. By default Jenkins will only look for new projects once a day. To ensure the project is recognized immediately you can press the Re-scan Organization > Run Now button. Jenkins will then scan the GitHub organisation again, this time finding the Jenkinsfile we’ve just committed and setting up the project for you.
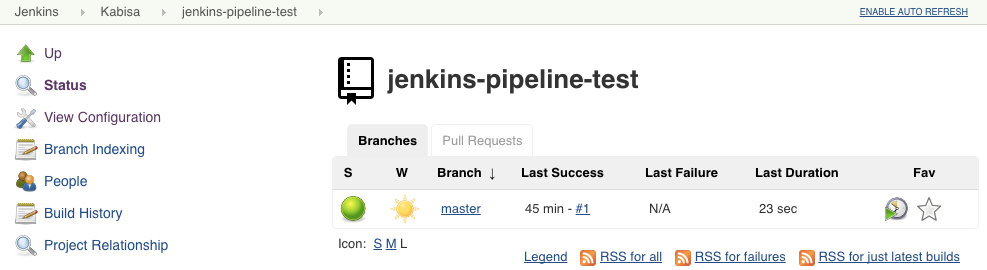
That’s it! From now on Jenkins will automatically build the master branch as commits are pushed to it, as well as build all Pull Requests each time a commit is added.
Things should look something like this now:
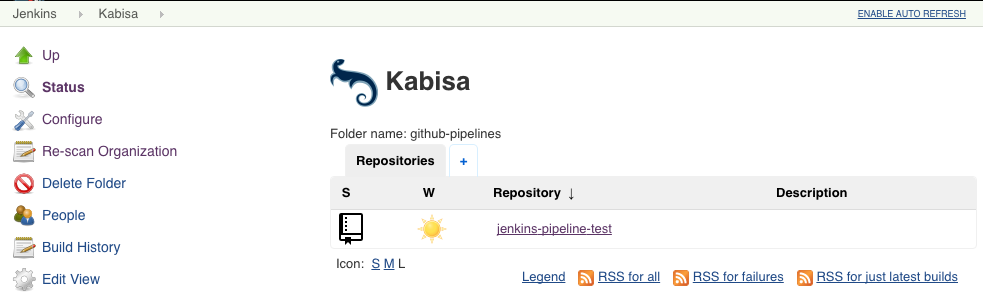
Supported repositories in your GitHub organisation are listed and Jenkins will create (temporary) jobs for branches and Pull Requests. These jobs are automatically removed when Pull Requests are closed, or branches removed.
Building jobs with Docker
As mentioned before Jenkins Pipelines have inbuilt support for building inside Docker containers. In an earlier post I described the virtues of running CI builds in Docker containers. With Jenkins 2.x this is much easier than before and doesn’t require any external tools (besides Docker itself obviously).
Given a Dockerfile located in the root of your project the following Jenkinsfile would use that to build your project:
1
2
3
4
5
6
7
node {
  checkout scm

  docker.build(env.JOB_NAME).inside {
    sh 'script/ci'
  }
}
This will basically run a docker build -t <job name> . and then invoke all commands contained in the inside block in the container.
Power of pipelines
This only scratches the surface of what Jenkins Pipelines can do. Please refer to the resources listed below to read up on Jenkins Pipelines.
Troubleshooting
If you have any issues setting this up please feel free to reply in the comments. Some things to keep in mind:
- The GitHub OAuth token you use needs at least write access to your projects to be able to set the build status on Pull Requests.
- If your OAuth token also provides organisation administration permissions Jenkins will automatically set up required webhooks. If you don’t want Jenkins to do all this make sure to configure the webhook yourself. Details here.
- For Docker builds to work Docker needs to run on your Jenkins machine(s) and the user running Jenkins should be in the
dockergroup
Resources
Recommend
-
54
In many projects, things that seem very small come to be decisive factors to continue on the current path or find a better one. Starting from simple text editors to tools used for a long period of time, we all have differ...
-
13
Ten Things I Wish I’d Known Before Using Jenkins Pipelines zwischenzugs Uncategoriz...
-
14
Posted by Pascal Widdershoven on 5-11-2013 We at Kabisa...
-
7
Halving iOS Test Time with Partitioning in Jenkins PipelinesAt Wealthfront, testing is core to the culture of our engineering organization and business. In fact, on the iOS team, testing is woven into our development process. We host and mana...
-
6
How eBay Leverages Kubernetes, Helm Charts and Jenkins Pipelines to Deliver High-Quality Software Learn how eBay has fully automated our software quality certification to enhance efficiency, minimize manual intervention, an...
-
14
A Better Model for Stacked (GitHub) Pull RequestsFriday, 23 April 2021Code review using GitHub pull requests (PRs) is generally pretty decent, but you're going to have trouble with medium-to-large changes, especially when th...
-
6
GitHub Pull Requests with Screenshots Tip #github Jun 29 ...
-
8
A developer's guide to CI/CD and GitOps with Jenkins Pipelines Skip to main content
-
6
Tutorial How To Set Up Continuous Integration Pipelines in Jenkins on Ubuntu 20.04 Ubuntu
-
8
Continuous Integration in AWS Using Jenkins Pipelines: Best Practices and Strategies ...
About Joyk
Aggregate valuable and interesting links.
Joyk means Joy of geeK