

Setting up Workspace ONE Single Sign-on (SSO) and Conditional Access
source link: https://darrylmiles.blog/2019/03/16/setting-up-workspace-one-single-sign-on-sso-and-conditional-access/
Go to the source link to view the article. You can view the picture content, updated content and better typesetting reading experience. If the link is broken, please click the button below to view the snapshot at that time.

Setting up Workspace ONE Single Sign-on (SSO) and Conditional Access
Workspace ONE Access as part of Workspace ONE, provides Single Sign-On (SSO) capabilities for iOS, Android, Windows 10 and macOS.
The following guide details how to set this up for all four operating systems. Mobile SSO is also required for leveraging Workspace ONE UEM (aka Airwatch) device compliance. This allows the administrator to ensure that users can only access applications if their device is compliant.
I’ve also provided a number of resources if you’re integrating Workspace ONE UEM, Workspace ONE Access with Okta too.
Before you read this article, I suggest you watch this excellent video by Peter Bjork (Principal Architect, EUC Technical Marketing at VMware). Peter details the concepts of SSO on mobile devices and how to enable this capability in Workspace ONE Access. The details of which I expand on in this article below.
Integrate applications with the Workspace ONE Access to enable single sign-on (SSO)
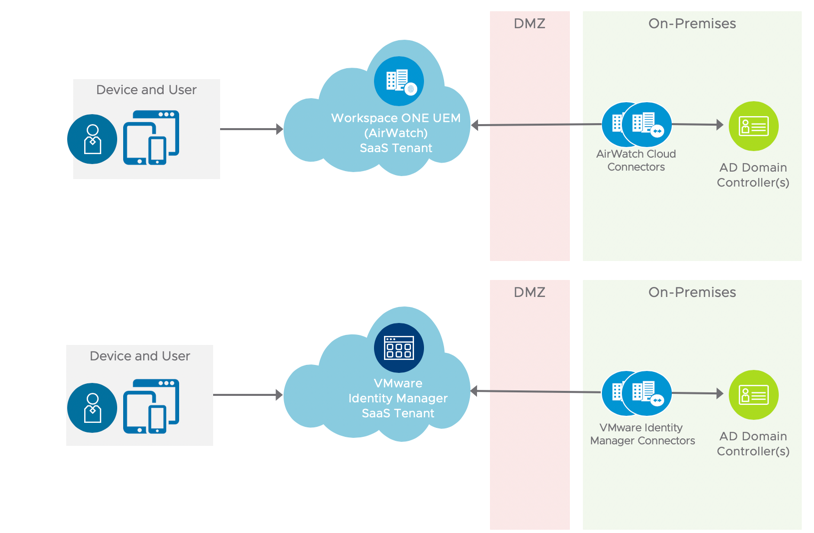
First off ensure you’ve connected your on-premises Active Directory to your Workspace ONE UEM and Workspace ONE Access tenant as per the following:
- Workspace ONE UEM – via the Airwatch Cloud Connector (ACC)
- Workspace ONE Access Connector – (previously Identity Manager or vIDM Connector)
This is illustrated as follows:
Then integrate both Workspace ONE UEM and Access. From Workspace ONE UEM 1902 or later, you can do this by enabling HUB services as per the following instructions. See this VMware docs article for further information.
There are a range of great online guides detailing how you can setup a number of applications within Workspace ONE Access. Check out the following guides:
- VMware Identity Manager Integration with Salesforce (January 2019 v2) – link
- Integrate Salesforce with vIDM (from the VMware LiveFire team) – link
- Integrating Salesforce with VMware Identity Manager: VMware Workspace ONE Operational Tutorial (April 2019) – link
- Federating Office 365 with vIDM (from the VMware LiveFire team) – link
- Single Signon for ServiceNow (by Ryan Pringnitz) – link
- Integrating Google G Suite with Workspace ONE Access by Aamir Khan – link
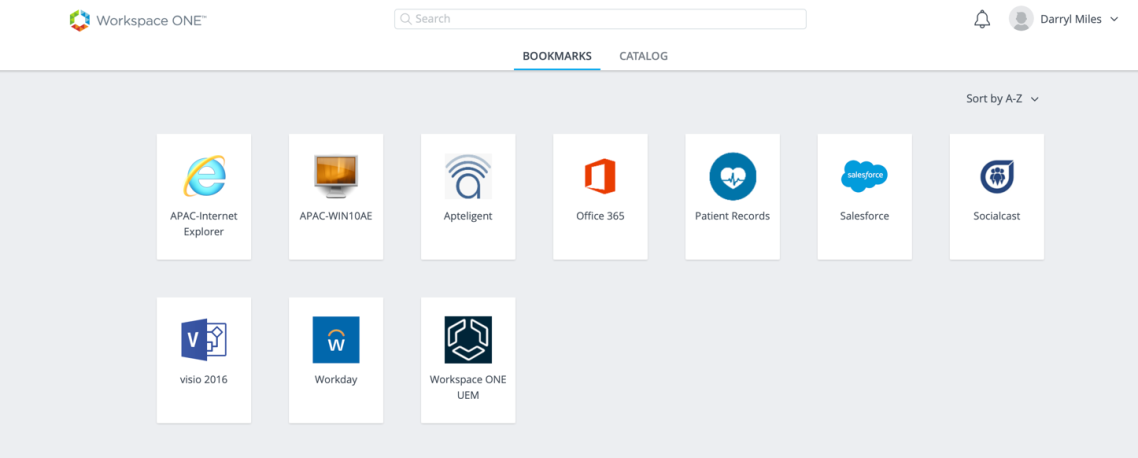
With this enabled, you can login to Workspace ONE Access from a web browser from your PC and then test SSO into a range of SaaS based applications.
Mobile Single Sign-On Wizard
Much of the setup of setting up SSO can be completed using the Mobile Single Sign-On Wizard. This is available by logging into the Workspace ONE UEM console then selecting Getting Started – Workspace ONE – Mobile Single Sign-On and Configure.
I’ve found this wizard will configure many of the settings below, however you can then verify this configuration using the step by step instructions below. For example I found that my SCEP settings for Windows and MacOS needed to be changed to Certificate (Cloud Deployment) and they were not automatically configured.
Setting up iOS SSO
For iOS device authentication, Workspace ONE Access uses an identity provider that is built in to the Workspace ONE Access service to provide access to mobile SSO authentication. This authentication method for iOS devices uses a Key Distribution Center (KDC) without the use of a connector or a third-party system. Kerberos authentication provides users, who are successfully signed in to their domain, access to their Workspace ONE apps portal without additional credential prompts.
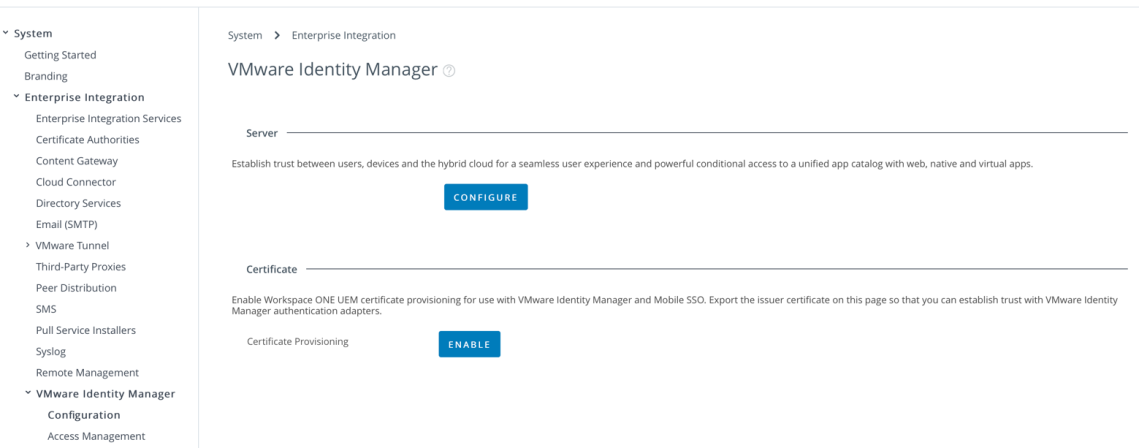
Enable the Workspace ONE UEM Certificate Authority
One option is to use a Microsoft Certificate Authority, or alternatively us the built in Workspace ONE UEM Certificate Authority.
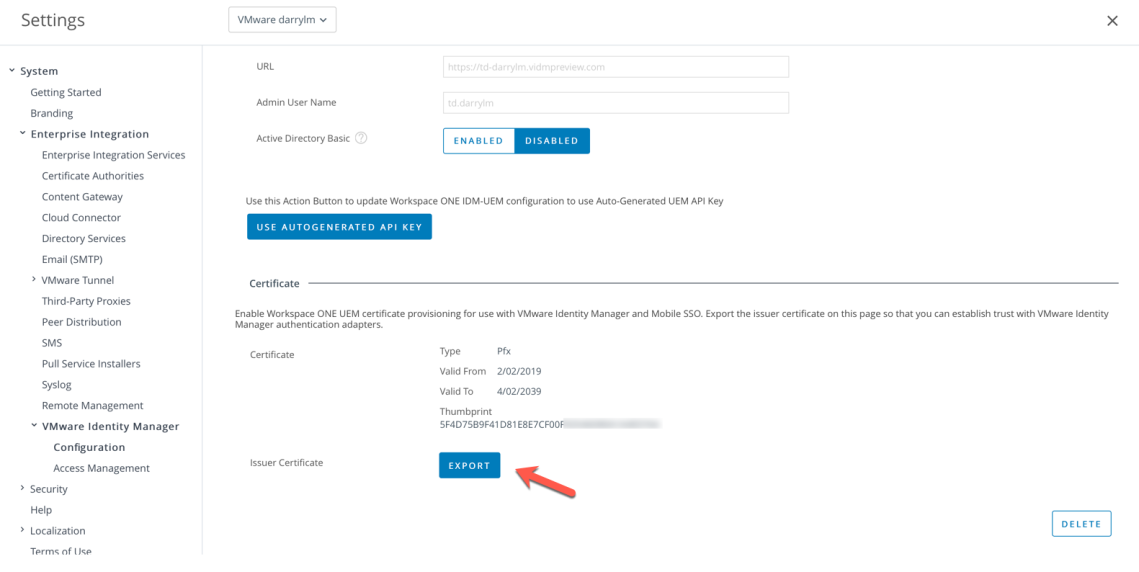
- Select Groups And Settings – All Settings – System – Enterprise Integration – VMware Identity Manager – Configuration. Click on the Enable button.You’ll then be shown that the certificate provisioning is enable as shown:
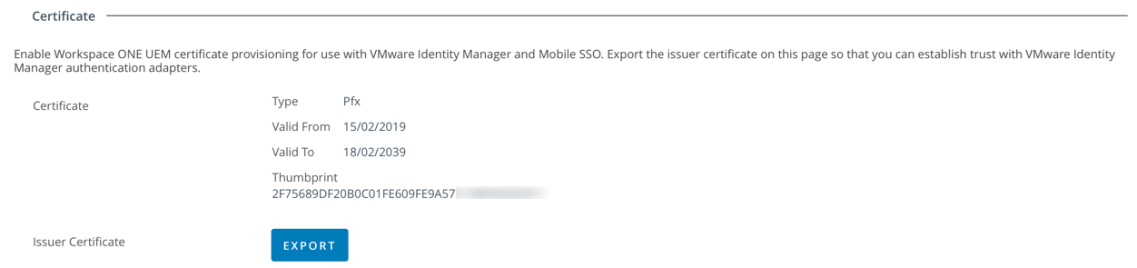
- Select Export to export the Issue Certificate and save this to your computer. We’ll use this later for iOS, Android, Windows 10 and macOS.
Configure Mobile SSO (for iOS) Authentication Method
Note: Ensure you’ve setup the ability to manage Apple devices by creating an APNS certificate as per this guide.
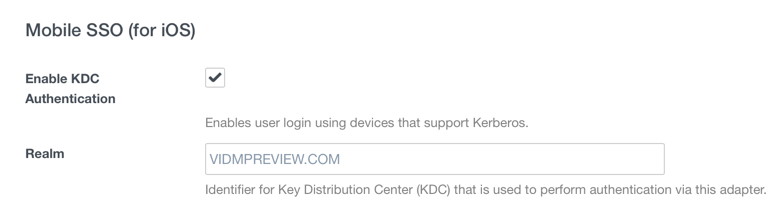
- Open the Workspace ONE Access console and select Identity & Access Management – Authentication Methods. Click the pencil for Mobile SSO (for iOS).

- Select Enable KDC Authentication as shown. The Realm will be automatically populated as shown in the following example:
- Click on the Select File button to browse and then upload the issuer certificate you exported from Workspace ONE UEM (Airwatch).
- When the certificate is uploaded it will be shown as follows:

- Select Save
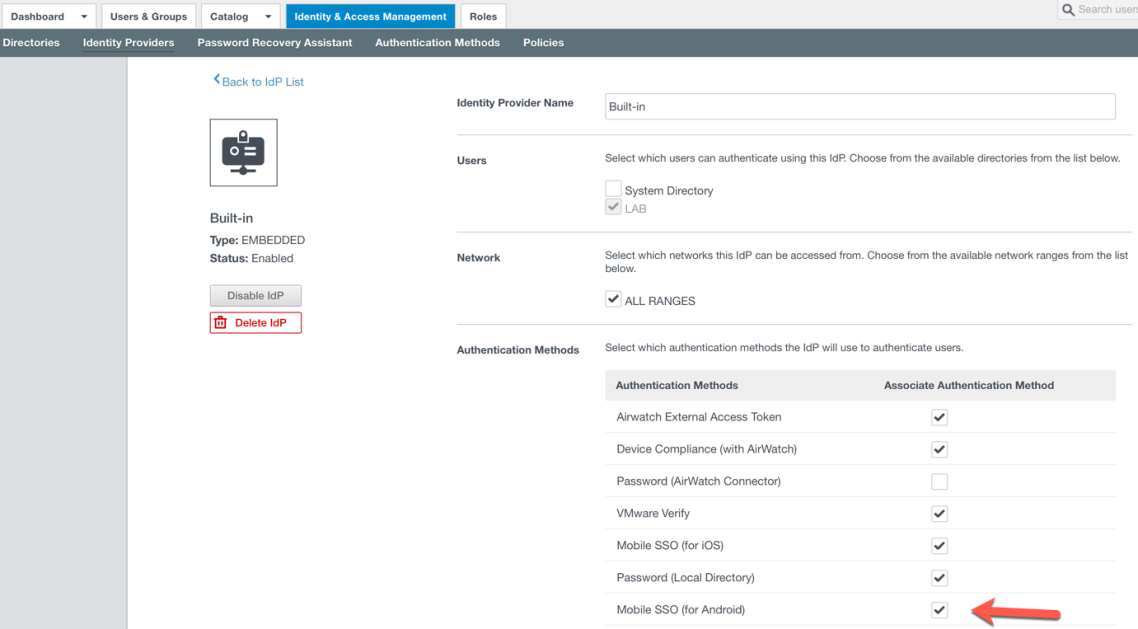
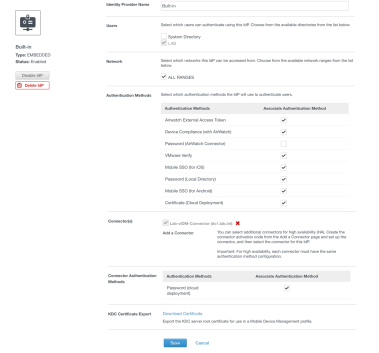
- Navigate to Identity & Access Management – Manage – Identity Providers. Select the Built-In Identity Provider. Browse to Authentication Methods and select Mobile SSO (for iOS) and Device Compliance (with Airwatch) as shown in the following example:

- Select Save
- If you open the Built-In Identity Provider (you just saved), browse to KDC Certificate Export and select Download Certificate. This is the certificate you’ll distribute to iOS devices using Workspace ONE in the steps below.

- Navigate to Identity & Access Management – Policies and modify the default access policy to include Mobile SSO (for iOS) as shown below. Save this new Policy Rule.

- Click Save
Create an Apple iOS Profile to deploy Identity Provider Settings
- Within the Workspace ONE Access administration console, navigate to Devices – Profiles & Resources – Profiles. Select Add – Add Profile – iOS.
- In the General tab:
- Provide a name such as iOS Kerberos SSO
- Select Smart Groups and select your group of devices. ie. All Devices
- Change to the Credentials tab and upload the KDC Certificate you downloaded in Step 8) above. ie. KDC-root-cert.cer
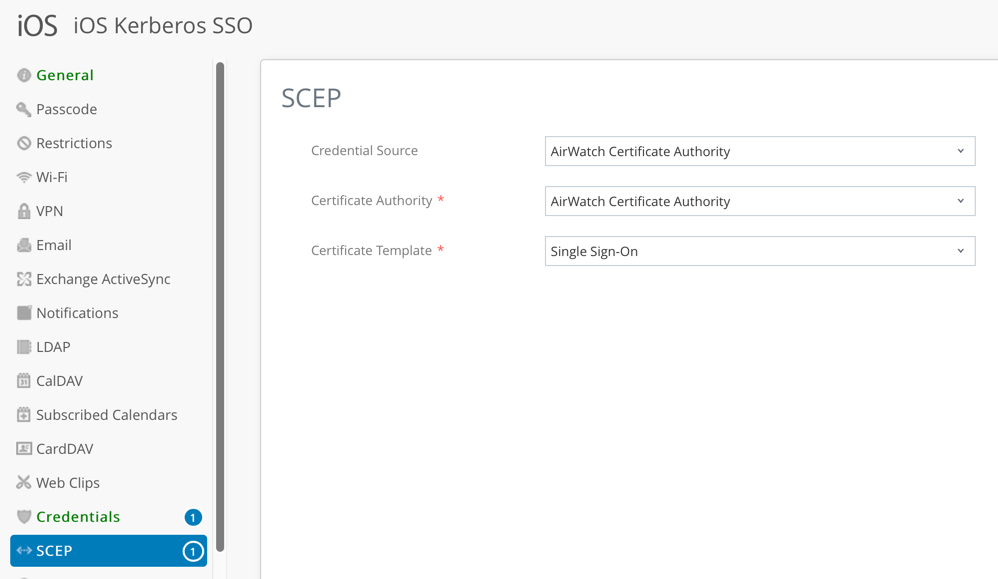
- Change to the SCEP section and select the following options:
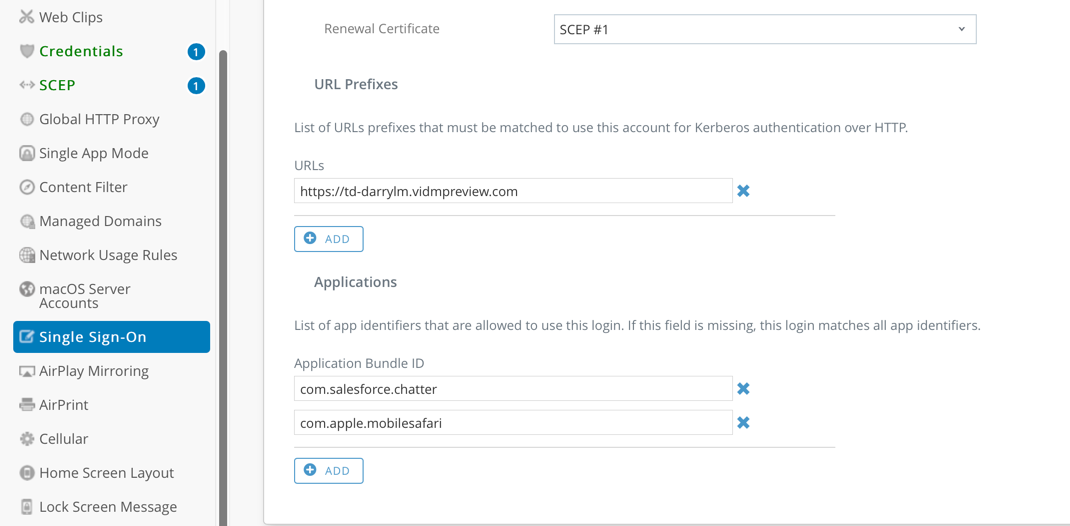
- Change to the Single Sign-On tab.
- For the account name enter Kerberos.
- For the Kerberos Principal Name, click + and select {EnrollmentUser}.
- For the realm name, enter in the realm name of your tenant. (In my case VIDMPREVIEW.COM, but most likely VMWAREIDENTITY.COM)
- Under renewal certificate, select SCEP #1.
- For URL Prefixes, enter in the full name of your tenant and applications which need SSO capability. In my lab I entered Salesforce which then allowed me to select com.salesforce.com (for the Salesforce app). I also selected com.apple.mobilesafari for the Safari browser. See the following example:
- Select Save and Publish.
Verifying iOS SSO
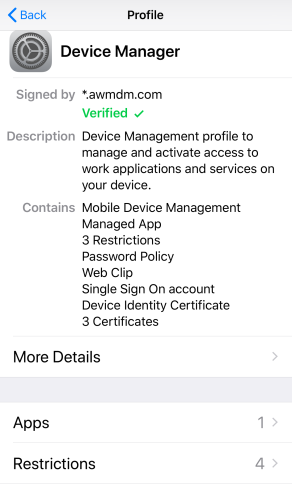
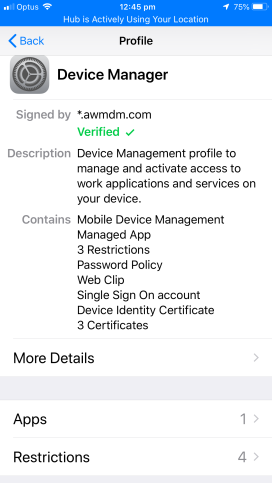
With the settings applied to an iOS device, you can see these settings under Settings – General – Device Management – Device Manager as shown below.


You should then be able to login to Workspace ONE (via the application) or Safari on your iOS, then select your applicable SaaS application and successfully sign-in without being prompted for a password ! SSO with mobile applications will also now work too.
Setting up Android SSO
Note: Ensure you’ve setup Android Enterprise Integration with Workspace ONE as per this video.
There is a great guide titled Android Mobile Single Sign-On to VMware Workspace ONE, however I’ve detailed the steps I followed below to setup SSO with Android.
Setup VMware Tunnel Configuration
- In the Workspace ONE UEM administration console, navigate to Groups and Settings – All Settings – System – Enterprise Integration – VMware Tunnel.
- The first time you configure VMware Tunnel, select Configuration. If required, change the current setting from Inherit to Override.
- Now select Configure and follow the configuration wizard.
- In the Configuration Type page, enable Per-App Tunnel (Linux Only). Click Next. Leave Basic as the VPN configuration type as shown below:

- Click Next
- In the Details page, enter a dummy value in the text box, as this field is not required for the single sign-on configuration. For example:
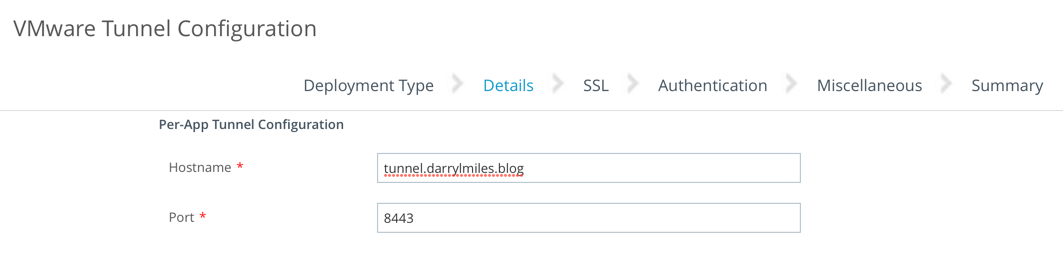
- Click Next
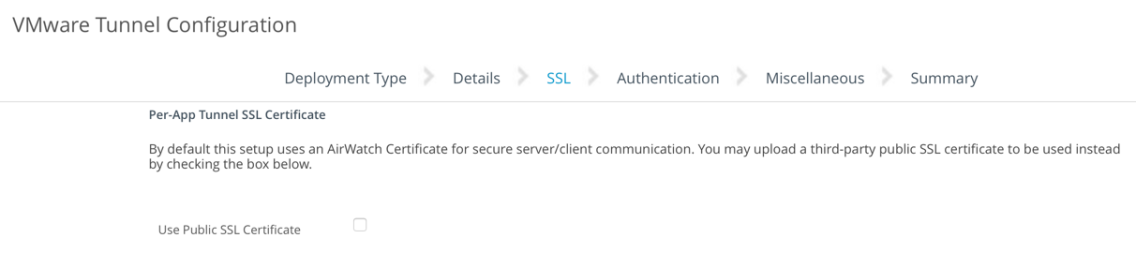
- On the Per-App Tunnel SSL Certificate window, do NOT select the Use Public SSL Certificate checkbox (as shown below). Click Next
- On the Authentication window, ensure Per-App Tunnel Authentication is selected:
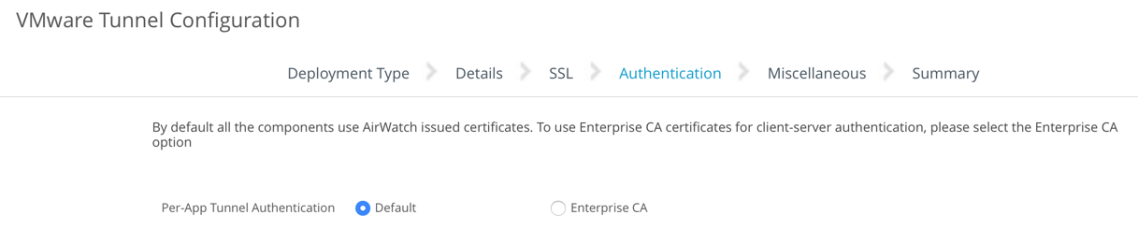
- If promoted with Please wait while the Authentication settings load. Are you sure you wish to continue? Click OK
- Leave the Miscellaneous tab as default, click Next to continue
- Review the final settings (see and example below)
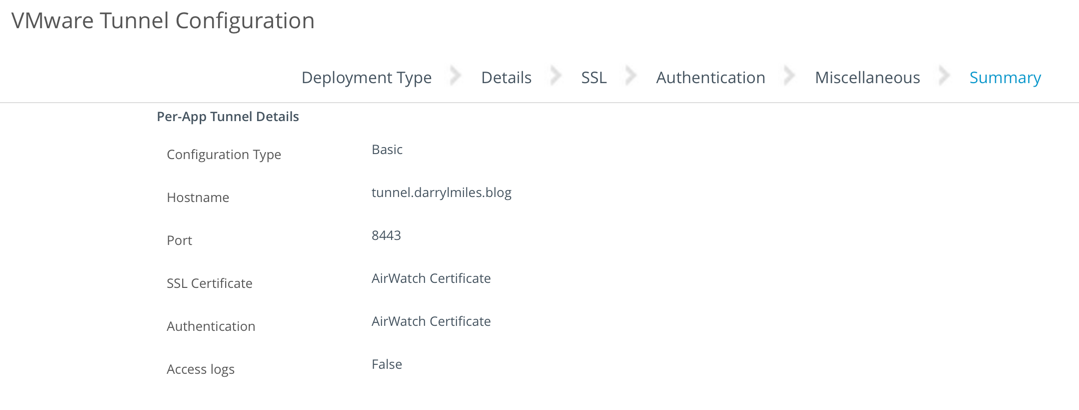
- Click Save to finish
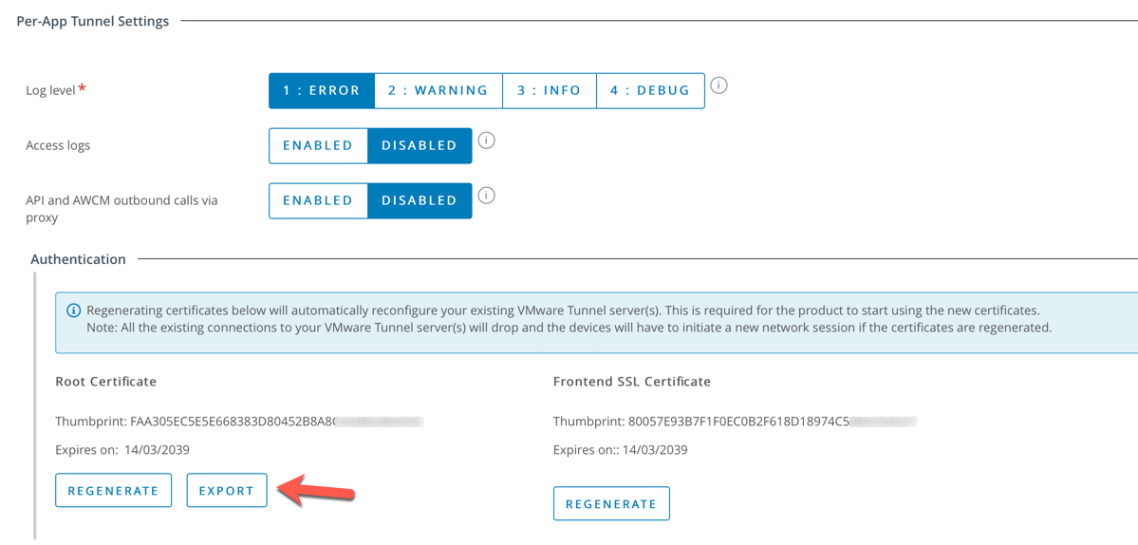
- Navigate to the Advanced tab within the VMware Tunnel configuration page and download the Root certificate using the Export button. This will be used later to configure the settings within Workspace ONE Access.
Create an Android Profile to deploy Identity Provider Settings
- Within the Workspace ONE UEM administration console, navigate to Devices – Profiles & Resources – Profiles. Select Add – Add Profile – Android.
- In the General tab:
- Provide a name such as Android SSO
- Select Smart Groups and select your group of devices. ie. All Devices
- Select VPN and click Configure.
- You can accept the defaults. I simply changed the Connection Name to Android Mobile SSO. See the following as an example:
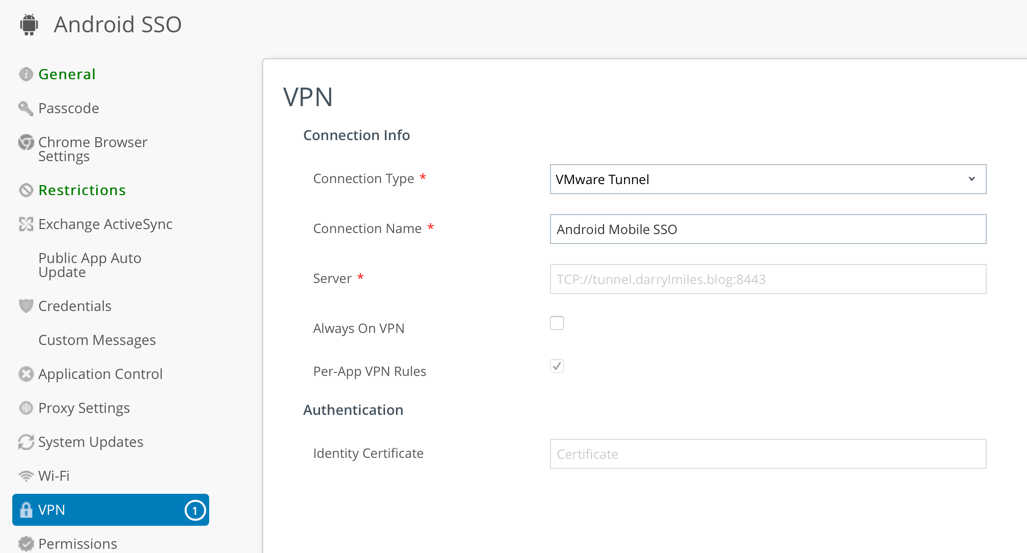
- Click Save and Publish
Publish the VMware VMware Tunnel application
The VMware Tunnel application is required for Android SSO. Therefore we’ll publish this application to everyone’s Android device as per the following steps:
- In the Workspace ONE UEM console, navigate to Apps & Books – Applications – List View.
- Select the Public tab
- Select Add Application, select the Platform as Android
- Enter VMware Tunnel as the name of the application and click Next
- Select the application name and click Approve and click Approve again
- Select Keep approved when app requests new permissions and click Save
- Click Save & Assign
- Click Add Assignment
- Complete the Assignment configuration using the following example. You may wish to select Auto as the application delivery method, so the Tunnel app is deployed to all devices.
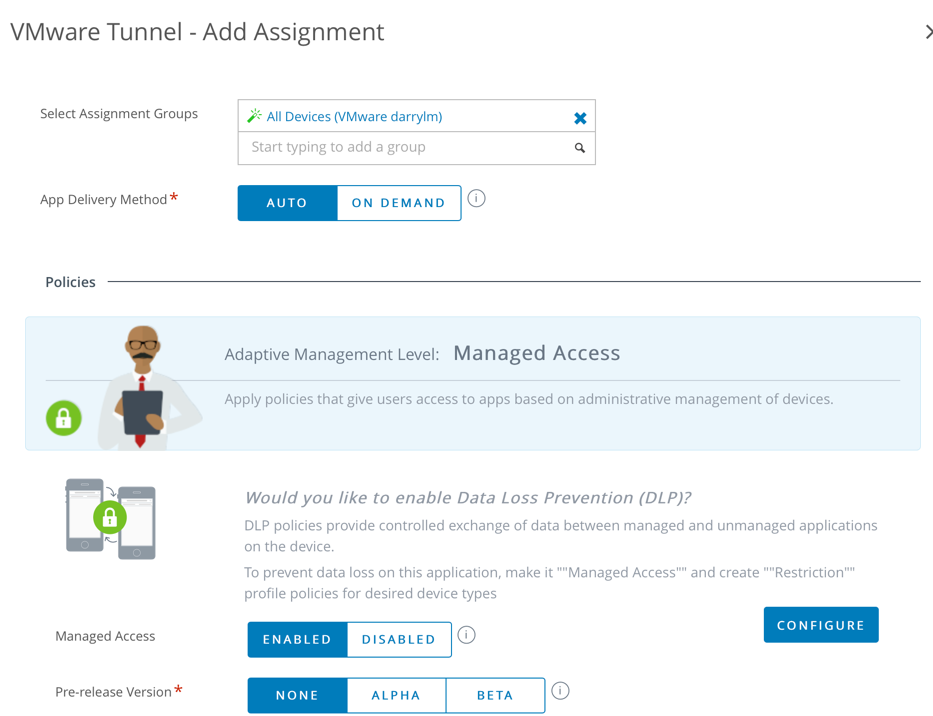
- Click Add and then Click Save & Publish.
- Click Publish
Enable Per-App VPN for Android Apps
- In the Workspace ONE UEM console, navigate to Apps & Books – Applications – List View.
- Select either the Internal or Public tab
- Select Add Application, select the Platform as Android
- Enter the name of the application and click Next
- Select the application name and click Select if prompted to approve the application
- Click Save & Assign
- Click Add Assignment
- Complete the Assignment configuration using the following example. Ensure the App Tunneling option is enabled.

- Click Add and then Click Save & Publish.
Configure Network Traffic Rules
- In the Workspace ONE UEM console, navigate to Groups and Settings – All Settings – System – Enterprise Integration – VMware Tunnel – Network Traffic Rules.
- Verify or create the following Deployment Details and Server Authentication:

- Within the Device Traffic Rules page, first enable all the Apps that you want to use Android SSO. For example Salesforce as shown below.
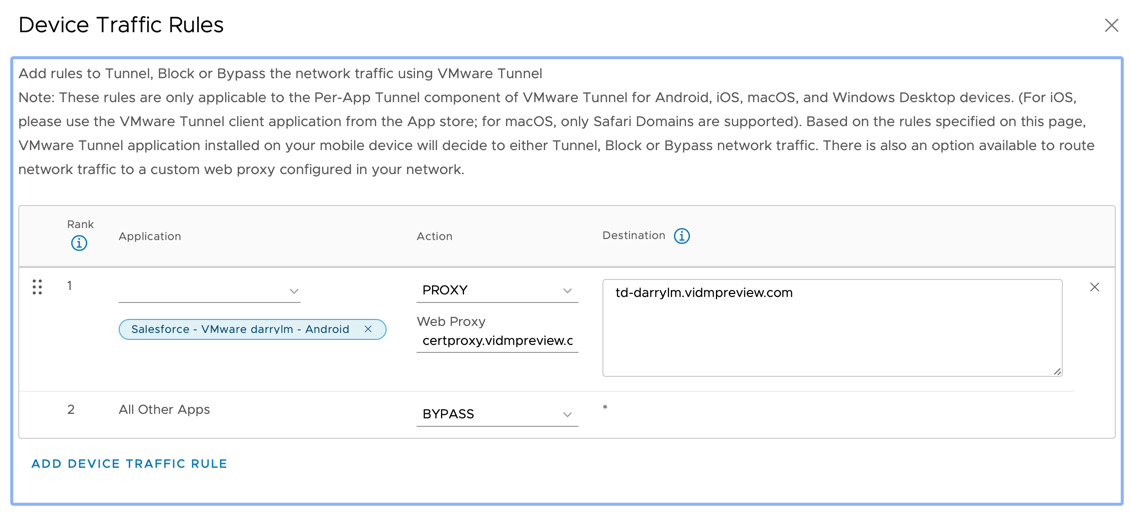
- Next set the following:
- Set the Action type to Proxy
- Configure Web Proxy option to point to the appropriate CertProxy address. You can then enter the appropriate hostname and port 5626 if you’re using a SaaS vIDM tenant. For example:
- certproxy.vmwareidentity.com:5262
- certproxy.vmwareidentity.asia:5262
- certproxy.vmwareidentity.com.au:5262
- In my case it was certproxy.vidempreview.com:5262
- Likewise for the Destination Hostname, you would enter the appropriate vIDM tenant name such as <tenant>.vmwareidentity.<top-leveldomain>. For example:
- <tenant>.vmwareidentity.com
- <tenant>.vmwareidentity.asia
- <tenant>.vmwareidentity.com.au:5262
- In my case it was td-darrylm.vidempreview.com
- Click Save and Publish
Configure Workspace ONE Access to utilise Mobile SSO for Android
- Open the Workspace ONE Access console and select Identity & Access Management – Authentication Methods – Mobile SSO (for Android). Click the Pencil icon to configure this feature.
- Select Enable Certificate Adapter
- Click on the Select File button to browse and then upload the issuer certificate you exported from Workspace ONE UEM (Airwatch). Click OK to accept the uploaded certificate. You should then see settings similar to the following:

- Select Save
- Navigate to Identity & Access Management – Mange – Identity Providers. Select the Built-In Identity Provider. Browse to Authentication Methods and select Mobile SSO (for Android) and Device Compliance (with Airwatch) as shown in the following example:
- Select Save
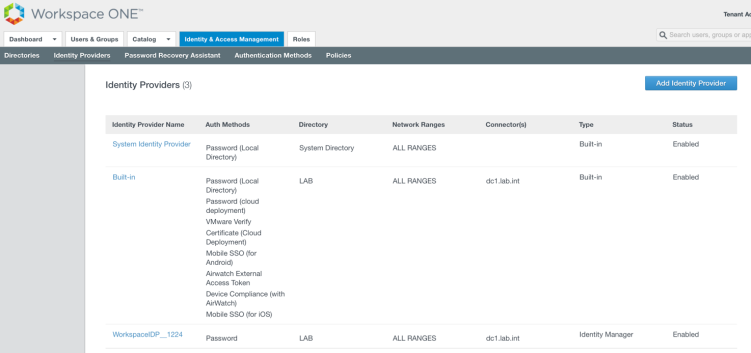
- For reference I’ve provided a screen capture of my final Identity Provider configuration with all four operating systems enabled with SSO:
- OK, now navigate to Identity & Access Management – Policies and modify the default access policy to include Mobile SSO (for Android) as shown below. Save this new Policy Rule.
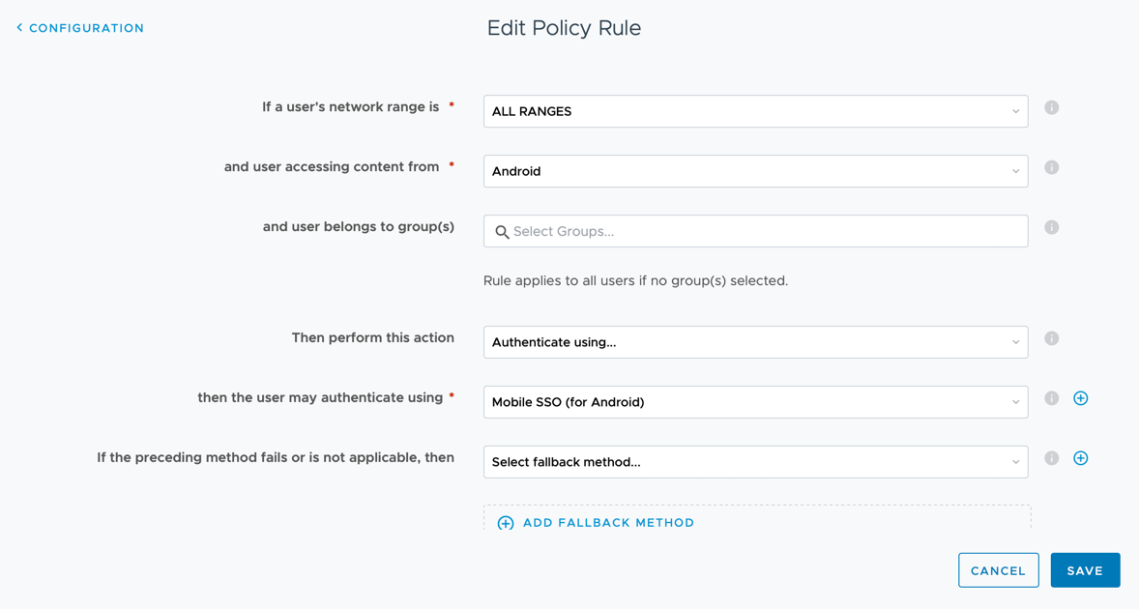
Verifying Android SSO
Start the VMware Tunnel application and you’ll see the application applications you enabled with App Tunnel listed:
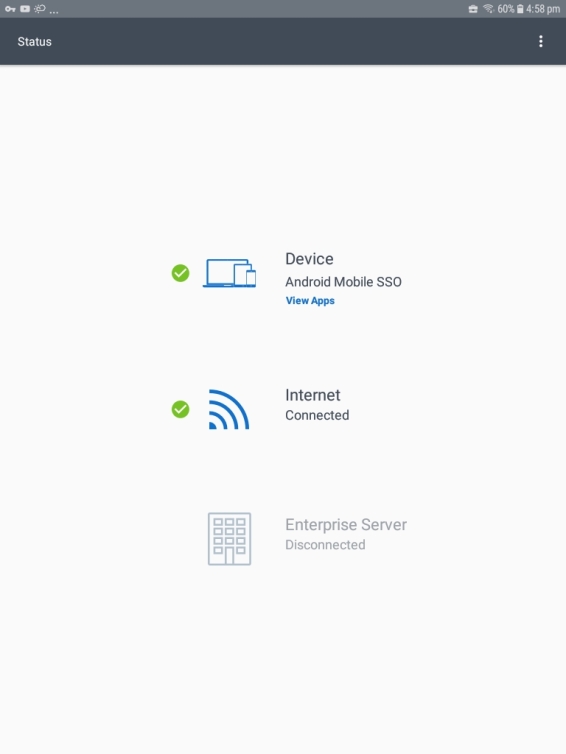

You should then be able to login to Workspace ONE (via the application), then select your applicable SaaS application and successfully sign-in without being prompted for a password.
Enabling Conditional Access
The compliance checking policy rule in Workspace ONE Access works in an authentication chain with Mobile SSO for iOS, Mobile SSO for Android, and Certificate cloud deployment (for Windows 10 and macOS – see below). This allows you to ensure that only compliant devices are then able to get access to applications as outlined above.
iOS and Android Conditional Access
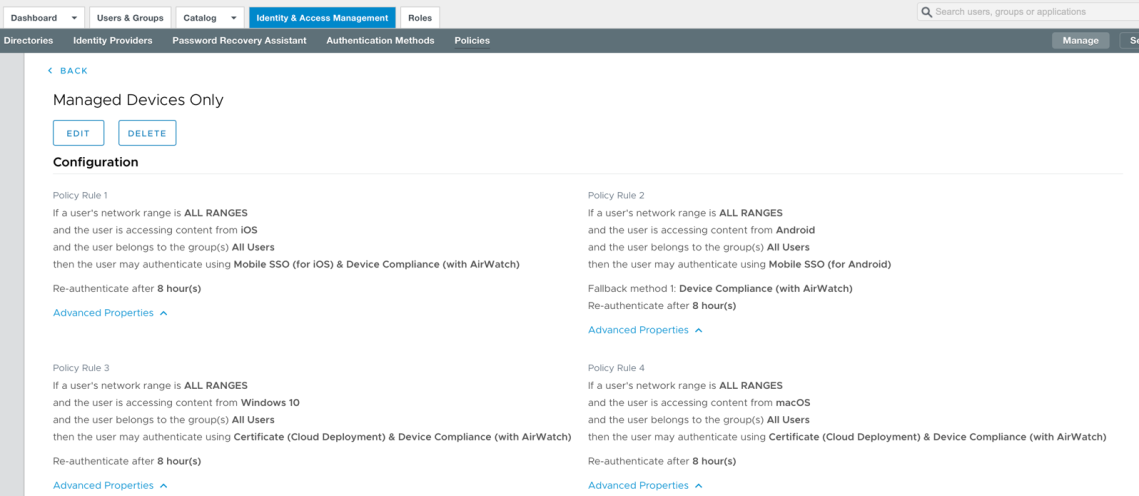
Since we’ve set a policy rule for iOS and Android we can easily edit these again and include the requirement that the devices are compliant from a Workspace ONE UEM perspective. I called this policy Managed Devices Only and included the applications which should be applied such as Salesforce. See the following policies as an example:
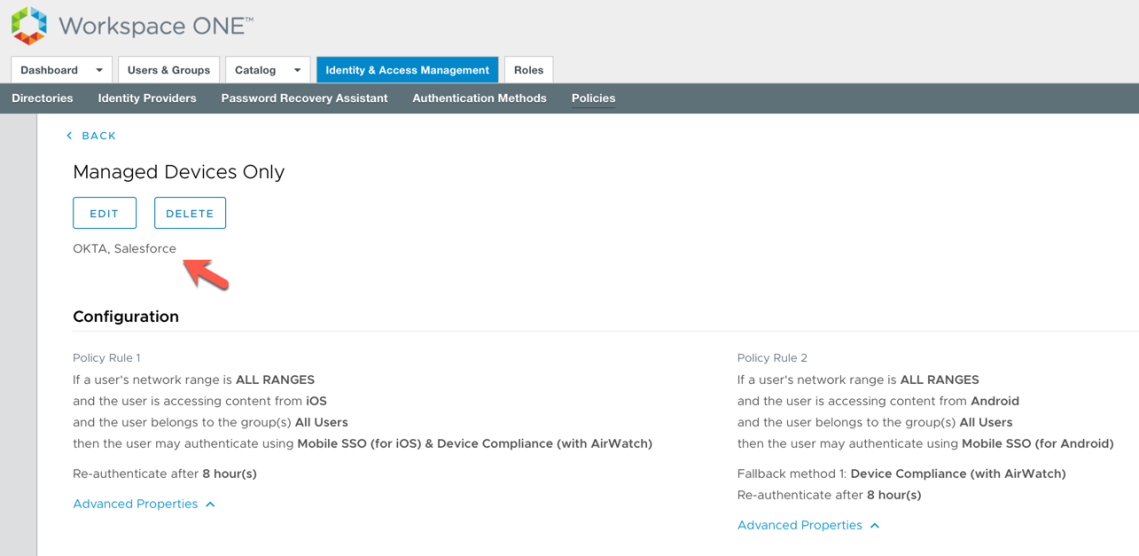
This only allows the user to access Salesforce if their device is enrolled in Workspace ONE UEM AND their device is compliant. If you test this with the detailed Workspace ONE compliance rules, you can block user access if their device was jailbroken/rooted, had blacklisted applications installed etc. See the following articles for further details:
Windows 10 and macOS Conditional Access
For Windows 10 and macOS, we’ll leverage the Workspace ONE UEM built in Certificate Authority to deploy a user certificate to the operating systems.
- Download the KDC certificate from the Workspace ONE UEM console under Groups & Settings – All settings – System – Enterprise Integration – VMware Identity Manager – Configuration. If it is not enabled then enable it and then download. NOTE: this certificate can only be generated at customer type OG
- Go to Workspace ONE Access Console, select the Identity & Access Management tab, select Manage – Authentication Methods.
- In the Authentication Methods section, click the Certificate (Cloud Deployment)
- Check the box for Enable Certificate Adapter
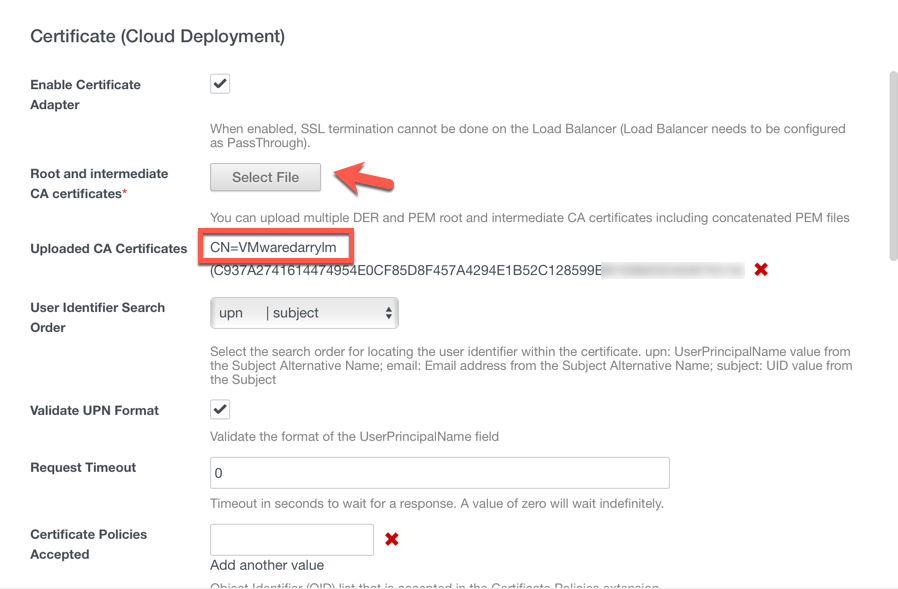
- Select the button Select File and upload the Root CA certificate that you obtained from Workspace ONE UEM console in Step 1
- You will see Uploaded CA Certificates. CN=<OGNAME>. In my case it’s listed as CN=VMwaredarrylm
- The following table provides a detailed breakdown on the various options available:Option
Description
Enablecertificateadapter
Select the check box to enable certificate authentication.
*Root and intermediate CA certificates
Select the certificate files to upload. You can select multiple root CA and intermediate CA certificates that are encoded as DER or PEM.
Uploaded CA certificates
The uploaded certificate files are listed in the Uploaded Ca Certificates section of the form.
Use email if no UPN incertificate
If the user principal name (UPN) does not exist in the certificate, select this check box to use the emailAddress attribute as the Subject Alternative Name extension to validate users’ accounts.
Certificatepolicies accepted
Create a list of object identifiers that are accepted in the certificate policies extensions.
Enter the object ID numbers (OID) for the Certificate Issuing Policy. Click Add another value to add additional OIDs.
Enable cert revocation Select the check box to enable certificate revocation checking. Revocation checking prevents users who have revoked user certificates from authenticating. Use CRL from certificates Select the check box to use the certificate revocation list (CRL) published by the CA that issued the certificates to validate the status of a certificate, revoked or not revoked. CRL Location Enter the server file path or the local file path from which to retrieve the CRL. Enable OCSP Revocation Select the check box to use the Online Certificate Status Protocol (OCSP) certificate validation protocol to get the revocation status of a certificate. Use CRL in case of OCSP failure If you configure both CRL and OCSP, you can check this box to fall back to using CRL if OCSP checking is not available. Send OCSP Nonce Select this check box if you want the unique identifier of the OCSP request to be sent in the response. OCSP URL If you enabled OCSP revocation, enter the OCSP server address for revocation checking. OCSP responder’s signingcertificate Enter the path to the OCSP certificate for the responder, /path/to/file.cer. Enable consent form before authentication Select this check box to include a consent form page to appear before users log in to their Workspace ONE portal using certificate authentication. Consent form content Type the text that displays in the consent form in this text box. - Click Save
- I then edited my Managed Devices Only Policy and included Windows 10 and macOS. See the following policies as an example:
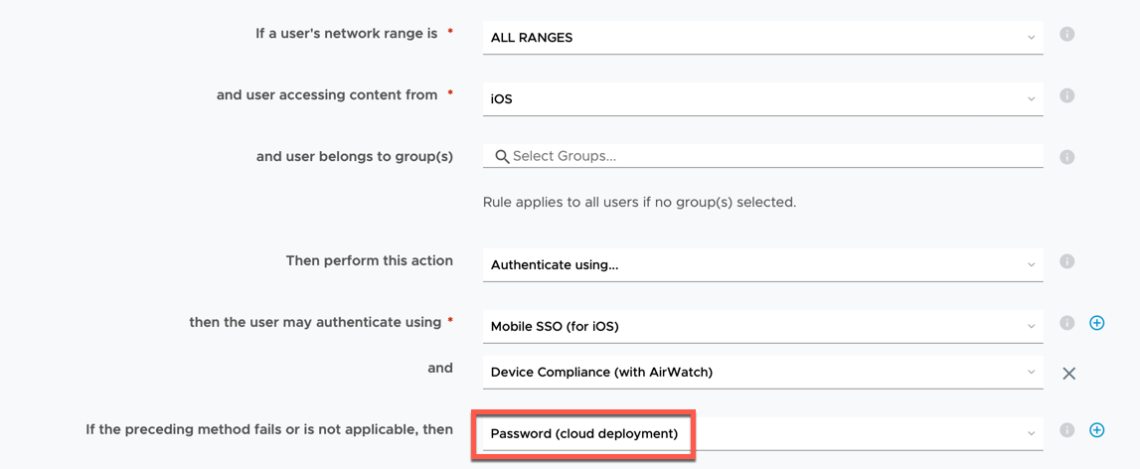
- As suggested by Jon Towels, it’s recommended to have a Fallback method for each of your policies in case certificate authentication is not available. For example, allowing the user to use a username/password to ensure they can still get access to IT services. For example:
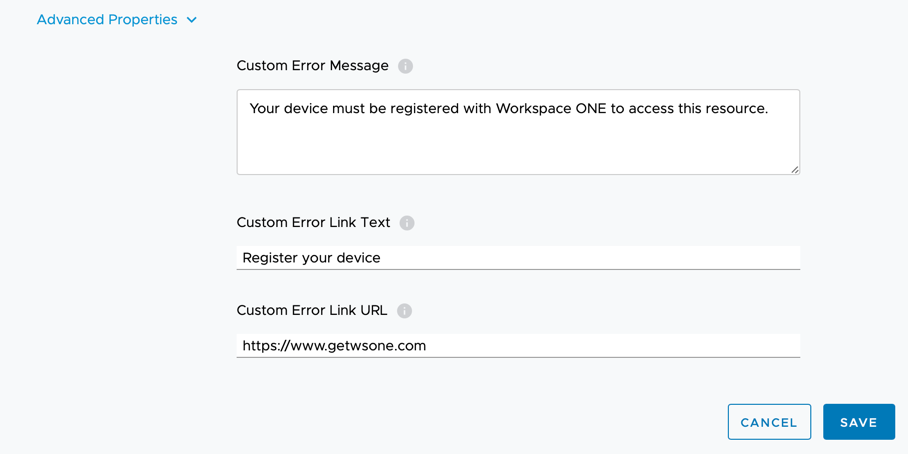
- I’d also recommend reviewing the advanced settings for each of your policies and changing the default custom error message as shown below. This provides the end user a more tailored message to inform them why they cannot access the resource unless their device is enrolled into Workspace ONE:
Deploy User Certificate for Windows 10 Conditional Access
- Now return to Workspace ONE UEM console and go to Devices – Profiles & Resources -Profiles.
- For Windows 10, click on Add – Add Profile
- Select Windows
- Select Windows Desktop
- Select User Profile
- Configure the General Page
- Configure SCEP Payload as follows:
- Credential Source – AirWatch Certificate Authority
- Credential Source: AirWatch Certificate Authority
- Certificate Authority: AirWatch Certificate Authority
- Certificate Template: Certificate (Cloud Deployment)
- Issuer: CN=<Any Name>
- Key Location: TPM if Present
- See the following screen capture of the settings as an example:
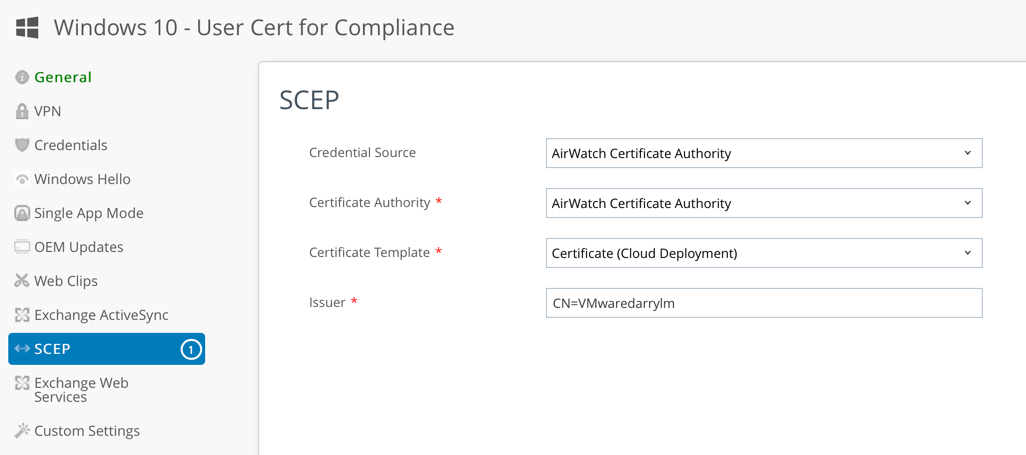
- Click Save
- When the Windows 10 PC is enrolled a user certificate is deployed as shown below:

Deploy User Certificate for macOS Conditional Access
The process for macOS is almost identity to Windows 10 outlined in the previous section.
- In the Workspace ONE UEM console and go to Devices – Profiles & Resources -Profiles.
- For Windows 10, click on Add – Add Profile
- Select macOS
- Select User Profile
- Configure the General Page
- Click SCEP and configure the settings as follows:
- Credential Source – AirWatch Certificate Authority
- Credential Source: AirWatch Certificate Authority
- Certificate Authority: AirWatch Certificate Authority
- Certificate Template: Certificate (Cloud Deployment)
- Select Allow Access to all applications
- See the following screen capture of the settings as an example:
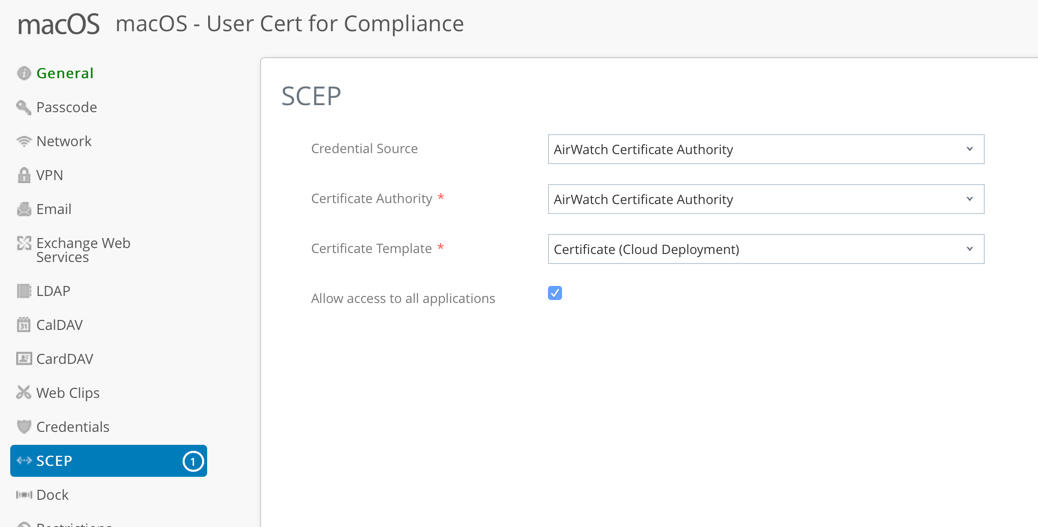
- Click Save
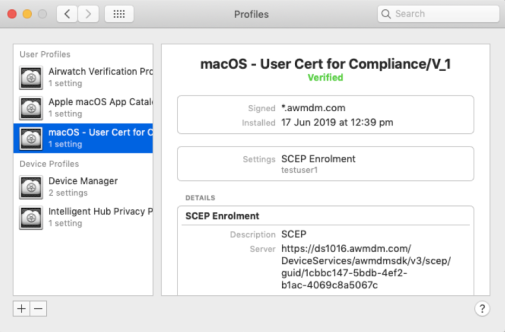
- When the Mac is enrolled an MDM profile is shown as follows:
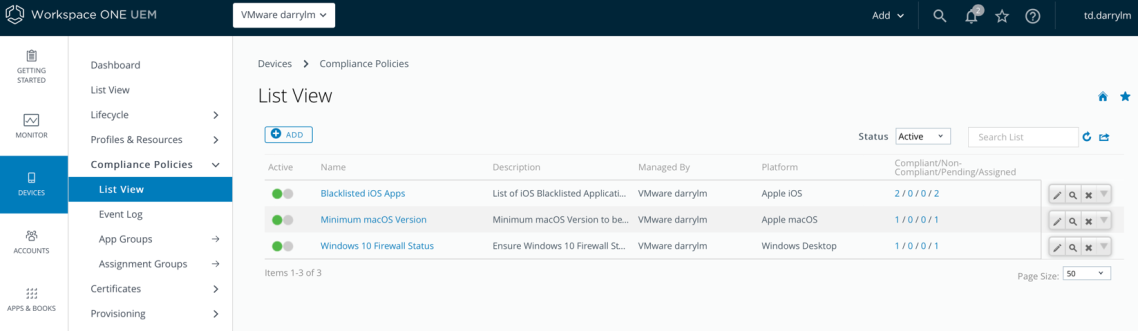
You should now be only able to access applications if your device is compliant in Workspace ONE UEM. Below are some example compliance rules I used for my testing:
That’s it! Your users can access their applications easily (using SSO) and you can ensure that this occurs only if their device is enrolled and compliant.
What about Okta?
There are many Workspace ONE clients that see the mutual benefits of both solutions. There are already a range of excellent articles available which detail how you can integrate Workspace ONE UEM, Workspace ONE Access and Okta. Please check out these excellent articles:
- Configure Conditional Access Policies in Workspace ONE with Okta – link.
- Enhancing your Zero Trust Architecture with Okta Identity Cloud and Workspace ONE by Pete Lindley (VMware) – link
- (New paper 11 March 2019) Integrating VMware Workspace ONE with Okta (Beta) – link (You’ll need a My VMware Account. You can sign-up for a free ID from here).
- Integrating Okta: VMware Workspace ONE Operational Tutorial (Techzone) – link
You now setup Workspace ONE UEM SSO and Conditional Access!
If you have any questions on Workspace ONE, I’d recommend checking out the Workspace ONE community forum. If you would like further information, you can also contact me directly via my blog contact page.
Darryl
References / Acknowledgements:
- Configuring Mobile SSO For iOS In Workspace One UEM (AirWatch) by Justin Johnson (VMware) – link (I used Justin’s for the iOS SSO section and updated some items, used default IDP etc)
- Configuring Mobile Single Sign-On for iOS (from the Quick-Start Tutorial Series for Cloud-Based VMware Workspace ONE) – link
- Andrew Price (Specialist Systems Engineering. End User Computing, VMware Australia) – who provided our team with a step by step guide to setup Android SSO (which is detailed above)
- I read this great blog post after posting this article above. It’s titled Device Compliance with Identity Manager – the less obvious implementation details by Arsen Bandurian – link
Recommend
-
12
Integrating Workspace ONE UEM and Access with Okta – Many Miles AwaySkip to content
-
11
Office 365 Portal, and more now controllable by Azure AD Conditional Access
-
9
Enhancing Your Zero Trust Security Capabilities by Using Workspace ONE Device Compliance Data in Azure Active Directory Conditional Access Policies Nov 30, 2020 ...
-
11
Conditional access and registering or joining devices to Azure AD May 3, 2021 by Peter van der Woude This week is all about registering a...
-
3
Setting up Single Sign-On (SSO) to Workspace ONE UEM Self Service Portal (SSP) and Admin Console Post navigation
-
8
Announcements
-
5
Conditional Access on Azure AD for macOS through Workspace ONE Zero Trust, a modern security framework pio...
-
7
Conditional Access for single-tenant service principals available in preview Let’s start the new year with some positive news. A much anticipated feature has been released in preview, namely Conditional acces...
-
7
Setting up Windows Autopilot using Workspace ONE UEM Post navigation Previ...
-
12
Google now lets you sign up for its Search and Workspace AI tests / Google’s dedicated Labs page also offers waitlists for Project Tailwind, which the company calls an ‘AI-first notebook.’By
About Joyk
Aggregate valuable and interesting links.
Joyk means Joy of geeK