

Federating Microsoft Azure with Workspace ONE Access and Office 365
source link: https://darrylmiles.blog/2019/09/02/federating-microsoft-azure-with-workspace-one-access-and-office-365/
Go to the source link to view the article. You can view the picture content, updated content and better typesetting reading experience. If the link is broken, please click the button below to view the snapshot at that time.
Federating Microsoft Azure with Workspace ONE Access and Office 365 – Many Miles AwaySkip to content

Workspace ONE provides a great way to provide a seamless experience when accessing Office 365. I found configuring this wasn’t too complex, however there were a number of settings you needed to get exactly right for this to work.
The purpose of this article is to provide you further details on how to enable this integration, with the settings from my lab environment and the guides I used to set this up.
The official integration guide is available here. This is a comprehensive guide, however I found the integration documentation written by the VMware LiveFire team much more straightforward. The LiveFire team’s guide is outlined in five parts:
- Part 1: Setting Up a Developer Account
- Part 2 : Federating Office 365 with Workspace ONE Access
- Part 3: Setting up the SAML between Workspace ONE Access and Office 365
- Part 4 : In this part, we will now start testing the federation to see and ensure it it working properly
- Part 5 : Inserting Office 365 Deep Links into Workspace ONE Access
My instructions below leverage this guide and my specific settings which should further clarify what you need to do if you set this up yourself.
Following the LiveFire instructions I had already completed Part 1: Setting Up a Developer Account.
For Part 2 : Federating Office 365 with Workspace ONE Access I completed the following:
- I’d setup Azure AD Connect and sychronised my on-premises Active Directory to Azure AD
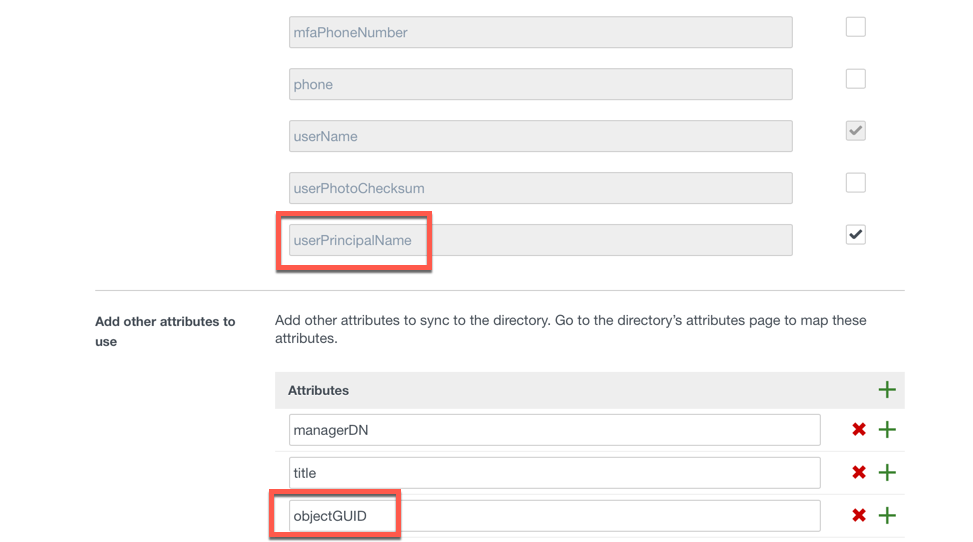
- As per the example in the article, in the User Attributes interface I had set userPrincipalName to Required and created the objectGUID attribute and made it required as well. As per the following:
- I opened Active Directory Domains and Trusts and add my custom domain name. In my case myws1lab.com. I then opened Active Directory Users and Computers and selected this custom domain for a number of my user accounts.
- Run Powershell as administrator and run this commands:
Install-module AzureAD
Install-module MSOnline
If you get any installation errors you might need to run this command first:
[Net.ServicePointManager]::SecurityProtocol = [Net.SecurityProtocolType]::Tls12
See this article for further information.
- I ran the Powershell commands as per the article such as:
Connect-MsolService
-
$sp = New-MSOLServicePrincipal -DisplayName 'ServPrinc1' -Type password -Value 'VMware1!'

Add-MsolRoleMember -RoleName 'User Account Administrator' -RoleMemberType ServicePrincipal -RoleMemberObjectId $sp.ObjectId
- I noted the ServicePrincipalNames value for my environment
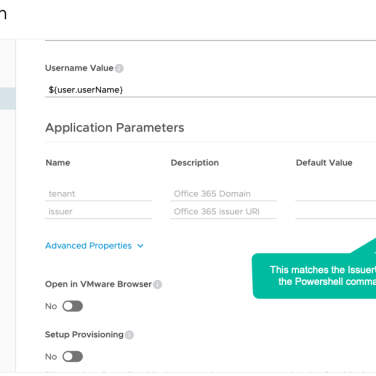
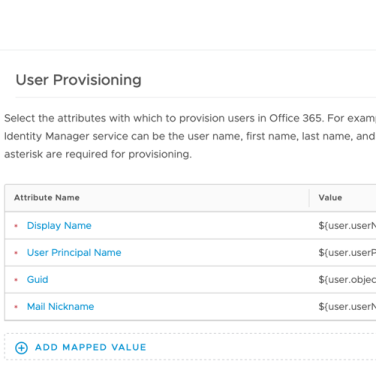
- Next I went into Workspace ONE Access and created a new SaaS Application for Office 365. The parameters I created are shown below:
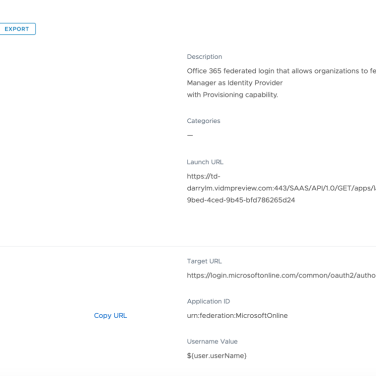
- The target URL was defined as follows (taken from the LiveFire documentation) for my lab. The item in blue would need to be updated for your Office 365 tenant name.
https://login.microsoftonline.com/common/oauth2/authorize?client_id=00000002-0000-0ff1-ce00-000000000000&response_mode=form_post&response_type=code+id_token&scope=openid+profile&redirect_uri=https%3a%2f%2foutlook.office365.com&domain_hint=myws1lab.com
For Part 3: Setting up the SAML between Workspace ONE Access and Office 365 the following items were completed:
- The article details how to download the Signing Certificate and using Notepad++ to remove carriage returns.
- I’d recommend to use the example powershell (example 2). It includes example parameters so you can ensure it’s correct for your environment. Below is the powershell I used to setup SSO for my lab (truncated cert). You would of course update the items in blue accordingly and enter your Signing Certificate details.
Set-MsolDomainAuthentication -DomainName myws1lab.com -Authentication Federated -IssuerUri "myws1lab" -FederationBrandName "MyWS1Lab" -PassiveLogOn Uri "https://td-darrylm.vidmpreview.com/SAAS/API/1.0/POST/sso" -ActiveLogOnUri "https://td-darrylm.vidmpreview.com/SAAS/auth/wsfed/active/logon" -LogOffUri "https://login.microsoftonline.com/logout.srf" -MetadataExchangeUri "https://td-darrylm.vidmpreview.com/SAAS/auth/wsfed/services/mex" -SigningCertificate MIIFGTCCAwGgAwIBAgIHBCxJaOtEvTANBgkqhkiG9w0BAQsFADBEMSAwHgYDVQQDDddBdWTXdhcmUgSWRlddbnRpdddHkgTWFuYWdlcjETMBEGA1UECgwKVEQtREFSUllMTTELMAkGA1UEBhMCVVMwHhcNMTkwMTAzMTcyMDM1WhcNMjgxMjMxMTcyMDM1WjBEMSAwHgYDVQQDDBdWTXdhcmUgSWRlbnRpdHkgTWFuYWdlcjETMB
For Part 4: Test Federation I tested my users were active users in Office 365. I also assigned licenses of Office to a number of my test accounts. Once it was completed I could sign into Workspace ONE and then click on Office 365 and it will seamlessly open the application without any userid/password.
Thats it !
If you have any questions on Workspace ONE, I’d recommend checking out the Workspace ONE community forum. If you would like further information, you can also contact me directly via my blog contact page.
Darryl
P.S. I’ve also written an article titled AuthN/AuthZ nuances when integrating Workspace ONE and Azure AD which you might find interesting too.
Recommend
-
8
Key Takeaways Service mesh architectures enable a control and observability loop The “levers” exposed by a service mesh can be used by specialized workflows to reduce the risk of...
-
4
Office 365 Portal, and more now controllable by Azure AD Conditional Access
-
7
Federating Learning: Privacy Aware Machine LearningFederating Learning: Privacy Aware Machine Learning by@jmau111
-
2
Conditional Access on Azure AD for macOS through Workspace ONE Zero Trust, a modern security framework pio...
-
2
Bring office culture to your virtual workspaceStay in sync with your team while working off-site:- Unmatched team visibility- A new hybrid/remote office culture- Online...
-
6
From home office to home oasis — Basic home office hacks: 8 things you need to elevate your workspace We've got some 101-level tips on essential gear for your home office.
-
5
Office Canvas Print Ideas for a Workspace Decor
-
2
Stitching, Integrating, Composing & Federating Multiple GraphQL APIsSeptember 8th 2022 new story...
-
2
Federating Users using Sign in with Apple and AWS Amplify for Swift by Kyle Lee | on 21 FEB 2023 | in
-
1
Federating queries to Databricks from SAP Datasphere for real-time analytics in SAP Analytics Cloud For many companies, data strategy may involve storing business data in independent silos at different repositories. ...
About Joyk
Aggregate valuable and interesting links.
Joyk means Joy of geeK