

MongoDB 安装及文档的基本操作
source link: https://ytao.top/2020/05/31/26-mongodb-install-base/
Go to the source link to view the article. You can view the picture content, updated content and better typesetting reading experience. If the link is broken, please click the button below to view the snapshot at that time.
MongoDB 安装及文档的基本操作

MongoDB 是一个基于分布式文件存储的半结构化的非关系型数据库。在海量数据中,可以较高性能的处理存取操作。它是以 BSON 格式进行数据存储(类似 JSON 格式,但类型更为丰富),因此对于复杂的数据类型,可以较轻松的保存和处理。同时,在非关系型数据库阵容中,相比其他数据库产品,它拥有更丰富的功能,并且与关系型数据库类型,所以对于新手使用也能快速上手。
环境:CentOS 7
版本号:4.2.6 企业版
版本:免安版(TGZ)
访问官网链接下载链接:https://www.mongodb.com/download-center/enterprise
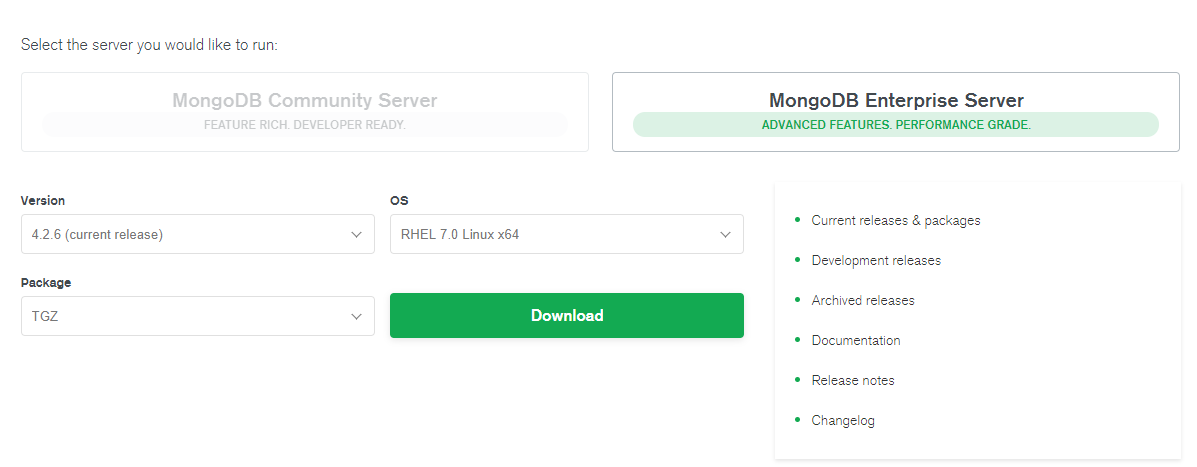
我这里使用的是企业版,下载选项如图:
下载后得到压缩包 mongodb-linux-x86_64-enterprise-rhel70-4.2.6.tgz
将下载的压缩包上传至对应目录,然后进行解压
1
> tar -zxvf mongodb-linux-x86_64-enterprise-rhel70-4.2.6.tgz
当前使用的是免安版,所以 mongoDB 的配置文件需要自己手动创建。如果使用的是安装版,安装后配置文件会在 /etc/mongod.conf 中。
创建配置前,先创建 data、log、run 三个目录,分别对应的数据存储目录、日志目录、进程 ID 保存目录
1
2
3
> mkdir -p /var/mongodb/data
> mkdir -p /var/mongodb/log
> mkdir -p /var/mongodb/run
创建 mongod.conf 在 /var/mongodb 目录中,内容如下:
1
2
3
4
5
6
7
8
9
10
11
12
13
14
15
16
17
18
19
20
21
22
23
24
25
26
27
28
29
30
31
32
33
34
35
36
37
38
39
40
41
42
43
44
45
# mongod.conf

# for documentation of all options, see:
#   http://docs.mongodb.org/manual/reference/configuration-options/

# where to write logging data.
systemLog:
  destination: file
  logAppend: true
  path: /var/mongodb/log/mongo.log # 日志文件路径设置

# Where and how to store data.
storage:
  dbPath: /var/mongodb/data # 数据存储路径
  journal:
    enabled: true
#  engine:
#  wiredTiger:

# how the process runs
processManagement:
  fork: true  # fork and run in background
  pidFilePath: /var/mongodb/run/mongod.pid  # location of pidfile
  timeZoneInfo: /usr/share/zoneinfo

# network interfaces
net:
  port: 27017 # 端口号
  bindIp: 127.0.0.1  # 监听 IP ,即可访问 IP,默认是本机


security:
  authorization: enabled

#operationProfiling:

#replication:

#sharding:

## Enterprise-Only Options

#auditLog:

#snmp:
配置文件常用基本属性:
属性 说明 systemLog#destination 日志输出位置,file 或 syslog,使用 file 时,必须指定 path systemLog#logAppend 当实例启动时日志是否追加写入到现有日志中 systemLog#path 日志存放路径 storage#dbPath 数据存储路径 storage#journal#enabled 日志是否永久性,可以用来恢复数据 processManagement#fork 是否后台运行服务 processManagement#pidFilePath pid 文件的存储路径 processManagement#timeZoneInfo 数据库使用的时区路径 net#port 数据使用的端口 net#bindIp 监听客户端连接的 IP,即可访问的 IP security#authorization 是否启动权限管控将解压后的安装包 bin 路径添加到环境变量 /etc/profile 中,在 PATH 上进行追加
1
2
# mongoDB
PATH=$PATH:/usr/local/software/mongoDB/mongodb-linux-x86_64-enterprise-rhel70-4.2.6/bin
使用 /var/mongodb/mongod.conf 配置文件启动:
1
> mongod -f /var/mongodb/mongodb.conf
如图所示,则启动成功

启动完成后,验证是否正常运行
1
> mongo
如果正常运行,则进入登录页面

创建账号,并设置角色为 root
1
2
> use admin
> db.createUser({user:"xxxx",pwd:"xxxxxx",roles:["root"]})
设置账号后,重新登录,此时需要进行账号权限校验
1
> mongo -u accont -p password
停止 MongoDB 服务,必须切换到 admin 数据库
1
2
> use admin
> db.shutdownServer()
在介绍几本操作之前,现将常用的 MongoDB 对象与关系型数据库进行类比,便于更好理解 MongoDB 对象。
MongoDB 关系型数据库 Database(数据库) Database(数据库) Collection(集合) Table(表) Document(文档) Row(行) Field(字段) Column(列)Database 的操作
数据创建和选择,都是使用use db命令
查看所有数据库
1
> show dbs
删除数据库,先选择再删除
1
2
> use db
> db.dropDatabase()
Collection 的操作
创建集合命令,同时,如果没有先创建集合,插入数据时会自动创建集合
1
> db.createCollection(collectionName, [options])
其中options为可选参数,主要是数据的校验规则,这里不展开分析。
查看数据库中所有集合
1
> show collections
1
2
3
> db.getCollection(collectionName)
或
> db.collectionName
1
> db.collectionName.drop()
MongoDB 插入方法有 insertOne()、insertMany()、insert()、save() 。其中 insert() 功能就包括了 insertOne() 和 insertMany() 功能。
insertOne
insertOne() 是向数据库中插入一个文档,语法格式为:
1
2
3
4
5
6
db.collect.insertOne(
    <document>,
    {
        writeConcern: <document>
    }
)
指令 insertOne() 中参数:
- document 参数为 插入的 BSON 数据
- writeConcern 为写入策略,是可选参数
向 MongoDB 的 ytao 数据库中,插入一条 article 集合的数据
1
2
3
4
5
6
7
db.article.insertOne(
    {
        title: "Dubbo 负载均衡的实现",
        url: "https://ytao.top/2020/05/02/23-dubbo-loadbalance/",
        author: "ytao"
    }
)
数据库数据为:

注意: 如果插入数据时,没指定 _id ,则会自动生成 _id ;如果指定 _id ,则必须 _id 在数据库中存在,否则会报错插入失败。
insertMany
insertMany() 方法是一次插入多个文档,语法格式为:
1
2
3
4
5
6
7
db.collect.insertMany(
    [<document 1>, <document 2>],
    {
        writeConcern: <document>,
        ordered: <boolean>
    }
)
参数ordered为是否有序插入文档,可选参数,默认 true。
向 MongoDB 的 ytao 数据库中,插入了两条 article 集合的数据
1
2
3
4
5
6
7
8
9
10
11
12
13
14
db.article.insertMany(
    [
    {
        title: "Netty中粘包/拆包处理",
        url: "https://ytao.top/2019/12/09/10-netty/",
        author: "ytao"
    },
    {
        title: "WebSocket实现Web端即时通信",
        url: "https://ytao.top/2019/11/17/7_websocket/",
        author: "ytao"
    }
    ]
)
插入后的数据

同理,与 insertOne() 相同,插入重复插入已存在的 _id ,否则报错。
insert
insert() 可以插入单个或多个文档,这个也是最较为常用的方法,其语法为
1
2
3
4
5
6
7
db.collect.insert(
    <document> or [<document 1>, <document 2>],
    {
        writeConcern: <document>,
        ordered: <boolean>
    }
)
插入的文档如果是单个,则类似 insertOne() 的插入方式;如果插入的文档是多个,则类似 insertMany() 的插入方式。其中参数 writeConcern 和 ordered 都是一样。
save() 也可以进行数据插入,当新插入的 _id 存在时,会将已存在的文档进行覆盖,如果 _id 不存在时,则类似 insertOne() 的方式插入。其操作语法:
1
2
3
4
5
6
db.collect.save(
    <document>,
    {
        writeConcern: <document>
    }
)
进行更新的方法有 updateOne()、updateMany()、update()、replaceOne() 以及 save() 。其中 update() 包括 updateOne() 和 updateMany() 的功能。
update
通过 update() 可以更新一个或多个文档,其语法:
1
2
3
4
5
6
7
8
9
10
11
db.collection.update(
    <query>,
    <update>,
    {
        upsert: <boolean>,
        multi: <boolean>,
        writeConcern <document>,
        collation: <document>,
        arrayFilters: [<filter1>,<filter2>]
    }
)
update 的参数:
- query:要更新文档的查询条件
- update:要更新的字段
- upsert:默认为 false。当设置 true 时,如果更新的条件没有匹配到数据时,则插入此更新条件。反之,设为 false 时,则不插入。
- multi:默认为 false。当查询条件匹配到多条数据时,如果设置为 true,则会更新所有匹配的数据;如果设置为 false,则更新匹配出的第一条数据。
- writeConcern:和上面 insert 的参数一样。
- collation:更新数据的排序规则。
- arrayFilters:更新数据中数组格式数据的某个特定元素。
接下来就演示两个例子,一个普通更新,一个带使用 arrayFilters 数据的更新,这个比较难说明,但通过例子就容易理解。
更新前数据:
1
2
3
4
5
6
{
    "_id" : ObjectId("5ed299cee89845fb9ec805e4"),
    "title" : "WebSocket实现Web端即时通信",
    "url" : "https://ytao.top/2019/11/17/7_websocket/",
    "author" : "ytao"
}
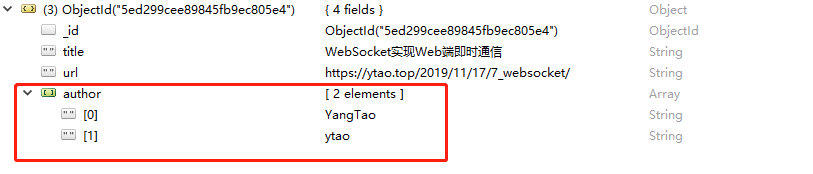
案例一 将author数据更新为["杨滔", "ytao"]
1
2
3
4
db.article.update(
    {title: "WebSocket实现Web端即时通信"},
    {$set: {author: ["杨滔", "ytao"]}}
)
案例二 将author数据["杨滔", "ytao"]的杨滔更新为YangTao
1
2
3
4
5
6
7
8
9
db.article.update(
    {title: "WebSocket实现Web端即时通信"},
    {$set: {"author.$[idx]": "YangTao"}},
    {
        arrayFilters:[
            {"idx": {$eq: "杨滔"}}
        ]
    }
)
上面idx表示数组中元素的位置。
更新后的数据
updateOne
updateOne() 只能更新一个文档,和 update() 使用类似,将multi参数值为 false 一样,这里不再使用案例演示。
1
2
3
4
5
6
7
8
9
10
11
db.collection.updateOne(
   <filter>,
   <update>,
   {
     upsert: <boolean>,
     writeConcern: <document>,
     collation: <document>,
     arrayFilters: [ <filterdocument1>, ... ],
     hint:  <document|string>
   }
)
hint是4.2.1版本中新增的参数,用于指定更新文档的索引。
updateMany
updateMany() 同样和 update() 更新多个文档使用一样。
1
2
3
4
5
6
7
8
9
10
11
db.collection.updateMany(
   <filter>,
   <update>,
   {
     upsert: <boolean>,
     writeConcern: <document>,
     collation: <document>,
     arrayFilters: [ <filterdocument1>, ... ],
     hint:  <document|string>
   }
)
replaceOne
replaceOne 将一个文档完全覆盖,并且不需要指定 _id。只能覆盖一个文档。
1
2
3
4
5
6
7
8
9
10
db.collection.replaceOne(
   <filter>,
   <replacement>,
   {
     upsert: <boolean>,
     writeConcern: <document>,
     collation: <document>,
     hint: <document|string>
   }
)
save() 在更新中是指定 _id 的方式进行文档覆盖。即上文插入中的 save() 用法。
删除文档的方法有 deleteOne()、deleteMany()、remove()
deleteOne
deleteOne() 一次只能删除一个文档,其语法:
1
2
3
4
5
6
7
db.collection.deleteOne(
   <filter>,
   {
      writeConcern: <document>,
      collation: <document>
   }
)
filter为删除文档的过滤条件。
deleteMany
deleteMany() 一次可删除多个匹配到的文档,其语法:
1
2
3
4
5
6
7
db.collection.deleteMany(
   <filter>,
   {
      writeConcern: <document>,
      collation: <document>
   }
)
remove
remove() 是删除查询出的文档,其语法有两个:
1
2
3
4
db.collection.remove(
   <query>,
   <justOne>
)
1
2
3
4
5
6
7
8
db.collection.remove(
   <query>,
   {
     justOne: <boolean>,
     writeConcern: <document>,
     collation: <document>
   }
)
justOne参数默认为 false,表示删除全部匹配到的数据;true 表示只删除第一个文档
MongoDB 中常用的基本查询有 findOne() 和 find() 。
findOne
findOne() 只返回匹配到的第一个文档,语法为:
1
2
3
4
5
db.collection.findOne(
    <query>,
    <projection>

)
参数说明:
- query 表示查询条件。
- projection 表示返回的字段(Field)。
下面查询一个文档,并且只返回title和url

通过指定字段的 value 为 1,即表示查询后返回的字段。
find() 是返回所有匹配到的集合,语法为:
1
2
3
4
5
db.collection.find(
    <query>,
    <projection>

)
下面案例查询查询结果:

本文对 MongoDB 的入门和基本操作进行了简单的了解,在这使用过程中,有点类似关系型数据库操作的影子,所以对有关系型数据库使用经验的人,上手是较为简单的。
更多使用操作,官方文档:https://docs.mongodb.com/manual/reference/
Recommend
About Joyk
Aggregate valuable and interesting links.
Joyk means Joy of geeK