

Wrap Widget & Chip Widgets in Flutter
source link: https://www.coderzheaven.com/2020/01/30/wrap-widget-chip-widgets-in-flutter/
Go to the source link to view the article. You can view the picture content, updated content and better typesetting reading experience. If the link is broken, please click the button below to view the snapshot at that time.

Wrap Widget & Chip Widgets in Flutter
Wrap widget is such a useful widget in many circumstances.
Watch Video Tutorial
First Let’s create a Chip Widget.
Widget chip(String label, Color color) {return Chip(labelPadding: EdgeInsets.all(5.0),avatar: CircleAvatar(backgroundColor: Colors.grey.shade600,child: Text(label[0].toUpperCase()),),label: Text(label,style: TextStyle(color: Colors.white,),),backgroundColor: color,elevation: 6.0,shadowColor: Colors.grey[60],padding: EdgeInsets.all(6.0),);}The above code creates a Chip widget and you can add it to the UI as you want.
If we add it inside a row…then this happens…
But we want the chips that overflow to be wrapped to the next line.
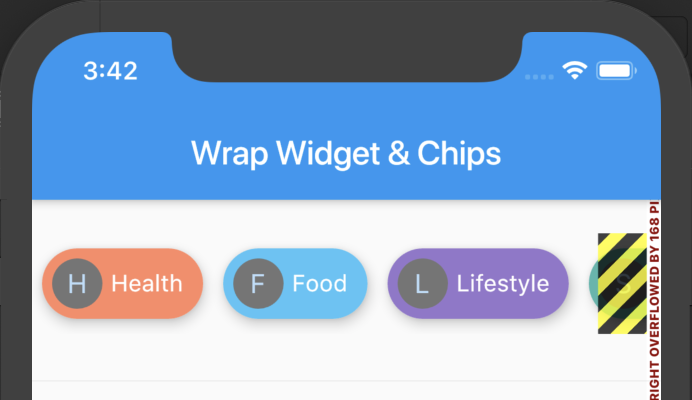
Chips inside a Row Widget
If we want just scroll, then we can add a ScrollView like this
SingleChildScrollView(scrollDirection: Axis.horizontal,child: rowChips(),),Here comes the Wrap Widgets.
Wrap Widget
wrapWidget() {return Wrap(spacing: 6.0,runSpacing: 6.0,children: <Widget>[chip('Health', Color(0xFFff8a65)),chip('Food', Color(0xFF4fc3f7)),chip('Lifestyle', Color(0xFF9575cd)),chip('Sports', Color(0xFF4db6ac)),chip('Nature', Color(0xFF5cda65)),chip('Learn', Color(0xFFacbb65)),],);}If you add a wrap widget around the Chips, then it will be properly wrapped to the next line like in the screenshot below.
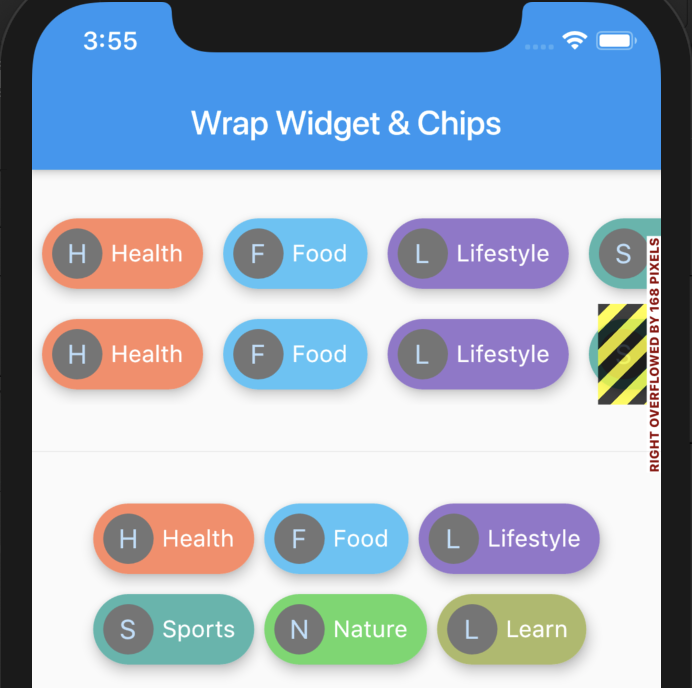
Wrap Widget
Chips has some properties out of which one of the important one is the ‘onDelete’ callback.
Let’s take an example of adding the Chips dynamically.
List<String> _dynamicChips; = ['Health', 'Food', 'Nature'];dynamicChips() {return Wrap(spacing: 6.0,runSpacing: 6.0,children: List<Widget>.generate(_dynamicChips.length, (int index) {return Chip(label: Text(_dynamicChips[index]),onDeleted: () {setState(() {_dynamicChips.removeAt(index);});},);}),);}Action Chips

Action Chips
These are for executing an action, so these chips won’t have the onDelete callback, instead they will have the ‘onPressed’ callback where you can execute the action when the Chip is tapped.
Widget actionChips() {return ActionChip(elevation: 6.0,padding: EdgeInsets.all(2.0),avatar: CircleAvatar(backgroundColor: Colors.green[60],child: Icon(Icons.call),),label: Text('Call'),onPressed: () {_key.currentState.showSnackBar(SnackBar(content: Text('Calling...'),));},backgroundColor: Colors.white,shape: StadiumBorder(side: BorderSide(width: 1,color: Colors.blueAccent,)),);}Input Chips
These are basically to represent a Person or an Entity.
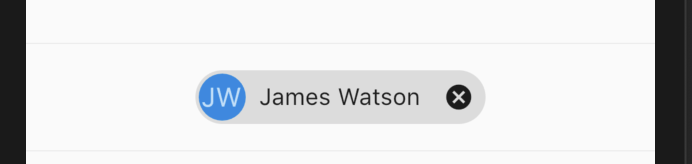
Input Chips
Widget inputChips() {return InputChip(padding: EdgeInsets.all(2.0),avatar: CircleAvatar(backgroundColor: Colors.blue.shade600,child: Text('JW'),),label: Text('James Watson'),selected: _isSelected,selectedColor: Colors.green,onSelected: (bool selected) {setState(() {_isSelected = selected;});},// onPressed: () {// //// },onDeleted: () {//},);}This will have ‘onSelected’, ‘onPressed’ and ‘onDeleted’ callbacks. The main thing to note is that the ‘onPressed’ and ‘onSelected’ cannot be used at the same time.
Filter Chips
This helps to filter some values from a bunch of chips.
<a href="https://www.coderzheaven.com/wp-content/uploads/2020/01/Filter_chips.png"><img src="https://www.coderzheaven.com/wp-content/uploads/2020/01/Filter_chips.png" alt="Filter Chips" width="692" height="314" class="size-full wp-image-9410" /></a> Filter ChipsList<Company> _companies = <Company>[const Company('Google'),const Company('Apple'),const Company('Microsoft'),const Company('Sony'),const Company('Amazon'),];Iterable<Widget> get companyWidgets sync* {for (Company company in _companies) {yield Padding(padding: const EdgeInsets.all(6.0),child: FilterChip(avatar: CircleAvatar(child: Text(company.name[0].toUpperCase()),),label: Text(company.name),selected: _filters.contains(company.name),onSelected: (bool selected) {setState(() {if (selected) {_filters.add(company.name);} else {_filters.removeWhere((String name) {return name == company.name;});}});},),);}class Company {const Company(this.name);final String name;}Choice Chips
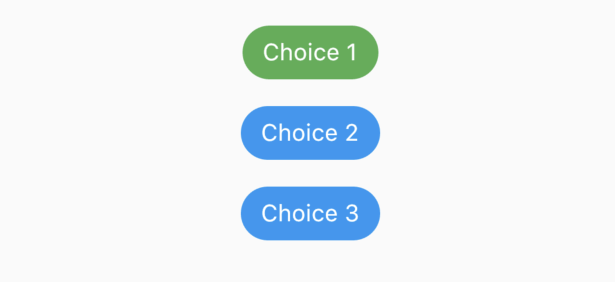
Choice Chips
This helps to create a list of Chips to Select from one at a time.
Widget choiceChips() {return Expanded(child: ListView.builder(itemCount: _choices.length,itemBuilder: (BuildContext context, int index) {return ChoiceChip(label: Text(_choices[index]),selected: _defaultChoiceIndex == index,selectedColor: Colors.green,onSelected: (bool selected) {setState(() {_defaultChoiceIndex = selected ? index : 0;});},backgroundColor: Colors.blue,labelStyle: TextStyle(color: Colors.white),);},),);}Source Code
Complete Source Code available in the below location
https://bitbucket.org/vipinvijayan1987/tutorialprojects/src/WrapWidgetDemo/FlutterTutorialProjects/flutter_demos/lib/widgets/Wrap/WrapWidgetDemo.dart
- Youtube Downloader
- Complete
- Youtube Videos
- Bunches
Recommend
About Joyk
Aggregate valuable and interesting links.
Joyk means Joy of geeK