

Load balance read replicas using ProxySQL in Azure Database for MySQL
source link: https://techcommunity.microsoft.com/t5/azure-database-for-mysql/load-balance-read-replicas-using-proxysql-in-azure-database-for/ba-p/880042
Go to the source link to view the article. You can view the picture content, updated content and better typesetting reading experience. If the link is broken, please click the button below to view the snapshot at that time.
09-30-2019 09:56 AM
Overview
ProxySQL, a high-performance MySQL proxy, enables users to distribute different queries to multiple servers to distribute the load more efficiently.
ProxySQL has several benefits, including intelligent load balancing across different databases and the ability to determine if a database instance is running so that read traffic can be redirected accordingly.
This blog post shows how to set up ProxySQL as a load balancer to split the read and write workloads to Azure Database for MySQL.
Note:
ProxySQL is an open source community tool. It is supported by Microsoft on a best effort basis. In order to get production support with authoritative guidance, you can evaluate and reach out to ProxySQL Product support.
ProxySQL on Azure Database for MySQL set up
The below figure shows the basic set up for ProxySQL with Azure Database for MySQL as a master and read replica server.
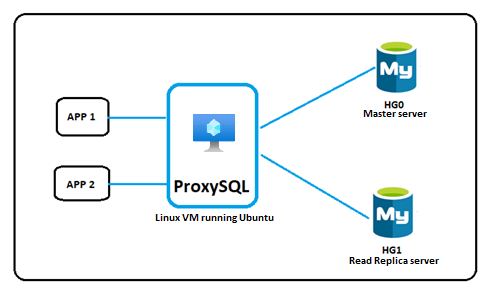
Figure 1: ProxySQL with Azure Database for MySQL
You can also set up ProxySQL using Azure Resource Manager. To deploy above setup, please refer to https://github.com/Azure/azure-mysql/tree/master/arm-templates/ExampleWithProxySQL
Prerequisites
To prepare for setting up ProxySQL, you need:
- A Linux Virtual Machine running Ubuntu, which will be the ProxySQL server. For more information, see the article Create a Linux virtual machine in the Azure portal.
- An Azure Database for MySQL server to use as host group 0 (the Master Server). For more information, see the article Create an Azure Database for MySQL server by using the Azure portal. ProxySQL will be configured to direct all the write workload to this server.
- Firewall rules allowing the Linux VM to connect to the Azure Database for MySQL master server. For more information, see Create a server-level firewall rule in the Azure portal.
- An Azure Database for MySQL server to use as the host group 1 (the Read Replica server). For more information, see Create a replica. ProxySQL will be configured to direct all the read workload to this server.
- Firewall rules allowing the Linux VM to connect to the Azure Database for MySQL read replica server. For more information, see Create a server-level firewall rule in the Azure portal.
Important: Enforcement of SSL connections is enabled by default on Azure Database for MySQL. We recommend avoiding disabling the SSL option and configure ProxySQL to use SSL as outlined below.
Procedure
The process for setting up ProxySQL as a load balancer in Azure Database for MySQL involves:
- Installing ProxySQL on Ubuntu VM.
- Setting up ProxySQL.
- Creating MySQL users on master server.
- Creating the ProxySQL user.
- Configuring monitoring on ProxySQL.
- Configuring the routing rules for read and write split.
- Saving the changes to the ProxySQL configuration to persist across restarts.
Install ProxySQL on Ubuntu VM
Important: Azure Database for MySQL supports ProxySQL version2.0.6 and later.
- Download the latest version of ProxySQL into the /tmp directory. ProxySQL packages are on ProxySQL GitHub release page.
cd /tmp curl -OL https://github.com/sysown/proxysql/releases/download/v2.0.6/proxysql_2.0.6-ubuntu18_amd64.deb - Install ProxySQL by using dpkg and update the package repository to ensure that you have the latest version build.
sudo dpkg -i proxysql_* sudo apt-get update - Install mysql-client.
sudo apt-get install mysql-client - After installing ProxySQL, start the ProxySQL service, as it does not start automatically
sudo systemctl start proxysql - Check the status of service.
After the proxysql successfully starts, a message similar to the following appears:systemctl status proxysql
Setting up the ProxySQL
Execute the below steps on ProxySQL server:
- Connect to the ProxySQL administration interface with the default password ‘admin’.
mysql –u admin –padmin -h 127.0.0.1 -P 6032 - Add the reader and writer nodes ProxySQL server pool.
insert into mysql_servers(hostgroup_id,hostname,port,weight,comment) values(1,'mydemomasterserver.mysql.database.azure.com',3306,1,'Write Group'); insert into mysql_servers(hostgroup_id,hostname,port,weight,comment) values(2,'mydemoreplicaserver.mysql.database.azure.com',3306,1,'Read Group'); - Enable SSL support in ProxySQL server pool
UPDATE mysql_servers SET use_ssl=1 WHERE hostgroup_id=1;
UPDATE mysql_servers SET use_ssl=1 WHERE hostgroup_id=2;
Creating the MySQL users on master server
In ProxySQL, the user connects to ProxySQL and in turn ProxySQL passes the connection to the MySQL node. To allow ProxySQL to access to the MySQL database, we need to create a user on MySQL database with the same credentials as on the ProxySQL server.
- Create a new user ‘mydemouser’ with the password ‘secretpassword’
CREATE USER 'mydemouser'@'%' IDENTIFIED BY 'secretpassword'; - Grant ‘mydemouser’ privileges to fully access the MySQL server.
GRANT SELECT, INSERT, UPDATE, DELETE, CREATE, DROP, RELOAD, PROCESS, REFERENCES, INDEX, ALTER, SHOW DATABASES, CREATE TEMPORARY TABLES, LOCK TABLES, EXECUTE, REPLICATION SLAVE, REPLICATION CLIENT, CREATE VIEW, SHOW VIEW, CREATE ROUTINE, ALTER ROUTINE, CREATE USER, EVENT, TRIGGER ON *.* TO 'mydemouser'@'%' WITH GRANT OPTION - Apply the changes to the permissions
FLUSH PRIVILEGES;
Creating the ProxySQL user
Allow the ‘mydemouser’ user to connect to ProxySQL server.
Execute the below query on ProxySQL server:
insert into mysql_users(username,password,default_hostgroup,transaction_persistent)values('mydemouser','secretpassword',1,1);Configure Monitoring on ProxySQL
Create the monitoring user on the Master server and then configure ProxySQL to monitor the nodes.
Create monitoring user on the master server:
- Create a new user ‘monitoruser’ with the password ‘secretpassword’
CREATE USER 'monitoruser'@'%' IDENTIFIED BY 'secretpassword'; - Grant ‘monitoruser’ privileges to fully access the MySQL server
GRANT SELECT ON *.* TO ' monitoruser'@'%' WITH GRANT OPTION; - Apply the changes to the permissions
FLUSH PRIVILEGES;
On the server running ProxySQL, configure mysql-monitor to the username of the new account.
set mysql-monitor_username='monitoruser';
set mysql-monitor_password='secretpassword';
Configure the routing rules for read and write split
- On the ProxySQL Server, configure the write traffic to route to the master server
insert into mysql_query_rules(rule_id,active,match_digest,destination_hostgroup,apply)values(1,1,'^SELECT.*FOR UPDATE$',1,1); - On the ProxySQL Server, configure the read traffic to route to the read replica server
insert into mysql_query_rules(rule_id,active,match_digest,destination_hostgroup,apply)values(2,1,'^SELECT',2,1);
Save the changes made to the ProxySQL configuration to persists across restarts
In ProxySQL configuration system, the changes we made are in memory and to make them persist across the restarts, you must copy settings to runtime and save them to disk.
- On the server running ProxySQL, execute the below commands to save the settings to runtime:
load mysql users to runtime; load mysql servers to runtime; load mysql query rules to runtime; load mysql variables to runtime; load admin variables to runtime; - On the server running ProxySQL, execute the following commands to save the settings to disk:
save mysql users to disk;
save mysql servers to disk;
save mysql query rules to disk;
save mysql variables to disk;
save admin variables to disk;
After successfully completing the above steps, ProxySQL is configured and is ready to split the read and write workload. To test the functionality to determine if the read and write splits are being forwarded properly:
- Log in to the server running ProxySQL with the ProxySQL user you created.
mysql –u mydemouser –p secretpassword -h127.0.0.1 -P6033 - Run the read and write queries
SELECT *
FROM mydemotable;
UPDATE mydemotable SET mydemocolumn=value WHERE condition;
To verify that ProxySQL has routed the above read and write correctly:
- Connect to the ProxySQL administration interface with the default password ‘admin’.
mysql –u admin –p admin -h127.0.0.1 -P6032 - Execute the following query:
SELECT * FROM stats_mysql_query_digest;
If you have trouble setting up ProxySQL on Azure Database for MySQL, please contact the Azure Database for MySQL team at [email protected]
Thank you!
Amol Bhatnagar
Program Manager - Microsoft
06-23-2020 10:25 AM
Hi @ambhatna,
When you connect to Azure DB for MySQL do you need to embed the database name in the username or is it not necessary (eg mydemouser@mydemomasterserver)? This limited my use of Azure DB for MySQL with ProxySQL.
Thank you.
06-23-2020 02:50 PM
Hi @wchiquito,
Yes, as of now we do require the server name with the username. Please read Why is username@servername required to connect to Azure Database for MySQL? for more details.
Said that, we have made a fix in ProxySQL to take care of this issue. ProxySQL version2.0.6 and later can be used with Azure Database for MySQL.
Please let me know if you are facing issues while setting up ProxySQL.
06-24-2020 11:32 AM
Hi @ambhatna,
Thanks for the quick reply.
To better understand it, does Azure Database for MySQL now understand the new connection attribute _server_host sent from ProxySQL?, see Let ProxySQL support Azure MySQL.
Thank you.
06-25-2020 09:29 AM
Hi @ambhatna,
I am already using ProxySQL 2.0.6 or later and just what I want is to understand what were the changes ProxySQL 2.0.6 or later and in Azure Database for MySQL because when I connect via MySQL CLI I have to use it
mysql -hmydemomaster.mysql.database.azure.com -umydemo@mydemomaster -p
but in ProxySQL 2.0.6 or later I just insert:
insert into mysql_users(username,password)values('mydemouser','secretpassword');Thank you.
06-25-2020 12:33 PM
The changes we did was on the ProxySQL side (https://github.com/sysown/proxysql/pull/2185) . If you want to connect to Azure Database for MySQL using CLI then Username@Servername format is still required.
You must be a registered user to add a comment. If you've already registered, sign in. Otherwise, register and sign in.
Recommend
About Joyk
Aggregate valuable and interesting links.
Joyk means Joy of geeK