

Basic Spring MVC example with Thymeleaf and no XML (annotation based configurati...
source link: https://marco.dev/2013/11/02/basic-spring-mvc-annotation-based-configuration-example-with-thymeleaf-and-no-xml/
Go to the source link to view the article. You can view the picture content, updated content and better typesetting reading experience. If the link is broken, please click the button below to view the snapshot at that time.

java-version.com: What's new in Java 16? 15? Keep up to date!
Basic Spring MVC example with Thymeleaf and no XML (annotation based configuration)
Since the version 3.x Springframework allows to write applications without any use of xml. It’s quite funny the idea that Spring the ‘xml oriented framework’ now is completely xml-free.
I tried to develop a website (a simple page to be honest) using the annotation configuration and the new ‘kid on the block’: Thymeleaf.
I think I’ll develop these example to build a new real website.
As usual you can find the source on github:
https://github.com/marco76/minimvc
ThymeleafConfig.java
We created a class that contains the Thymeleaf configuration : templateResolver, templateEngine, viewResolver
@Configuration
@PropertySource("classpath:thymeleaf.properties")
public class ThymeleafConfig {


    @Bean
    public TemplateResolver templateResolver(){
        ServletContextTemplateResolver templateResolver = new ServletContextTemplateResolver();
        templateResolver.setPrefix("/WEB-INF/templates/");
        templateResolver.setSuffix(".html");
        templateResolver.setTemplateMode("HTML5");

        return templateResolver;
    }

    @Bean
    public SpringTemplateEngine templateEngine(){
        SpringTemplateEngine templateEngine = new SpringTemplateEngine();
        templateEngine.setTemplateResolver(templateResolver());
        return templateEngine;
    }

    @Bean
    public ViewResolver viewResolver(){
        ThymeleafViewResolver viewResolver = new ThymeleafViewResolver() ;
        viewResolver.setTemplateEngine(templateEngine());
        viewResolver.setOrder(1);

        return viewResolver;
    }
You have to declare a ViewResolver that allow Spring to find and create the answer page. In the case of a ‘traditional’ jsp the ViewResolver would be the following:
//Defines the ViewResolver that Spring will use to render the views.
    @Bean
    public ViewResolver viewResolver() {
        System.out.println("Inside View Resolver...");
        InternalResourceViewResolver viewResolver = new InternalResourceViewResolver();
        viewResolver.setViewClass(JstlView.class);
        viewResolver.setPrefix("/WEB-INF/views/");
        viewResolver.setSuffix(".jsp");

        return viewResolver;
    }
AppConfiguration.java
The AppConfiguration class is the main class of the application. The @EnableWebMvc tells to Spring that we are developing a web application.
@Import it’s the equivalent of ‘<import resource= … >‘ in XML. It allows us to use the beans declared in other configuration files.
As you can see the AppConfiguration can be empty.
@Configuration
@EnableWebMvc
@ComponentScan(basePackages = "ch.javaee.simpleMvc")
@Import({ WebInitializer.class, DispatcherConfig.class})
public class AppConfiguration {
}
WebInitializer.java
The WebInitializer implements the WebApplicationInitializer that configures the ServletContext.
You can find more information in the Spring official documentation.
In brief, this class is bootstrapped by the application server (Servlet v.3.0) and it registers the dispatcher.
@Configuration
public class WebInitializer implements WebApplicationInitializer {
    @Override
    public void onStartup(ServletContext container) throws ServletException {

        // Create the 'root' Spring application context
        AnnotationConfigWebApplicationContext rootContext =
                new AnnotationConfigWebApplicationContext();
        rootContext.register(AppConfiguration.class);

        // Manage the lifecycle of the root application context
        container.addListener(new ContextLoaderListener(rootContext));

        // Create the dispatcher servlet's Spring application context
        AnnotationConfigWebApplicationContext dispatcherContext =
                new AnnotationConfigWebApplicationContext();
        dispatcherContext.register(DispatcherConfig.class);

        // Register and map the dispatcher servlet
        ServletRegistration.Dynamic dispatcher =
                container.addServlet("dispatcher", new DispatcherServlet(dispatcherContext));
        dispatcher.setLoadOnStartup(1);
        dispatcher.addMapping("/");
    }
}
Conclusion
There is no need of any xml file. We don’t use any web.xml or any configuration.xml file. Spring allow to combine the use of xml files with @Configuration annotations simplifying the integration of legacy code.
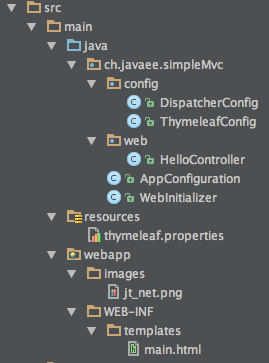
The integration of Thymeleaf is straightforward. As declared in the templateResolver bean the web pages are found in the /WEB-INF/templates/ directory.
The @Controller assign the value “Hello world!” to the attribute “title” and pass it to the “main” page.
@RequestMapping(method = RequestMethod.GET)
	public String printWelcome(ModelMap model) {
		model.addAttribute("title", "Hello world!");
		return "main";
	}
Eventually, the “main.html” page receives and shows the value of the attribute.
<body>
<img src="../../images/jt_net.png" th:attr="src=@{images/jt_net.png}"/>
    <h2 th:text="${title}">Title</h2>
</body>
</p>
Here you can see the result:

Recommend
About Joyk
Aggregate valuable and interesting links.
Joyk means Joy of geeK