

esp32 micropython using uPycraft IDE
source link: http://jeffsui.github.io/2020/03/24/esp32-micropython-using-uPyCraft/
Go to the source link to view the article. You can view the picture content, updated content and better typesetting reading experience. If the link is broken, please click the button below to view the snapshot at that time.

esp32 micropython using uPycraft IDE
esp32 micropython 之旅 02 使用uPycraft IDE

上次使用命令方式推送代码烧录到固件,今天介绍下micropython的几个著名的IDE。
- Thonny IDE
- uPyCraft IDE.
使用uPyCraft
Step 1. 点击这个链接下载uPyCraft 的.exe文件
Step 2. 双击安装包,打开安装后偶uPyCraft 可能是这个样子
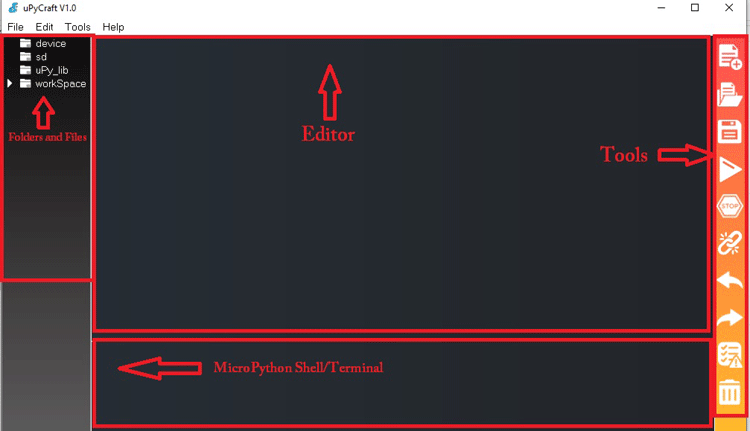
uPyCraft 核心组件
1. Folder and Files
Device :设备 是esp32还是esp8266 还是microbit
SD : 包含文件存储的 SD 卡。很多不开发版都支持SD
uPy_lib: 包含micropython 内置模块
workSpace : 将保结果存到本地
2. Editor :编写python代码。
3. Shell/Terminal: 终端
4. Tools: 创建新文件,保存和上传文件到开发板上,关闭连接等功能。
开始烧录最新的 esp32 micropython 固件
首先,从这个站点,下载最新的esp32 micropython固件
Step 2.,打开 uPyCraft ,点击 *Tools-> Serial** 选择映射端口.

Step 2. 选择*Tools->board*.这里我们选择esp32

Step 3. 开始烧录

使用 uPyCraft IDE 上传代码到esp32
Step 1. 打开 uPyCraft IDE 和 Tools->boards,选择你的主板
Step 2. 直接点击 tools-> Serial\ 选择COM口.
Step 3. 点击Connect 连接IDE和esp主板

Step 4. 如果连接正常,则下面的终端区会显示 >>> 符号,此时可以执行micropython的命令。
Step 5.现在点击iNew File,并保存到本地。

Step 6. 点击新创建的文件,开始编写小灯程序的代码
1
2
3
4
5
6
from time import sleep
from machine import Pin
led = Pin(2, Pin.OUT)
while True:
    led.value(not led.value())
    sleep(1)
Step 7. 点击 Download and run\ 按钮

Step 8. 重新测试代码是否正确,点击 En/Reset\ 按钮。
不知道什么原因,win7操作系统 uPycraft 就是识别不了 我的板子,换成win10 一次性搞定。
Recommend
-
49
Updated 22-11-17 to include Internet access. Now implements http and https GET requests via GPRS using the SIM800L HTTP AT interface - see below in section on UpyPhone Apps for example applications. UpyPhone...
-
41
Micropython之萝卜狗远程门禁控制系统
-
107
OTA for STM32Fxx MCU using ESP32 Program your STM32Fxx Over-the-Air using ESP32
-
11
esp32 micropython 之旅 03 webrepl
-
9
esp32 micropython 之旅 01 环境搭建
-
5
In this blog, you'll learn how to set up a Raspberry Pi as a JTAG debugger for the ESP32. I'll then show you how to use GDB and even Visual Studio Code to debug your ESP32 programs using this setup.I tested this setup on Raspberry Pi M...
-
8
esp32c2-bling (3 Part Series) The flashy NeoPixel-decorated ESP32-C3 board I've been learning about has no publish...
-
3
Show driving an I2C OLED display using a QTPy ESP32-S3, with the display soldered directly on top
-
3
ESP32-MicroPython 开发环境 Linux/Mac 下使用Mic...
-
5
ESP32-MicroPython without Thonny
About Joyk
Aggregate valuable and interesting links.
Joyk means Joy of geeK