

四种实现浏览器标签页数据通信方式
source link: https://xieyufei.com/2020/09/12/Tab-Communicate.html
Go to the source link to view the article. You can view the picture content, updated content and better typesetting reading experience. If the link is broken, please click the button below to view the snapshot at that time.
四种实现浏览器标签页数据通信方式
浏览器可以打开多个不同的标签页,有时候需要在这多个标签页共享同一份数据,那如何在多个标签页中进行数据的通信呢?让我们来看一下四种在标签页中通信的方式。
我们在网易云听歌时,可以打开多个标签页进行播放;但是我们发现在一个标签页播放的同时,其他标签如果正在播放,都会自动的停止。

想想这样也是合理的,因为毕竟如果多个标签页都同时播放声音就会干扰,同一时间只能存在一个音乐播放;因此我们也来尝试实现这样一个需求,在不同浏览器中进行数据通信:
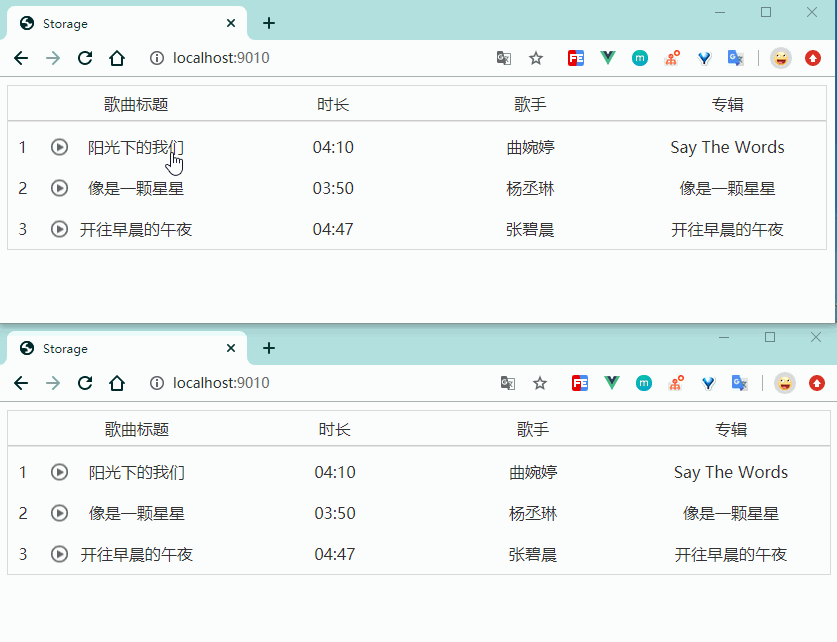
我们首先来准备一些数据,和网易云一样,准备一个专辑列表,每个专辑列表中有不同的歌曲,可以通过URL参数传递id来获取不同的专辑页面:
1
2
3
4
5
6
7
8
9
10
11
12
13
14
15
16
17
18
19
20
21
22
<div id="app">
  <div class="box">
    <div class="item header">
      <div class="index"></div>
      <div class="name">歌曲标题</div>
      <div class="time">时长</div>
      <div class="singer">歌手</div>
      <div class="album">专辑</div>
    </div>
    <template v-for="(item, index) in list">
      <div :class="['item','music',activeIndex == index ? 'active':'']"
      @click="clickMusic(item, index)"
      :key="index">
        <div class="index">{{index+1}}</div>
        <div class="name">{{item.name}}</div>
        <div class="time">{{item.time}}</div>
        <div class="singer">{{item.singer}}</div>
        <div class="album">{{item.album}}</div>
      </div>
    </template>
  </div>
</div>
1
2
3
4
5
6
7
8
9
10
11
12
13
14
15
16
17
18
19
20
21
22
23
24
25
26
27
new Vue({
    el: '#app',
    data() {
        return {
          list: [],
          activeIndex: -1,
        }
    },
    mounted() {
        const {
            id = '1'
        } = Qs.parse(window.location.search, { ignoreQueryPrefix: true })
        axios({
            url: '/api/list',
            params: {
                id,
            }
        }).then((res) => {
            return res.data
        }).then((res) => {
            const {
                list
            } = res
            this.list = list
        })
    },
})
cookie
要想在所有的标签页中实现通信,我们必须将数据存放到一个公共的存储空间,所有的标签页都能获取并且还能进行修改;我们知道,cookie在用户所有浏览器标签页中都是共享的,因此,我们可以尝试把选中的数据存放到cookie中去:
1
2
3
4
5
6
7
8
9
10
11
12
13
14
15
16
17
18
19
20
21
22
23
24
25
26
27
28
29
new Vue({
    mounted() {
        setInterval(() => {
            let newValue = Cookies.get('music')
            if (newValue) {
                let parse = {}
                try {
                    parse = JSON.parse(newValue)
                } catch (error) {}
                let {
                    list,
                } = this
                let activeIndex = -1
                list.map((item, index) => {
                    if (item.name == parse.name) {
                        activeIndex = index
                    }
                })
                this.activeIndex = activeIndex
            }
        }, 1000)
    },
    methods: {
        clickMusic(item, index) {
            this.activeIndex = index
            Cookies.set('music', JSON.stringify(item))
        }
    }
})
由于更新cookie并不能触发任何事件,因此我们需要通过定时器setInterval来主动监听cookie中的值是否改变;代码看起来没有问题,让我们看一下运行的效果:
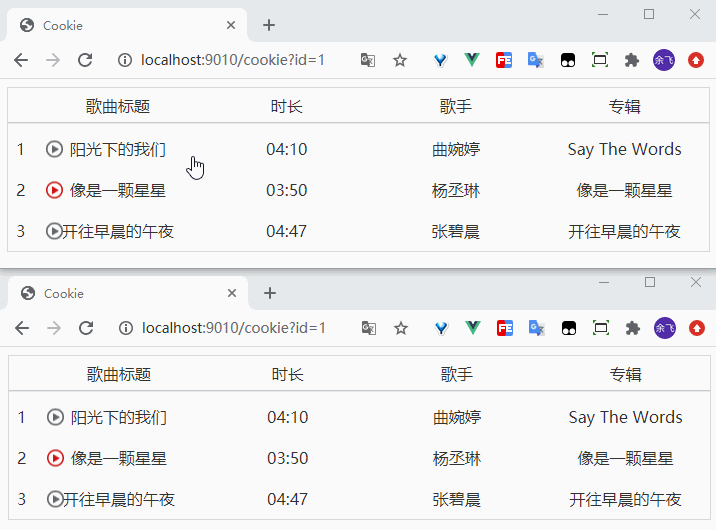
存在下面两个问题:
- 定时器存在时间差,点击后有一定的延迟,cookie本身的弊端
- 在同一个专辑id页面下,由于选中的数据没有区分页面,相同音乐item也会被选中
因此我们需要给每一个页面区分一个页面id;这个页面id可以从后台接口中获取,这里为了简单展示,我们使用时间戳作为页面id:
1
2
3
4
5
6
7
8
9
10
11
12
13
14
15
16
17
18
19
20
21
22
23
24
25
26
27
28
29
30
31
32
33
34
35
36
37
38
39
40
41
42
43
44
45
46
//省略其他代码
new Vue({
    data() {
        return {
            page_id: '0',
        }
    },
    mounted() {
        let timestamp = new Date().getTime()
        this.page_id = timestamp + ''
        setInterval(() => {
          let newValue = Cookies.get('music')
          if (newValue) {
            let parse = {}
            try {
                parse = JSON.parse(newValue)
            } catch (error) {}
            let {
                list,
            } = this
            let activeIndex = -1
            list.map((item, index) => {
                //是当前页面的id是才选中数据
                if (item.name == parse.name
                    && parse.page_id == page_id) {
                        activeIndex = index
                }
            })
            this.activeIndex = activeIndex
          }
        }, 1000)
    },
    methods: {
        clickMusic(item, index) {
          this.activeIndex = index
          let {
              page_id
          } = this
          //存放到cookie时将页面id带入
          item = Object.assign({
              page_id,
          }, item)
          Cookies.set('music', JSON.stringify(item))
        }
    }
})
我们虽然能通过给每个页面分配id来解决问题2,但是由于定时器的弊端,cookie+setInterval的方案会存在延时的情况。
localStorage
localStorage也是浏览器多个页面共用的存储空间;而且localStorage在一个页面中添加、修改或者删除时,都会在非当前页面中被动触发一个storage事件,我们通过在其他页面中监听storage事件,即可拿到storage更新前后的值:
1
2
3
4
5
6
7
8
9
10
11
12
13
14
15
16
17
18
19
20
21
22
23
24
25
26
27
28
29
30
//省略其他代码
new Vue({
    mounted() {
        let timestamp = new Date().getTime()
        this.page_id = timestamp + ''
        window.addEventListener('storage', (ev) => {
            const {
                key,
                newValue,
            } = ev
            if (key === 'music' && newValue) {
                let parse = {}
                try {
                    parse = JSON.parse(newValue)
                } catch (error) {}
                let {
                    list,
                    page_id
                } = this
                let activeIndex = -1
                list.map((item, index) => {
                    if (item.name == parse.name && parse.page_id == page_id) {
                        activeIndex = index
                    }
                })
                this.activeIndex = activeIndex
            }
        })
    },
})
相较于cookie的主动监听,localStorage的被动触发不仅在代码显得更加友好,而且还极大的避免了定时器带来的性能损耗。
webworker
我们在《从一道面试题来理解JS事件循环》提到,webworker只能用来做一些消耗CPU的逻辑运算等;webworker也分为Worker和SharedWorker,普通的worker可以直接使用new Worker()创建,只在当前页面中使用;而SharedWorker通过名字我们也能看出,是可以在多个标签页面中数据是共享的;
SharedWorker和Worker不同之处在于它第二个参数可以做直接指定name,或者使用对象参数,因此下面三种构造方式是相同的:
1
2
3
new SharedWorker('/public/shared.js', 'musicWorker');
new SharedWorker('/public/shared.js', { name: 'musicWorker' });
new SharedWorker('/public/shared.js', 'musicWorker', { type: 'classic' });
构造了SharedWorker实例对象后,我们需要通过其port属性进行通信,主要的API如下:
1
2
3
4
5
const sw = new SharedWorker('/public/shared.js');
//发送数据
sw.port.postMessage('...')
//监听数据
sw.port.onmessage = function (event) {  // ...  }
由于构造的多个SharedWorker实例形成了一个共享的连接,因此在连接成功时,我们给每个实例分配一个唯一id:
1
2
3
4
5
6
7
8
9
10
11
12
13
14
15
16
17
18
19
20
21
22
23
24
25
26
27
28
29
30
31
32
33
34
//main.js
new Vue({
  data() {
      return {
          workder_id: 0,
          sw: {},
      }
  },
  mounted() {
    this.sw = new SharedWorker('/public/shared.js');
    this.sw.port.addEventListener('message', (ev) => {
      let {
          type,
          data
      } = ev.data
      //初始化连接时返回一个id
      if (type == 'id') {
          this.workder_id = data
      }
    })
    this.sw.port.start()
  },
  methods: {
    clickMusic(item, index) {
      //省略部分代码
      //每次通信时将id带上
      this.sw.port.postMessage({
          type: 'set',
          id: this.workder_id,
          data: item
      })
    }
  }
})
我们在ShareWorker内部监听connect事件,并且处理内部的port事件:
1
2
3
4
5
6
7
8
9
10
11
12
13
14
15
16
17
18
19
20
21
22
23
24
25
26
27
28
29
30
31
32
33
34
35
36
37
//shared.js
const connectedClients = new Set()
let id = 1
//给其他连接端发送消息
function sendMessageToClients(payload, currentClientId = null) {
  connectedClients.forEach(({ id, client }) => {
    if (currentClientId && currentClientId == id) return;
    client.postMessage(payload);
  });
}
//当前连接绑定消息监听
function setupClient(clientPort) {
  clientPort.onmessage = (event) => {
    const { type, data, id } = event.data;
    if(type=='set'){
      sendMessageToClients({
        type: 'get',
        data: data,
      }, id)
    }
  };
}
self.addEventListener("connect", (event) => {
  const newClient = event.source;
  //每次连接后给client唯一id标识
  //将每次连接存在数组中
  connectedClients.add({
    client: newClient,
    id: id,
  });
  setupClient(newClient);
  newClient.postMessage({
    type: 'id',
    data: id
  })
  id++
});
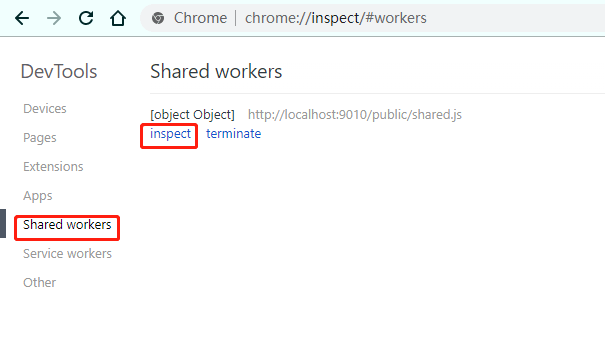
当写shared.js,我们经常会遇到问题,那么怎么来调试sharedworker呢?直接console.log并不会在标签页面中有输出;我们打开新的标签页chrome://inspect,选择Shared workers然后再选择对应脚本,就能愉快的调试了。
websocket
websocket作为全双工通信,自然可以实现多个标签页之间的通信;WebSocket是HTML5新增的协议,它的目的是在浏览器和服务器之间建立一个不受限的双向通信的通道。
这里我们使用express的一个框架express-ws来模拟websocket服务器;由于服务器会储存很多标签页的连接对象信息,因此我们需要给每个用户进行唯一标识进行区分;我们从服务器获取user_id并保存。
1
2
3
4
5
6
7
8
9
10
11
12
13
14
15
16
17
18
19
20
21
22
23
24
25
26
27
28
29
30
31
32
33
34
//省略其他代码
new Vue({
    el: '#app',
    data() {
        return {
            list: [],
            activeIndex: -1,
            page_id: '0',
            ws: null
        }
    },
    mounted() {
        let timestamp = new Date().getTime()
        this.page_id = timestamp + ''
        let store_user_id = Cookies.get('user_id')
        if (!!store_user_id) {
            this.connectWs(store_user_id)
        } else {
            axios({
                url: '/api/get_user_id'
            })
            .then((res) => {
                return res.data
            })
            .then((res) => {
                let {
                    user_id
                } = res
                Cookies.set('user_id', user_id)
                this.connectWs(user_id)
            })
        }
    },
})
通过user_id我们就可以向websocket服务器连接并发起请求了。
1
2
3
4
5
6
7
8
9
10
11
12
13
14
15
16
17
18
19
20
21
22
23
24
25
26
27
28
29
30
31
32
33
34
35
36
//省略其他代码
new Vue({
  methods: {
    clickMusic(item, index) {
      this.activeIndex = index
      let {
        page_id
      } = this
      item = Object.assign({
        page_id,
      }, item)
      this.ws.send(JSON.stringify(item))
    },
    connectWs(user_id) {
      var ws = new WebSocket(`ws://localhost:9010/ws/${user_id}`)
      ws.onmessage = (e) => {
        let parse = {}
        try {
          parse = JSON.parse(e.data)
        } catch (error) {}
        let {
          list,
          page_id
        } = this
        let activeIndex = -1
        list.map((item, index) => {
          if (item.name == parse.name && parse.page_id == page_id) {
            activeIndex = index
          }
        })
        this.activeIndex = activeIndex
      };
      this.ws = ws
    }
  }
})
在标签页每次和websocket建立连接后,将连接对象存放到数组中。
1
2
3
4
5
6
7
8
9
10
11
12
13
14
15
16
17
18
19
20
21
22
23
24
25
26
27
28
29
30
31
32
33
34
//省略其他代码
const expressWs = require("express-ws")(app);
let clients = [];
let musicNum = null;

app.ws("/ws/:user_id", function (ws, req) {
  let { user_id } = req.params;
  clients.push({
    user_id,
    ws,
  });
  ws.send("连接成功");

ws.on("message", function (msg) {
    let parsed = {};
    try {
      parsed = JSON.parse(msg);
    } catch (error) {}
    musicNum = parsed;
    for (let i = 0; i < clients.length; i++) {
      let item = clients[i];
      if (item.user_id === user_id && item !== this) {
        item.ws.send(msg);
      }
    }
  });
  ws.on("close", function () {
    for (let i = 0; i < clients.length; i++) {
      if (clients[i].ws === this) {
        clients.splice(i, 1);
      }
    }
  });
});
本文所有代码都在git仓库
Recommend
About Joyk
Aggregate valuable and interesting links.
Joyk means Joy of geeK