

Good Quality DOSBox Video Capture
source link: https://susam.in/blog/good-quality-dosbox-video-capture/
Go to the source link to view the article. You can view the picture content, updated content and better typesetting reading experience. If the link is broken, please click the button below to view the snapshot at that time.

Good Quality DOSBox Video Capture
Vintage DOS Programs
Once in a while, I fire up one of the vintage DOS games or language interpreters in DOSBox for nostalgia's sake. I have archived these vintage programs at github.com/susam/dosage. DOSBox is an emulator program that emulates IBM PC compatible computers running DOS. Trying my hands on these antiquated DOS programs now evokes old memories from my childhood days days when I first came across computers as part of our primary school curriculum.
Computers were much simpler in those days. The ones in our school were IBM PC compatible computers with mostly monochrome displays. A couple of them had support for a very limited number of colours provided by CGA or EGA graphics cards. The ability to boot a computer using a 5¼-inch floppy disk containing MS-DOS, load a Logo or BASIC interpreter, or a computer game from another floppy disk, and then write some programs or play a few games without any distraction had its own charm that I find missing from modern day computing.
Often while using old DOS programs with DOSBox in this day and age, I want to take screenshot captures or video captures of the DOSBox sessions and share them with my friends. In this article, I will explain how I create good quality screenshot captures and video captures of DOSBox sessions in formats that I can share with others.
Contents
Software Versions
Since this article involves several pieces of software, some of what is written here may not hold good in future if the behaviour of any of these software tools change in future. The list below contains the versions of all software tools that were used to test the commands provided in this article:
- macOS High Sierra 10.13.6
- DOSBox 0.74-3
- FFmpeg 4.3.1
- ImageMagick 7.0.10-28
- IBM Personal Computer Logo Version 1.00
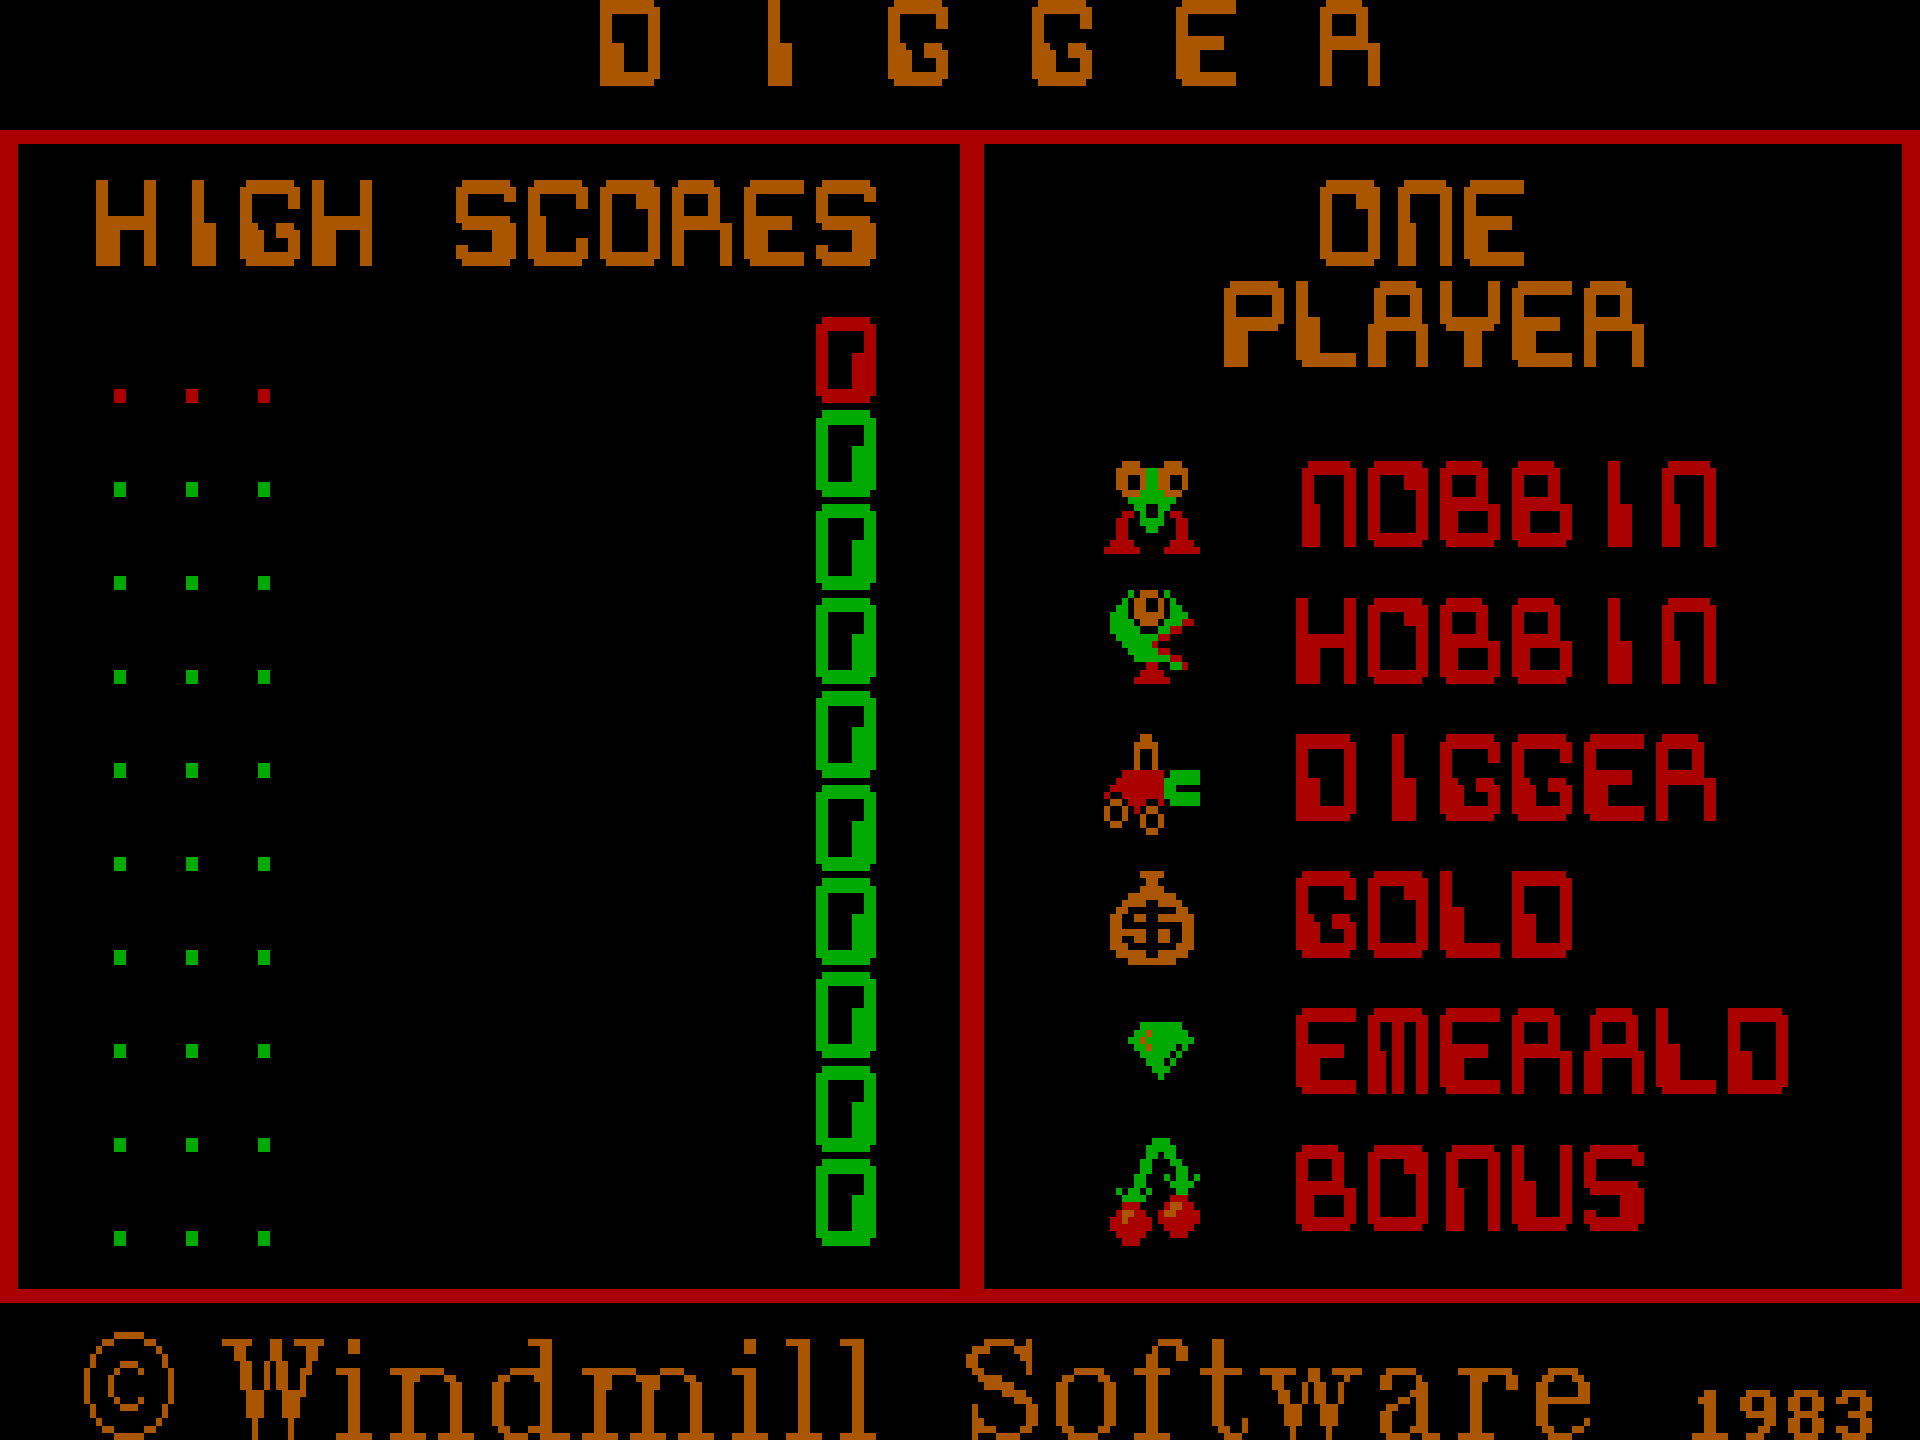
- Digger (Original PC booter version by Windmill Software)
Note that both Logo and Digger programs in the list above are DOS programs that were released in 1983. They cannot be run directly on modern computers but they can be run with DOSBox since it emulates old IBM PC compatible computers.
IBM PC Logo in DOSBox
IBM Personal Computer Logo developed by Logo Computer Systems Inc. (LCSI) in 1983 was the first piece of software I got introduced to while learning computers as a kid. I came across it at the age of 8 when I was in Class 4 and our school had a 5¼-inch floppy disk with IBM PC Logo on it. As a result, Logo was the first programming language I learnt in my life. About 20 years later, I would realize that the first programming language I learnt is a dialect of Lisp. How wonderful!
If the Logo interpreter program LOGO.COM exists in the
current directory, it can be run with DOSBox using the following
command:
dosbox LOGO.COMOne of the things I enjoyed drawing with Logo was a grid of overlapping circles like this:
Here is the Logo source code for the above output:
REPEAT 20 [REPEAT 180 [FD 1 RT 2] RT 18]
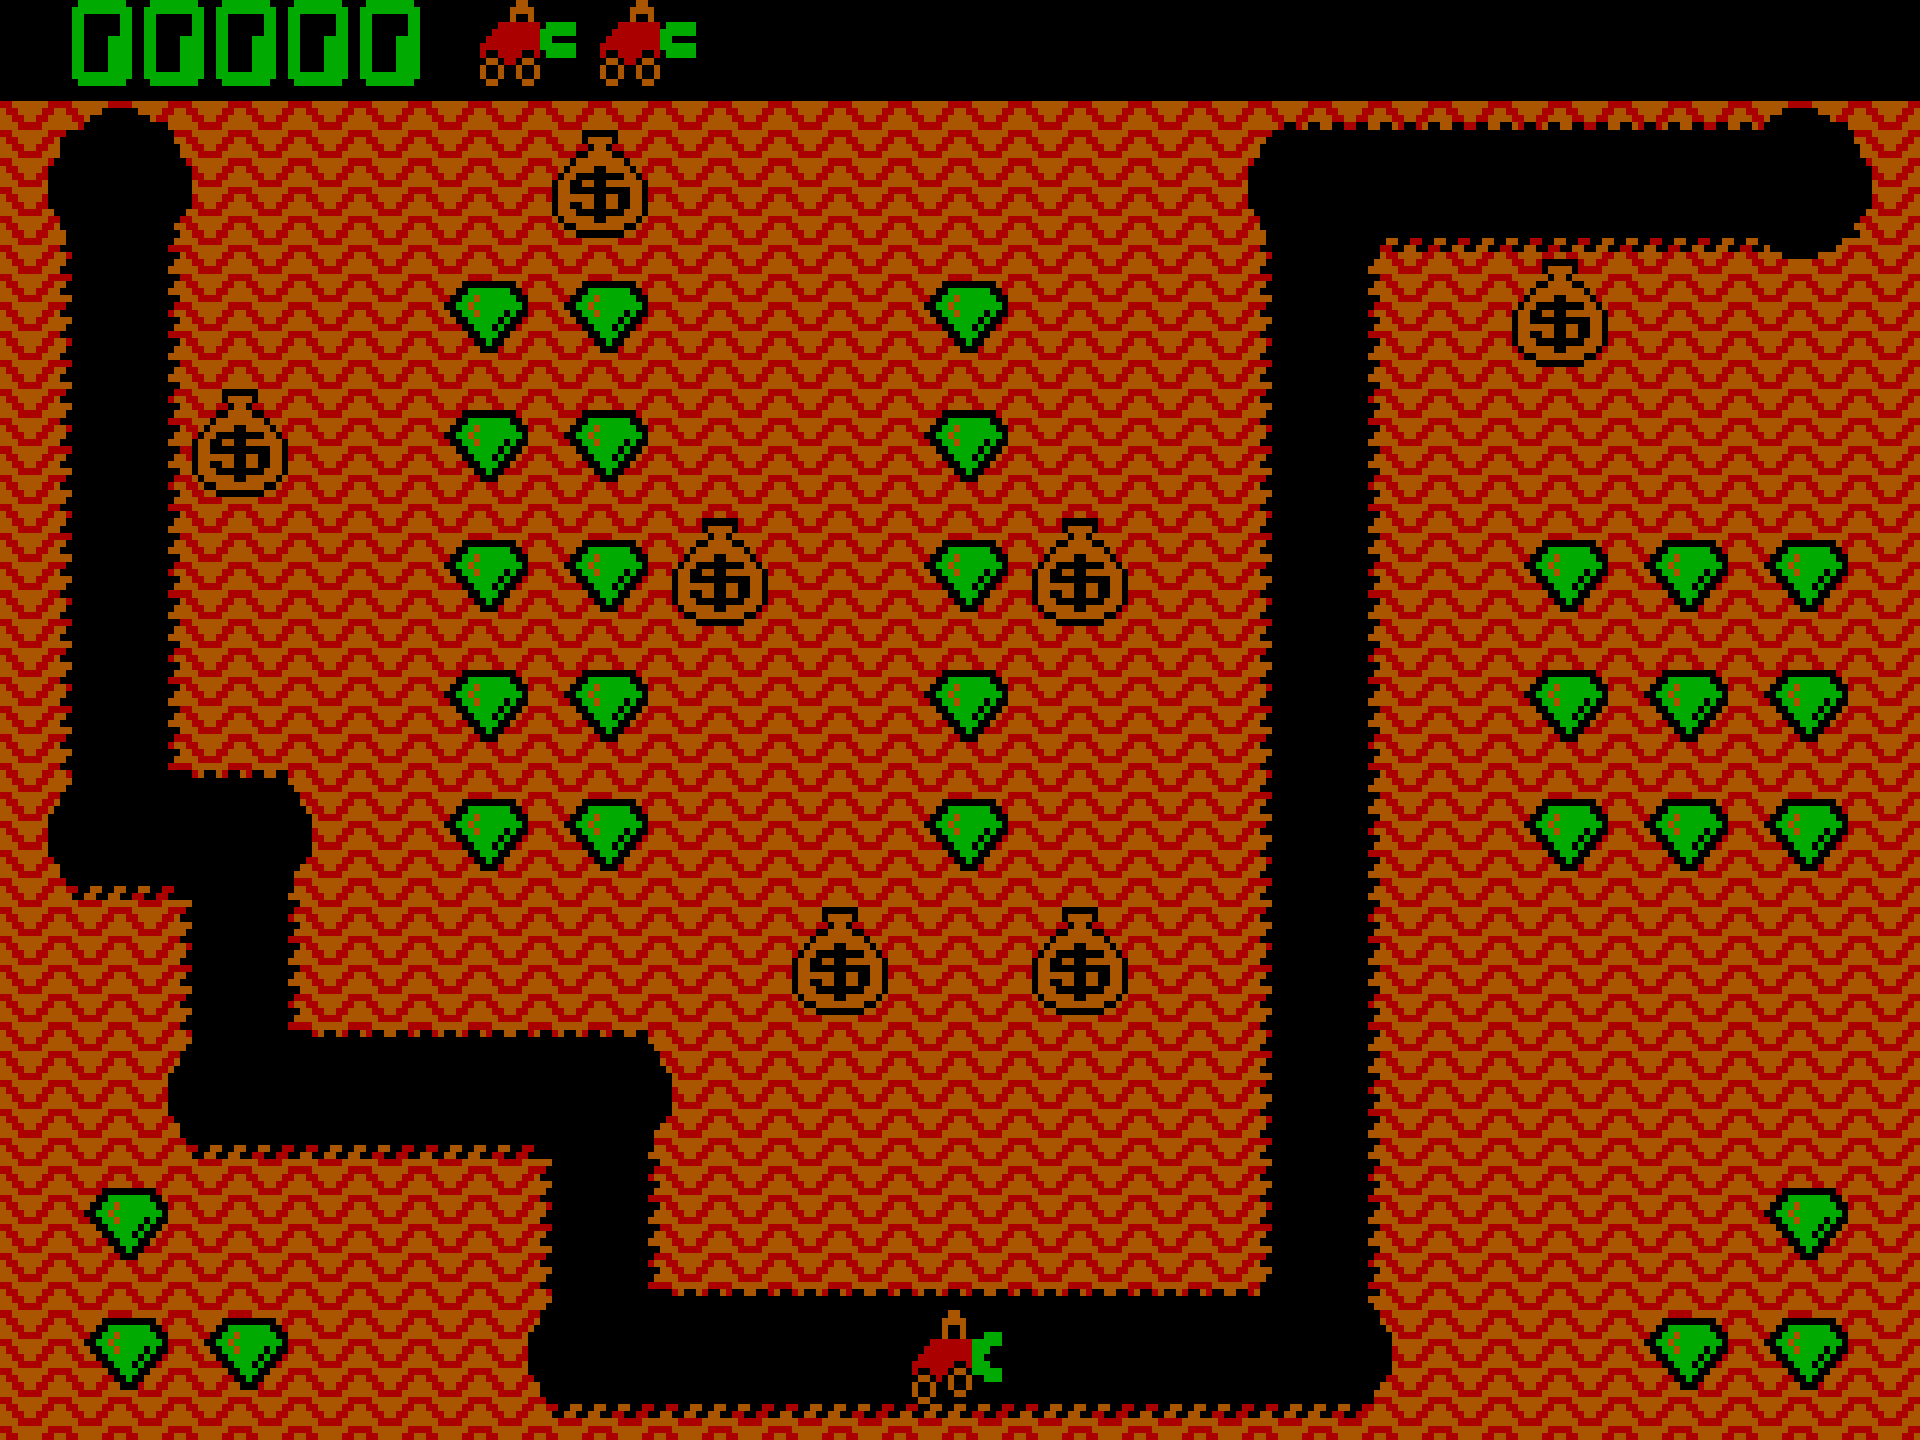
Digger in DOSBox
At around the same time I learnt Logo, I also came across Digger, a computer game for IBM PC developed by Windmill Software in 1983.
If the Digger program DIGGER.COM exists in the directory,
it can be run using DOSBox with the following command:
dosbox DIGGER.COM -c "config -set cpu cycles=500" -machine cga
The -machine cga option emulates a machine with Color
Graphics Adapter (CGA) because Digger requires a machine of this type to
run correctly. The cycles=500 configuration option slows
down the speed at which DOSBox emulates instructions in order to emulate
the slow machines of olden days. Without this option, Digger runs too
fast to be able to be conveniently playable.

Digger has an excellent gameplay where the player digs through underground tunnels to pick up emeralds, drop gold bags to release the gold or squash nobbins and hobbins, collect the released gold to earn more points, and so on. It uses bright and attractive colours. The music is great. When Digger was released in 1983, it was quite advanced for its time.
DOSBox Screenshot Capture
The screenshots above were obtained by running IBM PC Logo and the original 1983 PC booter version of Digger on DOSBox and then resizing the screenshots such that their aspect ratio matches the aspect ratio of old CRT computer monitors.
To obtain the screenshots, we first press Ctrl + F5 while DOSBox is running. The paths of the screenshots appear in the console output at the terminal where DOSBox was launched. For example:
Capturing Screenshot to /Users/susam/Library/Preferences/capture/logo_000.png
Capturing Screenshot to /Users/susam/Library/Preferences/capture/logo_001.png
Capturing Screenshot to /Users/susam/Library/Preferences/capture/digger_000.png
Capturing Screenshot to /Users/susam/Library/Preferences/capture/digger_001.png
The screenshots obtained in this manner have an aspect ratio of 8:5 which makes the output look stretched horizontally. The old CRT computer monitors for which these old DOS programs were written had an aspect ratio of 4:3 instead. This stretched look can be fixed by resizing the images to an aspect ratio of 4:3. Here are the commands used to fix the aspect ratio and produce the images:
convert logo_000.png -sample '1920x1440!' dosbox-logo-0.png
convert logo_001.png -sample '1920x1440!' dosbox-logo-1.png
convert digger_000.png -sample '1920x1440!' dosbox-digger-0.png
convert digger_001.png -sample '1920x1440!' dosbox-digger-1.png
The convert program comes with ImageMagick. There are a few
things worth noting here:
-
We use the
-sampleoption here to resize the image as opposed to using-resizeor-scale. The-resizeor-scaleoption would smooth the jagged edges in the text and graphics by introducing additional colours. The-resizeoption is great for real world images where we do want the edges to be smooth while scaling up or down but in these screenshots we want to retain the crisp and jagged edges that is typical of DOSBox and the old CRT monitors. Therefore we use the-sampleoption that does not introduce any new colours. Instead it uses nearest-neighbour interpolation (point sampling) to decide the colours of the scaled image. -
The
!flag is used to ignore the aspect ratio of the original image. Without this flag, the output files would be 1920x1200 in size, that is, the largest size with an aspect ratio of 8:5 that fits in a 1920x1440 box. With this flag, the original aspect ratio of 8:5 is ignored and the output is exactly 1920x1440 in size.
By the way, I have donated these images above to Wikimedia Commons under the Creative Commons Attribution 4.0 International (CC BY 4.0) license:
Having the images on Wikimedia Commons helps to include these screenshots in the Wikipedia articles on Logo and Digger.
DOSBox Video Capture
To start capturing video of DOSBox, we press Ctrl + Alt + F5. The same key combination stops capturing video. The following output appears in the console output to show where the video file is saved:
Capturing Video to /Users/susam/Library/Preferences/capture/logo_000.avi
Stopped capturing video.
Say, I want to share a video capture of DOSBox with Logo running on it with my friends who might be on devices that do not support playing AVI files. The following FFmpeg command converts the video to a format that can be distributed widely and played on a wide range of devices and players:
ffmpeg -i logo_000.avi -an -c:v libx264 -preset veryslow \
       -crf 17 -vf format=yuv420p,scale=1920:1440:flags=neighbor,fps=30 \
       dosbox-logo.mp4
Here is what the output looks like:
Video capture of IBM Personal Computer Logo [MP4]
Let us briefly discuss the various FFmpeg options used here:
-
-i logo_000.aviThis, of course, specifies the input file.
-
-anThe audio is silent in this video, so we reduce the file size a little by disabling the audio stream with this option. For example, without this option the output file size was 317 KB but with this option it turned out to be 282 KB.
This option should not be specified if the audio stream needs to preserved, for example, with DOS games that have audio. We will see an example of this in the next section.
-
-c:v libx264This option selects the x264 encoder to encode the video stream into H.264 format. H.264 is also known as MPEG-4 Part 10, Advanced Video Coding (MPEG-4 AVC). Currently, it is the most popular format for recording, compression, and distribution of video content.
-
-crf 17This option provides visually lossless output, that is, high quality output without any loss in quality that can be perceived by human eyes. For completely lossless output, we need to use the
-crf 0option. However, this option sets the video profile toHigh 4:4:4 Predictivewhich prevents the video from playing in some video players. This issue is discussed in more detail in the point aboutyuv420ppixel format that comes later in this list. Since-crf 0cannot be used due to this issue, the next best option is-crf 1which while not completely lossless is much better than visually lossless. Since it trades quality for output size, the output file turns out to be 319 KB in size. The-crf 51option produces the most lossy output, that is, the worst quality output with a file size of 159 KB. -
-preset veryslowThis option provides better compression at the cost of encoding speed. For example, without this option it produces an output of size 355 KB in about 16 seconds on my system but with this option it produces an output of size 282 KB in about 31 seconds on the same system.
-
-vf format=yuv420pThis video filter option ensures that the output video file can be run in a wide range of devices and players.
For example, without this video filter option, we get the output in the YUV 4:4:4 planar format. I found that QuickTime Player version 10.4 on macOS High Sierra as well as Android 9.0.0 was unable to play this format.
$ ffmpeg -v quiet -i logo_000.avi -an -c:v libx264 dosbox-logo.mp4
$ ffprobe -v error -show_entries stream=codec_name,profile,pix_fmt dosbox-logo.mp4
[STREAM]
codec_name=h264
profile=High 4:4:4 Predictive
pix_fmt=yuv444p
[/STREAM]
With this video filter option, we get the output in the YUV 4:2:0 planar format. Now both QuickTime Player version 10.4 as well as Android 9.0.0 could play this format.
$ ffmpeg -v quiet -i logo_000.avi -an -c:v libx264 -vf format=yuv420p dosbox-logo.mp4
$ ffprobe -v error -show_entries stream=codec_name,profile,pix_fmt dosbox-logo.mp4
[STREAM]
codec_name=h264
profile=High
pix_fmt=yuv420p
[/STREAM]
For maximum compatibility with very old or obsolete devices, we could add the
-profile:v baselineoption that setst the video profile toConstrained Baseline. This option is not recommended unless we really need to support old or obsolete devices. We also need to keep in mind that the baseline profile does not support lossless encoding with the-crf 0option. The least lossy encoding option we can specify with this profile is-crf 1which while not technically lossless is much better than visually lossless.$ ffmpeg -v quiet -i logo_000.avi -an -c:v libx264 -vf format=yuv420p -profile:v baseline dosbox-logo.mp4 $ ffprobe -v error -show_entries stream=codec_name,profile,pix_fmt dosbox-logo.mp4 [STREAM] codec_name=h264 profile=Constrained Baseline pix_fmt=yuv420p [/STREAM]
-
scale=1920:1440:flags=neighborWith this video filter option, we resize the video to maintain an aspect ratio of 4:3, that is, the aspect ratio of the old CRT computer monitors, so that the output looks similar to how it used to look on those monitors.
The
neighborflag ensures that the nearest-neighbor interpolation (point sampling) is used to decide the colours of the scaled image. Without this option, the default bicubic interpolation algorithm is used. It has the effect of smoothing the edges by introducing new colours such as new shades of grey for this example video. While such smoothing of edges is good for scaling pictures of the real world, in this case, it spoils the crisp and jagged edges that is typical of output visible in DOSBox or the old CRT monitors. With theneighboroption, we retain the crisp and jagged edges visible in the original video capture. -
fps=30This video filter option sets the frame rate to 30 frames per second (FPS). Without this option, the output video has a frame rate of 70.09 FPS and file size of 558 KB. With this option the output frame rate is 30 FPS and the file size is 282 KB.
The default value of
machineconfiguration variable of DOSBox v0.74-3 issvga_s3, so by default it emulates a machine with SVGA card. While emulating a machine with SVGA card, DOSBox creates video capture files with frame rate of 70.09 FPS. When it emulates a machine with CGA card, such as when the itsmachineconfiguration variable is set tocgaor when DOSBox is run with the-machine cgaoption, it creates video captures files with frame rate of 59.92 FPS.For the Logo video capture, there is no high-speed motion going on in the video, so we don't need a high frame rate. A lower frame rate of 30 FPS looks just as good.
DOSBox Audio/Video Capture
The video capture of Digger game is processed similarly, however, there are a few additional things we need to take care of. We want to include the game audio in the output file. We also want a higher frame rate because games may sometimes have high-speed motion.
Like before, we use Ctrl + Alt + F5 to start capturing the video. The same key combination stops capturing video. The following output appears in the console output to show where the video file is saved:
Capturing Video to /Users/susam/Library/Preferences/capture/digger_000.avi
Stopped capturing video.
Here is the command to convert the video capture of Digger to a distributable format:
ffmpeg -i digger_000.avi -c:a aac -b:a 256k -c:v libx264 -preset veryslow \
       -crf 17 -vf format=yuv420p,scale=1920:1440:flags=neighbor,fps=50 \
       dosbox-digger.mp4
Here is the output:
Video capture of Digger [MP4]
Most of the FFmpeg options used in the command above have been discussed in the previous section. Let us discuss the new options used here that have not been discussed earlier:
-
-c:a aacThis option selects the native FFmpeg AAC encoder to encode the audio stream to Advanced Audio Coding (AAC) format. It is a very popular format for audio streams in MP4 files.
-
-b:a 256kThis sets the audio bitrate high enough to ensure that we get good quality audio in the output. We don't need to worry about the our specified bitrate being too high. If the audio can be encoded with a lower bitrate without compromising on quality, the output audio stream is encoded at a lower bitrate. For example, for this specific video, the actual audio bitrate in the output file turns out to be 245k because that is enough to encode the audio stream in the input file.
$ ffprobe -v error -select_streams a -show_entries stream=bit_rate dosbox-digger.mp4
[STREAM]
bit_rate=245184
[/STREAM]
-
fps=50If we set the frame rate to a lower value like 30 FPS like we did in the previous section, we still get pretty good output, however, certain parts of the output video look slightly choppy. For example, at 7 seconds into the video when the player is the pushing up against the gold bag, the video becomes slightly choppy if we generate the output with a frame rate of 30 FPS. A higher frame rate such as 50 FPS prevents this problem.
If we omit this option entirely, we get an output video that has the same frame rate as that of the input video, that is, 59.92 FPS, with an output file size of 4.6 MB. With this option, we get an output video that has a frame rate of 50 FPS and a file size of 4.2 MB.
If we look at the output video above closely enough, we see that the
colours don't look as crisp as they do in the Digger game screenshot. The
neighbor flag was very effective at maintaining the crisp
and jagged edges in the Logo video capture but
it does not produce perfect results for the Digger video capture in this section. Despite
the imperfection, it is still necessary to specify the
neighbor option because without this option, the output
video looks even worse. We can use a different pixel format like
yuv444p instead of yuv420p to work around this
issue. Using the yuv444p format indeed results in perfect
nearest-neighbour interpolation which helps in retaining the crisp and
jagged edges in the video accurately but as explained in the previous
section, many media players currently cannot play this pixel format, so
we stick to using the yuv420p format in this article.
DOSBox GIF Animation
Now just for fun, let us see if we can convert the video captures into GIF animations. This can be done quite easily with FFmpeg. Here are the commands to convert the Logo video capture to GIF animation:
ffmpeg -i logo_000.avi -vf palettegen palette.png
ffmpeg -i logo_000.avi -i palette.png \
       -lavfi 'scale=1920:1440:flags=neighbor,paletteuse,fps=30' \
       dosbox-logo.gif
The first command generates a colour palette from the video capture. The
second command uses this colour palette to generate a GIF animation.
Like before, we use the neighbor flag to retain the crisp
and jagged edges. Here is the output:
Here are the commands to convert the Digger video capture to GIF animation:
ffmpeg -i digger_000.avi -vf palettegen palette.png
ffmpeg -i digger_000.avi -i palette.png \
       -lavfi 'scale=1920:1440:flags=neighbor,paletteuse,fps=50' \
       dosbox-digger.gif
References
Here is a bunch of references that contains more details about the commands used in this article:
Home Feed Dark About GitHub Twitter
© 2006–2020 Susam Pal
Recommend
About Joyk
Aggregate valuable and interesting links.
Joyk means Joy of geeK