

Git速查手册(第三版)
source link: https://answerywj.com/2020/09/29/git-help-v3/
Go to the source link to view the article. You can view the picture content, updated content and better typesetting reading experience. If the link is broken, please click the button below to view the snapshot at that time.

本文是对Git速查手册(第二版)的更新,补充了一些近期使用或者收集的一些命令。
设置Git
Git下载地址:https://git-scm.com/downloads,推荐使用v1.8及以上版本。
查看Git版本:
1
$ git --version
Git配置分为三个级别:
--system:系统级,位于/etc/gitconfig;--global:用户级,位于~/.gitconfig;--local:仓库级,位于[repo]/.git/config,为默认级别且优先级最高;
删除global用户信息,防止不同Git服务之间冲突:
1
2
$ git config --global --unset user.name
$ git config --global --unset user.email
配置用户名:
1
2
$ git config --local user.name "username"
$ git config --local user.email "email"
保存用户凭证,若同时使用不同的Git服务,不推荐使用:
1
$ git config --global credential.helper store
执行后,下次操作输入的用户名和密码会被保存,后续不必手动输入用户名和密码。
配置超时时间:
1
$ git config --global credential.helper 'cache --timeout=3600'
根据目录配置用户信息,需要使用v2.13.0及以上版本:
首先修改用户目录下的
.gitconfig,通过includeIf配置不同目录的配置文件:1
2
3
4
5
6
7
8- [user]
- name = weijie.yuan
- email = [email protected]
+ [includeIf "gitdir:~/github/"]
+ path = .gitconfig-github
+ [includeIf "gitdir:~/gitlab/"]
+ path = .gitconfig-gitlab根据配置的
path,分别创建.gitconfig-github文件和.gitconfig-gitlab文件:1
2
3
4
5
6
7
8
9$ vi .gitconfig-github
[user]
name = weijie.yuan
email = [email protected]
$ vi .gitconfig-gitlab
[user]
name = weijie.yuan
email = [email protected]
includeIf 配置有如下规则:
- 家目录下的
.gitconfig,includeIf后面的path最后需要/结尾; - 家目录下的
.gitconfig,原有的user部分需要删除; - 家目录下的
.gitconfig,includeIf中配置的各个目录,不能是包含关系;
一般Git服务默认都支持SSH和HTTPS,SSH支持的原生Git协议速度最快,HTTPS除了速度慢以外,还有个最大的麻烦是每次推送都必须输入口令。
检查本机SSH公钥,若存在,则将id_rsa.pub添加到Git服务的SSH keys:
1
$ ls ~/.ssh
若不存在,则生成:
单个
Git服务1
$ ssh-keygen -t rsa -C "[email protected]"
多个
Git服务1
2
3
4
5
6
7
8
9
10
11
12
13
14
15
16$ ssh-keygen -t rsa -C "[email protected]" -f "git1_id_rsa"
$ ssh-keygen -t rsa -C "[email protected]" -f "git2_id_rsa
# 创建配置文件
$ vi ~/.ssh/config
# git1
Host git1.com
HostName git1.com
PreferredAuthentications publickey
IdentityFile ~/.ssh/git1_id_rsa
# git2
Host git2.com
HostName git2.com
PreferredAuthentications publickey
IdentityFile ~/.ssh/git2_id_rsa
配置完成后,再次检查ssh连接情况;若不生效,则重启后再尝试:
1
2
$ ssh -T [email protected]
Hi! You’ve successfully authenticated, but GitHub does not provide shell access.
若出现上述信息,则表示设置成功。
1
$ git clone [email protected]:test.git
HTTPS
关闭ssl校验:
1
$ git config --global http.sslverify false
1
$ git clone https://git.server/test.git
配置diff和merge工具,可以通过git difftool --tool-help查看支持的工具集合,推荐使用meld。
LinuxorMacOS:1
2$ git config --global diff.tool meld
$ git config --global merge.tool meldWindows:
1
2
3
4
5
> git config --global diff.tool meld
> git config --global merge.tool meld
> git config --global difftool.bc3.path 'C:\Program Files (x86)\Meld\Meld.exe'
> git config --global mergetool.meld.path 'C:\Program Files (x86)\Meld\Meld.exe'
> git config --global difftool.meld.path 'C:\Program Files (x86)\Meld\Meld.exe'
配置显示颜色:
1
$ git config --global color.ui.true
配置Git操作别名,示例:
1
$ git config --global alias checkout co
上面的命令将
checkout设置为别名co。
查看所有配置
1
2
3
$ git config --local --list
$ git config --global --list
$ git config --system --list
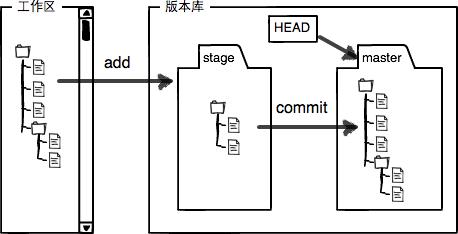
工作区就是你的本地仓库文件夹,不过其中的.git目录不属于工作区,而是版本库,里面存了很多东西,其中最重要的就是称为stage(或者叫index)的暂存区,还有Git为我们自动创建的第一个分支master,以及指向master的一个指针叫HEAD。
现在来解释一下前面的添加和提交操作:
git add:把文件修改添加到暂存区;git commit:把暂存区的所有内容提交到当前分支,即版本区;
获取远程仓库:
1
$ git clone [email protected]:USERNAME/repo.git
将本地的仓库添加到远程:
1
2
3
$ cd repo
$ git init
$ git remote add origin [email protected]:USERNAME/repo.git
origin就是一个名字,是git为你默认创建的指向这个远程代码库的标签。
添加修改到暂存区:
1
2
3
$ git add <filename>
$ git add . # 添加当前目录所有修改过的文件
$ git add * # 递归地添加执行命令时所在的目录中的所有文件
提交修改到版本区:
1
2
$ git commit -m "commit message"
$ git commit -am "commit message" # am:将添加和提交合并为一步,但只对本来就存在的文件有效
commit message的填写可以参考写好 Git Commit 信息的 7 个建议。
推送修改到远程服务器:
1
$ git push -u origin <feature-branch-name>
-u选项可以将本地分支与远程分支关联,下次git pull操作时可以不带参数.具体参见这里。
查看远程仓库:
1
2
3
$ git remote -v
origin [email protected]:USERNAME/repo.git (push)
origin [email protected]:USERNAME/repo.git (fetch)
添加上游仓库:
1
$ git remote add upstream [email protected]:USERNAME/repo.git
fork后同步上游仓库的更新:
1
2
3
4
5
6
7
8
9
10
$ git remote -v
origin [email protected]:USERNAME/repo.git (push)
origin [email protected]:USERNAME/repo.git (fetch)
upstream [email protected]:USERNAME/repo.git (push)
upstream [email protected]:USERNAME/repo.git (fetch)
$ git fetch upstream
$ git difftool <branch-name> upstream/master
$ git merge upstream/master
$ git mergetool
代码引用在Git上有submodule和subtree两种方式,推荐使用subtree方式:
1
2
3
4
5
6
7
8
9
# 第一次初始化
$ git remote add -f <remote-subtree-repository-name> <remote-subtree-repository-url>
$ git subtree add --prefix=<local-subtree-directory> <remote-subtree-repository> <remote-subtree-branch-name> --squash
# 同步subtree的更新
$ git subtree pull --prefix=<local-subtree-directory> <remote-subtree-repository> <remote-subtree-branch-name> --squash
# 推送到远程subtree库
$ git subtree push --prefix=<local-subtree-directory> <remote-subtree-repository> <remote-subtree-branch-name>
查看所有分支,有*标记的是当前分支:
1
$ git branch -a
创建本地分支:
1
$ git branch <newbranch>
创建并切换本地分支:
1
$ git checkout -b <newbranch>
从标签创建分支:
1
2
$ git branch <branch> <tagname>
$ git checkout <branch> # 切换到新建分支
推送新建本地分支到远程:
1
2
3
$ git push -u origin <remote-branch-name>
or
$ git push --set-upstream origin <remote-branch-name>
删除本地分支:
1
$ git branch -d <branch>
若当前分支因为有修改未提交或其它情况不能删除,请使用
-D选项强制删除。
删除远程分支(三种方法):
1
2
3
$ git push origin --delete <remote-branch-name>
$ git push origin -d <remote-branch-name>
$ git push origin :<remote-branch-name>
清除无用的分支:
1
$ git remote prune origin
说明:remote上的一个分支被其他人删除后,需要更新本地的分支列表。
获取远程分支到本地已有分支:
1
$ git branch --set-upstream <local-branch> origin/branch
获取远程分支到本地并新建本地分支:
1
$ git checkout -b <local-branch> <remote-branch>
同步当前分支的更新,使用git pull并不保险:
1
2
3
4
5
6
7
8
# 下载最新的代码到远程跟踪分支, 即origin/<branch-name>
$ git fetch origin <branch-name>
# 查看更新内容
$ git difftool <branch-name> origin/<branch-name>
# 尝试合并远程跟踪分支的代码到本地分支
$ git merge origin/<branch-name>
# 借助mergetool解决冲突
$ git mergetool
同步其它分支的更新,本例拉取master分支更新:
1
2
3
4
$ git fetch origin master
$ git difftool <branch-name> origin/master
$ git merge origin/master
$ git mergetool
查看某个<commit id>属于哪个分支:
1
$ git branch -a --contains <commit id>
查看标签:
1
$ git tag
创建标签:
1
2
$ git tag -a <tagname> -m "tag message" # 创建标签在当前最新提交的commit上
$ git tag -a <tagname> -m "tag message" <commit id> # 创建标签在指定的commit上
推送标签到远程服务器:
1
2
$ git push origin <tagname> # 推送一个本地标签
$ git push origin --tags # 推送全部未推送过的本地标签
删除标签:
1
2
$ git tag -d <tagname> # 删除一个本地标签
$ git push origin :refs/tags/<tagname> # 删除一个远程标签
撤销与回退
查看当前仓库状态:
1
$ git status
查看文件更改:
1
2
$ git difftool <filename>
$ git mergetool <filename>
查看提交历史:
1
2
$ git log
$ git log --pretty=oneline #只保留commit id 和 commit message
撤销工作区Tracked files的修改:
1
$ git checkout -- <filename>
撤销工作区Untracked files的修改:
- n:查看将会删除的文件,防止误删;
- f:
Untracked的文件; - d:
Untracked的目录; - x:包含
gitignore的Untracked文件和目录一并删掉,慎用!;
1
git clean -nfd
回退版本区(git commit)和暂存区(git add),不删除工作空间代码:
1
2
$ git reset --mixed HEAD^ # --mixed为默认参数
$ git reset HEAD^
回退版本区(git commit),暂存区(git add)不回退,不删除工作空间代码:
1
$ git reset --soft HEAD^
回退版本区(git commit)和暂存区(git add),并删除工作空间代码(不包括Untracked files),执行后直接恢复到指定<commit-id>状态:
1
$ git reset --hard <commit-id>
HEAD表示当前版本,HEAD^表示上个版本,HEAD^^表示上上个版本,上100个版本可以表示为HEAD~100以此类推。
回退版本后,若需要返回原来的版本,会发现找不到未来的commit id,则需要查看操作命令历史进行查找:
1
$ git reflog
从版本库删除文件:
1
$ git rm <filename>
若你的代码已经push到线上,则推荐使用下面这个命令回滚:
1
$ git revert <commit-id>
revert是用一次新的commit来回滚之前的commit,更安全;reset则是直接删除指定的commit,若直接push会导致冲突。
当你需要切换分支时,若当前工作区还有些修改没有完成、又不适合提交的,操作切换分支是会提示出错的,这时就需要将这些修改暂存起来:
1
$ git stash save "message"
1
$ git stash list
1
2
3
$ git stash pop [--index] [stash@{num}]
or
$ git stash apply [--index] [stash@{num}] # 不删除已恢复的进度.
--index表示不仅恢复工作区,还会恢复暂存区;num是你要恢复的操作的序列号,默认恢复最新进度。
删除进度:
1
2
$ git stash drop [stash@{num}] # 删除指定进度
$ git stash clear # 删除所有
清理无用的分支和标签
1
2
3
4
$ git branch -d <branch-name>
$ git tag -d <tag-name>
$ git remote prune origin
$ git pull
清理大文件
查看
git相关文件占用空间:1
2$ git count-objects -v
$ du -sh .git寻找大文件
ID:1
$ git verify-pack -v .git/objects/pack/*.idx | sort -k 3 -n | tail -10
输出的第一列是文件
ID,第二列表示文件(blob)或目录(tree),第三列是文件大小,此处筛选了最大的10条。
获取文件名与
ID映射:1
$ git rev-list --objects --all | grep "$(git verify-pack -v .git/objects/pack/*.idx | sort -k 3 -n | tail -10 | awk '{print$1}')"从所有提交中删除文件:
1
2
$ git filter-branch --tree-filter 'rm -rf xxx' HEAD --all
$ git pull清理
.git目录:1
$ git gc --prune=now
在执行
push操作时,git会自动执行一次gc操作,不过只有loose object达到一定数量后才会真正调用,建议手动执行。
处理大型二进制文件
由于Git在存储二进制文件时效率不高,所以需要借助第三方组件。
忽略特殊文件
当你的仓库中有一些文件,类似密码或者数据库文件不需要提交但又必须放在仓库目录下,每次git status都会提示Untracked,看着让人很不爽,提供两种方法解决这个问题
在代码仓库目录创建一个.gitignore文件,编写规则如下:
1
2
3
tmp/ # 忽略tmp文件夹下所有内容
*.ini # 忽略所有ini文件
!data/ #忽略除了data文件夹的所有内容
在用户目录创建一个.gitignore_global文件,编写规则同.gitignore,并修改~/.gitconfig:
1
2
[core]
excludesfile = ~/.gitignore_global
如果添加的忽略对象已经Tracked,纳入了版本管理中,则需要在代码仓库中先把本地缓存删除,改变成Untracked状态:
1
$ git rm -r --cached .
重写历史(慎用!)
1
2
$ git rebase -i [git-hash| head~n]
$ git push -f # 不强制 push 会多一条 merge 提交信息
其中
git-hash是你要开始进行rebase的commit的hash,而head~n则是从HEAD向前推n个commit
全局更换电子邮件
1
2
3
4
5
6
7
8
9
git filter-branch --commit-filter '
        if [ "$GIT_AUTHOR_EMAIL" = "xxx@localhost" ];
        then
                GIT_AUTHOR_NAME="xxx";
                GIT_AUTHOR_EMAIL="[email protected]";
                git commit-tree "$@";
        else
                git commit-tree "$@";
        fi' HEAD --all
查看帮助:
1
$ git --help
Reference
Recommend
About Joyk
Aggregate valuable and interesting links.
Joyk means Joy of geeK