

Substrate实战——真正的从“零“搭建一条区块链
source link: https://learnblockchain.cn/article/1875
Go to the source link to view the article. You can view the picture content, updated content and better typesetting reading experience. If the link is broken, please click the button below to view the snapshot at that time.

Substrate实战——真正的从“零“搭建一条区块链,适用于虚拟机和远程服务器部署的教程。
说明本文适用于虚拟机部署 & 远程服务器部署
波卡介绍
 官方链接: https://polkadot.network/ 波卡(Polkadot)的核心愿景是跨链,它是由多条区块链异构组成的集合,通过波卡网络,不同区块链之间可以进行通信和数据的传递。为了实现这一愿景,波卡网络设计了中继链、平行链和转接桥的结构。
中继链是波卡网络的核心枢纽,确保平行链的安全并且实现平行链之间的通信,维护整个网络的安全。
平行链负责处理具体的事物,不同的平行链专注于不同的业务,服务于不同的需求,平行链的形态非常有利于波卡网络打造自己的生态。
转接桥则负责连接波卡网络和外部区块链网络,比如比特币和以太坊网络。
理论上,未来任意两条平行链之间都可以直接或借路中继链完成跨链交互。
Substrate 介绍
 官方链接: https://substrate.dev/en/ Substrate 是一个用于构建区块链的开源,模块化和可扩展框架。
Substrate 的设计从一开始就是灵活的,而且允许开发者设计和构建满足其需求的区块链网络。它提供了构建自定义区块链节点所需的所有核心组件。
从“零”开始
实验环境
centos7虚拟机
系统环境配置
安装依赖
yum install -y cmake pkg-config libssl-dev git build-essential clang libclang-dev curl
安装Rust
参考链接 https://forge.rust-lang.org/infra/other-installation-methods.html
安装和配置rustup
curl --proto '=https' --tlsv1.2 -sSf https://sh.rustup.rs | sh
source ~/.cargo/env
rustup换源在~/.bashrc中写入
export RUSTUP_DIST_SERVER=https://mirrors.ustc.edu.cn/rust-static
export RUSTUP_UPDATE_ROOT=https://mirrors.ustc.edu.cn/rust-static/rustup
cargo换源在$HOME/.cargo/下创建 config 文件 并写入以下内容
[source.crates-io]
registry = "https://github.com/rust-lang/crates.io-index"
replace-with = 'ustc'
[source.ustc]
registry = "https://mirrors.ustc.edu.cn/crates.io-index"
[http]
check-revoke = false
tips:这里不换源, rustup update 的时候可能会失败。
将Rust工具链配置为默认为最新的稳定版本:
rustup default stable
安装前端依赖
substrate自带的前端模板是基于ReactJS前端模板来构建的,所以这里需要安装nodejs和yarn来实现部署。
安装 node.js
node.js 官网: https://nodejs.org/en/download/  在官方上选择对应的包进行下载。
cd /usr/local
wget https://nodejs.org/dist/v14.15.1/node-v14.15.1-linux-x64.tar.xz
tar -xvf node-v14.15.1-linux-x64.tar.xz

# 建立软链接
ln -s  /usr/local/node-v14.15.1-linux-x64/bin/node /usr/local/bin/node
ln -s  /usr/local/node-v14.15.1-linux-x64/bin/npm /usr/local/bin/npm
ln -s  /usr/local/node-v14.15.1-linux-x64/bin/npx /usr/local/bin/npx
查看是否安装成功
node -v
npm -v

安装 yarn
下载yarn
mkdir -p /usr/local/yarn
wget https://github.com/yarnpkg/yarn/releases/download/v1.12.0/yarn-v1.12.0.tar.gz
tar -zxvf yarn-v1.12.0.tar.gz -C /usr/local/yarn
设置一下环境变量(也可以添加软链接,自己选择)
vi /etc/profile
# 在文件结尾加入以下内容
export PATH=$PATH:/usr/local/yarn/yarn-1.12.0/bin
source /etc/profile
查看是否安装成功 yarn -v  *yarn 换源
yarn config set registry https://registry.npm.taobao.org/

搭建区块链
编译 substrate
- 下载项目代码
git clone https://github.com/substrate-developer-hub/substrate-node-template
cd substrate-node-template
- 初始化WebAssembly构建环境
make init
# 安装Rust
# 若失败了,可以直接参考上文中的Rust安装。
- 编译节点模板
make build
# 如果是国内用户,这里需要先进行cargo的换源。
启动节点
# Run a temporary node in development mode
./target/release/node-template --dev --tmp
 如果之后的
如果之后的 finalized: 值增加,表示你的区块链将产生新的区块,并达成共识! 
nginx做端口转发(很重要)观察第一张启动成功的截图,可以发现服务启动在 127.0.0.1 上,这里我们只需要对 127.0.0.1:9944 做成端口转发就行,端口我设置为 9900 ,以实现 0.0.0.0:9900 的效果。
vi /etc/nginx/substrate.conf
### 写入以下内容
server {
    listen       9900; # 将端口转发为9900

    location / {
    proxy_pass http://localhost:9944; # 指向本地服务端口
    proxy_http_version 1.1;
    proxy_read_timeout 120s;
    proxy_redirect off;
    proxy_set_header Upgrade $http_upgrade;
    proxy_set_header Connection "upgrade";
    proxy_set_header Host $host:$server_port;
    proxy_set_header X-Real-IP $remote_addr;
    proxy_set_header REMOTE-HOST $remote_addr;
    proxy_set_header X-Forwarded-For $proxy_add_x_forwarded_for;
    }
}
配置 nginx.conf
vi /etc/nginx/nginx.conf
user  nginx;
worker_processes  1;

error_log  /var/log/nginx/error.log warn;
pid        /var/run/nginx.pid;


events {
    worker_connections  1024;
}


http {
    include       /etc/nginx/mime.types;
    default_type  application/octet-stream;

    log_format  main  '$remote_addr - $remote_user [$time_local] "$request" '
                      '$status $body_bytes_sent "$http_referer" '
                      '"$http_user_agent" "$http_x_forwarded_for"';

    access_log  /var/log/nginx/access.log  main;

    sendfile        on;
    #tcp_nopush     on;

    keepalive_timeout  65;

    #gzip  on;
    include /etc/nginx/conf.d/substrate.conf; # 引入substrate.conf
}
重新导入nginx配置
nginx -s reload
tips:这里做成端口转发是十分有必要的,因为前端项目在宿主机访问的时候,会request ws://127.0.0.1:9944 ,这里的127.0.0.1:9944 就是我们nginx转发的端口,而且还是虚拟机的内网ip,所以不替换这里的ip和端口会导致前端项目运行失败。
部署前端代码
下载源码以及安装依赖
# Clone the code from github
git clone -b v2.0.0 --depth 1 https://github.com/substrate-developer-hub/substrate-front-end-template

# Install the dependencies
cd substrate-front-end-template
yarn install
启动服务
yarn start
在宿主机上的浏览器进行访问 -- 却失败了?  其实这里失败的原因,我在启动节点的末尾也提到了,所以对于虚拟机和远程服务器安装substrate,nginx那块配置还是十分重要的。当然,如果是通过mac搭建或者通过虚拟机内部的浏览器进行访问,这里其实是成功了的。那为什么偏偏在宿主机上访问就有毛病呢?
宿主机访问失败的原因我们通过浏览器自带的抓包的工具跟踪一下。(F12)  在宿主机上访问,却在调用
 ws://127.0.0.1:9944 。所以这就是为什么如果用虚拟机内部的浏览器访问就能成功却用宿主机的浏览器无法访问的原因。很简单,我们只需要把这里替换成虚拟机的ip(如果是远程服务器,替换成公网ip即可)以及nginx转发的端口就行(上文我们提到过,nginx把 127.0.0.1:9944 转发到了 0.0.0.0:9900 ) 开始解决问题 cd substrate-front-end-template
- 查看当前的前端代码配置信息
cat src/config/development.json
- 查看虚拟机ip(如果是远程服务器,使用公网ip即可)
ifconfig | grep inet
- 根据ip信息,修改development.json中的"PROVIDER_SOCKET"关键字的值。
vi src/config/development.json
{
  "CUSTOM_TYPES": {
    "Address": "AccountId",
    "LookupSource": "AccountId"
  },
  "PROVIDER_SOCKET": "ws://192.168.80.144:9900"
}
再次在宿主机上访问成功! 
参考链接
https://substrate.dev/docs/en/tutorials/create-your-first-substrate-chain/setup https://substrate.dev/docs/en/knowledgebase/getting-started/ https://learnblockchain.cn/article/1069 https://blog.csdn.net/shangsongwww/article/details/90269564 https://blog.csdn.net/weixin_43941564/article/details/102733870 https://mp.weixin.qq.com/s?__biz=Mzg2NzE5NTg3Nw==&mid=2247485864&idx=1&sn=7555a9386e7afc2991a6c1bfee242628&chksm=cebe0722f9c98e345d5271406eabca414c5627357197be25d2aa6576f1b7c8ad993c223414c1&mpshare=1&scene=1&srcid=1210VGiNyQNXsmae0uUdxIsR&sharer_sharetime=1607598594362&sharer_shareid=fde08c1723940f3fd35f1d64a161b285&key=db37f969c9442cd2a9b5d586c913dc5cd45fdb7d53b5b19d7ef7b5ad567111d3b94c25faa6b8ba9a05f71e65803f68adfdd064792b50099e87395cb62490f59029028b947a578504b0beb95fcc1697f31e3f484f94ea97b0a056bbebc9dea1bf1af152a0b00e5699446fbbfaa49ec5ff23c9aedf18e5f5087eeb91868dc484ff&ascene=1&uin=MTA3NjMzNjE2Nw%3D%3D&devicetype=Windows+10+x64&version=6300002f&lang=zh_CN&exportkey=AeyIt%2BieAfIf8UkY2VC%2BNzE%3D&pass_ticket=cYDECbJrOJZhvk%2BBmnUDxzaFUrW3TZ1xJqlUU%2BruXoIjc4KCEBRdIw6%2F8QMaLJvo&wx_header=0
总结
systemctl stop firewalld.service
关于作者

作者的联系方式:
微信:thf056 qq:1290017556 邮箱:[email protected]
你也可以通过 github | csdn | @新浪微博 关注我的动态
我们的公众号平台 — (湖师区块人)
欢迎各位大大关注我们 湖州师范区块链协会 的公众号(湖师区块人),我们会在这里不定期推送区块链相关的“精神食粮”。 
欢迎评论关注+点赞啊!
说明本文适用于虚拟机部署 & 远程服务器部署
波卡介绍
官方链接: https://polkadot.network/ 波卡(Polkadot)的核心愿景是跨链,它是由多条区块链异构组成的集合,通过波卡网络,不同区块链之间可以进行通信和数据的传递。为了实现这一愿景,波卡网络设计了中继链、平行链和转接桥的结构。
中继链是波卡网络的核心枢纽,确保平行链的安全并且实现平行链之间的通信,维护整个网络的安全。
平行链负责处理具体的事物,不同的平行链专注于不同的业务,服务于不同的需求,平行链的形态非常有利于波卡网络打造自己的生态。
转接桥则负责连接波卡网络和外部区块链网络,比如比特币和以太坊网络。
理论上,未来任意两条平行链之间都可以直接或借路中继链完成跨链交互。
Substrate 介绍
官方链接: https://substrate.dev/en/ Substrate 是一个用于构建区块链的开源,模块化和可扩展框架。
Substrate 的设计从一开始就是灵活的,而且允许开发者设计和构建满足其需求的区块链网络。它提供了构建自定义区块链节点所需的所有核心组件。
从“零”开始
实验环境
centos7虚拟机
系统环境配置
安装依赖
yum install -y cmake pkg-config libssl-dev git build-essential clang libclang-dev curl
安装Rust
参考链接 https://forge.rust-lang.org/infra/other-installation-methods.html
安装和配置rustup
curl --proto '=https' --tlsv1.2 -sSf https://sh.rustup.rs | sh
source ~/.cargo/env
rustup换源在~/.bashrc中写入
export RUSTUP_DIST_SERVER=https://mirrors.ustc.edu.cn/rust-static
export RUSTUP_UPDATE_ROOT=https://mirrors.ustc.edu.cn/rust-static/rustup
cargo换源在$HOME/.cargo/下创建 config 文件 并写入以下内容
[source.crates-io]
registry = "https://github.com/rust-lang/crates.io-index"
replace-with = 'ustc'
[source.ustc]
registry = "https://mirrors.ustc.edu.cn/crates.io-index"
[http]
check-revoke = false
tips:这里不换源, rustup update 的时候可能会失败。
将Rust工具链配置为默认为最新的稳定版本:
rustup default stable
安装前端依赖
substrate自带的前端模板是基于ReactJS前端模板来构建的,所以这里需要安装nodejs和yarn来实现部署。
安装 node.js
node.js 官网: https://nodejs.org/en/download/ 在官方上选择对应的包进行下载。
cd /usr/local
wget https://nodejs.org/dist/v14.15.1/node-v14.15.1-linux-x64.tar.xz
tar -xvf node-v14.15.1-linux-x64.tar.xz

# 建立软链接
ln -s  /usr/local/node-v14.15.1-linux-x64/bin/node /usr/local/bin/node
ln -s  /usr/local/node-v14.15.1-linux-x64/bin/npm /usr/local/bin/npm
ln -s  /usr/local/node-v14.15.1-linux-x64/bin/npx /usr/local/bin/npx
查看是否安装成功
node -v
npm -v
安装 yarn
下载yarn
mkdir -p /usr/local/yarn
wget https://github.com/yarnpkg/yarn/releases/download/v1.12.0/yarn-v1.12.0.tar.gz
tar -zxvf yarn-v1.12.0.tar.gz -C /usr/local/yarn
设置一下环境变量(也可以添加软链接,自己选择)
vi /etc/profile
# 在文件结尾加入以下内容
export PATH=$PATH:/usr/local/yarn/yarn-1.12.0/bin
source /etc/profile
查看是否安装成功 yarn -v *yarn 换源
yarn config set registry https://registry.npm.taobao.org/
搭建区块链
编译 substrate
- 下载项目代码
git clone https://github.com/substrate-developer-hub/substrate-node-template
cd substrate-node-template
- 初始化WebAssembly构建环境
make init
# 安装Rust
# 若失败了,可以直接参考上文中的Rust安装。
- 初始化WebAssembly构建环境
-
编译节点模板
make build
# 如果是国内用户,这里需要先进行cargo的换源。
启动节点
# Run a temporary node in development mode
./target/release/node-template --dev --tmp
如果之后的 finalized: 值增加,表示你的区块链将产生新的区块,并达成共识!
nginx做端口转发(很重要)观察第一张启动成功的截图,可以发现服务启动在 127.0.0.1 上,这里我们只需要对 127.0.0.1:9944 做成端口转发就行,端口我设置为 9900 ,以实现 0.0.0.0:9900 的效果。
vi /etc/nginx/substrate.conf
### 写入以下内容
server {
    listen       9900; # 将端口转发为9900

    location / {
    proxy_pass http://localhost:9944; # 指向本地服务端口
    proxy_http_version 1.1;
    proxy_read_timeout 120s;
    proxy_redirect off;
    proxy_set_header Upgrade $http_upgrade;
    proxy_set_header Connection "upgrade";
    proxy_set_header Host $host:$server_port;
    proxy_set_header X-Real-IP $remote_addr;
    proxy_set_header REMOTE-HOST $remote_addr;
    proxy_set_header X-Forwarded-For $proxy_add_x_forwarded_for;
    }
}
配置 nginx.conf
vi /etc/nginx/nginx.conf
user  nginx;
worker_processes  1;

error_log  /var/log/nginx/error.log warn;
pid        /var/run/nginx.pid;

events {
    worker_connections  1024;
}

http {
    include       /etc/nginx/mime.types;
    default_type  application/octet-stream;

    log_format  main  '$remote_addr - $remote_user [$time_local] "$request" '
                      '$status $body_bytes_sent "$http_referer" '
                      '"$http_user_agent" "$http_x_forwarded_for"';

    access_log  /var/log/nginx/access.log  main;

    sendfile        on;
    #tcp_nopush     on;

    keepalive_timeout  65;

    #gzip  on;
    include /etc/nginx/conf.d/substrate.conf; # 引入substrate.conf
}
重新导入nginx配置
nginx -s reload
tips:这里做成端口转发是十分有必要的,因为前端项目在宿主机访问的时候,会request ws://127.0.0.1:9944 ,这里的127.0.0.1:9944 就是我们nginx转发的端口,而且还是虚拟机的内网ip,所以不替换这里的ip和端口会导致前端项目运行失败。
部署前端代码
下载源码以及安装依赖
# Clone the code from github
git clone -b v2.0.0 --depth 1 https://github.com/substrate-developer-hub/substrate-front-end-template

# Install the dependencies
cd substrate-front-end-template
yarn install
启动服务
yarn start
在宿主机上的浏览器进行访问 -- 却失败了? 其实这里失败的原因,我在启动节点的末尾也提到了,所以对于虚拟机和远程服务器安装substrate,nginx那块配置还是十分重要的。当然,如果是通过mac搭建或者通过虚拟机内部的浏览器进行访问,这里其实是成功了的。那为什么偏偏在宿主机上访问就有毛病呢?
宿主机访问失败的原因我们通过浏览器自带的抓包的工具跟踪一下。(F12) 在宿主机上访问,却在调用 ws://127.0.0.1:9944 。所以这就是为什么如果用虚拟机内部的浏览器访问就能成功却用宿主机的浏览器无法访问的原因。很简单,我们只需要把这里替换成虚拟机的ip(如果是远程服务器,替换成公网ip即可)以及nginx转发的端口就行(上文我们提到过,nginx把 127.0.0.1:9944 转发到了 0.0.0.0:9900 ) 开始解决问题 cd substrate-front-end-template
- 查看当前的前端代码配置信息
cat src/config/development.json - 查看虚拟机ip(如果是远程服务器,使用公网ip即可)
ifconfig | grep inet - 根据ip信息,修改development.json中的"PROVIDER_SOCKET"关键字的值。
vi src/config/development.json{ "CUSTOM_TYPES": { "Address": "AccountId", "LookupSource": "AccountId" }, "PROVIDER_SOCKET": "ws://192.168.80.144:9900" }
**再次在宿主机上访问** 成功! 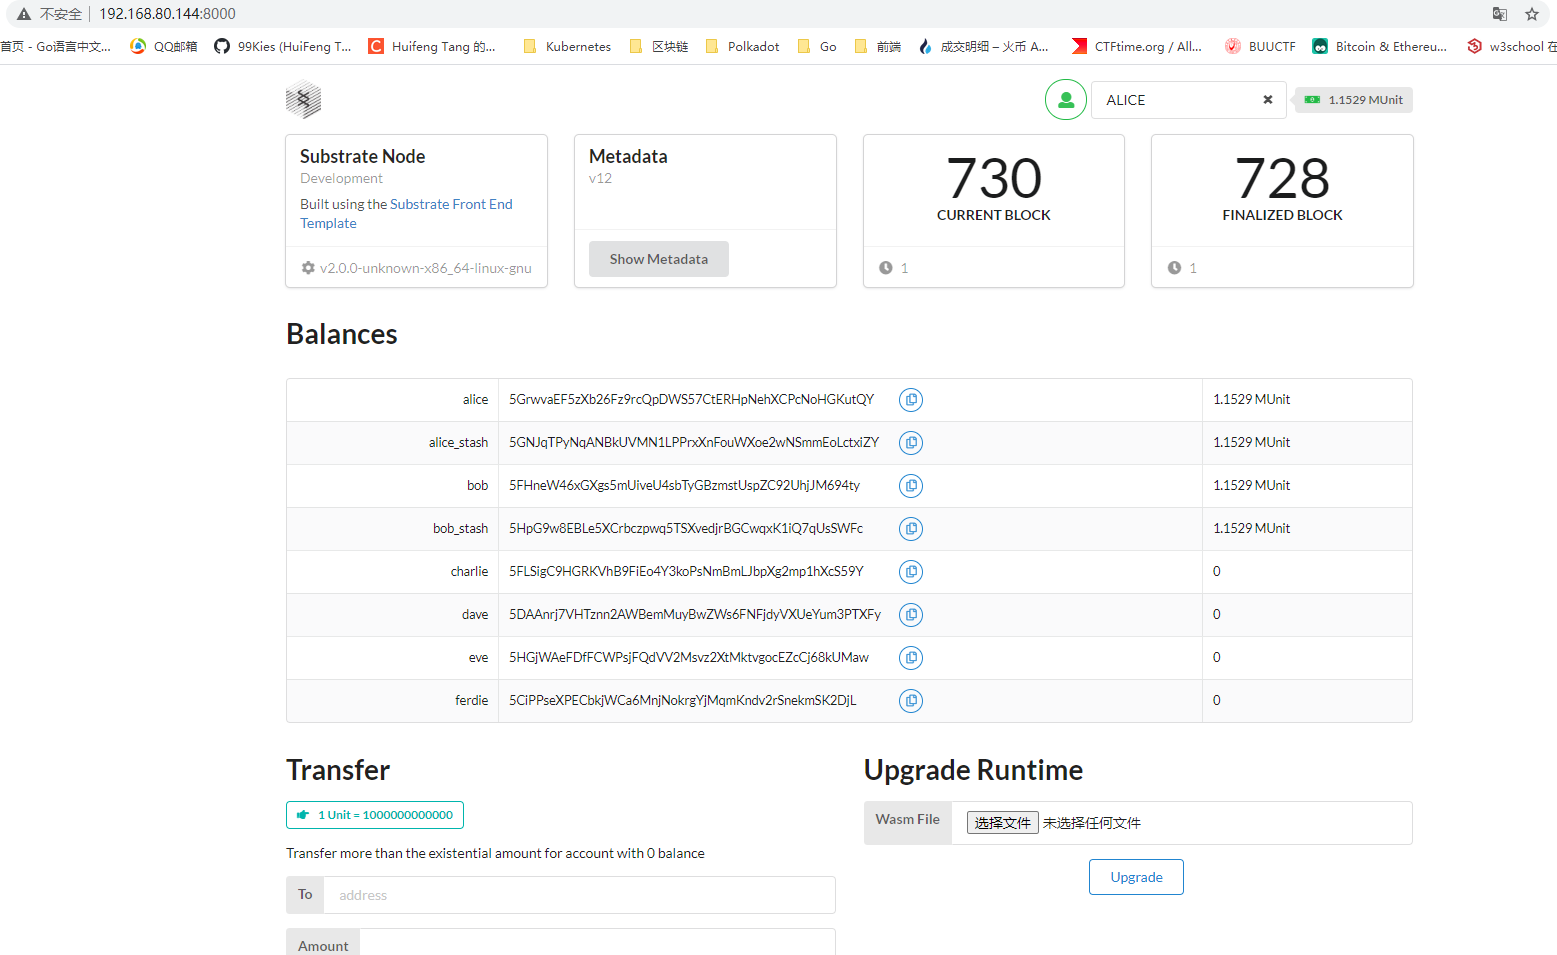 # 参考链接 <https://substrate.dev/docs/en/tutorials/create-your-first-substrate-chain/setup> <https://substrate.dev/docs/en/knowledgebase/getting-started/> <https://learnblockchain.cn/article/1069> <https://blog.csdn.net/shangsongwww/article/details/90269564> <https://blog.csdn.net/weixin_43941564/article/details/102733870> <https://mp.weixin.qq.com/s?__biz=Mzg2NzE5NTg3Nw==∣=2247485864&idx=1&sn=7555a9386e7afc2991a6c1bfee242628&chksm=cebe0722f9c98e345d5271406eabca414c5627357197be25d2aa6576f1b7c8ad993c223414c1&mpshare=1&scene=1&srcid=1210VGiNyQNXsmae0uUdxIsR&sharer_sharetime=1607598594362&sharer_shareid=fde08c1723940f3fd35f1d64a161b285&key=db37f969c9442cd2a9b5d586c913dc5cd45fdb7d53b5b19d7ef7b5ad567111d3b94c25faa6b8ba9a05f71e65803f68adfdd064792b50099e87395cb62490f59029028b947a578504b0beb95fcc1697f31e3f484f94ea97b0a056bbebc9dea1bf1af152a0b00e5699446fbbfaa49ec5ff23c9aedf18e5f5087eeb91868dc484ff&ascene=1&uin=MTA3NjMzNjE2Nw%3D%3D&devicetype=Windows+10+x64&version=6300002f⟨=zh_CN&exportkey=AeyIt%2BieAfIf8UkY2VC%2BNzE%3D&pass_ticket=cYDECbJrOJZhvk%2BBmnUDxzaFUrW3TZ1xJqlUU%2BruXoIjc4KCEBRdIw6%2F8QMaLJvo&wx_header=0> # 总结 1. 如果是使用WSL的用户,其实可以不用nginx转发,同事告诉我说”WSL和宿主机是共用网络“ 2. 不过大多数环境下还是虚拟机或者远程服务器进行搭建,所以整理这篇文章还是十分有必要的。 3. 为了从”零“开始,我选择了一台崭新的centos7虚拟机,如果遇到宿主机可以ping通虚拟机ip却无法访问虚拟机的web服务时,请检查防火墙是否关闭。(`systemctl stop firewalld.service`) 4. 更多总结。。。 # 关于作者 <div align=center><a href="https://blog.csdn.net/qq_19381989" target="_blank"><img src="https://img-blog.csdnimg.cn/20200427000145250.png" width="40%" /></a></div> **作者的联系方式:** 微信:thf056 qq:1290017556 邮箱:[email protected] 你也可以通过 <strong><a href="https://github.com/99kies" target="_blank">github</a></strong> | <strong><a href="https://blog.csdn.net/qq_19381989" target="_blank">csdn</a></strong> | <strong><a href="https://weibo.com/99kies" target="_blank">@新浪微博</a></strong> 关注我的动态 # 我们的公众号平台 — (湖师区块人) 欢迎各位大大关注我们**湖州师范区块链协会**的公众号(湖师区块人),我们会在这里不定期推送区块链相关的“精神食粮”。 
欢迎评论关注+点赞啊!
本文参与登链社区写作激励计划 ,好文好收益,欢迎正在阅读的你也加入。
- 发表于 2小时前
- 阅读 ( 17 )
- 学分 ( 0 )
- 分类:Polkadot
Recommend
About Joyk
Aggregate valuable and interesting links.
Joyk means Joy of geeK