

Introducing CryptoKit [FREE]
source link: https://www.raywenderlich.com/10846296-introducing-cryptokit
Go to the source link to view the article. You can view the picture content, updated content and better typesetting reading experience. If the link is broken, please click the button below to view the snapshot at that time.
Apple’s new CryptoKit API provides you the ability to authenticate and encrypt data sent and received by your app, if your app needs more than Apple’s default hardware and software protection.
In this article, you’ll authenticate and encrypt data with both symmetric key and public key cryptography. You’ll learn when and how to use:
- Cryptographic hashing
- Hash-based Message Authentication Code ( HMAC )
- Authenticated Encryption with Associated Data ( AEAD ) ciphers
- Public key cryptography with elliptic curves ( ECC )
- Digital signatures
- Key agreement
Keep reading to unlock all the secrets!
Spoiler Alert : This tutorial assumes you’re familiar with the Harry Potter series by J.K. Rowling or have no interest in reading it. It discusses secrets revealed in the last few books.
Getting Started
Get started by downloading the materials for this article — you can find the link at the top or bottom of this article. Open, build and run the SecretKeeper project in the starter folder.
SecretKeeper app
This app is a list of Voldemort’s horcruxes . As long as part of his soul is safe in one of these items, Voldemort cannot be killed. So he must keep the secret of their identities and locations from everyone, especially Albus Dumbledore and Harry Potter.
Protecting Users’ Data
Like Voldemort’s secrets, your users’ data needs protection from accidental or malicious corruption and from unauthorized use. iOS already has a lot of built-in or easy-to-use security in Foundation/NSData, Security/Keychain and CloudKit. You get TLS encryption and digital signing for free if your app accesses HTTPS servers. And now there’s CryptoKit, if your app needs to verify data or authenticate senders.
You need to protect data in each of these three states:
- Data in motion : in transit, usually over a network
- Data in use : in memory
- >Data at rest: stored on disk, not in use
Data in motion is the original reason for encryption, going back to before the Caesar cipher for sending written orders to Caesar’s generals. Nowadays, encryption is handled by Transport Layer Security (TLS) if your app communicates with a server using TLS 1.3. But you might still need to authenticate the data and sender with cryptographic hashing and keyed signatures. Most of this tutorial is about these topics.
Data in use must be protected by user authentication. To restrict when an operation can be executed, use Local Authentication to check when and how the user authenticated. For example, you could require the user to authenticate with biometrics — Face ID or Touch ID — to ensure the user is present.
Data at rest is protected on the device by the Data Protection API. Users get automatic software data protection as soon as they set a passcode for the device. Every new file gets a new 256-bit encryption key, specific to the file’s protection type. There are three file protection types:
- Protected Until First User Authentication : The default file protection type. The file is not accessible while the device is booting up, but is then accessible until the device reboots, even while the device is locked.
- Complete : The file is accessible only when the device is unlocked.
- Complete Unless Open : If the file is open when the device locks, it’s still accessible. If the file is not open when the device locks, it’s not accessible until the device unlocks.
You might want to allow access to a file when the device is locked to enable network transfers to continue.
Your app can also store encrypted data in a private CloudKit database, where it’s available on all the user’s devices.
Increasing Protection for Voldemort’s Secrets
SecretKeeper reads from a file to create the list of horcruxes. The app writes this file with no file protection option:
try data.write(to: secretsURL)
This means the secrets file has only the default file protection, so it’s accessible when the app is in the background and even when the device is locked.
Voldemort’s secrets need a higher level of file protection. In ContentView.swift
, in writeFile(items:)
, replace the data.write(to:)
statement with this line:
try data.write(to: secretsURL, options: .completeFileProtection)
With this level of protection, the file is accessible only when the device is unlocked.
Keychain and Secure Enclave
Your app should store encryption keys, authentication tokens and passwords in the local or iCloud Keychain
. Apple’s sample app Storing CryptoKit Keys in the Keychain
shows how to convert CryptoKit key types P256, P384 and P521 to SecKey
and other key types to generic passwords.
iOS devices released since late 2013 — iPhone 5S, iPad Air and later models — have the Secure Enclave chip. The Secure Enclave is a dedicated cryptography engine, separate from the processor, with the device’s Unique IDentifier (UID) 256-bit encryption key fused in at the factory. The Secure Enclave also stores biometric data for TouchID and FaceID.
Keys and data in the Secure Enclave never leave it. They’re never loaded into memory or written to disk, so they’re completely protected. Your app communicates with the Secure Enclave via a mailbox, where you deposit data to be encrypted or decrypted, then retrieve the results.
CryptoKit enables your app to create a key for public-key cryptography directly in the Secure Enclave. There’s sample code near the end of this tutorial.
Using CryptoKit
All this built-in data protection might be as much as your app needs. Or, you might need to use CryptoKit if your app works with data encrypted by third parties or authenticates file transfers or financial transactions.
Rolling Your Own Crypto: Don’t
Data security is a battleground between cryptographers and attackers. Unless you’re a cryptographer, writing your own cryptographic algorithms is a huge risk for your users’ data. There are many cryptography frameworks for different platforms. And now you have Apple’s CryptoKit making it super easy to use cryptography in your apps.
Performance: Don’t Worry
What about performance? CryptoKit is built on top of corecrypto , Apple’s native cryptographic library. Corecrypto’s hand-tuned assembly code makes highly efficient use of the hardware.
Cryptographic Hashing
Now for the most basic form of cryptography. You’re probably familiar with the idea of hashing dictionary items or database records for more efficient retrieval. Many standard types
conform to the Hashable
protocol
. Hashing objects of these types into a Hasher
produces integer hash values with a reasonable probability of uniqueness. A small change to the input produces a large change in the hash value.
Hasher
uses a randomly generated seed value, so it produces different hash values each time your app runs. See this for yourself.
Open CryptoKitTutorial.playground
in the starter folder. The first section, Hashable Protocol
, has this hashItem(item:)
function:
func hashItem(item: String) -> Int {
  var hasher = Hasher()
  item.hash(into: &hasher)
  return hasher.finalize()
}
Try it out by adding this line below it:
let hashValue = hashItem(item: "the quick brown fox")
Run the playground. The hash value appears in the results sidebar, or click the Show Result button to view it in the playground:
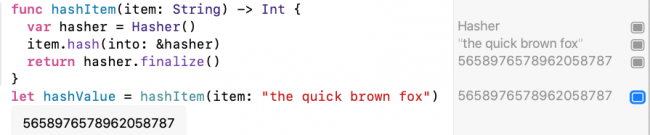
Hasher hash value
Your value is different from mine. Run the playground again, and you’ll get a different value.
Unlike Hasher
, cryptographic hashing
produces the same hash value every time. Like the Hasher
algorithm, cryptographic hashing algorithms produce almost-unique hash values, and a small change to the input produces a large change in the hash value. The difference is one of degree and the amount of computation required to produce a hash value — called a digest
or checksum
— that can reliably verify the integrity of data.
Cryptographic hashing algorithms create a small, fixed length, almost unique data value (digest) for the input data. The most common digest sizes are 256 and 512 bits. The 512-bit digest can be truncated to 384 bits. Finding two inputs that produce the same digest is very unlikely but not impossible, as there are, respectively, only 2 256 or 2 512 possible values for a 256-bit or 512-bit digest.
Hashing algorithms are one-way and include non-linear operations, so attackers can’t reverse the operations to compute the original data from the digest. Each bit of the output is dependent on every bit of the input so attackers can’t try to compute part of the input from part of the digest. Changing even a single bit in the input produces a completely different digest, so attackers can’t find relationships between inputs and outputs.

Cryptographic digest is almost unique and very hard to reverse.
These characteristics let you see if two data sets are different by computing digests. For example, Git computes a digest to identify every commit. You can transmit or store data with its digest to detect subsequent changes like data corruption. Software downloads often provide a digest, called a checksum . The downloader uses the same hashing algorithm to compute a digest for the downloaded data. If this digest doesn’t match the file’s checksum, the file is corrupted or incomplete.

Receiver computes digest to check data is complete, not corrupted.
CryptoKit provides the Secure Hash Algorithm 2 (SHA-2)
algorithms SHA-256, SHA-384 and SHA-512. The numbers indicate the digest size. Its Insecure
container provides SHA-1
(160-bit) and MD5
(128-bit) for backward compatibility with older services. SHA-2 was published by the U.S. National Institute of Standards and Technology (NIST) and is required by law for use in certain U.S. Government applications.
In the playground, scroll down to this statement:
UIImage(data: data)
In the results sidebar, click Show Result next to w 714 h 900 to see the data is an image of the one-year-old Harry Potter:
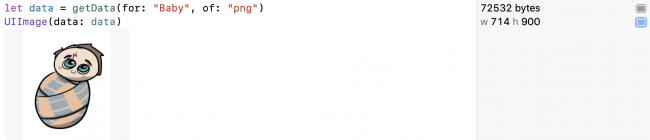
Data is baby Harry Potter image.
When Voldemort failed to kill Harry, he accidentally turned him into a horcrux. But Voldemort doesn’t know this. Albus Dumbledore knows, and he wants to share this secret with Harry.
First you, as Dumbledore, create a digest of this data. Add this line:
let digest = SHA256.hash(data: data)
That’s all you have to do! SHA256
produces a 256-bit digest. It’s just as easy to use one of the other two hashing algorithms — SHA384
or SHA512
. And if Apple updates these to use SHA-3
instead of SHA-2, you won’t have to change your code.
Then Dumbledore sends the data and digest over a network connection to Harry. So now, as Harry, add this code to check the digests match:
let receivedDataDigest = SHA256.hash(data: data)
if digest == receivedDataDigest {
  print("Data received == data sent.")
}
You use the same hashing algorithm on the data then check the two digest values are equal.
Run the playground. The message prints. Not surprising, as data
had no opportunity to become corrupted.
Now click the Show Result
button next to receivedDataDigest
to get a good look at the digest:

CryptoKit SHA256 digest of data
It’s a tuple. Not very readable.
Type this line to show its description
instead:
String(describing: digest)
Note
: Apple’s documentation discourages calling .description
directly.
Run the playground. Click Show Result :

String description of CryptoKit digest
The digest description
contains a String
. This is more human-readable and looks like a Git hash value, but twice as long. It’s also much much much longer than the Hasher
hash value.
Finally, to see how a small change in data produces a completely different digest, make a very small change to one of the two identical lines of code. For example:
String(describing: SHA256.hash(data: "Harry is a horcrux".data(using: .utf8)!))
String(describing: SHA256.hash(data: "Harry's a horcrux".data(using: .utf8)!))
Run the playground. Click Show Result for both lines:

CryptoKit digests of almost-identical data are very different.
Notice you’re getting exactly the same hash values I did.
Signing the Digest
Hashing data doesn’t protect you from malicious changes, as a malicious attacker will just send the correct digest for their changed data.
Hash-based Message Authentication Code ( HMAC ) protects against malicious changes by signing the digest with a symmetric cryptographic key . A common use case is signing the digest of a file so the app’s server can check that you’re authorized to upload files.
“Symmetric key” means the sender and receiver both know the secret key. HMAC uses the secret key to derive inner and outer keys. Then it creates an internal hash from the data and the inner key. Finally, it creates the signature from the internal hash and the outer key.
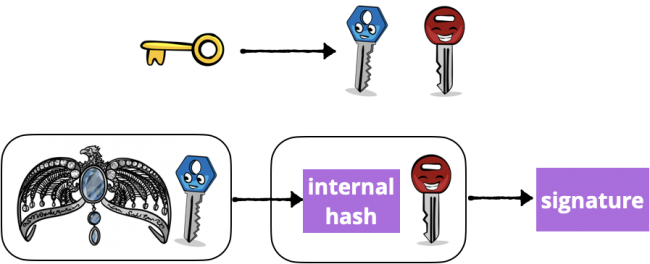
Diagram of Hashed Message Authentication Code
That’s what the algorithm does. But to create a symmetric key with CryptoKit, you only have to type this line:
let key256 = SymmetricKey(size: .bits256)
So much less work than Apple’s old C cryptography API, where you had to convert bits and bytes and remember to remove the key from memory when you were done!
The most common attack against HMAC is brute force to uncover the secret key, so the security of HMAC depends on the size of the secret key. CryptoKit allows three key sizes: .bits128
, .bits192
and .bits256
.
Next, add these two code statements:
let sha512MAC = HMAC<SHA512>.authenticationCode(
  for: data, using: key256)
String(describing: sha512MAC)
You’re creating the digest for data
using your symmetric key, so now the digest is called an authentication code
or signature
.
Run the playground. Click Show Result to see the signature’s description:

Description of CryptoKit HMAC 512-bit signature
You’ve produced a 512-bit (64-byte) signature for the baby image.
To send this signature over the network, convert it to Data
:
let authenticationCodeData = Data(sha512MAC)
Now Dumbledore sends the signed data to you-as-Harry. You-as-Harry already have the same
secret key key256
. Type this code to authenticate what you’ve received:
if HMAC<SHA512>.isValidAuthenticationCode(authenticationCodeData,
   authenticating: data, using: key256) {
    print("The message authentication code is validating the data: \(data))")
  UIImage(data: data)
}
else { print("not valid") }
If the signature is valid, you-as-Harry view the data, knowing it’s really what Dumbledore sent.
Run the playground. Click Show Result
next to the print
statement and next to the UIImage
:
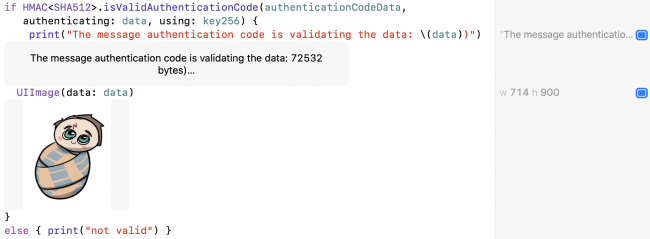
CryptoKit authenticating HMAC signature and data
HMAC lets you verify the sender’s identity and the integrity of the data, but doesn’t encrypt the data. If you forget to use TLS, and Voldemort intercepts the transmission, he’ll suspect that Harry is one of his horcruxes.
Or Voldemort might decide to manually encrypt his list of horcruxes, to be absolutely sure Dumbledore and Harry can’t find and destroy them.
Data encryption is what cryptography is all about, so here it comes.
Encrypting and Authenticating Data
Even with TLS encrypting network data, you might want to send encrypted files to users. For example, if they’ve made an in-app purchase, you’d send them the encrypted file and (separately) the key to decrypt it.
The current state of the art is an Authenticated Encryption with Associated Data ( AEAD ) cipher. An AEAD cipher uses different keys for encryption and MAC, and the MAC hashes the cipher text, not the plain text. Everything is combined into a sealed box .
There are two AEADs in common use: Advanced Encryption Standard Galois/Counter Mode ( AES-GCM ) and ChaCha20-Poly1305 . Both are new to Apple’s cryptography API. AES-GCM is the established standard from NIST. Daniel J. Bernstein developed ChaCha20-Poly1305 in case an attacker manages to break AES-GCM.
In 2019, almost all TLS traffic used AES, but ChaCha20-Poly1305 is increasing in popularity because it’s much faster than AES-GCM on mobile devices that don’t have hardware support for AES-GCM. But feel free to use AES-GCM in your apps, because iOS devices have AES hardware :].
AES and ChaCha20 are cipher algorithms. GCM and Poly1305 are MAC algorithms. Bernstein developed ChaCha20 from his earlier Salsa cipher. ;]
To create a sealed box, an AEAD cipher takes these inputs:
- Plaintext to be encrypted
- A secret key
- A unique initialization value — IV or nonce : This prevents replay attacks, like someone (who really needs to get a life) resending the same shopping cart order many times.
- Optional: Additional non-secret Data, authenticated but not encrypted. This is the AD in AEAD .
Then the seal operation:
ciphertext
I’ve left out the associated data in this diagram:
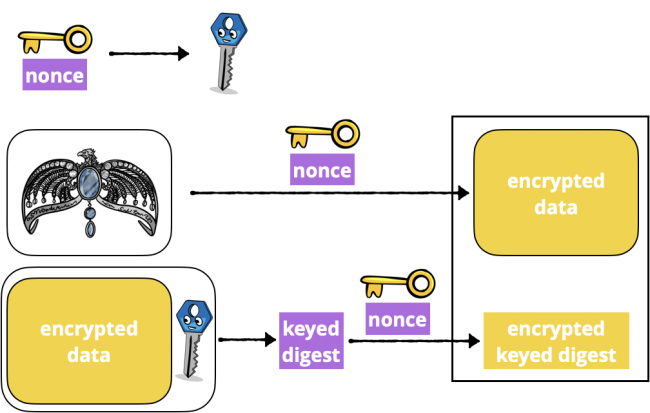
Diagram of CryptoKit Sealed Box seal operation
That looks like a lot of work, doesn’t it? Well, here’s all you need to type, to create a sealed box:
let sealedBoxData = try! ChaChaPoly.seal(data, using: key256).combined
You supply the data and key to get a sealed box. Its combined
property is of type Data
, which you can send over the network.
To use AES-GCM instead, you’d replace ChaChaPoly
with AES.GCM
.
Now Dumbledore sends the sealed box data to Harry. You-as-Harry type this code to turn it back into a sealed box:
let sealedBox = try! ChaChaPoly.SealedBox(combined: sealedBoxData)
You-as-Harry already have the same secret key as Dumbledore, so you can open the sealed box and decrypt its ciphertext
:
let decryptedData = try! ChaChaPoly.open(sealedBox, using: key256)
Run the playground.

CryptoKit code for ChaChaPoly seal and open operations
Notice the size of sealedBoxData
is 28 bytes more than the image data. Add these lines to see what else is in the sealed box:
sealedBox.nonce  // 12 bytes
sealedBox.tag  // 16 bytes
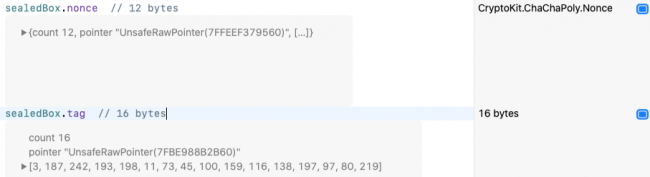
Sizes and contents of CryptoKit sealed box nonce and tag
Both algorithms select a nonce for you, then pack it into the sealed box for open
to use. So easy! The 16-byte tag
is the encrypted keyed digest — the signature that authenticates the data. The nonce changes each time you create the sealed box, and this changes the encrypted keyed digest too. So your actual nonce
and tag
values don’t match my screenshot.
Finally, just to prove the encrypted data can’t be viewed, add these lines:
let encryptedData = sealedBox.ciphertext
UIImage(data: encryptedData)
UIImage(data: decryptedData)
Run the playground. Show Result for both lines:
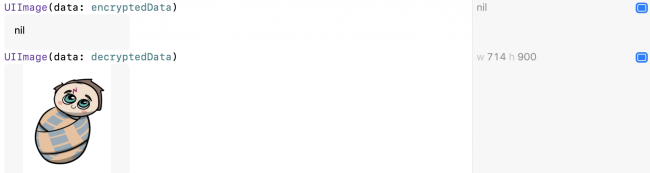
Encrypted data cannot be viewed as UIImage.
That’s how easy it is to send encrypted data, but both sender and receiver need to know the secret key. What if this isn’t possible?
Public-Key Cryptography
Note : This is still part of CryptoKit, but it’s a pretty big topic, so gets its own section.
HMAC and Sealed Box encryption use symmetric keys, where the sender and receiver both know the key. Symmetric keys must be transmitted “out of band”. If you can’t do this securely, you use public-key cryptography. In fact, most of the routine encryption on the internet uses public-key cryptography, including whenever Xcode signs your app.
Public-key cryptography creates two mathematically linked keys. You keep your private key secret and publish the corresponding public key data. You sign data or its digest with your private key, then send it. The receiver creates a public key from your public key data, then uses it to check the signed data or digest.
For example, your app might need to authenticate an operation with your back-end server. On the user’s device, it creates a private key, which it stores in Keychain
or SecureEnclave
, then registers the corresponding public key on the server. When your user sets up the operation, your app signs the operation’s details with the user’s private key and sends the signed details to the server, which verifies it with the user’s public key.
To send encrypted data, you and your recipient each create a pair of keys and publish the public keys. Both of you then combine your private key with the other’s public key to create a shared secret . Both of you use this shared secret to derive the same symmetric key , which you can then use for AEAD as described in the previous section.
Creating Private and Public Keys
The key feature of public-key cryptography is that it uses trapdoor algorithms : It’s very very difficult to compute the private key from the public key.
After its publication in 1978, RSA (Rivest-Shamir-Adleman) became the most popular public-key algorithm. It relies on the difficulty of determining the two prime number factors of a very, very, very large number. Other mathematicians rose to the challenge, developing factoring algorithms that could only be held at bay by increasing the size of the keys. Generating RSA keys is slow, and the time increases with key size. Eventually, factoring algorithms improved faster than the power of mobile devices to compute with very large numbers. Attention turned to another technology, which is proving much harder to attack.
ECC (Elliptic Curve Cryptography), first suggested in 1985, has been widely used since 2004 and became the preferred technology on servers at the end of 2015. ECC keys are much smaller than RSA keys with similar security: for example, the security of a 256-bit ECC public key is comparable to a 3072-bit RSA public key.
CryptoKit uses ECC algorithms exclusively. Your options here are NIST’s P256/P384/P521
or Daniel J. Bernstein’s Curve25519
. P256 is by far the most widely used curve. It’s the default curve for OpenSSL, where it’s known as prime256v1
. P384 requires 2-3 times as much computation as P256. The U.S. National Security Agency (NSA) requires P384 to protect top-secret information. P256 and P384 are in the NSA’s Suite B Cryptography
, but P521 isn’t, and I couldn’t find any information about who uses it. Super-spooks, perhaps?
Note : In 2018, the NSA replaced Suite B with Commercial National Security Algorithm Suite ( CNSA ) as a step in its transition to quantum-resistant cryptography , because quantum computing can easily break ECC algorithms.
Bernstein released Curve25519 the same year as the NSA’s Suite B, but its popularity increased after whistleblower Edward Snowden
released internal memos in 2013 suggesting the NSA had inserted a cryptographic back door into the elliptic curve-based pseudo random generator Dual_EC_DRBG
. Both Dual_EC_DRBG
and P256 rely on Nothing Up My Sleeve
(NUMS) magic numbers. The cryptographic community suspected the NSA used special values to derive these magic numbers, enabling them to decrypt anything encrypted with P256. Curve25519 doesn’t rely on magic numbers. Its computational complexity is 40% lower than P256. And the 2018 TLS 1.3 standard requires support for it.
ECC: How Does It Work?
Many articles, like this one , use small prime number arithmetic to explain RSA in a way that’s easy to understand. The algorithm is quite clever.
Elliptic curve cryptography is even better! But a little more complicated to explain.
An elliptic curve consists of the (x,y)
points satisfying an equation of this form:
y^2 = x^3 + ax + b
For example, y^2 = x^3 - x + 1
looks like this:

Graph of an elliptic curve
You can graph more elliptic curves at Desmos Graphing Calculator .
ECC uses two properties of elliptic curves:
x
These properties let you define a dot operation between any two points on the graph:
- Draw a line between points A and B.
-
Where this line hits the graph at a third point, reflect across the
x-axis to get point C = A dot B .

elliptic curve A dot B operation
You can also define the point multiplication
operation k * A
, where k
is a positive integer.
- Start with A dot A to get point B: Draw the tangent line to the curve at point A and reflect across the x-axis where this line hits the graph. This is the first dot operation.
-
Now do A dot B to get point C, then A dot C = D, and so on. Do a total of
kdot operations, ending at point P. If you tell someone where points A and P are, it’s really hard for them to calculatek.
The actual algorithm uses only integer values of x
and y
, modulo a prime number n
. The start point is called the generator
, so it’s usually named G
. It has the property that n * G = G
.
To set up an ECC cryptosystem, you pick a curve equation (the coefficient of x
and the constant b
), a generator point G
on this curve and its corresponding prime number n
. The private key is a randomly selected number k
, and the public key is k * G
— the endpoint on the curve after k
dot operations on G
.
Of course, you don’t need to do any of this. There are already standard curves like Curve25519 and those used by the NIST ECCs, and these are implemented in CryptoKit’s public-key methods.
Digital Signatures
Digital signatures are like HMAC, but with public-key cryptography. Instead of using the same secret key to sign and to verify, the sender uses a private key to sign, and the receiver uses the sender’s public key to verify.

Public key cryptography: sign with private key, verify with public key.
The acronyms for digital signing are Elliptic Curve Digital Signature Algorithm ( ECDSA ), using NIST’s P256/P384/P512 curves, and Edwards-curve Digital Signature Algorithm ( EdDSA ), using Bernstein’s Ed25519 curve.
Suppose you-as-Dumbledore want to send the horcrux image to Harry. You’ll sign it so Harry can verify it’s from you-as-Dumbledore. First, you create private and public keys for digital signing:
let albusSigningPrivateKey = Curve25519.Signing.PrivateKey()
let albusSigningPublicKeyData =
  albusSigningPrivateKey.publicKey.rawRepresentation
The rawRepresentation
of the public key is of type Data
, so you can send it over the network.
Next, you-as-Dumbledore use your private key to sign the data:
let signatureForData = try! albusSigningPrivateKey.signature(for: data)
Or you sign the digest of the data, which is faster:
let digest512 = SHA512.hash(data: data)
let signatureForDigest = try! albusSigningPrivateKey.signature(
  for: Data(digest512))
You-as-Dumbledore use SHA-512 this time.
When using a Curve25519 private key, signature(for:)
generates an elliptic curve digital signature algorithm (EdDSA) signature of the data or digest over the Ed25519 elliptic curve, using SHA-512
as the hash function. This algorithm generates a random nonce to produce a different signature on every call, even for the same data and key, to guard against timing attacks.
If you use P256 instead of Curve25519, it generates an elliptic curve digital signature algorithm (ECDSA) signature of the data over the P-256 elliptic curve, using SHA-256 as the hash function.
Now you-as-Dumbledore send data
, digest512
and signatureForData
or signatureForDigest
to Harry.
Switching to you-as-Harry, you add this code to verify the signatures with a key created from albusSigningPublicKeyData
.
let publicKey = try! Curve25519.Signing.PublicKey(
  rawRepresentation: albusSigningPublicKeyData)
if publicKey.isValidSignature(signatureForData, for: data) {
  print("Dumbledore sent this data.")
}
if publicKey.isValidSignature(signatureForDigest,
  for: Data(digest512)) {
  print("Data received == data sent.")
  UIImage(data: data)
}
Note
: P256 and its NIST siblings have a method to sign a digest without converting it to Data
.
Run the playground to see the authenticated data:
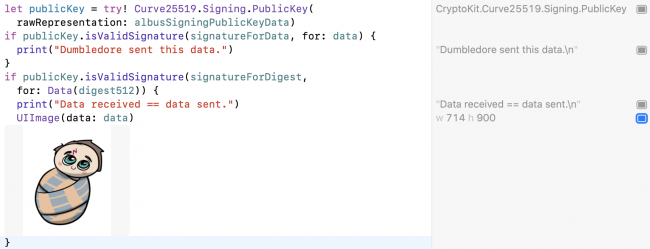
CryptoKit code using public key to verify private key signature
And that’s how easy it is to do digital signatures. But again, the data isn’t encrypted. So keep reading!
Creating a Symmetric Key for Encryption
Earlier in this tutorial, Dumbledore and Harry had a secret key they both knew, which allowed them to use an AEAD sealed box to encrypt and decrypt data. But Voldemort somehow discovered this secret key, and it’s not possible to securely set a new symmetric key — Harry’s on the run and Dumbledore’s only a spirit — so now they need to find another way.
Key agreement algorithms enable them to create a shared secret from their public and private keys, then add an agreed salt value to generate a symmetric key .
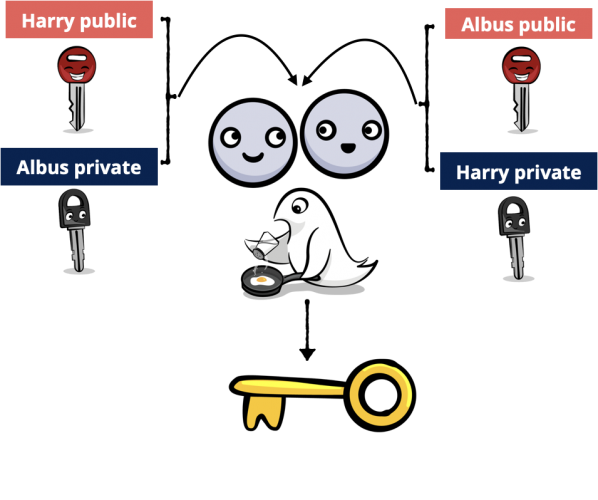
Diagram of public-private key agreement algorithm
Computing the shared secret is amazingly simple. If G
is the elliptic curve’s generator point, and a
is Dumbledore’s secret key, then a * G
is his public key. Similarly, Harry’s secret key is h
and his public key is h * G
. It turns out this is true:
(a * G) * h = (h * G) * a
That’s right, Harry multiplies Dumbledore’s public key by his private key, and this is the same point Dumbledore gets by multiplying Harry’s public key by his own private key. Magic!
Here, the acronym is Elliptic Curve Diffie Hellman (ECDH) key agreement, using either NIST’s P256/P384/P512 curves or Bernstein’s X25519 curve.
First, Dumbledore and Harry create private and public keys for key agreement, and publish their public keys as Data
.
let albusPrivateKey = Curve25519.KeyAgreement.PrivateKey()
let albusPublicKeyData = albusPrivateKey.publicKey.rawRepresentation
let harryPrivateKey = Curve25519.KeyAgreement.PrivateKey()
let harryPublicKeyData = harryPrivateKey.publicKey.rawRepresentation
Dumbledore and Harry have to agree on the salt value for creating the symmetric key:
let protocolSalt = "Voldemort's Horcruxes".data(using: .utf8)!
It’s safe to send this across the network. It won’t help an attacker unless they also know one of the private keys.
Dumbledore creates Harry’s public key from its raw representation, then combines it with his private key to calculate first the sharedSecret
and then the symmetricKey
:
let harryPublicKey = try! Curve25519.KeyAgreement.PublicKey(
  rawRepresentation: harryPublicKeyData)
let ADsharedSecret = try! albusPrivateKey.sharedSecretFromKeyAgreement(
  with: harryPublicKey)
let ADsymmetricKey = ADsharedSecret.hkdfDerivedSymmetricKey(
  using: SHA256.self, salt: protocolSalt,
  sharedInfo: Data(), outputByteCount: 32)
Harry creates Dumbledore’s public key from its raw representation, then combines it with his private key to calculate first the sharedSecret
and then the symmetricKey
:
let albusPublicKey = try! Curve25519.KeyAgreement.PublicKey(
rawRepresentation: albusPublicKeyData)
let HPsharedSecret = try! harryPrivateKey.sharedSecretFromKeyAgreement(
  with: albusPublicKey)
let HPsymmetricKey = HPsharedSecret.hkdfDerivedSymmetricKey(
  using: SHA256.self, salt: protocolSalt,
  sharedInfo: Data(), outputByteCount: 32)
Now to see if they match:
if ADsymmetricKey == HPsymmetricKey {
  print("Dumbledore and Harry have the same symmetric key.")
}
Run the playground.

CryptoKit derived symmetric keys match.
As if by magic, Dumbledore and Harry produce the same symmetric key! Now they can use this symmetric key for AEAD authenticated encryption.
P256 Key in Secure Enclave
Note
: SecureEnclave
code only works on a device with a Secure Enclave chip: iPhone 5S, iPad Air and later models.
For extra protection, you can create P256 private keys directly in the device’s Secure Enclave. It’s a very small change to the code:
// Check that the device has a Secure Enclave
if SecureEnclave.isAvailable {
  // Generate private key in Secure Enclave
  let privateKey = try SecureEnclave.P256.Signing.PrivateKey()
} else {
  let privateKey = P256.Signing.PrivateKey()
}
With the private key in the Secure Enclave, creating the public key data and signing data or digest work exactly the same:
// Create public key data
let publicKeyData = privateKey.publicKey.compactRepresentation!
// Produce a signature
let dataSignature = try privateKey.signature(for: data)
let digestSignature = try privateKey.signature(for: digest)
Note : You can only create P256 keys in the Secure Enclave. This may be because the chip contains the AES engine used by P256 and not because the U.S. government requires Apple to provide a back door.
The Secure Enclave has this cool feature: You can constrain key usage with access control. For example:
let accessControl = SecAccessControlCreateWithFlags(
  nil,
  kSecAttrAccessibleWhenUnlockedThisDeviceOnly,
  [.privateKeyUsage, .userPresence],
  nil)!
let privateKey = try SecureEnclave.P256.Signing.PrivateKey(
  accessControl: accessControl)
You’re setting access control so the key you’re creating in the Secure Enclave is only accessible when the device is unlocked and is available on this device only . Also, your app requires user presence when it’s performing an operation with the private key. Requiring user presence means the user must authenticate with TouchID or FaceID or the device passcode.
Complying With Encryption Export Regulations
One last thing. Encryption is a sensitive political issue in many countries. This map shows which countries have licensing or registration requirements, import/export controls, obligations on providers to assist authorities and other restrictions.
The U.S. is one of the countries with export controls. It’s legal stuff, so I’ll quote directly from Apple’s article Complying with Encryption Export Regulations :
When you submit your app to TestFlight or the App Store, you upload your app to a server in the United States. If you distribute your app outside the U.S. or Canada, your app is subject to U.S. export laws, regardless of where your legal entity is based. If your app uses, accesses, contains, implements, or incorporates encryption, this is considered an export of encryption software, which means your app is subject to U.S. export compliance requirements, as well as the import compliance requirements of the countries where you distribute your app.
And from Apple’s App Store Connect Help Export compliance overview :
Use of encryption includes, but is not limited to:
- Making calls over secure channels (i.e. HTTPS, SSL, and so on).
- Using standard encryption algorithms.
- Using crypto functionality from other sources such as iOS or macOS.
- Using proprietary or non-standard encryption algorithms. The U.S. Government defines “non-standard cryptography” as any implementation of “cryptography” involving the incorporation or use of proprietary or unpublished cryptographic functionality, including encryption algorithms or protocols that have not been adopted or approved by a duly recognized international standards body ( e.g., IEEE, IETF, ISO, ITU, ETSI, 3GPP, TIA, and GSMA) and have not otherwise been published.
App Store Connect provides a set of questions to help you determine if export compliance documentation is required from you, and which forms are needed.
Where To Go From Here?
Congratulations! You’ve taken a quick tour of all the things CryptoKit can do and learned a little of how cryptography works. And aren’t you glad CryptoKit makes everything so easy?
You can download the completed version of the project using the Download Materials button at the top or bottom of this tutorial.
As always, you can find out more at the source:
- WWDC 2019 Session 709: Cryptography and Your Apps .
- Apple CryptoKit documentation .
In addition to the (mostly Wikipedia) links throughout this tutorial, here’s the explanation of elliptic curve cryptography that really helped me see what was going on:
- A (Relatively Easy To Understand) Primer on Elliptic Curve Cryptography really is pretty easy to understand, and has some really helpful animated GIFs. But be sure to scan the comments for some missing info. Cloudflare has many other great articles about cryptography topics.
Recommend
About Joyk
Aggregate valuable and interesting links.
Joyk means Joy of geeK