

Creating an Application Performance Monitor Using Node 14 New and Experimental F...
source link: https://medium.com/@erickwendel/node-v14-x-is-up-deep-diving-into-new-features-ace6dd89ac0b
Go to the source link to view the article. You can view the picture content, updated content and better typesetting reading experience. If the link is broken, please click the button below to view the snapshot at that time.
Creating an Application Performance Monitor Using Node 14 New and Experimental Features
Node v14 came with lots of new exciting features. Let’s dive into some of those features by creating a real app.


On April 21st, Node.js 14 has been announced as a current release. It came not only with platform improvements but also new keywords available from the new Javascript.
In this post, you’re going to create a complete Node.js program. Keep in mind we are using a few experimental features which means that this code could break at any time. If you see something not working here, leave a comment below and I’ll take a look as soon as possible.
Our goal is to create an Application Performance Monitor (APM). I’ll cover the following Node.js features in this app:
New or improvements:
- Optional Chaining & Nullish Coalescing;
- Intl.DisplayNames from Localization API;
- Diagnostic Reports;
- Node.js Streams default autoDestroy flag;
- Experimental Async Local Storage API;
- Experimental assert.CallTracker;
- Experimentaltop-level await;
- ExperimentalECMAScript Modules.
Not so new:
- Performance Hooks.
Using Node.js v14
However, you might be thinking about how you can install the Node.js in this specific version. You’ll need to install and configure the Node Version Manageror Install it from the Node.js website. I highly recommend you install the NVM so you can go back and forth into versions without the need to change the entire environment. Also, you'll run Unix commands in this tutorial. If you're on Windows, you may use Windows Subsystem for Linux (WSL) to use Unix commands as well.
Should you have NVM installed, on a terminal runnvm install 14.3and thennode -vto check your current version. If you're familiar with Docker and prefer using it I wrote a Dockerfile and that may help you.
The APM
As I said before, you’re going to create an app to monitor a Web API. Our app will follow the requirements below:
- Users' requests duration and users' id must be stored in a file;
- It must be an Agent/Middleware which adds custom behavior to HTTP requests;
- If some fatal error happens it must save the diagnostic report on the reportsfolder.
Getting started
It's time to code! Going to your environment, you'll need an empty folder to create the programs. I'll start from scratch, running mkdir app
Going through the app folder, we'll initialize a Node.js project, install nodemon for hot reload, uuid to generate unique ids and debug for logs, with the following commands:
cd app && npm init -y && npm i -D nodemon@2 && npm i uuid@8 debug@4
ECMAScript Modules Core Support
Node.js version 13.2.0 announced core support for ECMAScript Modules. Since then, ESModules has been evolving. In Node.js 14.x the experimental warning for ESModules was removed. That means they’re taking a huge step towards the stable stage. However, it's still in the experimental stage.
Our projects will run ESModules and Javascript files using the .jsextension to see how it works but you can also use .mjs files.
At first, we'll change the package.jsonfile by simply adding the key-value property type: "module". This flag tells Node.js runtime that we're going to use ESModules.
package.json — after adding type property
Customers Datasource
External databases won't be our focus today. To simplify our lives, we'll use a JSON file as a data source. Create a file database.json on your app folder with the information below.
customers' database — who request APIs
Creating the APM Agent
On the root folder (app) you'll create a folder and a file as follows:
mkdir agent && touch agent/agent.js
In the agent.jsfile, we'll implement a function that extends the HTTP module behavior. Copy the file below and fill your agent.js
It’ll perform the actions below. In parenthesis, I put the code line for easier understanding:
- (14) — Read incoming request headers and retrieve the
x-app-idheader that is the current user requesting the API. Thex-app-idis actually the customeridon our data-source; - (15) — Using the id, it’ll look up for the owner on the data-source provided and retrieve the user's data;
- (17) — Set a specific header called
x-request-idthat we'll use to distinguish each unique call. - (18) — Mutate the incoming request adding user's data object;
Experimental assert.CallTracker
Before we move on, let me introduce you other Node.js experimental feature. If you're familiar with test Spies you'll love this feature. I've been using sinon.JS for it. Spies are functions that record function arguments, returned values, and exceptions thrown from function requests.
Yet, assert.CallTracker only checks the function's amount calls. It still in the experimental stage and it has only three functions: .calls to record the function's amount calls, .report and .verify to validate assertions. We'll use it to inspect if the .setHeader function was called to make sure our custom header will be added.
Setting up APM Agent tests
Creating a fileagent.test.js, we'll implement our test runner for our APM Agent. Copy the code below and fill agent.test.js
adding tests to track setHeader call and user data
As I did before, In parenthesis the code line for easier understanding:
- (12) — A mock database. There I'm just making sure that it wouldn't need internet or external resources to test our agent;
- (20) — Creating a request body adding the customer id on its header;
- (25) — Creating the setHeader function empty, to track it later. The function .on will be executed when the HTTP Emit will have finished its job;
- (30) — Wrapping up the HTTP module on our start function, which I added an alias for InjectMiddleware on (6), from
agent.js; - (35) — Setting up the tracker function for just one call and then on (36) merging response and setHeader (from tracker) objects;
- (36) — Here is where the magic happens. After calling .emit function our setHeader function should be called once. To check that all assertions will have executed before the program closes, we add the tracker.verify() on (45).
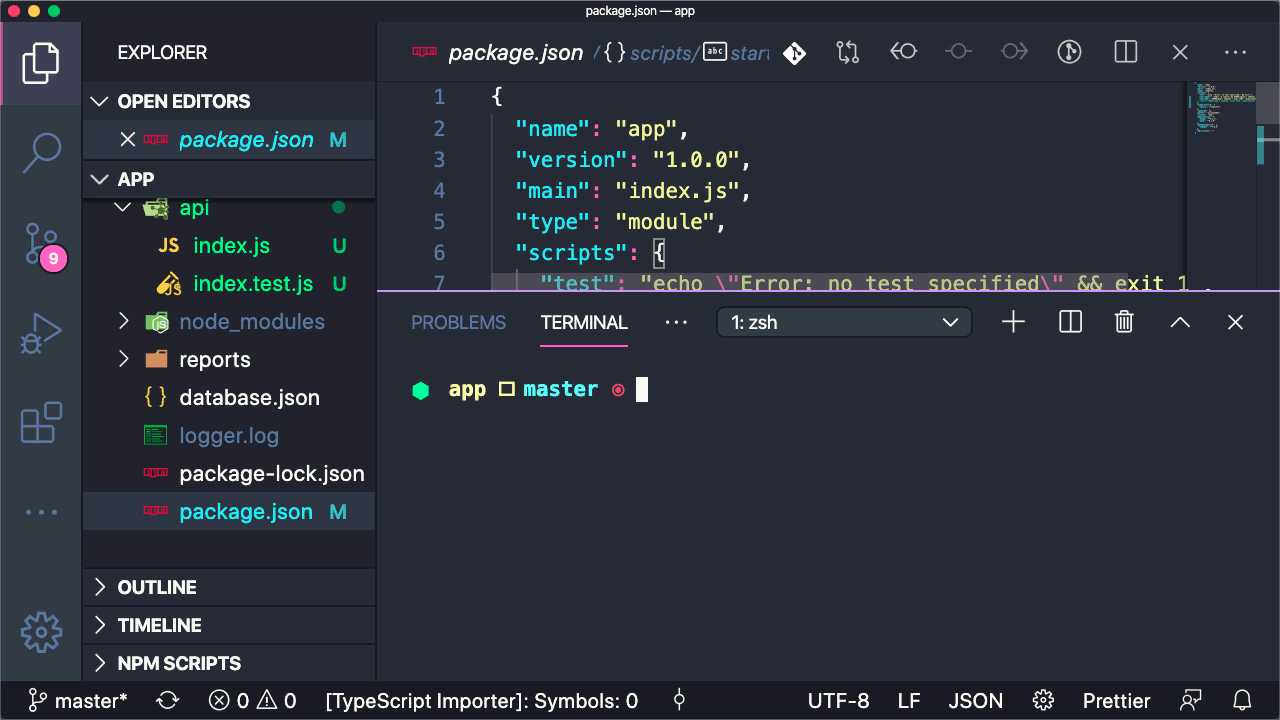
Adding scripts to the package.json
Excited to see the result? Let's go back to our package.jsonand add scripts for testing this app.
package.json — adding tests scripts
On the 08th line, I added a few flags on thenodemoncommand to use experimental Node.js features as follows:
DEBUG=agent:*— Inagent.jswe implementedlog('agent:runner')and onagent.test.js,log('agent:test'). Usingagent:*pattern, our console will show both log tags;nodemon --exec— We'll need to use specific Node.js flags so I prefer using--execandnodeflags wrapped on it;--experimental-json-modules— Allows importing JSON files on ESModules;--experimental-top-level-await— Allows top-level-await.
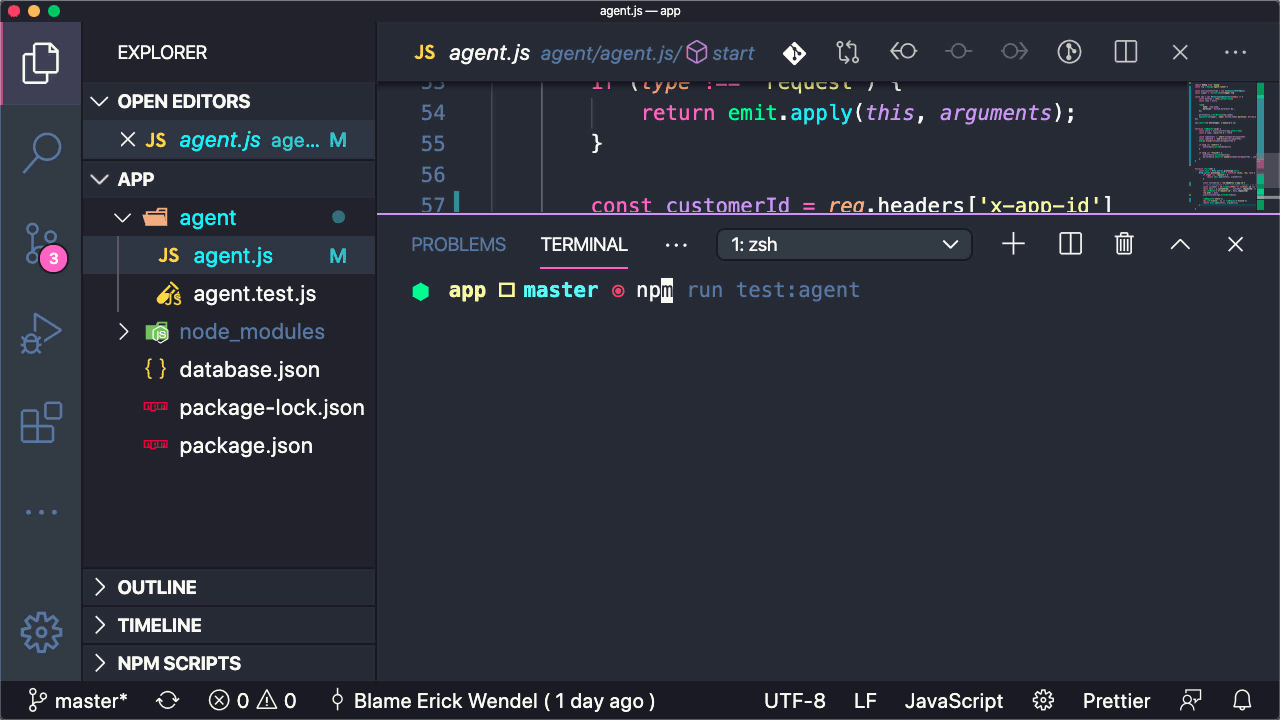
Shall we test?
Running npm run test:agent you may have seen the following result:
running the test and seeing logs
Experimental Async Local Storage API
Have you ever thought about how to track a user request?
Node.js Async Hooks is an API that allows us to attach functions to track async events on the Node.js lifecycle. Before Async Local Storage API was introduced we could create Javascript objects and handle data in-memory. Certainly, a bad idea for something single-threaded, isn't it?
Using the Async Local Storage API it can store individual contexts adding data for requests and threaten them independently. As we must track different customers in individual requests, it'll be perfect!
And about Performance Hooks?
That can be easier! Using the Performance Hooks API we can mark when some action started, ended, and then measure duration.
Wrapping Up
Instead of incremental code, I'll implement all agent.jscode and then explain it later, ok?. Create the agent.js file into the agent folder then paste the code below on it.
Final implementation of agent.js
What's happening there?
Let's take a look at the order that actions have happened here.
- (14–27) — It sets up a global Performance Hook watcher. Any time a
performance.measurefunction is called it will trigger our watcher. When the measurement is completed, it'll append data to aloggerfile; - (63) — It’ll initialize a new context using the Async Local Storage API. Also, we must generate a request id just to make sure that customers making concurrent requests with the same customer id will be handled as different calls;
- (31) — Once we initialized our context, we can retrieve the customer's current context using
.getStore. It looks magic, isn't it? I'm not going through in how it works because is not our focus here so if you wanna deeply understand what's happening there check out the docs; - (66) — It configures an event to trigger an HTTP request conclusion. After marking the request fulfillment, it'll also call the
performance.measurefunction that will trigger our performance hook observer on (14); - (58) — Well, how do we know if its actually handling concurrence and it doesn't have any critical performance issue? I put on a comment there to randomly choose either customer 1 or customer 2. Let it there, for now, I'm gonna explain it later.
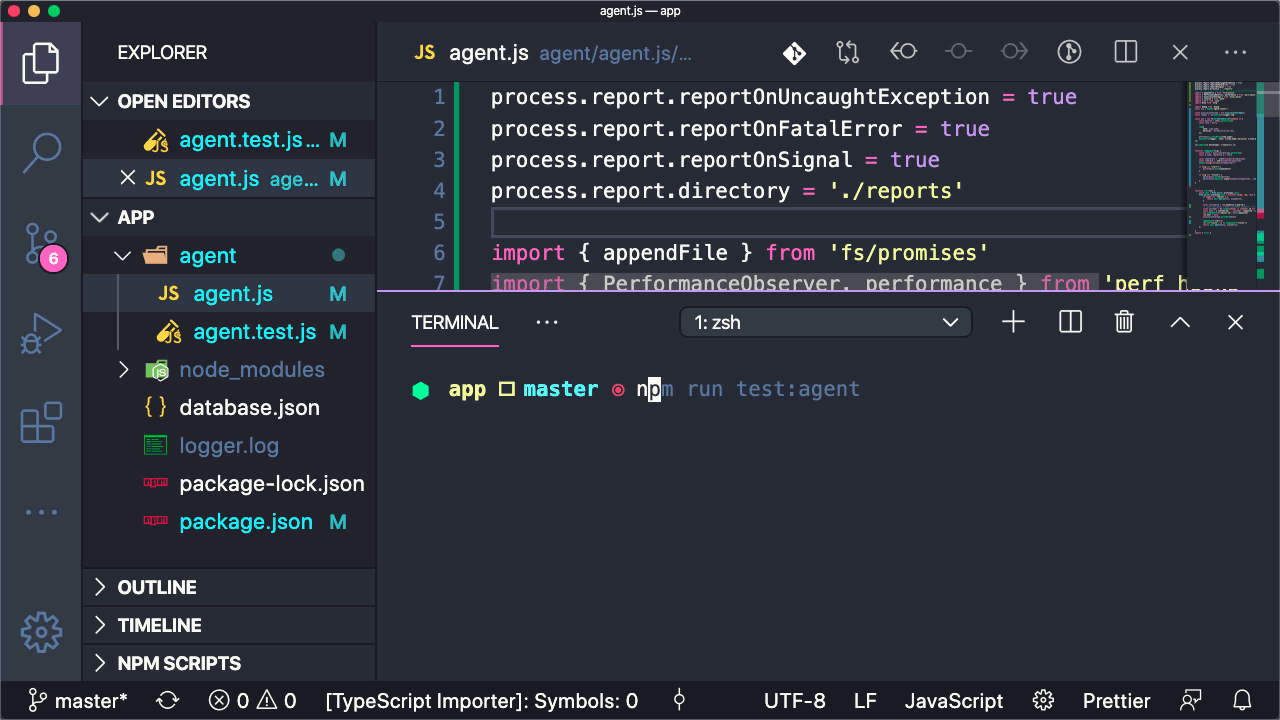
Seeing results
As we did before, running npm run test:agent you may have seen the following result in your console:
the result after running the command and generating logs of requests
Diagnostic Reports
Accordingly the Node.js announcement, the Diagnostic Report came to the stable stage. It brings huge power for debugging Node.js programs. We just need to add a few command lines and any unexpected error will be stored in a file for further analysis.
On our agent.js, you'll add the following instructions at the head of your file. Now, if a non-handled exception has happened or for some reason, the application has crashed we'll have a new file at the ./reports folder.
code that must be added on top of agent.js
Testing
Ok, to test this feature isn't an easy task. We must raise an error and catch it via process.on global events. Below, I put how the agent.test.js file must look.
What’s happening there?
- (46–47) —The reports folder location Set up. It keeps how many files this folder had before the test.
- (50) — An expected error after removing a key from the
requestobject. - (52) — It's listening for any global uncaught exception. As a test failed, it will trigger also an uncaught exception so in (53) I'm just printing output if there's another error that isn't related to my test case.
- (56–57) — If an uncaught exception has been triggered our application should create a new entry on
reportsfolder. It's comparing before and after the error has happened. - (59) — There is where the magic happens. We emit the error then the app will crash and then consequently will run the assertion in (56–57).
Oh, wait. There is a top-level await statement, isn't it?
Yeah, my friend if you realized there's a top-level await statement, congrats for you!! It was released as experimental on Node.js v14.0.3 and it enables using the await keyword without being on an async function by (47). Now, adding the --experimental-top-level-await flag on thenode command will make it happens.
Checking output
Before running this project again, we must have created a folder called reports on the approot folder. I'm gonna add this command on thepackage.json right at the beginning of thetest:agent script. Also, add a rule to the nodemon package for ignoring report files.
adding mkdir -p command on script and nodemonConfig
As we did before, running again npm run test:agent you may have seen the following result:
generating diagnostic reports
Finally, our Application Performance Monitoring app is ready to use! Let's create a Web API to see how it works in practice.
Creating the Web API
The Web API project must follow a list of requirements:
- By using Intl.DisplayNames from Localization API itmust use the current user language to translate incoming requests;
- It must handle incoming requests using Node.js Streams;
- It must map incoming data without using if statements;
- It must handle Streams errors and return custom messages to the requester.
Let's create our api folder on app and empty Javascript files running the following code:
mkdir api && touch api/index.js api/index.test.js
Let's import the APM Agent and create a simple server using the code below:
What’s happening there?
- (8) — Initializing the Agent injecting the customer's database on startup;
- (24–25) — I left this comment there just in case you wanna request the API later by using cURL.
Adding API scripts on package.json
On the package.json, let's add a script for starting the API and other for testing scripts.
Notice that theDEBUG environment variable is set for app:* that will ignore all logs from the Agent. If you wanna see logs from the agent as well, you need to write them as DEBUG=app:*,agent:* and then your console will show complete logs.
Checking output
I'm gonna use the cURL,for now, to test if the agent is logging out our requests. Also, I'll choose either 1 or 2 for thex-app-id to see different outputs in thelogger.log file. Opening two terminal sessions on the left run npm start and on the right the cURL given on the index.jsfile.
the output of APM Agent working
Mocking
Using the same idea of our cURL request. We'll need to create mock data to request APIs. On theapi create a folder called mocks. Thought this folder we'll create two files: request1.json and request2.json as following data:
Testing
The index.test.js should request the index.js API and validate the outputs. I'll put the whole index.test.js file below. Create the index.test.jstest file, copy the data below, and paste it there.
What’s happening there?
Ok, I know there's a lot of code here. Shall we dig into some of them?
- (14) — A function that makes requests using the
Http.requestfunction and return Promised results; - (41–51) — Test case: Given a user who speaks Portuguese and a currency code it should translate currency code to currency description in a specified language. As
request1has currency codeBRL(Brazilian Real) then the application must translate toFrenchas réal brésilien; - (56–64) — Test case: Given a user who speaks Portuguese and a currency code it should translate currency code to currency description in a specified language. As
request2has currency codeTWD(New Taiwan dollar) then the application must translate toPortugueseas Novo dólar taiwanês;
4. (67) — After all, it closes de app.
A Node.js Stream calls .destroy function before it ends
Just a quick pause to introduce more one important improvement on the Node.js Ecosystem.
These changes are intended to improve consistency across the Streams APIs to remove ambiguity and streamline behaviors across the various parts of Node.js core — https://medium.com/@nodejs/node-js-version-14-available-now-8170d384567e
We usually handle streams with the Transform, Writabe, Readable, and Duplex functions from the streams core module. Now, before a Node.js stream function ends we can add custom behavior which will be called per default.
Optional Chaining & Nullish Coalescing
And last but not least, on the V8 Engine Version 8.1 of Node.js v14 many new Javascript keywords were introduced and I'm so excited to talk about it.
If you've been working with the C# language you may have seen the following code:ob1?.ob2()?.obj3 ?? "That's not enough 😨"
Optional Chaining is a feature that avoids unnecessary if statements. See how is the Before and after it was added below:
- Before:
if(obj && obj.obj1 && typeof obj.obj1 === "function" && obj.obj1()) {} - After:
obj?.obj1()
Implementing Web API business rules
Let's copy the code below and I'll explain later what's going on there:
What’s happening there?
- (10–11) — Importing modules for Node.js Streams;
- (13) — Parsing the pipeline function to a Promised function;
- (39) — As
req(request) is a Readable Stream we can read its data and pass-through to other streams and so on. On this pipeline, it's been receiving individual requests, mapping, and then piping out to theres(response). Notice that we're retrieving data fromreq.user.speakswho has being inserted by the APM Agent; - (15) — The function that will be called every time we receive a POST request with customers' data. Notice that I'm using the Transform function from Node.js Streams. There is also a destroy function in which will be called before Transform died;
- (22) — Using the New Intl.DisplayNames for translating currencies and return them;
- (27) — Using Optional Chaining plus Nullish Coalescing to map optional data.
Testing
Once we have our package.json ready, let's run the app tests with npm run test:app as shown below:
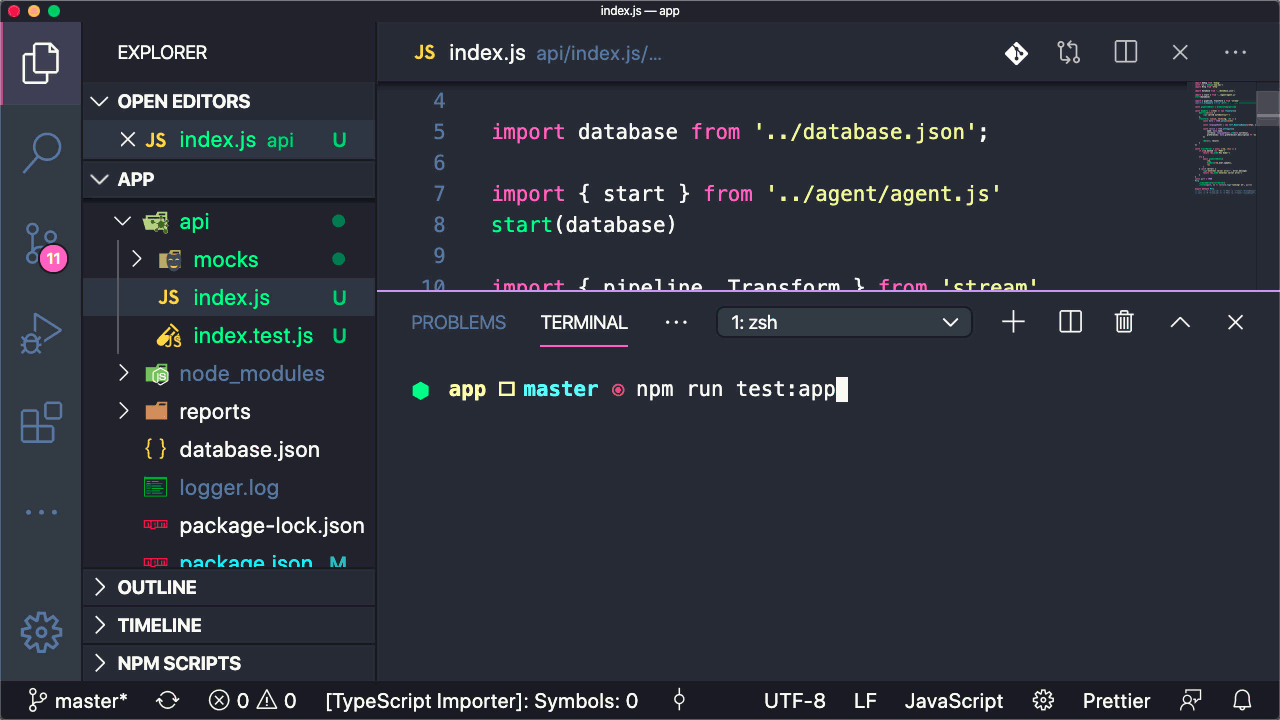
running npm run test:app and seeing output on the console
Shall do we make some stress tests there?
We're going to install the autocannon package using npm i -g autocannon@4
Do you remember we left a comment in agent.js on the 58thline? I'm going to comment on the 57thlineand then uncomment the 58thline. I'll run a load test using the autocannon package and see if our logger.log file makes sense. For that, copy the command below and paste it on your console after starting your app using npm start.
Autocannon — running 100 concurrent users for 10 seconds
Running it
Ok, Let's see in practice if it does work! Running all statements shown above you may have seen a similar output as following:
load test output
That's all folks
We made a complete Application Performance Monitor using the top newest features of Javascript and Node.js. Also used Node.js advanced concepts such as concurrence, Node.js Streams, testing, and so on. It was amazing being with you and sharing a few knowledge I have.
I wish you the best and hope you liked this content. Please share it on your social media channels and help me keep growing leaving your comment below.
Recommend
About Joyk
Aggregate valuable and interesting links.
Joyk means Joy of geeK