

CALayer Tutorial for iOS: Getting Started [FREE]
source link: https://www.raywenderlich.com/10317653-calayer-tutorial-for-ios-getting-started
Go to the source link to view the article. You can view the picture content, updated content and better typesetting reading experience. If the link is broken, please click the button below to view the snapshot at that time.
Update note : Ron Kliffer updated this tutorial for Xcode 11, Swift 5 and iOS 13. Scott Gardner wrote the original.
As you probably know, everything you see in an iOS app is a view. There are button views, table views, slider views and even parent views that contain other views!
But what you might not know is that each view in iOS is backed by another class called a layer
— a CALayer
, to be specific.
In this article, you’ll build the Layer Player app. In the process, you’ll learn:
CALayer
CALayer
Getting Started
CALayer
has more than a few properties and methods to tinker with. It has several subclasses with unique properties and methods. What better way to get an overview of this great API than by taking a raywenderlich.com-style guided tour?
Use the Download Materials
button at the top or bottom of this tutorial to download the starter project. Open it in Xcode, then build and run to see what you’re starting with. The Layer Player app demonstrates nine different CALayer
capabilities.
The starter project doesn’t do much. You’re about to write the code to turn this app into a fully functional CALayer
tour guide!

In each section, you’ll add the necessary code to make the layer magic work. After adding each line of code, play around with the settings you’ve just enabled. This will give you a deeper understanding of the power of each capability you explore.
But first, some theory.
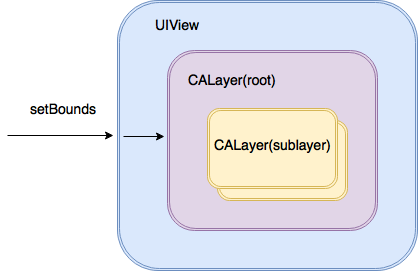
How does CALayer relate to UIView?
UIView
handles many things, including layout and touch events. However, it doesn’t directly control drawing or animations. UIKit
delegates that task to the Core Animation
framework, which enables the use of CALayer
. UIView
, in fact, is just a wrapper over CALayer
.
Each UIView
has one root CALayer
, which can contain multiple sublayers. When you set bounds on a UIView
, the view in turn sets bounds on its backing CALayer
. If you call layoutIfNeeded()
on a UIView
, the call gets forwarded to the root CALayer
.
Here are a few more things you should know about CALayer
before you dive into the Layer Player app:
- Layers can have sublayers : Just like views can have subviews, layers can have sublayers. You can use these for some cool effects!
-
Their properties are animatable
: When you change the property of a layer, you can use
CAAnimationto animate the changes. - Layers are lightweight : Layers are lighter weight than views, and therefore help you achieve better performance.
- They have tons of useful properties : You’ll explore some of them in the following examples.
Now, you’re ready to get started by using CALayer
to create some custom views.
Customizing Views With CALayer
Open CALayerViewController.swift
and add the following code to setupLayer()
:
//1
layer.frame = viewForLayer.bounds
layer.contents = UIImage(named: "star")?.cgImage

// 2
layer.contentsGravity = .center
layer.magnificationFilter = .linear

// 3
layer.cornerRadius = 100.0
layer.borderWidth = 12.0
layer.borderColor = UIColor.white.cgColor
layer.backgroundColor = swiftOrangeColor.cgColor

//4
layer.shadowOpacity = 0.75
layer.shadowOffset = CGSize(width: 0, height: 3)
layer.shadowRadius = 3.0
layer.isGeometryFlipped = false
In this code, you create a customized view:
-
You set the bounds of the layer, then set an image as the layer’s contents. Notice the use of the underlying
CGImage. -
Then you center the image within the layer. You can use
contentsGravityto change both size — as in resizing, resizing aspect and resizing aspect fill — and position — center, top, top-right, right, etc.magnificationFiltercontrols the behavior of the enlarged image. -
Next, you set
CALayer‘s background color, make it round and add a border to it. Notice that you’re using the underlyingCGColorobjects to change the layer’s color attributes. -
Finally, you create a shadow for the layer. When
isGeometryFlippedistrue, the positional geometry and shadow will be upside-down.
Build and run. Select CALayer and check out the result:

The controls don’t do anything at this point. So add the following to prepare(for:sender:)
:
if segue.identifier == "DisplayLayerControls" {
  (segue.destination as? CALayerControlsViewController)?.layerViewController = self
}
This connects the embedded CALayerControlsViewController
. Build and run again and check out the layer properties in action. Play around with the various controls to get a feel for what you can do with CALayer
!

Improving Performance With ShouldRasterize and DrawsAsynchronously
CALayer
has two additional properties that improve performance: shouldRasterize
and drawsAsynchronously
.
shouldRasterize
is false
by default. When set to true
, the layer’s contents only render once, which improves performance. It’s perfect for objects that animate around the screen but don’t change in appearance.
drawsAsynchronously
is the opposite of shouldRasterize
, and it’s also false
by default. Set it to true
to improve performance when the app needs to repeatedly redraw a layer’s contents. This might happen, for example, when you work with an emitter layer that continuously renders animated particles. You’ll use this feature later in the tutorial.
Note
: Consider the implications before setting either shouldRasterize
or drawsAsynchronously
. Change the settings and compare the performance. This will help you determine whether activating these features actually improves performance in a given situation. If you misuse these properties, performance is likely to take a nosedive!
Scrolling With CAScrollLayer
CAScrollLayer
displays a portion of a scrollable layer. It’s fairly basic — it can’t directly respond to user touches or even check the bounds of the scrollable layer. But it does cool things like preventing scrolling beyond the bounds. :]
UIScrollView
doesn’t use a CAScrollLayer
to do its work. Instead, it directly changes its layer’s bounds. With a CAScrollLayer
, you can:
- Set the scrolling mode to horizontal or vertical .
- Scroll to a specific point or area programmatically.
Build and run and select CAScrollLayer from the menu. You’ll see an image and two switches that control the scrolling direction.

Now it’s time for you to set up the scrolling.
Setting up Scrolling
Return to the code and open CAScrollLayerViewController.swift
. There’s already a CAScrollLayer
in the view.
Add the following to panRecognized(_:)
:
var newPoint = scrollingView.bounds.origin
newPoint.x -= sender.translation(in: scrollingView).x
newPoint.y -= sender.translation(in: scrollingView).y
sender.setTranslation(.zero, in: scrollingView)
scrollingViewLayer.scroll(to: newPoint)

if sender.state == .ended {
  UIView.animate(withDuration: 0.3) {
    self.scrollingViewLayer.scroll(to: CGPoint.zero)
  }
}
When a pan gesture occurs, you calculate the corresponding translation required and then call the scroll(to:)
method on the CAScrollLayer
to move the image accordingly.
scroll(to:)
doesn’t animate automatically, so you animate it explicitly using UIView.animate(withDuration:animations:)
.
Build and run and go back to the CAScrollLayer example. Now when you pan the image, you’ll see something like this:
Layer Player also includes two controls to lock scrolling horizontally and vertically. You’ll get those working next.
Locking Scrolling Directions
Add the following code to scrollingSwitchChanged(_:)
:
switch (horizontalScrollingSwitch.isOn, verticalScrollingSwitch.isOn) {
case (true, true):
  scrollingViewLayer.scrollMode = .both
case (true, false):
  scrollingViewLayer.scrollMode = .horizontally
case (false, true):
  scrollingViewLayer.scrollMode = .vertically
default:
  scrollingViewLayer.scrollMode = .none
}
Here, you add a simple switch
block. It determines the scrolling direction according to the values of the switches in the user interface.
Now build and run. Go back to the app, flip the switches and see how CAScrollLayer
behaves.
Here are some rules of thumb for when to use — or not to use — CAScrollLayer
:
-
If you want something lightweight
and you only need to scroll programmatically, consider using
CAScrollLayer. -
When you want the user to be able to scroll, you’re better off with
UIScrollView. To learn more, check out ourScroll View School video tutorial series. -
If you’re scrolling a very large
image, consider using
CATiledLayer.
Rendering Text With CATextLayer
CATextLayer
provides simple but fast rendering of plain text or attributed strings. Unlike UILabel
, a CATextLayer
cannot have an assigned UIFont
, only a CTFont
or CGFont
.
Open CATextLayerViewController.swift
and add the following to the end of setUpTextLayer()
:
// 1
textLayer.font = helveticaFont
textLayer.fontSize = Constants.baseFontSize

// 2
textLayer.foregroundColor = UIColor.darkGray.cgColor
textLayer.isWrapped = true
textLayer.alignmentMode = .left
textLayer.truncationMode = .end

// 3
textLayer.contentsScale = UIScreen.main.scale
Here’s what you’re doing:
-
You set the font of the text layer. Notice that this is a
CTFontand not aUIFont. You create these usingCTFontCreateWithName(_:_:_:).CATextLayerlets you set the font size directly on the layer, as you do here. -
Next, you set the text color, wrapping, alignment and truncation modes. All of these are also available on a regular
UILabelorUITextView. -
Finally, you set the layer’s
contentsScaleto match the screen’s scale. All layer classes, not justCATextLayer, render at a scale factor of 1 by default. Attaching a layer to a view automatically sets itscontentsScaleto the appropriate scale factor for the current screen. For any layer you create manually, however, you must setcontentsScaleexplicitly. Otherwise, its scale factor will be 1, causing it to appear pixelated on Retina displays.
Build and run, then select CATextLayer
from the menu. Layer Player has controls to change many of CATextLayer
‘s properties. Play around with them to see what they do:

Next, you’ll give Layer Player the ability to play media files.
Playing Media With AVPlayerLayer
AVPlayerLayer
adds a sweet layer of goodness to AVFoundation
. It holds an AVPlayer
to play media files of type AVPlayerItem
.
Setting up Media Playback
Open AVPlayerLayerViewController.swift
and add the following code to setUpPlayerLayer()
:
// 1
playerLayer.frame = viewForPlayerLayer.bounds

// 2
let url = Bundle.main.url(forResource: "colorfulStreak", withExtension: "m4v")!
let item = AVPlayerItem(asset: AVAsset(url: url))
let player = AVPlayer(playerItem: item)

// 3
player.actionAtItemEnd = .none

// 4
player.volume = 1.0
player.rate = 1.0


playerLayer.player = player
In this code, you set up the player. Here’s how:
AVPlayerItem
Now that you can play media files, you’re going to give your users the ability to change the speed at which they play.
Changing Playback Speeds
rate
sets the video playing speed. 0 means pause and 1 means the video plays at regular speed.
However, setting rate
also instructs playback to commence at that rate. In other words, calling pause()
and setting rate
to 0 does the same thing, as does calling play()
and setting rate
to 1!
So what about fast forward, slow motion or playing in reverse? Well, AVPlayer
has you covered!
When you set rate
to anything higher than 1, playback commences at that number times the regular speed. For instance, setting rate
to 2 means double speed. And setting rate
to a negative number results in playback at that number times regular speed in reverse
.
Before playback occurs at any rate other than forward at regular speed, however, you should check the appropriate variable in AVPlayerItem
to verify that it can be played back at that rate:
canPlayFastForward
canPlaySlowForward
canPlayReverse
canPlaySlowReverse
canPlayFastReverse
Most videos can play at various forward speeds, but it’s less common that they can play in reverse.
Updating the User Interface
Now, back to the code. When you tap the play button, it should toggle the controls to play AVAsset
and set the button’s title.
Add the following to playButtonTapped(_:)
:
if player?.rate == 0 {
  player?.rate = rate
  updatePlayButtonTitle(isPlaying: true)
} else {
  player?.pause()
  updatePlayButtonTitle(isPlaying: false)
}
Here, you toggle the player’s state and update the play button’s title, depending on the initial rate.
Finally, you’ll add code to move the playback cursor back to the beginning when the player has reached the end of the media file.
Resetting the Playback Cursor
In viewDidLoad()
, you can see that AVPlayerItemDidPlayToEndTimeNotification
has an observer. This notification is called when an AVPlayerItem
has reached the end.
Add the following code to playerDidReachEndNotificationHandler(_:)
:
// 1
guard let playerItem = notification.object as? AVPlayerItem else { return }

// 2
playerItem.seek(to: .zero, completionHandler: nil)

// 3
if player?.actionAtItemEnd == .pause {
  player?.pause()
  updatePlayButtonTitle(isPlaying: false)
}
In this code:
-
You verify that the notification object is an
AVPlayerItem. -
You use
seek(to:completionHandler:)to send the player to a desired position. In this case, you send the player toCMTime.zero— which is the beginning. -
You pause the player if its
actionAtItemEndis set to.pause, and you set the button text accordingly.
Build and run and select AVPlayerLayer from the menu. Change the values on the controls to see how each one changes the layer’s behavior.

For your next step, you’ll see how easy it is to make cool gradients with CALayer
.
Color Blending With CAGradientLayer
CAGradientLayer
makes it easy to blend two or more colors, which makes it especially well suited to backgrounds. You configure it by assigning:
CGColor
startPoint
endPoint
Bear in mind that startPoint
and endPoint
are not explicit points. Rather, you define them in the unit coordinate space and map them to the layer’s bounds when you draw them. In other words:
- An x value of 1 means the point is at the right edge of the layer.
- A y value of 1 means the point is at the bottom edge of the layer.
CAGradientLayer
has a type
property that lets you change the gradient pattern. The default, and most commonly used, is axial
(linear). This means that if you draw a line (A) between startPoint
and endPoint
, the gradations would occur along an imaginary line (B) that is perpendicular to A, and all points along B would be the same color:
Alternatively, you can control the gradient pattern with the locations
property. locations
takes an array of values between 0 and 1. These values specify relative stops where the gradient layer should use the next color in the colors
array. If left unspecified, the stop locations are evenly spaced by default.
Note
: If you set locations
, its count must match the count of colors
or undesirable things will happen. So beware!
Open CAGradientLayerViewController.swift
and add the following code to setUpGradientLayer()
:
gradientLayer.frame = viewForGradientLayer.bounds
gradientLayer.colors = colors
gradientLayer.locations = locations.map { NSNumber(value: $0) }
gradientLayer.startPoint = CGPoint(x: 0.5, y: 0.0)
gradientLayer.endPoint = CGPoint(x: 0.5, y: 1.0)
In this code, you assign an array of colors to the layer and you set start and end points.
Build and run, select CAGradientLayer from the menu, and look at the result:
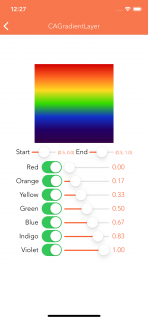
So colorful! Layer Player provides you with controls to change start and end points, colors and locations. Have fun trying them out to see what you get.
For your next step, you’ll add a loading animation to Layer Player.
Creating a Loading Animation with CAReplicatorLayer
CAReplicatorLayer
duplicates a layer a specified number of times. This allows you to create some surprisingly cool effects!
Each layer copy can have its own color and positioning changes. And you can delay its drawing to give an animation effect to the overall replicator layer.
Build and run and select CAReplicatorLayer from the menu. You’ll see several controls… but nothing to control:

You’ll start by configuring the layers to replicate.
Configuring Replicator Layers
Go back to Xcode and open CAReplicatorLayerViewController.swift
. There are three methods to fill under // MARK: - Layer setup
.
First, add the following to setUpReplicatorLayer()
:
// 1
replicatorLayer.frame = viewForReplicatorLayer.bounds

// 2
let count = instanceCountSlider.value
replicatorLayer.instanceCount = Int(count)
replicatorLayer.instanceDelay =
  CFTimeInterval(instanceDelaySlider.value / count)

// 3
replicatorLayer.instanceColor = UIColor.white.cgColor
replicatorLayer.instanceRedOffset = offsetValueForSwitch(offsetRedSwitch)
replicatorLayer.instanceGreenOffset = offsetValueForSwitch(offsetGreenSwitch)
replicatorLayer.instanceBlueOffset = offsetValueForSwitch(offsetBlueSwitch)
replicatorLayer.instanceAlphaOffset = offsetValueForSwitch(offsetAlphaSwitch)

//4
let angle = Float.pi * 2.0 / count
replicatorLayer.instanceTransform =
  CATransform3DMakeRotation(CGFloat(angle), 0.0, 0.0, 1.0)

//5
viewForReplicatorLayer.layer.addSublayer(replicatorLayer)
In this code, you configure the instances of a replicator layer:
- First, you set the layer’s frame.
- You set the number of replications to create and the time delay between creations.
- You define the base color for all the replicated instances and the delta value to add to each color component. Each defaults to 0, which effectively preserves color value across all instances. However, in this case, the instance color was originally set to white. This means red, green and blue are 1.0 already. If you set red to 0, for example, and set green and blue to negative numbers, then red would become the prominent color. Similarly, add the alpha offset to the alpha of each successive replicated instance.
- Now, you rotate each instance to create a circle effect.
- Finally, you add the layer to the view’s layer.
Setting Position and Fade
Next, create an instance layer for the replicator layer to use. Add the following to setUpInstanceLayer
:
let layerWidth = CGFloat(layerSizeSlider.value)
let midX = viewForReplicatorLayer.bounds.midX - layerWidth / 2.0
instanceLayer.frame = CGRect(
  x: midX,
  y: 0.0,
  width: layerWidth,
  height: layerWidth * lengthMultiplier)
instanceLayer.backgroundColor = UIColor.white.cgColor
replicatorLayer.addSublayer(instanceLayer)
This code sets the instance frame. Here, the first instance will be drawn at center x and at the top of viewForReplicatorLayer
‘s bounds. You then set the instance’s color and add the instance layer to the replicator layer.
Now for the fade animation. Add the following to setUpLayerFadeAnimation
:
fadeAnimation.fromValue = 1.0
fadeAnimation.toValue = 0.0
fadeAnimation.repeatCount = Float(Int.max)
Here, you use fadeAnimation
, a CABasicAnimation
, to change the instance’s opacity
from 1 (opaque) to 0 (transparent).
Build and run and enjoy what your code now does:
Layer Player includes controls to manipulate most of these properties. Change the values and see how they affect the animation!

Now that you’ve created a fun animated circle, you’ll use another property of CALayer to draw a star.
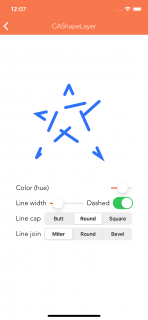
Drawing a Star With CAShapeLayer
CAShapeLayer
uses scalable vector paths to draw lines, shapes and patterns — and it’s much faster than using images! Another benefit is that you don’t need to provide images at regular, @2x and @3x sizes. Hooray!
Additionally, you have a variety of properties at your disposal to customize your graphics. For example, you can adjust line thickness, color, dashing and specify how the lines join. And when your lines make shapes, you can change how they’re filled.
Now it’s time to draw an orange star! First, Open CAShapeLayerViewController.swift
and add the following to setUpShapeLayer()
:
// 1
shapeLayer.path = openPath.cgPath

// 2
shapeLayer.lineCap = .butt
shapeLayer.lineJoin = .miter
shapeLayer.miterLimit = 4.0

// 3
shapeLayer.lineWidth = CGFloat(lineWidthSlider.value)
shapeLayer.strokeColor = swiftOrangeColor.cgColor
shapeLayer.fillColor = UIColor.white.cgColor

// 4
shapeLayer.lineDashPattern = nil
shapeLayer.lineDashPhase = 0.0

viewForShapeLayer.layer.addSublayer(shapeLayer)
Going through this:
-
CAShapeLayertakes aCGPaththat defines how to draw it on the screen. You’ll draw that path soon. -
lineJoinandlineCapdefine how lines in the path intersect and end. - Set the path line width and color.
-
lineDashPatternandlineDashPhaseallow you to draw dashed lines. In this case, you’ll draw simple lines without dashes.
Next you’ll draw the path itself. Add the following to setUpPath()
:
openPath.move(to: CGPoint(x: 30, y: 196))

openPath.addCurve(
  to: CGPoint(x: 112.0, y: 12.5),
  controlPoint1: CGPoint(x: 110.56, y: 13.79),
  controlPoint2: CGPoint(x: 112.07, y: 13.01))

openPath.addCurve(
  to: CGPoint(x: 194, y: 196),
  controlPoint1: CGPoint(x: 111.9, y: 11.81),
  controlPoint2: CGPoint(x: 194, y: 196))

openPath.addLine(to: CGPoint(x: 30.0, y: 85.68))
openPath.addLine(to: CGPoint(x: 194.0, y: 48.91))
openPath.addLine(to: CGPoint(x: 30, y: 196))
This draws your star shape.
Build and run and select CAShapeLayer to see the result:

Layer Player includes controls to manipulate many of CAShapeLayer
‘s properties. Play with these controls to adjust your star:
CALayer
doesn’t only let you draw 2D figures, but 3D shapes as well. That’s what you’ll do in the next section.
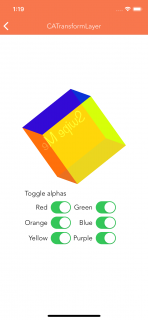
Drawing a 3D Cube With CATransformLayer
CATransformLayer
does not flatten its sublayer hierarchy like other layer classes. This makes it handy for drawing 3D structures. CATransformLayer
is actually a container for its sublayers. Each sublayer can have its own transforms and opacity changes. However, it ignores changes to other rendered layer properties such as border width and color.
In this section you’ll build an interactive 3D cube. Start by opening CATransformLayerViewController.swift
and adding the following code to buildCube()
:
// 1
transformLayer = CATransformLayer()

// 2
let redLayer = sideLayer(color: redColor)
redLayer.addSublayer(swipeMeTextLayer)
transformLayer.addSublayer(redLayer)

// 3
let orangeLayer = sideLayer(color: orangeColor)
var orangeTransform = CATransform3DMakeTranslation(
  sideLength / 2.0,
  0.0,
  sideLength / -2.0)
orangeTransform = CATransform3DRotate(
  orangeTransform,
  degreesToRadians(90.0),
  0.0,
  1.0,
  0.0)
orangeLayer.transform = orangeTransform
transformLayer.addSublayer(orangeLayer)
Here, you create the first two sides of your cube:
-
First, you create a
CATransformerLayer. -
Next, you add a
CALayerto represent the red side of the cube and add it totransformLayer. -
Then you add the orange side of the cube. You position it by setting the
transformproperty, which accepts aCATransform3D.
Similarly, add the following code:
let yellowLayer = sideLayer(color: yellowColor)
yellowLayer.transform = CATransform3DMakeTranslation(0.0, 0.0, -sideLength)
transformLayer.addSublayer(yellowLayer)

let greenLayer = sideLayer(color: greenColor)
var greenTransform = CATransform3DMakeTranslation(
  sideLength / -2.0,
  0.0,
  sideLength / -2.0)
greenTransform = CATransform3DRotate(
  greenTransform,
  degreesToRadians(90.0),
  0.0,
  1.0,
  0.0)
greenLayer.transform = greenTransform
transformLayer.addSublayer(greenLayer)

let blueLayer = sideLayer(color: blueColor)
var blueTransform = CATransform3DMakeTranslation(
  0.0,
  sideLength / -2.0,
  sideLength / -2.0)
blueTransform = CATransform3DRotate(
  blueTransform,
  degreesToRadians(90.0),
  1.0,
  0.0,
  0.0)
blueLayer.transform = blueTransform
transformLayer.addSublayer(blueLayer)

let purpleLayer = sideLayer(color: purpleColor)
var purpleTransform = CATransform3DMakeTranslation(
  0.0,
  sideLength / 2.0,
  sideLength / -2.0)
purpleTransform = CATransform3DRotate(
  purpleTransform,
  degreesToRadians(90.0),
  1.0,
  0.0,
  0.0)
purpleLayer.transform = purpleTransform
transformLayer.addSublayer(purpleLayer)
Here, you create the remaining four sides of your cube.
Finally, set the layer’s z anchor point and add it to the screen by adding the following:
transformLayer.anchorPointZ = sideLength / -2.0
viewForTransformLayer.layer.addSublayer(transformLayer)
Here, you configure anchorPointZ
to specify the anchor point on the z axis around which the geometric manipulations occur.
- 3DTransformFun project byRich Turton.
- Enter The Matrix project by Mark Pospesel.
Now that you’ve created the cube, it’s time to set it in motion.
Rotating the Cube
To rotate the cube, you need to handle touch events. You can’t directly hit test a transform layer because it doesn’t have a 2D coordinate space to use to map a touchpoint. However, it’s possible to hit test individual sublayers.
The project code already includes the TrackBall utility
from Bill Dudney, ported to Swift. This makes it easy to apply 3D transforms based on user gestures. You can check it out under // MARK: - Touch Handling
.
Build and run. Select CATransformLayer from the menu and you’ll see a red square:

Swipe the cube and toggle the switches to see how they change the cube:
Making a Shooting Star With CAEmitterLayer
In computer graphics, Particle Systems are used to generate real-world phenomena such as fire, smoke, sparks, fireworks and explosions.
In Core Animation, CAEmitterLayer
is available to render such systems and control animated particles that are instances of CAEmitterCell
. Both CAEmitterLayer
and CAEmitterCell
have properties to change rendering rate, size, shape, color, velocity, lifetime and more.
Preparing the Emitter Layer
The Emitter Layer configures the position and shape of where particles are emitted.
Add the following to setUpEmitterLayer()
in CAEmitterLayerViewController.swift
:
// 1
resetEmitterCells()
emitterLayer.frame = viewForEmitterLayer.bounds
viewForEmitterLayer.layer.addSublayer(emitterLayer)

// 2
emitterLayer.seed = UInt32(Date().timeIntervalSince1970)

// 3
emitterLayer.emitterPosition = CGPoint(
  x: viewForEmitterLayer.bounds.midX * 1.5,
  y: viewForEmitterLayer.bounds.midY)

// 4
emitterLayer.renderMode = .additive
Here’s what you’ve done:
- First, you reset the layer and add it to the view.
- Then, you provide a seed for the layer’s random number generator. This, in turn, randomizes certain properties of the layer’s emitter cells, such as velocity. See the comments below, after the next code block, for more information.
- You set the emitter position.
- Finally, you define how particle cells render into the layer.
Setting up the Emitter Cell
Next, set up the emitter cell, which determines the specific behavior and appearance of the particles.
Add the following to setUpEmitterCell()
:
// 1
emitterCell.contents = UIImage(named: "smallStar")?.cgImage

// 2
emitterCell.velocity = 50.0
emitterCell.velocityRange = 500.0

// 3
emitterCell.color = UIColor.black.cgColor

// 4
emitterCell.redRange = 1.0
emitterCell.greenRange = 1.0
emitterCell.blueRange = 1.0
emitterCell.alphaRange = 0.0
emitterCell.redSpeed = 0.0
emitterCell.greenSpeed = 0.0
emitterCell.blueSpeed = 0.0
emitterCell.alphaSpeed = -0.5
emitterCell.scaleSpeed = 0.1

// 5
let zeroDegreesInRadians = degreesToRadians(0.0)
emitterCell.spin = degreesToRadians(130.0)
emitterCell.spinRange = zeroDegreesInRadians
emitterCell.emissionLatitude = zeroDegreesInRadians
emitterCell.emissionLongitude = zeroDegreesInRadians
emitterCell.emissionRange = degreesToRadians(360.0)

// 6
emitterCell.lifetime = 1.0
emitterCell.birthRate = 250.0

// 7
emitterCell.xAcceleration = -800
emitterCell.yAcceleration = 1000
Going through this step-by-step:
- You set up the emitter cell by setting its contents to an image. This image is available in the Layer Player project.
-
Then you specify an initial velocity and maximum variance with
velocityRange. The emitter layer uses the aforementioned seed to create a random number generator. The random number generator randomizes values within the range by using the initial value plus and minus the range value. This randomization happens for any properties ending inRange. - You set the color to black. This allows the variance to vary from the default of white, which results in overly bright particles.
-
Next, you set a series of color ranges using the same randomization as for
velocityRange. This time, the randomization specifies the range of variance to each color. Speed values dictate how quickly each color can change over the lifetime of the cell. -
Here, you specify how to distribute the cells around a full circular cone. You do this by setting the emitter cell’s spinning velocity and emission range. The
emissionRangedefines the cone, specified in radians.emissionRangedetermines how to distribute emitter cells around the cone. -
You set the cell’s lifetime to 1 second. This property’s default value is 0, so if you don’t explicitly set it, your cells never appear! The same goes for
birthRateper second. ThebirthRatedefault is 0, so this must be set to a positive number for cells to appear. - Finally, you set cell x and y acceleration. These values affect the visual angle at which the particles emit.
Build and run and select CAEmitterLayer . Here’s the outcome:
Back in Xcode, find prepare(for:sender:)
and uncomment the code to hook up the controls table.
Now, build and run the app again and use the controls to adjust all the above-mentioned properties and several more:

Where to Go From Here?
Congratulations! You’ve completed the great CALayer
Tour. You have seen nine examples of how to use CALayer
and its many subclasses. You can download the completed version of the project using the Download Materials
button at the top or bottom of this tutorial.
But don’t stop here! Open a new project, or work with one of your existing ones, and see how you can use layers. You may be able to achieve better performance, or you might add some new animations to wow your users — and yourself! :]
If you want to learn more about this topic, check out our video course on CALayers
If you have any questions or comments about this article or working with layers, join in on the discussion below!
Recommend
About Joyk
Aggregate valuable and interesting links.
Joyk means Joy of geeK