

一文了解Netty整体流程 - fredal的博客
source link: https://fredal.xin/netty-process?
Go to the source link to view the article. You can view the picture content, updated content and better typesetting reading experience. If the link is broken, please click the button below to view the snapshot at that time.
本文基于版本 4.1.46,同时只描述类而不展示具体源码。
Netty 的整体流程
Netty 的整体流程相对来说还是比较复杂的,初学者往往会被绕晕。所以这里总结了一下整体的流程,从而对 Netty 的整体服务流程有一个大致的了解。从功能上,流程可以分为服务启动、建立连接、读取数据、业务处理、发送数据、关闭连接以及关闭服务。整体流程如下所示(图中没有包含关闭的部分):
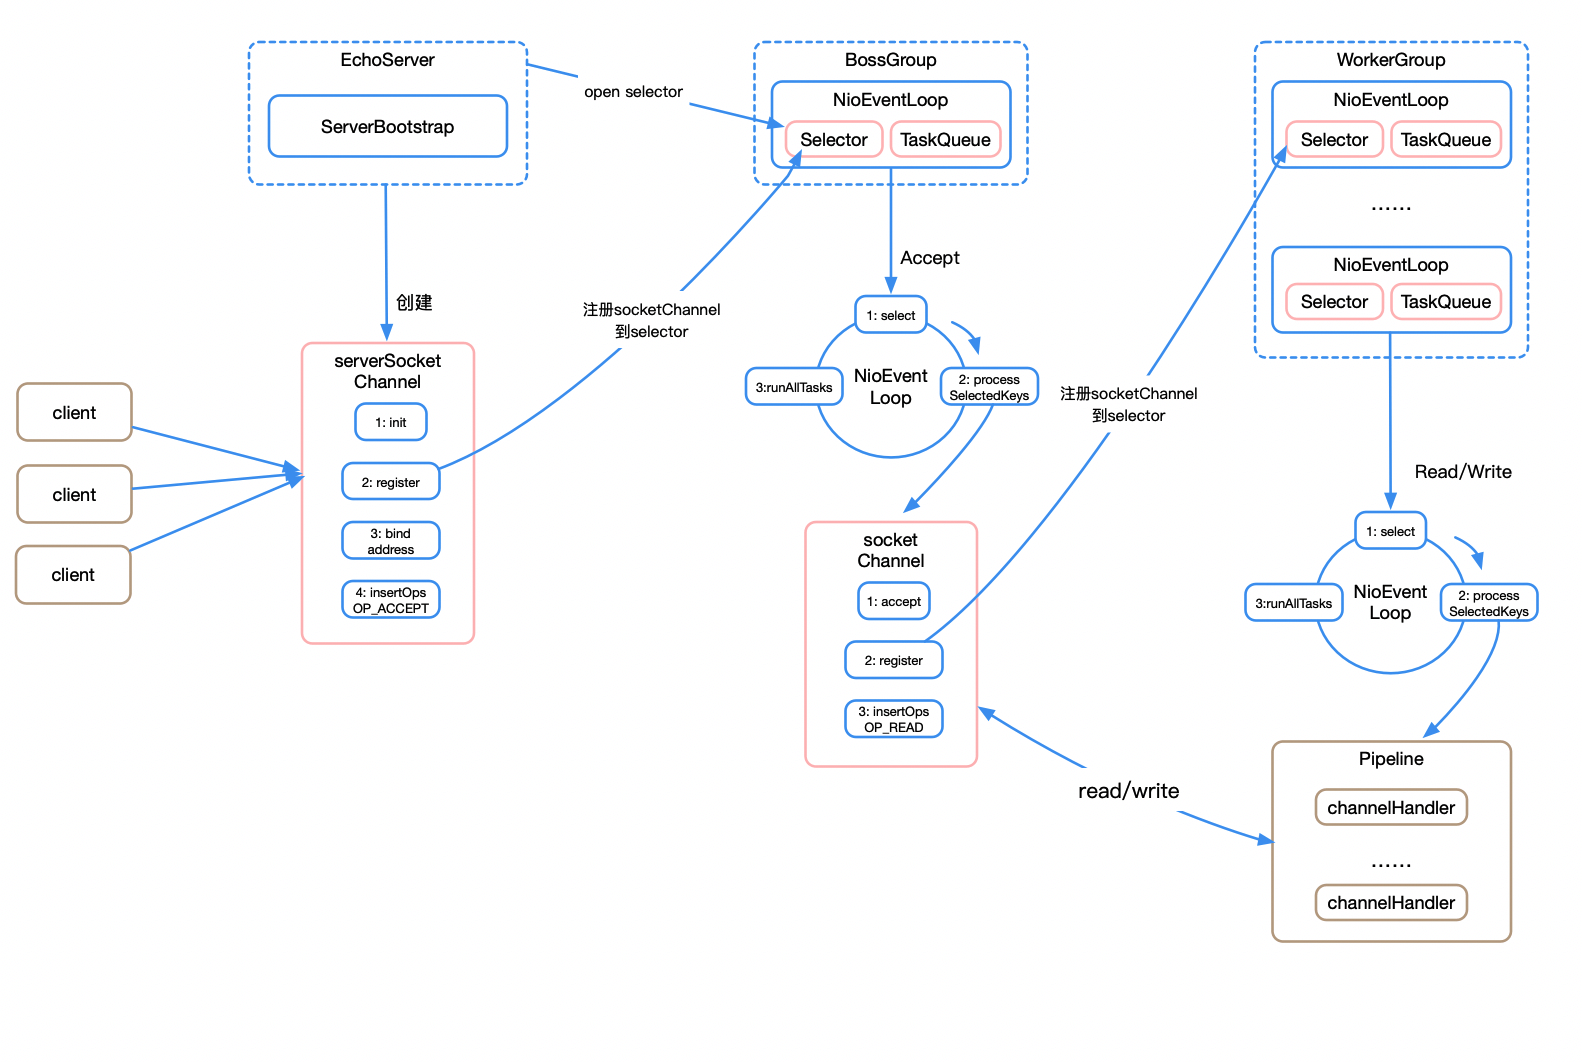
服务启动时,我们以 example 代码中的 EchoServer 为例,启动的过程以及相应的源码类如下:
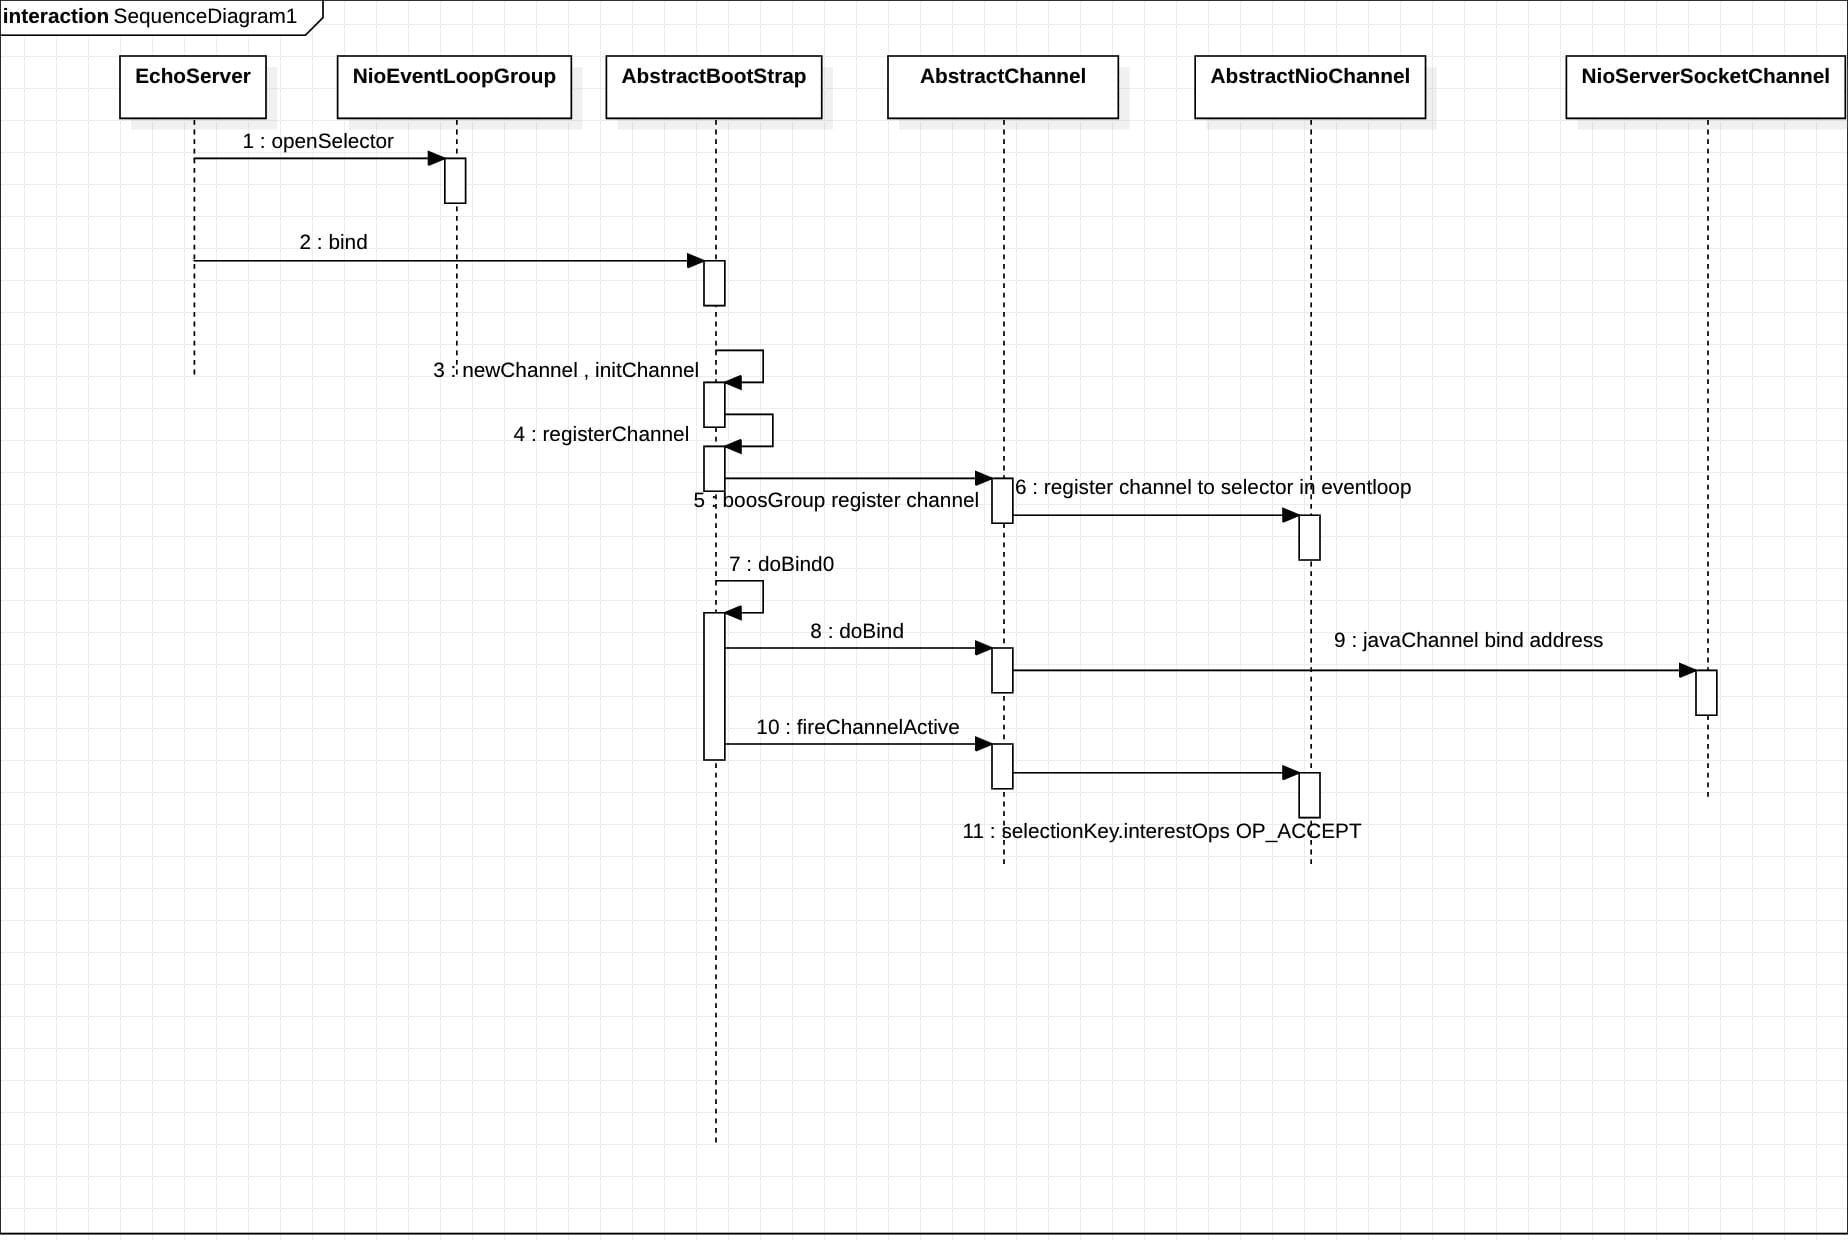
EchoServer#new NioEventLoopGroup(1)->NioEventLoop#provider.openSelector(): 创建 selectorEchoServer#b.bind(PORT).sync->AbstractBootStrap#doBind()->initAndRegister()-> channelFactory.newChannel() / init(channel): 创建 serverSocketChannel 以及初始化EchoServer#b.bind(PORT).sync->AbstractBootStrap#doBind()->initAndRegister()-> config().group().register(channel):从 boss group 中选择一个 NioEventLoop 开始注册 serverSocketChannelEchoServer#b.bind(PORT).sync->AbstractBootStrap#doBind()->initAndRegister()->config().group().register(channel)->AbstractChannel#register0(promise)->AbstractNioChannel#javaChannel().register(eventLoop().unwrappedSelector(), 0, this): 将 server socket channel 注册到选择的 NioEventLoop 的 selectorEchoServer#b.bind(PORT).sync()->AbstractBootStrap#doBind()->doBind0()->AbstractChannel#doBind(localAddress)->NioServerSocketChannel#javaChannel().bind(localAddress, config.getBacklog()): 绑定地址端口开始启动EchoServer#b.bind(PORT).sync()->AbstractBootStrap#doBind()->doBind0()->AbstractChannel#pipeline.fireChannelActive()->AbstractNioChannel#selectionKey.interestOps(interestOps|readInterestOp): 注册 OP_READ 事件
上述启动流程中,1、2、3 是由我们自己的线程执行的,即 mainThread,4、5、6 是由 Boss Thread 执行。相应时序图如下:
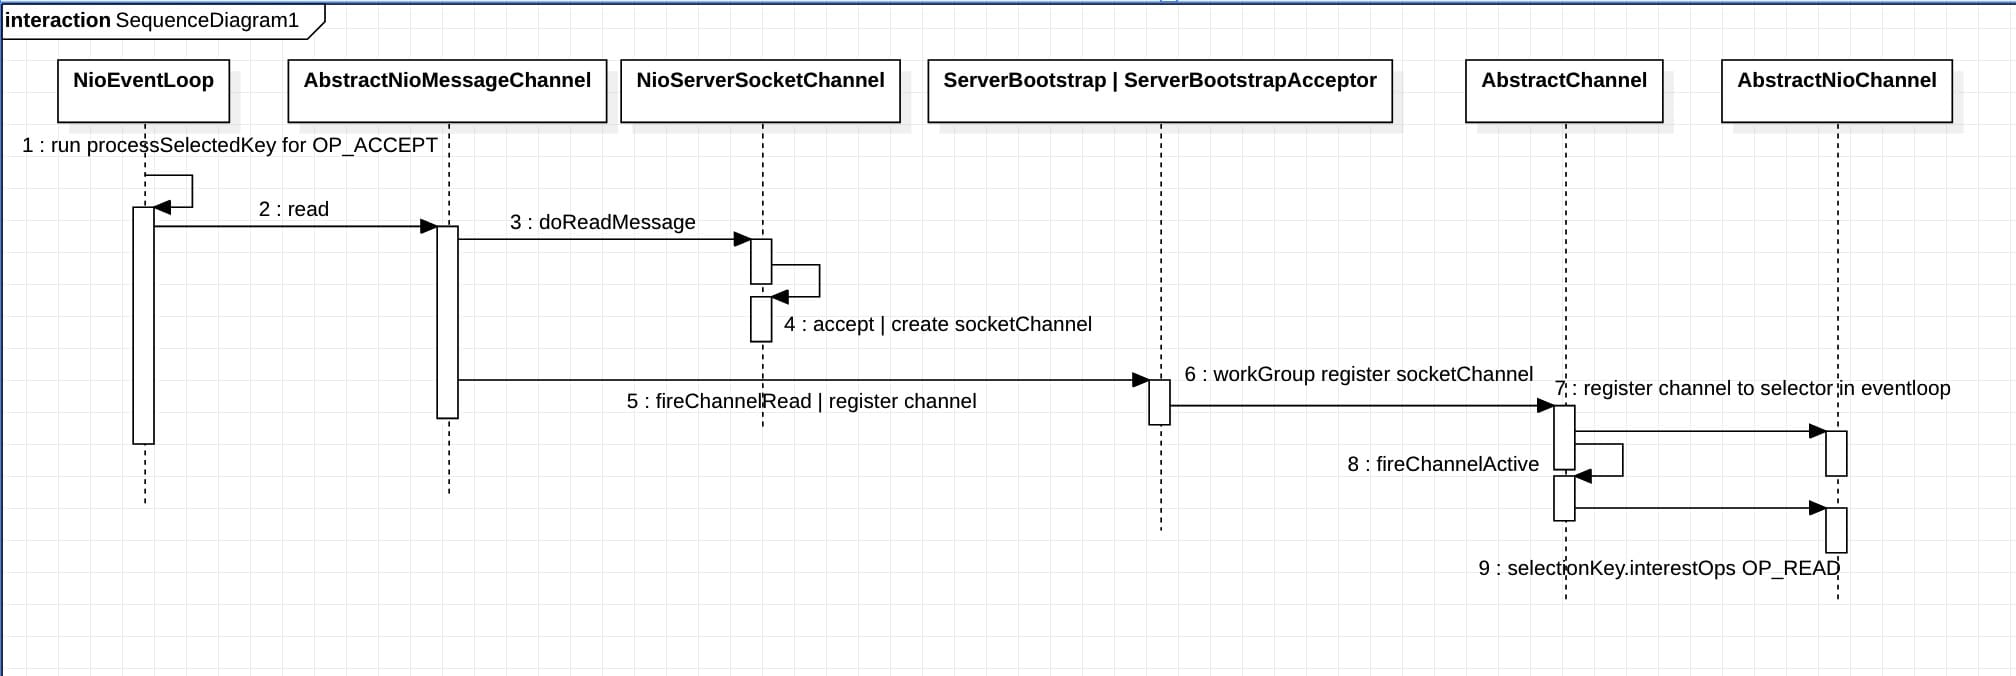
服务启动后便是建立连接的过程了,相应过程及源码类如下:
NioEventLoop#run()->processSelectedKey()NioEventLoop 中的 selector 轮询创建连接事件(OP_ACCEPT)NioEventLoop#run()->processSelectedKey()->AbstractNioMessageChannel#read->NioServerSocketChannel#doReadMessages()->SocketUtil#accept(serverSocketChannel)创建 socket channelNioEventLoop#run()->processSelectedKey()->AbstractNioMessageChannel#fireChannelRead->ServerBootstrap#ServerBootstrapAcceptor#channelRead-> childGroup.register(child)从worker group 中选择一个 NioEventLoop 开始注册 socket channelNioEventLoop#run()->processSelectedKey()->AbstractNioMessageChannel#fireChannelRead->ServerBootstrap#ServerBootstrapAcceptor#channelRead-> childGroup.register(child)->AbstractChannel#register0(promise)-> AbstractNioChannel#javaChannel().register(eventLoop().unwrappedSelector(), 0, this)将 socket channel 注册到选择的 NioEventLoop 的 selectorNioEventLoop#run()->processSelectedKey()->AbstractNioMessageChannel#fireChannelRead->ServerBootstrap#ServerBootstrapAcceptor#channelRead-> childGroup.register(child)->AbstractChannel#pipeline.fireChannelActive()-> AbstractNioChannel#selectionKey.interestOps(interestOps | readInterestOp)注册 OP_ACCEPT 事件
同样,上述流程中 1、2、3 的执行仍由 Boss Thread 执行,直到 4、5 由具体的 Work Thread 执行。
读写与业务处理
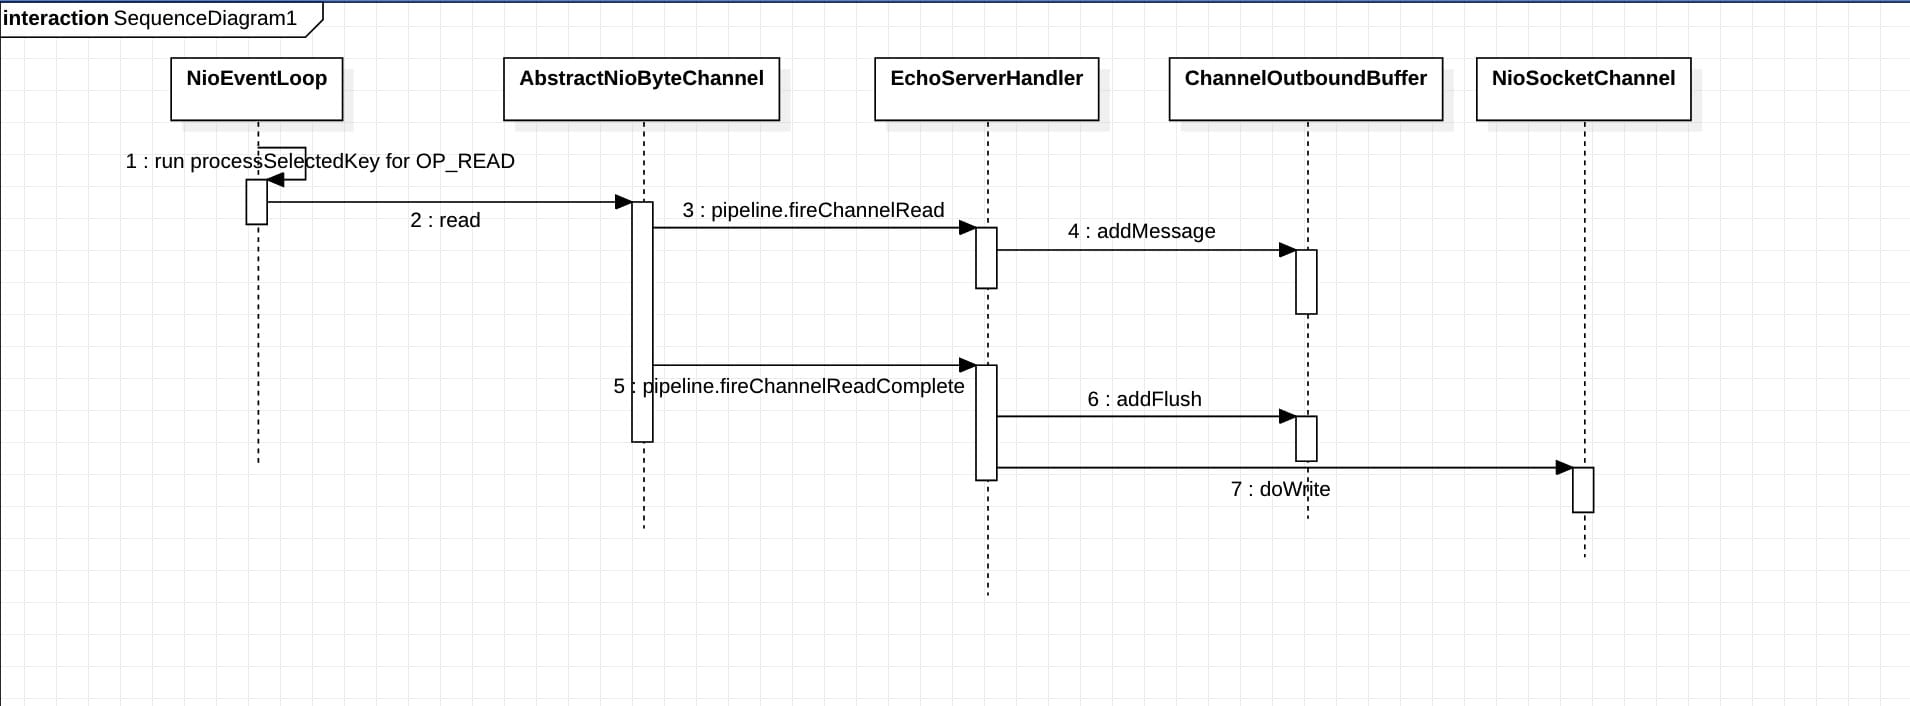
连接建立完毕后是具体的读写,以及业务处理逻辑。以 EchoServerHandler 为例,读取数据后会将数据传播出去供业务逻辑处理,此时的 EchoServerHandler 代表我们的业务逻辑,而它的实现也非常简单,就是直接将数据写回去。我们将这块看成一个整条,流程如下:
NioEventLoop#run()->processSelectedKey() NioEventLoop 中的 selector轮询创建读取事件(OP_READ)NioEventLoop#run()->processSelectedKey()->AbstractNioByteChannel#read()nioSocketChannel 开始读取数据NioEventLoop#run()->processSelectedKey()->AbstractNioByteChannel#read()->pipeline.fireChannelRead(byteBuf)把读取到的数据传播出去供业务处理AbstractNioByteChannel#pipeline.fireChannelRead->EchoServerHandler#channelRead在这个例子中即 EchoServerHandler 的执行EchoServerHandler#write->ChannelOutboundBuffer#addMessage调用 write 方法EchoServerHandler#flush->ChannelOutboundBuffer#addFlush调用 flush 准备数据EchoServerHandler#flush->NioSocketChannel#doWrite调用 flush 发送数据
在这个过程中读写数据都是由 Work Thread 执行的,但是业务处理可以由我们自定义的线程池来处理,并且一般我们也是这么做的,默认没有指定线程的情况下仍然由 Work Thread 代为处理。
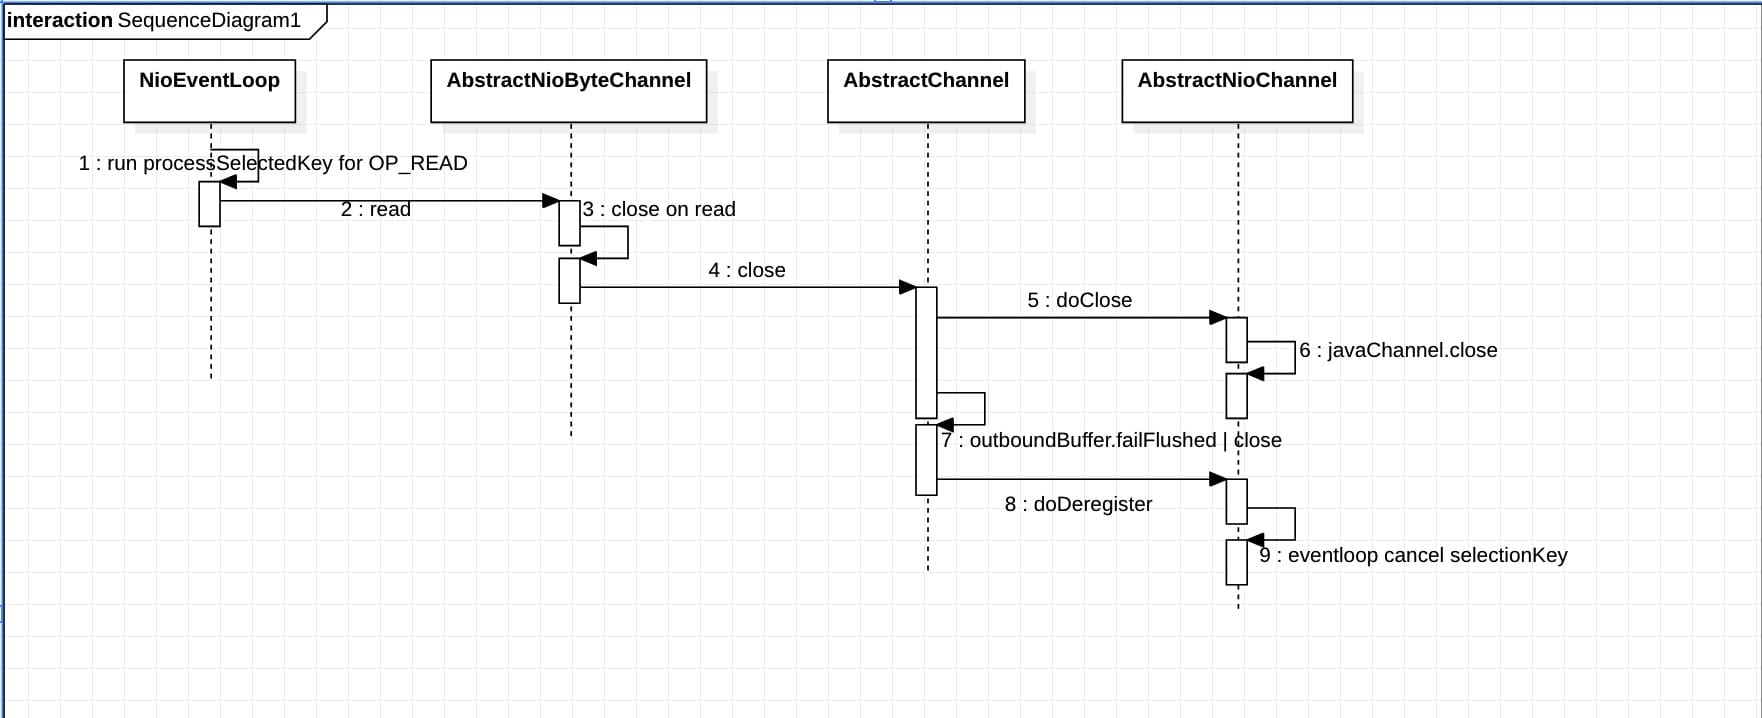
服务处理完毕后,单个连接的关闭是什么样的呢?
NioEventLoop#run()->processSelectedKey()NioEventLoop 中的 selector 轮询创建读取事件(OP_READ),这里关闭连接仍然是读取事件NioEventLoop#run()->processSelectedKey()->AbstractNioByteChannel#read()->closeOnRead(pipeline)当字节<0 时开始执行关闭 nioSocketChannelNioEventLoop#run()->processSelectedKey()->AbstractNioByteChannel#read()->closeOnRead(pipeline)->AbstractChannel#close->AbstractNioChannel#doClose()关闭 socketChannelNioEventLoop#run()->processSelectedKey()->AbstractNioByteChannel#read()->closeOnRead(pipeline)->AbstractChannel#close->outboundBuffer.failFlushed/close清理消息:不接受新信息,fail 掉所有 queue 中消息NioEventLoop#run()->processSelectedKey()->AbstractNioByteChannel#read()->closeOnRead(pipeline)->AbstractChannel#close->fireChannelInactiveAndDeregister->AbstractNioChannel#doDeregister eventLoop().cancel(selectionKey())关闭多路复用器的 key
时序图如下:
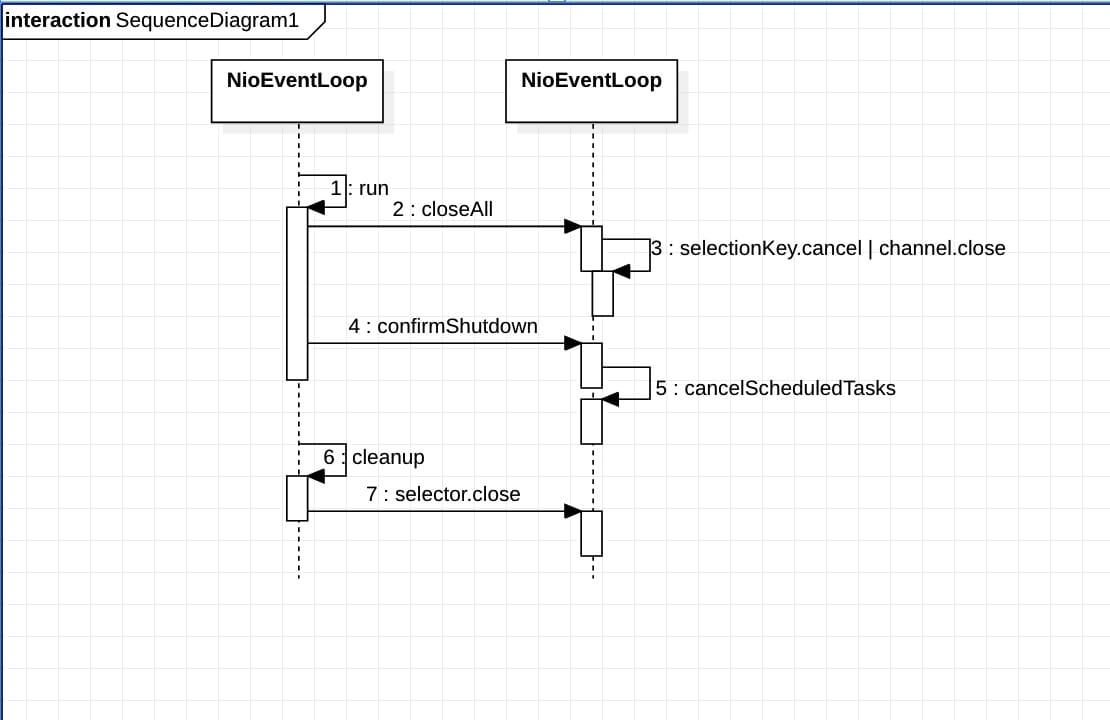
最后是关闭整个 Netty 服务:
NioEventLoop#run->closeAll()->selectionKey.cancel/channel.close关闭 channel,取消 selectionKeyNioEventLoop#run->confirmShutdown->cancelScheduledTasks取消定时任务NioEventLoop#cleanup->selector.close()关闭 selector
时序图如下,为了好画将 NioEventLoop 拆成了 2 块:
至此,整个 Netty 的服务流程就结束了。
Recommend
About Joyk
Aggregate valuable and interesting links.
Joyk means Joy of geeK