

WebRTC+MongoDB+Vue+Docker:全栈用开源项目,实现一个Slack | WebRTC中文网-最权威的...
source link: https://webrtc.org.cn/20200603-slack/?
Go to the source link to view the article. You can view the picture content, updated content and better typesetting reading experience. If the link is broken, please click the button below to view the snapshot at that time.
WebRTC+MongoDB+Vue+Docker:全栈用开源项目,实现一个Slack
现在聊天和视频会议应用火遍全球。 Slack、Microsoft Teams、Zoom、Google Meet、Facebook Rooms等应用程序越来越受欢迎。这是因为Covid-19大流行,我们所有人不得不呆在家里,所以掌握在线工作和协作的能力变得非常必要。聊天和视频会议应用解决了我们的困境,并提供了有效的远程团队协作工具,所以其用户和收入有了巨大增长。
虽然大多数这样的应用程序都提供免费选项,但如果你想使用一些高级功能(比如更大的聊天组,更多的会议参与者或更高质量的视频/音频)就要花钱了。
如果我们可以创建自己的Slack应用呢?
我指的不是那种网上一抓一大把的聊天演示应用,而是更加复杂,类似于完全由以下功能组成的应用程序:
- 多达50人的多方通话和视频会议;
- 强大的富文本聊天功能,包含表情符号、字样、文件共享、提示和回复;
- 支持采用多种形式的对话频道,包括私人的频道(房间加密码)、公开的频道(仅需输入房间名称即可加入)、多频道(在一个房间内可支持两人或多人发起私密对话,类似场景可以参考在线教育中的超级小班课场景),并且可支持简单、高效的会议组织形式(比如主持人+观众);
除此之外,还有可以在本地或云中部署的这种功能。
好吧,这正是我们要做的内容。我们把这个项目命名为Roomler。
各位,你可以将其视为“ Slack on Crack”或“ Microsoft Teams on Wheels”项目,以及所有免费和开源的产品。
事不宜迟,让我们开始深入讨论。
行动起来!
俗话说得好,行动胜于雄辩。首先我们看看该项目实操如何。要了解最终结果,请观看这个介绍视频:
构建功能强大的视频会议和团队协作工具
技术栈
我们将使用最先进的开源技术来搭建技术栈:
Janus Gateway:Meetecho优秀的通用WebRTC服务器(SFU);
Coturn :TURN和STUN Server的免费开源项目;
Fastify :用于Node.js的快速、低开销的Web框架;
PM2 :Node.JS的生产过程管理器;
MongoDB :为现代应用程序开发人员和云时代构建的基于文档的分布式数据库;
Redis :内存中的数据结构存储,用作数据库,缓存和消息代理;
VueJS :渐进式JavaScript框架;
NuxtJS:通用应用程序的元框架;
VuetifyJS :材质设计UI组件框架;
Nginx :高性能负载平衡器,Web服务器和有HTTP3 / Quiche和Brtoli支持的反向代理;
Docker:用于构建、部署和管理容器化应用程序的平台。
基于微服务的架构
整个应用程序由以下几个微服务(Docker容器)组成:
- MongoDB :官方图像(386MB);
- Redis:Bitnami图像(105MB);
- Coturn :高山:基于边缘的图像(20MB);
- Janus:Debian:精巧的形象(170MB);
- Roomler:Debian:buster-slim NodeJS安装的图像(622MB);
- Nginx :Debian:有HTTP3 / Quic + Brotli支持的buster-slim映像(107MB)。
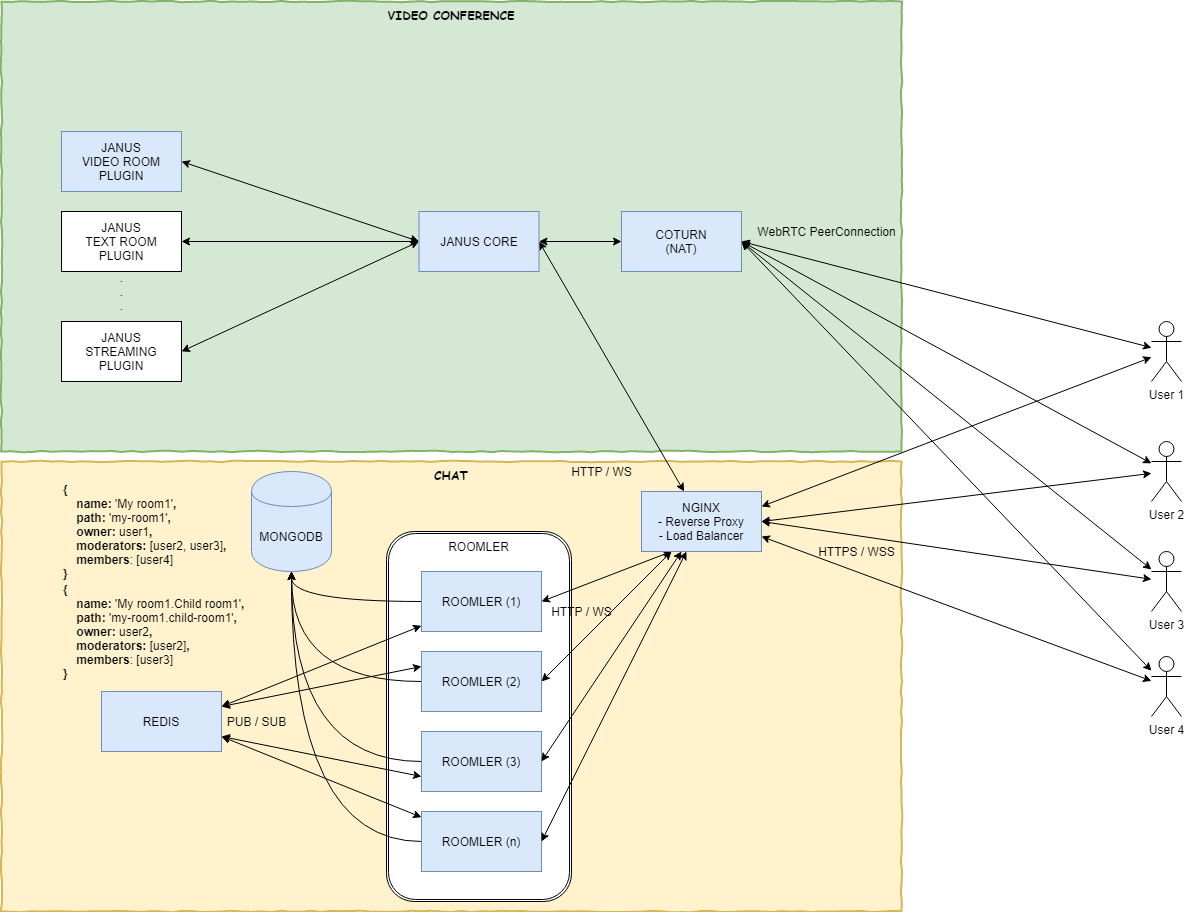
组装微服务
先决条件——我们需要两个docker网络:
docker network create frontend # for nginx<->roomler
docker network create backend # for roomler<->[mongo, redis]
MongoDB
用于存储以下内容的数据库:
- 连接数量;
- 通话请求等等..
我们将使用MongoDB,通过以下方式启动一个MongoDB容器:
docker run -d --name mongo \
  --restart=always \
  -p 27017:27017 \
  -e MONGO_INITDB_ROOT_USERNAME=SuperAdmin \
  -e MONGO_INITDB_ROOT_PASSWORD=SuperAdminSecret \
  -v mongo_data:/data/db \
  --network=backend \
  mongo
启动MongoDB容器后,你可以登录进来:
mongo roomlerdb -u SuperAdmin -p SuperAdminSecret --host your_host --port 27017
并为Roomler应用创建用户:
db.createUser(
  {
    user: "roomler",
    pwd: "super_secret",
    roles: [ { role: "readWrite", db: "roomlerdb" } ]
  }
)
然后,您的MongoDB连接字符串会作为环境变量传递到roomler中(请参阅下面的Roomler部分),如下所示:
为了简单起见,我们仅启动一个mongo实例。在实际场景中,你可以设置mongo实例集群。关于如何设置mongo集群,详见这篇文章。
下面我们继续单个实例的操作。
Redis
为了使这些容器能够相互通信,Roomler Chat需要有可扩展的功能(即支持多个可复制的容器),所以我们选择使用Redis的PUB / SUB机制。
举个例子,通过容器C1中Web Sockets收到的聊天消息会发布到Redis,以便其他订阅Redis的容器Ci也可以接收这些信息。
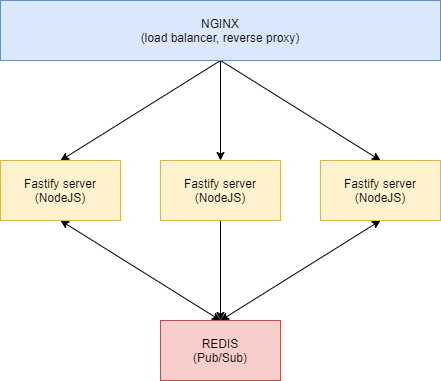
接下来,在没有密码的情况下启动Redis。即使我们不建议这样做,但这不会造成多大困扰。因为Internet无法访问Redis,只能通过后端Docker Bridge网络访问。
docker run -d --name redis \
 --restart=always \
    -e ALLOW_EMPTY_PASSWORD=yes \
    --network=backend \
    bitnami/redis:latest
Coturn
为了支持NAT身后(即具有专用IP地址)的用户加入视频会议,我们需要一个TURN服务器。建议大家直接在dockers host网络上运行此程序:
docker run -d \
  --name="coturn" \
  --restart="always" \
  --net=host \
       instrumentisto/coturn -n \
         --lt-cred-mech
         --fingerprint \
         --no-multicast-peers \
         --cli-password=MyTopSecret \
         --no-tlsv1 \
         --no-tlsv1_1 \
         --fingerprint \
         --lt-cred-mech \
         --verbose \
         --user=SuperUser:MyTopSecret \
         --server-name=your_domain \
         --realm=your_domain \
         --listening-ip='$(detect-external-ip)' \
         --min-port=10200 \
         --max-port=49200
Janus
我们会依靠浏览器的WebRTC连接视频会议。 但由于WebRTC是p2p协议,在视频会议下,默认的MESHED可扩展功能不太行。所以我们选择通过优秀的Janus网关实现SFU(选择性转发单元)拓扑。
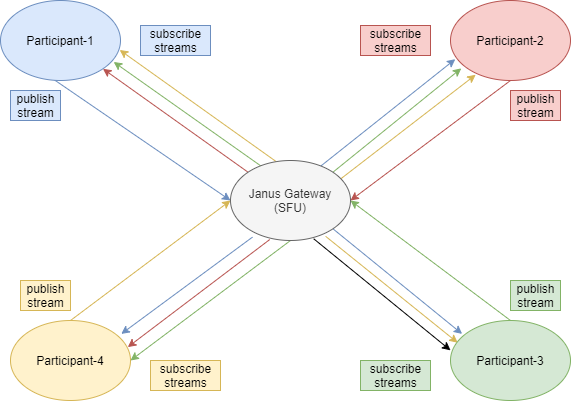
像Coturn一样,我们建议大家把janus也连接到dockers主机网络,以避免在加入视频会议时出现网络问题,比如ICE candidate收集失败等。
docker run -d \
  --name="janus" \
  --restart="always" \
  --network="host" \
  gjovanov/janus-slim
Roomler
Roomler支持用自己喜欢的帐户(Facebook、Gmail、LinkedIn、Github)或本地注册(使用用户名、电子邮件和密码)进行OAuth身份验证。我们需要连接所有OAuth ID / Secrets、数据库连接字符串、Coturn Auth和Giphy API密钥。
docker run -d --name roomler \
    --hostname roomler \
    --restart always \
    --network=backend \
    -e API_URL=https://roomler.live \
    -e DB_CONN=YOUR_DB_CONN \
    -e WS_SCALEOUT_ENABLED=true \
    -e WS_SCALEOUT_HOST=redis \
    -e SENDGRID_API_KEY=YOUR_SEND_GRID_KEY \
    -e FACEBOOK_ID=YOUR_FACEBOOK_ID \
    -e FACEBOOK_SECRET=YOUR_FACEBOOK_SECRET \
    -e GOOGLE_ID=YOUR_GOOGLE_ID \
    -e GOOGLE_SECRET=YOUR_GOOGLE_SECRET \
    -e GITHUB_ID=YOUR_GITHUB_ID \
    -e GITHUB_SECRET=YOUR_GITHUB_SECRET \
    -e LINKEDIN_ID=YOUR_LINKEDIN_ID \
    -e LINKEDIN_SECRET=YOUR_LINKEDIN_SECRET \
    -e TURN_URL=YOUR_TURN_URL \
    -e TURN_USERNAME=YOUR_TURN_USERNAME \
    -e TURN_PASSWORD=YOUR_TURN_PASSWORD \
    -e GIPHY_API_KEY=YOUR_GIPHY_KEY \
    gjovanov/roomler
由于Roomler容器需要同时在后端和前端docker网络中运行,且默认情况下,在启动容器时我们只能将其附加到一个网络(后端),所以我们需要在启动roomler之后将容器附加到第二个网络:
docker network connect frontend roomler
Nginx
在启动nginx之前,我们需要先启动nginx.conf
user  nginx;
pid   /var/run/nginx.pid;

##################################################################################
# nginx.conf Performance Tuning: https://github.com/denji/nginx-tuning
##################################################################################

# you must set worker processes based on your CPU cores, nginx does not benefit from setting more than that
worker_processes auto; #some last versions calculate it automatically

# number of file descriptors used for nginx
# the limit for the maximum FDs on the server is usually set by the OS.
# if you don't set FD's then OS settings will be used which is by default 2000
worker_rlimit_nofile 100000;

# only log critical errors
error_log /var/log/nginx/error.log crit;

# provides the configuration file context in which the directives that affect connection processing are specified.
events {
    # determines how much clients will be served per worker
    # max clients = worker_connections * worker_processes
    # max clients is also limited by the number of socket connections available on the system (~64k)
    worker_connections 4000;

    # optmized to serve many clients with each thread, essential for linux -- for testing environment
    use epoll;

    # accept as many connections as possible, may flood worker connections if set too low -- for testing environment
    multi_accept on;
}

http {
  include       /etc/nginx/mime.types;
  default_type  application/octet-stream;

  log_format  main  '$remote_addr - $remote_user [$time_local] "$request" '
                    '$status $body_bytes_sent "$http_referer" '
                    '"$http_user_agent" "$http_x_forwarded_for"';

  # cache informations about FDs, frequently accessed files
  # can boost performance, but you need to test those values
  open_file_cache max=200000 inactive=20s;
  open_file_cache_valid 30s;
  open_file_cache_min_uses 2;
  open_file_cache_errors on;

  # to boost I/O on HDD we can disable access logs
  access_log off;

  # copies data between one FD and other from within the kernel
  # faster then read() + write()
  sendfile on;

  # send headers in one peace, its better then sending them one by one
  tcp_nopush on;

  # don't buffer data sent, good for small data bursts in real time
  tcp_nodelay on;

  # reduce the data that needs to be sent over network -- for testing environment
  gzip on;
  gzip_min_length 10240;
  gzip_proxied expired no-cache no-store private auth;
  gzip_types text/plain text/css text/xml text/javascript application/x-javascript application/json application/xml;
  gzip_disable msie6;

  # allow the server to close connection on non responding client, this will free up memory
  reset_timedout_connection on;

  # request timed out -- default 60
  client_body_timeout 10;

  # if client stop responding, free up memory -- default 60
  send_timeout 2;

  # server will close connection after this time -- default 75
  keepalive_timeout 30;

  # number of requests client can make over keep-alive -- for testing environment
  keepalive_requests 100000;

  #########################################
  # Just For Security Reason
  #########################################

  # Security reasons, turn off nginx versions
  server_tokens off;

  more_clear_headers Server; # Custom module: headers-more-nginx-module (https://github.com/openresty/headers-more-nginx-module)

  # #########################################
  # # NGINX Simple DDoS Defense
  # #########################################

  # limit the number of connections per single IP
  limit_conn_zone $binary_remote_addr zone=conn_limit_per_ip:10m;

  # limit the number of requests for a given session
  limit_req_zone $binary_remote_addr zone=req_limit_per_ip:10m rate=5r/s;

  # zone which we want to limit by upper values, we want limit whole server
  server {
      limit_conn conn_limit_per_ip 10;
      limit_req zone=req_limit_per_ip burst=10 nodelay;
  }

  # if the request body size is more than the buffer size, then the entire (or partial)
  # request body is written into a temporary file
  client_body_buffer_size  128k;

  # headerbuffer size for the request header from client -- for testing environment
  client_header_buffer_size 3m;

  # maximum number and size of buffers for large headers to read from client request
  large_client_header_buffers 4 256k;

  # read timeout for the request body from client -- for testing environment
  # client_body_timeout   3m;

  # how long to wait for the client to send a request header -- for testing environment
  client_header_timeout 3m;

  include /etc/nginx/conf.d/*.conf;
}
以及conf.d / roomler.live.conf:
server {
    listen         80;
    listen         [::]:80;
    server_name    roomler.live; # replace with your domain
    return         301 https://$server_name$request_uri;
}

# HTTPS server
#
server {
    # Enable QUIC and HTTP/3.
    listen 443 quic reuseport;
    # Ensure that HTTP/2 is enabled for the server
    listen 443 ssl http2;
    server_name  roomler.live; # replace with your domain

    http2_push_preload on;

    client_max_body_size 0;

    gzip on;
    gzip_http_version 1.1;
    gzip_vary on;
    gzip_comp_level 6;
    gzip_proxied any;
    gzip_types text/plain text/css application/json application/javascript application/x-javascript text/javascript;

    brotli_static on;
    brotli on;
    brotli_types text/plain text/css application/json application/javascript application/x-javascript text/javascript;
    brotli_comp_level 4;

    # Enable TLS versions (TLSv1.3 is required for QUIC).
    ssl_protocols TLSv1.2 TLSv1.3;

    ssl_certificate /etc/nginx/cert/roomler.live.pem; # replace with your cert
    ssl_certificate_key /etc/nginx/cert/roomler.live.key; # replace with your cert key

    ssl_session_cache    shared:SSL:1m;
    ssl_session_timeout  5m;

    # Enable TLSv1.3's 0-RTT. Use $ssl_early_data when reverse proxying to
    # prevent replay attacks.
    #
    # @see: http://nginx.org/en/docs/http/ngx_http_ssl_module.html#ssl_early_data
    ssl_early_data on;
    ssl_ciphers  HIGH:!aNULL:!MD5;
    ssl_prefer_server_ciphers  on;

    # Add Alt-Svc header to negotiate HTTP/3.
    add_header alt-svc 'h3-27=":443"; ma=86400';
    # Debug 0-RTT.
    add_header X-Early-Data $tls1_3_early_data;

    add_header x-frame-options "deny";
    add_header Strict-Transport-Security "max-age=31536000" always;

    location / {
        proxy_set_header   X-Real-IP $remote_addr;
        proxy_set_header   Host      $http_host;
        proxy_pass         http://roomler2:3000;
        proxy_set_header X-Forwarded-For $proxy_add_x_forwarded_for;

        proxy_http_version 1.1;
        proxy_set_header Upgrade $http_upgrade;
        proxy_set_header Connection "upgrade";

        proxy_read_timeout 1800;
        proxy_connect_timeout 1800;
        proxy_send_timeout 1800;
        send_timeout 1800;
    }

}

map $ssl_early_data $tls1_3_early_data {
    "~." $ssl_early_data;
    default "";
}
docker run -d --name nginx \
    --hostname nginx \
    --restart always \
    -v /your_path/nginx/nginx.conf:/etc/nginx/nginx.conf \
    -v /your_path/nginx/conf.d/:/etc/nginx/conf.d/ \
    -v /your_path/nginx/cert/:/etc/nginx/cert/ \
    -v /your_path/nginx/logs/:/etc/nginx/logs/ \
    -p 80:80 \
    -p 443:443/tcp \
    -p 443:443/udp \
    --net=bridge \
    gjovanov/nginx
默认情况下,我们将启动连接到默认bridge网络的nginx容器,并实行端口映射。需要注意的是:在端口443上,我们同时公开了tcp和udp协议映射。因为我们的nginx图像支持实验性的http3,该实验速度很快且依赖于udp和tcp连接。
同Roomler操作相同,我们也把nginx附加到前端网络。
docker network connect frontend nginx
成功!
如果按照上述步骤操作,现在你应该可以启动、运行自己强大的视频会议和团队协作工具S̶l̶a̶c̶kRoomler。
你也可以试试这种方法,详见此视频。
当然,上述所有步骤都可以连接到单个docker-compose.yml文件中。但是那样一来,我们就会缺少亲自动手的乐趣。如果想试试的话,你可以通过docker-compose进行此操作。
同时,你可以在这里找到源代码。
总结
通过组合一些简单的开源,但功能非常强大的微服务,我们设法建立并运行了自己的视频会议和团队协作工具。该工具的功能可以与Slack、Microsoft、Teams、Zoom等大型应用程序的相媲美,甚至超过他们。
只要花上一点钱,你就可以在自己的基础架构(内部部署或在云中)上与团队、客户、家庭和朋友进行协作了。否则你就得为上述大公司的优质服务支付大量费用。
文章地址:https://medium.com/@gjovanov/building-your-own-slack-54874bf5fd7a
原文作者:Goran Jovanov
Recommend
About Joyk
Aggregate valuable and interesting links.
Joyk means Joy of geeK