16

Hello World in P4

 3 years ago
source link: https://www.sdnlab.com/24136.html
Go to the source link to view the article. You can view the picture content, updated content and better typesetting reading experience. If the link is broken, please click the button below to view the snapshot at that time.

作者简介:付晨聪,Juniper 中国研发中心软件开发工程师 博客:fuchencong.com

网络行业新技术层出不穷,最近又学习了解了 P4。P4 思想诞生于 2013 年,距离现在时间也不是很长。作为一门新技术,其资料还比较少,主要集中在其官方网站和 github 主页。这篇文章是基于我个人理解所写的一篇关于 P4 的入门介绍。

P4 概述

P4 是什么

P4 是一种特定领域(domain-specific)的编程语言,用于描述可编程的转发设备如何处理报文,可编程的转发设备可以是交换芯片 ASIC、FPGA、网络接口卡、软件交换机等等。P4 的全名是 Programming Protocol-independent Packet Processors。P4 最初设计是用于可编程的交换机(尤指其所使用的交换芯片 ASIC),目前已经扩展到了许多设备。在 P4 中,使用术语 target指代这些设备。

通常一个网络设备包含控制平面和数据平面。P4 被设计用于 target 的数据平面,即 P4 本身是用于对 target 的数据平面进行编程。下图展示了一个传统固定功能的交换机和一个 P4 可编程的交换机:

P4-001.PNG

在传统交换机中,交换芯片 ASIC 决定了其数据平面所支持的功能。而控制平面负责处理控制报文(例如路由协议包)、处理异步事件(例如接口 up/down )等,其最终目的是通过正确的设置 ASIC 的各种表项来控制其转发行为。因此交换芯片所支持的功能很大程度上就决定了交换机所能够支持的功能。

而 P4 可编程交换机则不同:数据平面的功能并不是固定的,而是由 P4 程序定义。数据平面本身不知道任何网络协议,其根据 P4 程序实现其功能。P4 是协议无关的,由程序员通过编程来使数据平面能够处理各种协议以及其他数据平面功能。

当然,这里其实说的有些绝对。例如,在传统交换机上,对于芯片不支持的协议或者不好实现的特性,可以将报文上送到 CPU 上,由软件进行处理(也就是我们通常所说的软转)。但其实这个例子也侧面说明了可编程的重要性:固定功能 ASIC 处理不了的特性交由运行在通用 CPU 上的软件处理。而现在 P4 要解决的问题就是对 ASIC 进行编程,使其能够灵活地处理新协议、新功能。

P4 简史

P4 的想法最早诞生于 2013 年,由斯坦福大学的 Nick Mckeown 教授提出,在 2014 年发布了 P4 语言的第一个正式规范 ,称为P4_14。之后,在 2016 年发布了新规范 P4_16,是对 P4_14 的改进。可以看出 P4 语言使用发布年限作为其大版本的标识。

这里八卦一下 Nick Mckeown 教授,其不仅是一位超级学术大牛,而且也是 SDN 产业界的先驱,主导参与多个 SDN 开源项目:OpenFlow 协议、首个 SDN 控制器 NOX 等,创办了多个 SDN 创业公司:Nicira(已被 VMware 收购)、Barefoot Network(已被 Intel 收购)等。

使用 P4 对 Target 编程

如下展示了使用 P4 对 target 进行编程的工作流:

P4-002.PNG

可以看到,网络设备的制造厂商需要提供以下组件:

  • 网络设备硬件(当然也可以是软件交换设备,例如 OVS、P4 项目自己实现的 simple_switch)
  • 针对该设备的 P4 编译器(准确来说,编译器与 architecture 相关)
  • 该设备所使用的 architecture 定义

P4 是一门用于特定领域的编程语言,它被设计用于大量不同的 targets。而 P4 architecture 可以认为是 P4 程序和 target 之间的约定。因此每个设备厂商必须同时提供编译器以及该 target 所使用的 architecture 定义。P4 程序员针对特定的 architecture 编写程序。设备的 architecture 定义了该设备上一系列的 P4 可编程组件以及它们的外部数据平面接口。

通常来说,P4 程序不能跨 architecture 进行移植,但是如果不同 target 兼容同一种 architecture,那么在这些 target 上运行的 P4 程序是可以相互移植的。P4 社区希望针对不同形态的网络产品分别定义各自标准的 architecture,这样就可以提高 P4 程序的可移植性。目前针对交换机,P4 已经发布了 PSA 标准。

编译 P4 程序会产生两个交付件:

  • 数据平面配置,用于在数据平面实现由 P4 程序指定的转发逻辑。这个交付件可以是二进制的设备固件(例如针对 ASIC);也可以是其他格式的文件,例如运行在 simple_switch 的 P4 程序交付件就是一个 JSON 文件
  • API,用于控制平面管理数据平面对象,例如对某个表进行表项添加/删除

PSA

与 P14_16 语言一起发布的还有 PSA(Portable Switch Architecture),它是一种 target 体系结构,用于描述能够处理/转发报文的多端口网络交换设备的公共能力。PSA 定义了一个类型库、externs 以及一系列的包路径(允许你编写程序控制报文在多端口交换设备中的流动)。只要遵守了 PSA 定义的 API 和各种行为,那么开发者编写的 P4 程序就可以进行跨设备移植,前提是这些设备兼容 PSA 体系结构。

在 PSA 官方介绍中,PSA 与 P14_16 语言的关系类似于 C 语言标准库与 C 语言的关系。个人认为这有两个含义:

  • 使用 PSA 体系结构,可以更加容易地构造出自己的交换机 target
  • 如果你的 target 遵从 PSA 体系结构,P4 程序员编写的针对 PSA 体系结构的 P4 程序就可以轻易地运行在你的 target 上

PSA 体系结构中的部分内容和网络交换机相关,因此如果存在另外一种 architecture(假设是 Portable NIC Architecture),那么新体系结构的这部分内容可能就和 PSA 的相应部分完全不同。

PSA 模型定义了 6 个 P4 可编程的 block 和 2 个固定功能的 block。可编程 block 的行为由 P4 程序指定。PRE(The Packet buffer and Replication Engine)以及 BQE(Buffer Queuing Engine)是与 target 相关的功能块,其通常是由一系列固定动作组成:

P4-003.PNG

P4 语言核心抽象

为了对网络设备的转发行为进行适当建模,P4 语言定义了如下核心概念:

  • Header types:定义了每个报文中各个报头的格式(所包含的字段和它们的大小)
  • Parsers:描述如何处理所收到报文的包头,这包括包头的解析顺序,从报文中要提取的包头和字段等
  • Tables:将用户定义的 key 和 action 进行关联。P4 的 Tables 对传统的二层交换表进行了泛化,可以用于实现路由表、flow 查找表和用户自定义类型的表
  • Actions:描述如何处理包头的字段以及元数据。Actions 可以包含由控制平面在运行时提供的数据
  • Match-action units:执行以下动作序列
    • 根据包头字段或者元数据构建查找 key
    • 使用构建的查找 key 在 table 中执行查找,选择一个 action 执行(包括该 action 所包含的数据)
    • 执行该动作
  • Control flow:描述在某个 target 上包处理的流程,这包括处理顺序(通常与报文相关)以及要执行的 match-actions。包重组(Deparse)也可以通过 Control flow 实现
  • Extern objects:体系结构相关的组件,可以由 P4 程序通过定义明确的 API 来调用
  • User-defined metadata:与每个报文相关联的用户自定义数据结构
  • Intrinsic metadata:与每个报文相关联的由体系结构提供的元数据,例如接收报文的端口号

可以看到,P4 语言根本不对协议做任何假设,而是通过提供这些语言抽象,让你能够编写程序处理各种网络协议,这也是 P4 核心思想之一。

P4 项目组件

P4 是个开源项目,其 github 上包含多个子项目,这里列举出几个重要的子项目,通过介绍这些子项目以及这些子项目想要解决的问题,可以进一步加深对网络的理解。

p4c

P4 是一种编程语言,而编程语言的实体存在就是编译器(解释型语言需要解释器)。p4c 就是 P4 语言的参考编译器。上文讲过,编译器是和 target 相关的,由网络设备制造厂商提供,那为什么还需要 p4c 呢?

p4c 至少存在两个重要用途:

  • p4c 编译器的前端代码、中端代码可以被复用,vendor 只需要实现自己的编译器后端
  • p4c 自己实现的编译器后端 p4c-bm2-ss 用于编译运行在 p4 bmv2 simpe_switch 软件交换机上的 P4 程序

bmv2

可以简单地认为,bmv2(Behavior Model Version 2)是 P4 项目实现的一个 P4 可编程软件交换机。bmv2 并不是一个产品质量级交换机,它只是用于开发人员开发、测试、调试 P4 程序(毕竟不是人人都有支持 P4 可编程的硬件设备)。

但 bmv2 项目又不仅只提供一个软件交换机,它是一套框架,通过它开发人员可以实现自己的软件交换机体系结构。因此目前 bmv2 已经提供了几个 target 变体:

  • simple_switch:一个 P4 可编程软件交换机,可以运行在通用 CPU 上(Intel/AMD 等)。它遵循 P4_14 语言规范,在 P4_16 中也就是遵循 v1model 体系结构
  • simple_switch_grpc:基于 simple_switch,但是其可以接受来自控制器的 TCP 连接,该连接中的控制消息由 P4Runtime 规范制定
  • psa_switch:类似于 simple_switch,只不过在 P4_16 中发布了 PSA 体系结构,而 psa_switch 就是以 PSA 为体系结构,而不再是 v1model
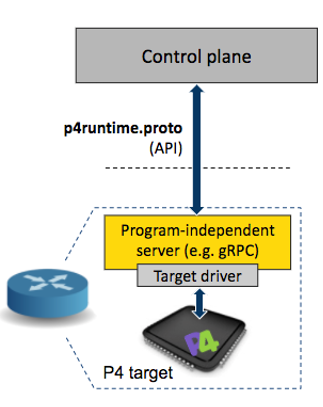
p4runtime

P4 是用于对数据平面进行编程的语言,它定义了数据平面所支持的功能。但是数据平面仍然需要在运行时接收控制平面下发的控制信息,以指导数据平面对现网实现正确的转发行为。而 P4Runtime 就是一套控制平面规范,用于控制网络设备的转发平面。

传统网络设备使用芯片厂商提供的 SDK 来操作 ASIC,网络设备内的控制平面通过内部 IPC 机制将控制信息下发到设备的驱动程序,驱动程序进而使用 ASIC 厂商提供的 SDK 来设置 ASIC。整个过程完全是厂商私有的、非公开的、且与 ASIC 硬件强相关的。随着 SDN 概念的兴起,其核心思想是控制平面与转发平面的分离,网络设备的控制平面可以不再位于网络设备内了,而是由集中式的 SDN 控制器进行控制,控制平面与转发平面也强调使用统一的标准协议(例如 OpenFlow)进行通信,而不再是设备厂商私有的 IPC 机制以及芯片厂商的 SDK 了。而 P4Runtime 就是想成为控制平面与转发平面通信的标准机制(OpenFlow/SAI 是其当前的竞争者)。

P4Runtime 使用 Google 的 Protobuf 定义通信 API,使用 gRPC 作为通信机制,然后又通过一个名为 PI 的项目实现了 P4Runtime Server(运行在数据平面),这个过程的示意图如下:

P4-004.PNG

实践 P4

开发环境搭建

通过上面的介绍,其实我们可以搭建一个非常复杂的 SDN P4 测试环境,整个网络栈都可以采用开源组件,例如:

  • 使用 ONOS 作为控制器
  • 使用 P4Runtime 作为南向接口
  • 使用 bmv2 模拟 P4 可编程数据平面
  • 自行编写 P4 程序,定义 bmv2 的转发行为
  • 使用 p4c 编译 P4 程序,将其作为 bmv2 的输入
  • 使用 mininet 构建仿真网络拓扑

但是既然本篇文章是 P4 的 Hello World,那么还是从一个比较简单的例子入手,该简易程序只处理以太封装的 IPv4 报文,并对 IPv4 目的地址执行最长匹配,以实现简单三层转发行为。想要实现该简单示例,至少需要在系统中安装 p4c、bmv2 及其相关依赖。

这里我用了一个偷懒的方法,在网络上找到了一个 P4 社区提供的虚拟机镜像,用虚拟机软件直接启动该虚拟机镜像即可,一切所需软件皆以就绪:

Java
p4@p4:~$ whoami p4 p4@p4:~$ uname -a Linux p4 4.4.0-142-generic #168-Ubuntu SMP Wed Jan 16 21:00:45 UTC 2019 x86_64 x86_64 x86_64 GNU/Linux p4@p4:~$ which p4c /usr/local/bin/p4c p4@p4:~$ which simple_switch /usr/local/bin/simple_switch
1
2
3
4
5
6
7
8
p4@p4:~$whoami
p4
p4@p4:~$uname-a
Linux p44.4.0-142-generic#168-Ubuntu SMP Wed Jan1621:00:45UTC2019x86_64 x86_64 x86_64 GNU/Linux
p4@p4:~$which p4c
/usr/local/bin/p4c
p4@p4:~$which simple_switch
/usr/local/bin/simple_switch

编写 P4 程序

这里直接 copy 了 P4 官方 Tutorial 里提供的实例代码:

Java

#include <core.p4> #include <v1model.p4>

typedef bit<48> EthernetAddress; typedef bit<32> IPv4Address;

header ethernet_t { EthernetAddress dst_addr; EthernetAddress src_addr; bit<16> ether_type; }

header ipv4_t { bit<4> version; bit<4> ihl; bit<8> diffserv; bit<16> total_len; bit<16> identification; bit<3> flags; bit<13> frag_offset; bit<8> ttl; bit<8> protocol; bit<16> hdr_checksum; IPv4Address src_addr; IPv4Address dst_addr; }

struct headers_t { ethernet_t ethernet; ipv4_t ipv4; }

struct metadata_t { }

error { IPv4IncorrectVersion, IPv4OptionsNotSupported }

parser my_parser(packet_in packet, out headers_t hd, inout metadata_t meta, inout standard_metadata_t standard_meta) { state start { packet.extract(hd.ethernet); transition select(hd.ethernet.ether_type) { 0x0800: parse_ipv4; default: accept; } }

state parse_ipv4 { packet.extract(hd.ipv4); verify(hd.ipv4.version == 4w4, error.IPv4IncorrectVersion); verify(hd.ipv4.ihl == 4w5, error.IPv4OptionsNotSupported); transition accept; } }

control my_deparser(packet_out packet, in headers_t hdr) { apply { packet.emit(hdr.ethernet); packet.emit(hdr.ipv4); } }

control my_verify_checksum(inout headers_t hdr, inout metadata_t meta) { apply { } }

control my_compute_checksum(inout headers_t hdr, inout metadata_t meta) { apply { } }

control my_ingress(inout headers_t hdr, inout metadata_t meta, inout standard_metadata_t standard_metadata) { bool dropped = false;

action drop_action() { mark_to_drop(standard_metadata); dropped = true; }

action to_port_action(bit<9> port) { hdr.ipv4.ttl = hdr.ipv4.ttl - 1; standard_metadata.egress_spec = port; }

table ipv4_match { key = { hdr.ipv4.dst_addr: lpm; } actions = { drop_action; to_port_action; } size = 1024; default_action = drop_action; }

apply { ipv4_match.apply(); if (dropped) return; } }

control my_egress(inout headers_t hdr, inout metadata_t meta, inout standard_metadata_t standard_metadata) { apply { } }

V1Switch(my_parser(), my_verify_checksum(), my_ingress(), my_egress(), my_compute_checksum(), my_deparser()) main;

1
2
3
4
5
6
7
8
9
10
11
12
13
14
15
16
17
18
19
20
21
22
23
24
25
26
27
28
29
30
31
32
33
34
35
36
37
38
39
40
41
42
43
44
45
46
47
48
49
50
51
52
53
54
55
56
57
58
59
60
61
62
63
64
65
66
67
68
69
70
71
72
73
74
75
76
77
78
79
80
81
82
83
84
85
86
87
88
89
90
91
92
93
94
95
96
97
98
99
100
101
102
103
104
105
106
107
108
109
110
111
112
113
114
115
116
117
118
119
120
121
122
123
124
125
126
127
128
129
#include<core.p4>
#include<v1model.p4>
 
typedefbit<48>EthernetAddress;
typedefbit<32>IPv4Address;
 
headerethernet_t{
    EthernetAddress dst_addr;
    EthernetAddress src_addr;
    bit<16>         ether_type;
}
 
headeripv4_t{
    bit<4>      version;
    bit<4>      ihl;
    bit<8>      diffserv;
    bit<16>     total_len;
    bit<16>     identification;
    bit<3>      flags;
    bit<13>     frag_offset;
    bit<8>      ttl;
    bit<8>      protocol;
    bit<16>     hdr_checksum;
    IPv4Address src_addr;
    IPv4Address dst_addr;
}
 
structheaders_t{
    ethernet_t ethernet;
    ipv4_t     ipv4;
}
 
structmetadata_t{
}
 
error{
    IPv4IncorrectVersion,
    IPv4OptionsNotSupported
}
 
parser my_parser(packet_in packet,
                out headers_t hd,
                inout metadata_t meta,
                inout standard_metadata_t standard_meta)
{
    statestart{
        packet.extract(hd.ethernet);
        transition select(hd.ethernet.ether_type){
            0x0800:  parse_ipv4;
            default:accept;
        }
    }
 
    stateparse_ipv4{
        packet.extract(hd.ipv4);
        verify(hd.ipv4.version==4w4,error.IPv4IncorrectVersion);
        verify(hd.ipv4.ihl==4w5,error.IPv4OptionsNotSupported);
        transition accept;
    }
}
 
control my_deparser(packet_out packet,
                   inheaders_t hdr)
{
    apply{
        packet.emit(hdr.ethernet);
        packet.emit(hdr.ipv4);
    }
}
 
control my_verify_checksum(inout headers_t hdr,
                         inout metadata_t meta)
{
    apply{}
}
 
control my_compute_checksum(inout headers_t hdr,
                          inout metadata_t meta)
{
    apply{}
}
 
control my_ingress(inout headers_t hdr,
                  inout metadata_t meta,
                  inout standard_metadata_t standard_metadata)
{
    booldropped=false;
 
    action drop_action(){
        mark_to_drop(standard_metadata);
        dropped=true;
    }
 
    action to_port_action(bit<9>port){
        hdr.ipv4.ttl=hdr.ipv4.ttl-1;
        standard_metadata.egress_spec=port;
    }
 
    tableipv4_match{
        key={
            hdr.ipv4.dst_addr:lpm;
        }
        actions={
            drop_action;
            to_port_action;
        }
        size=1024;
        default_action=drop_action;
    }
 
    apply{
        ipv4_match.apply();
        if(dropped)return;
    }
}
 
control my_egress(inout headers_t hdr,
                 inout metadata_t meta,
                 inout standard_metadata_t standard_metadata)
{
    apply{}
}
 
V1Switch(my_parser(),
         my_verify_checksum(),
         my_ingress(),
         my_egress(),
         my_compute_checksum(),
         my_deparser())main;

简单解释一下该程序:

  • 在 parser 这个可编程 block 里定义了自己的处理逻辑,只是简单的解析出以太头和 IPv4 头,并对 IPv4 头做简单的字段检查
  • 在 ingress 这个可编程 block 里定义了自己的处理逻辑,对 IPv4 目的地址执行 LPM(最长前缀匹配)
  • 在 deparser 这个可编程 block 里定义了自己的处理逻辑,简单重组以太头和 IPv4 头
  • 最后使用自己的定义实例化了 V1Switch

编译该 P4 程序

使用如下命令编译该 P4 程序:

Java
p4c -b bmv2 test.p4 -o test.bmv2
1
p4c-bbmv2 test.p4-otest.bmv2
  • -b:指定 target
  • -o:指定输出路径

如果编译成功,可以在当前目录的 test.bmv2 目录下找到名为 test.json 的交付件,这就是接下来要运行在 simple_switch 软件交换机的 程序

构建网络拓扑

我们将构建如下的网络拓扑,其中交换机就是我们的 P4 可编程 simple_switch,同时使用 Linux 的 veth 为该 switch 创建以太接口:

P4-005.PNG

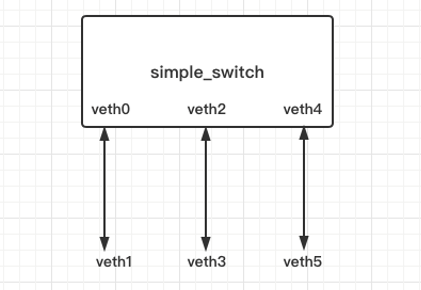
  • 创建虚拟 veth pair 接口,同时禁用该接口上的 IPv6,防止对后面测试产生干扰
Java

sudo ip link add name veth0 type veth peer name veth1 sudo ip link set dev veth0 up sudo ip link set dev veth1 up sudo sysctl net.ipv6.conf.veth0.disable_ipv6=1 sudo sysctl net.ipv6.conf.veth1.disable_ipv6=1

sudo ip link add name veth2 type veth peer name veth3 sudo ip link set dev veth2 up sudo ip link set dev veth3 up sudo sysctl net.ipv6.conf.veth2.disable_ipv6=1 sudo sysctl net.ipv6.conf.veth3.disable_ipv6=1

sudo ip link add name veth4 type veth peer name veth5 sudo ip link set dev veth4 up sudo ip link set dev veth5 up sudo sysctl net.ipv6.conf.veth4.disable_ipv6=1 sudo sysctl net.ipv6.conf.veth5.disable_ipv6=1

1
2
3
4
5
6
7
8
9
10
11
12
13
14
15
16
17
sudo ip link add name veth0 type veth peer name veth1
sudo ip link set dev veth0 up
sudo ip link set dev veth1 up
sudo sysctl net.ipv6.conf.veth0.disable_ipv6=1
sudo sysctl net.ipv6.conf.veth1.disable_ipv6=1
 
sudo ip link add name veth2 type veth peer name veth3
sudo ip link set dev veth2 up
sudo ip link set dev veth3 up
sudo sysctl net.ipv6.conf.veth2.disable_ipv6=1
sudo sysctl net.ipv6.conf.veth3.disable_ipv6=1
 
sudo ip link add name veth4 type veth peer name veth5
sudo ip link set dev veth4 up
sudo ip link set dev veth5 up
sudo sysctl net.ipv6.conf.veth4.disable_ipv6=1
sudo sysctl net.ipv6.conf.veth5.disable_ipv6=1
  • 启动 simple_switch 交换机
Java
p4@p4:~/test$ sudo simple_switch --interface 0@veth0 --interface 1@veth2 --interface 2@veth4 test.bmv2/test.json & [1] 4060 p4@p4:~/test$ Calling target program-options parser Adding interface veth0 as port 0 Adding interface veth2 as port 1 Adding interface veth4 as port 2
1
2
3
4
5
6
p4@p4:~/test$sudo simple_switch--interface0@veth0--interface1@veth2--interface2@veth4test.bmv2/test.json&
[1]4060
p4@p4:~/test$Calling target program-options parser
Adding interfaceveth0 asport0
Adding interfaceveth2 asport1
Adding interfaceveth4 asport2

向交换机的路由表中下发路由

接下来将通过 simple_switch_CLI 程序 来控制该 P4 软件交换机

Java
p4@p4:~/test$ simple_switch_CLI Obtaining JSON from switch... Done Control utility for runtime P4 table manipulation RuntimeCmd:
1
2
3
4
5
p4@p4:~/test$simple_switch_CLI
Obtaining JSON from switch...
Done
Control utility forruntime P4 table manipulation
RuntimeCmd:

使用 show tables 命令查看当前所有表,使用 table_info 命令查看指定表的具体信息:

Java
RuntimeCmd: show_tables my_ingress.ipv4_match [implementation=None, mk=ipv4.dst_addr(lpm, 32)] tbl_act [implementation=None, mk=] RuntimeCmd: table_info ipv4_match my_ingress.ipv4_match [implementation=None, mk=ipv4.dst_addr(lpm, 32)] ******************************************************************************** my_ingress.drop_action [] my_ingress.to_port_action [port(9)]
1
2
3
4
5
6
7
8
RuntimeCmd:show_tables
my_ingress.ipv4_match          [implementation=None,mk=ipv4.dst_addr(lpm,32)]
tbl_act                        [implementation=None,mk=]
RuntimeCmd:table_info ipv4_match
my_ingress.ipv4_match          [implementation=None,mk=ipv4.dst_addr(lpm,32)]
********************************************************************************
my_ingress.drop_action         []
my_ingress.to_port_action      [port(9)]

接下来我本人就是控制平面,将使用 table_add 命令向交换机添加路由,这里假设:

  • port 0(veth 0)连接 10.10.0.0/16 网段
  • port 1(veth 2)连接 20.20.0.0/16 网段
  • port 2(veth 4)连接 30.30.0.0/16 网段
Java
RuntimeCmd: table_add ipv4_match to_port_action 10.10.0.0/16 => 0 Adding entry to lpm match table ipv4_match match key: LPM-0a:0a:00:00/16 action: to_port_action runtime data: 00:00 Entry has been added with handle 0 RuntimeCmd: table_add ipv4_match to_port_action 20.20.0.0/16 => 1 Adding entry to lpm match table ipv4_match match key: LPM-14:14:00:00/16 action: to_port_action runtime data: 00:01 Entry has been added with handle 1 RuntimeCmd: table_add ipv4_match to_port_action 30.30.0.0/16 => 2 Adding entry to lpm match table ipv4_match match key: LPM-1e:1e:00:00/16 action: to_port_action runtime data: 00:02 Entry has been added with handle 2
1
2
3
4
5
6
7
8
9
10
11
12
13
14
15
16
17
18
RuntimeCmd:table_add ipv4_match to_port_action10.10.0.0/16=>0
Adding entry tolpm match table ipv4_match
match key:           LPM-0a:0a:00:00/16
action:              to_port_action
runtime data:        00:00
Entry has been added with handle0
RuntimeCmd:table_add ipv4_match to_port_action20.20.0.0/16=>1
Adding entry tolpm match table ipv4_match
match key:           LPM-14:14:00:00/16
action:              to_port_action
runtime data:        00:01
Entry has been added with handle1
RuntimeCmd:table_add ipv4_match to_port_action30.30.0.0/16=>2
Adding entry tolpm match table ipv4_match
match key:           LPM-1e:1e:00:00/16
action:              to_port_action
runtime data:        00:02
Entry has been added with handle2

使用 table_dump 确认添加的表项:

Java
RuntimeCmd: table_dump ipv4_match ========== TABLE ENTRIES ********** Dumping entry 0x0 Match key: * ipv4.dst_addr : LPM 0a0a0000/16 Action entry: my_ingress.to_port_action - 00 ********** Dumping entry 0x1 Match key: * ipv4.dst_addr : LPM 14140000/16 Action entry: my_ingress.to_port_action - 01 ********** Dumping entry 0x2 Match key: * ipv4.dst_addr : LPM 1e1e0000/16 Action entry: my_ingress.to_port_action - 02 ========== Dumping default entry Action entry: my_ingress.drop_action - ==========
1
2
3
4
5
6
7
8
9
10
11
12
13
14
15
16
17
18
19
20
21
22
RuntimeCmd:table_dump ipv4_match
==========
TABLE ENTRIES
**********
Dumping entry0x0
Match key:
*ipv4.dst_addr       :LPM       0a0a0000/16
Action entry:my_ingress.to_port_action-00
**********
Dumping entry0x1
Match key:
*ipv4.dst_addr       :LPM       14140000/16
Action entry:my_ingress.to_port_action-01
**********
Dumping entry0x2
Match key:
*ipv4.dst_addr       :LPM       1e1e0000/16
Action entry:my_ingress.to_port_action-02
==========
Dumping defaultentry
Action entry:my_ingress.drop_action-
==========

测试交换机的三层转发

接下来我们将使用 scapy 工具从 veth1 注入报文,然后分别在 veth3 和 veth 5 上使用 tcpdump 抓包:

Java
p4@p4:~$ sudo scapy INFO: Can't import python gnuplot wrapper . Won't be able to plot. INFO: Can't import PyX. Won't be able to use psdump() or pdfdump(). WARNING: No route found for IPv6 destination :: (no default route?) INFO: Can't import python Crypto lib. Won't be able to decrypt WEP. INFO: Can't import python Crypto lib. Disabled certificate manipulation tools Welcome to Scapy (2.2.0) >>>
1
2
3
4
5
6
7
8
p4@p4:~$sudo scapy
INFO:Can't import python gnuplot wrapper . Won'tbe able toplot.
INFO:Can't import PyX. Won'tbe able tousepsdump()orpdfdump().
WARNING:No route found forIPv6 destination::(no defaultroute?)
INFO:Can't import python Crypto lib. Won'tbe able todecrypt WEP.
INFO:Can'timportpython Crypto lib.Disabled certificate manipulation tools
Welcome toScapy(2.2.0)
>>>
Java
p4@p4:~$ sudo tcpdump -n -i veth3 tcpdump: verbose output suppressed, use -v or -vv for full protocol decode listening on veth3, link-type EN10MB (Ethernet), capture size 262144 bytes
1
2
3
p4@p4:~$sudo tcpdump-n-iveth3
tcpdump:verbose output suppressed,use-vor-vv forfull protocol decode
listening on veth3,link-type EN10MB(Ethernet),capture size262144bytes
Java
p4@p4:~$ sudo tcpdump -n -i veth5 tcpdump: verbose output suppressed, use -v or -vv for full protocol decode listening on veth5, link-type EN10MB (Ethernet), capture size 262144 bytes
1
2
3
p4@p4:~$sudo tcpdump-n-iveth5
tcpdump:verbose output suppressed,use-vor-vv forfull protocol decode
listening on veth5,link-type EN10MB(Ethernet),capture size262144bytes
  • 从 veth1 注入目的地为 20.20.0.1 的报文,veth 3 收到报文,而 veth 5 没有收到任何报文
Java
>>> p = Ether()/IP(dst="20.20.0.1")/UDP() >>> sendp(p, iface="veth1") . Sent 1 packets.
1
2
3
4
>>>p=Ether()/IP(dst="20.20.0.1")/UDP()
>>>sendp(p,iface="veth1")
.
Sent1packets.
Java
p4@p4:~$ sudo tcpdump -n -i veth3 18:12:18.435592 IP 192.168.204.145.53 > 20.20.0.1.53: [|domain]
1
2
p4@p4:~$sudo tcpdump-n-iveth3
18:12:18.435592IP192.168.204.145.53>20.20.0.1.53:[|domain]
  • 从 veth1 注入目的地为 30.30.0.1 的报文,veth 5 收到报文,而 veth 3 没有收到任何报文
Java
>>> p = Ether()/IP(dst="30.30.0.1")/UDP() >>> sendp(p, iface="veth1") . Sent 1 packets.
1
2
3
4
>>>p=Ether()/IP(dst="30.30.0.1")/UDP()
>>>sendp(p,iface="veth1")
.
Sent1packets.
Java
p4@p4:~$ sudo tcpdump -n -i veth5 18:13:56.702667 IP 192.168.204.145.53 > 30.30.0.1.53: [|domain]
1
2
p4@p4:~$sudo tcpdump-n-iveth5
18:13:56.702667IP192.168.204.145.53>30.30.0.1.53:[|domain]

可以看到,运行着由我们编写的 P4 程序的 simple_switch 按照预期执行了 LPM 转发。假设我们想要改变该交换机的行为,例如执行最短前缀匹配,我们只需要重新编写我们的 P4 程序,然后让 simple_switch 重新加载我们的 P4 程序,该 simple_switch 就能按照最短前缀匹配执行 IPv4 转发了。

这就是 P4 的魅力!

Reference

P4_16 语言规范
PSA
P4 Tutorial
P4 Get Started
P4 Github


About Joyk


Aggregate valuable and interesting links.
Joyk means Joy of geeK