

音视频学习 (十二) 基于 FFmpeg + OpenSLES 实现音频万能播放器
source link: https://www.devyk.top/articles/2020/05/06/1588694932599.html
Go to the source link to view the article. You can view the picture content, updated content and better typesetting reading experience. If the link is broken, please click the button below to view the snapshot at that time.

前言
唠叨一句:
说实话现在搞 Android 开发的要求是越来越高,初级都要被淘汰的感觉。所以想要一直往 Android 的道路上走,深入 音视频领域 是一个不错的选择。虽然现在跨平台 Flutter 很火,但终究它还是一个写 UI 的(个人看法)。程序员随着年龄的增长不可能一直写 UI 。但是深入 C/C++ 就不一样了。它可以给移动端甚至 Flutter 提供底层 SDK 和技术支持这难道不香吗?所以想要或者准备学习音视频知识的,那么该篇文章可以助你快速入门。
五一假期即将结束,不知道大家玩的怎么样,我了也趁着这个假期抽出了一天时间去爬了长城,有句话不是说,不到长城非好汉嘛。何况来北京好些年了一直没机会去。之后利用剩下的这 4 天写了一个音频处理库,目前包含如下功能:
| 功能 | 是否完成 |
| - | - |
| 读取任意格式音频流 | Yes |
| FFmpeg 音频解码为 PCM | Yes |
| 音频 Native OpenSL ES 渲染 | Yes |
| 音量控制 | Yes |
| seek 控制 | Yes |
| 声道切换 | Yes |
|变调变速 | Yes |
| 变声 | No |
| 裁剪音频输出 MP3/PCM 等格式 | pcm-ok |
| 边播边录制 | No |
| 音频编码为 AAC、MP3、WAV | No |
其实音频处理的库在 GitHub 搜都是一大堆,那为什么我自己还要写一个呢?原因是我不想当伸手党,如果每次都这样,那自己的技术何来进步,是吧?而且自己写的库也便于自己修改和增加一些特殊的功能。下面我就大概来说一下具体每个功能是如何实现及做一个音频处理的库需要搭建怎样的一个架构。当然我也不是一时兴起就来写一个音频处理库。
还是有一个小目标的:
- 打造一个万能音频播放器。不管是直播源还是网络/本地源,只要给我一个路径我就能播放。
- 增加一些特殊的处理比如,变调变速、变声、裁剪...
- 一切皆有可能。
可以看下效果图:
介绍
编码环境
FFmpeg : 4.2.2
NDK: 17c
OS: MAC
实现流程:

粗略架构组成:
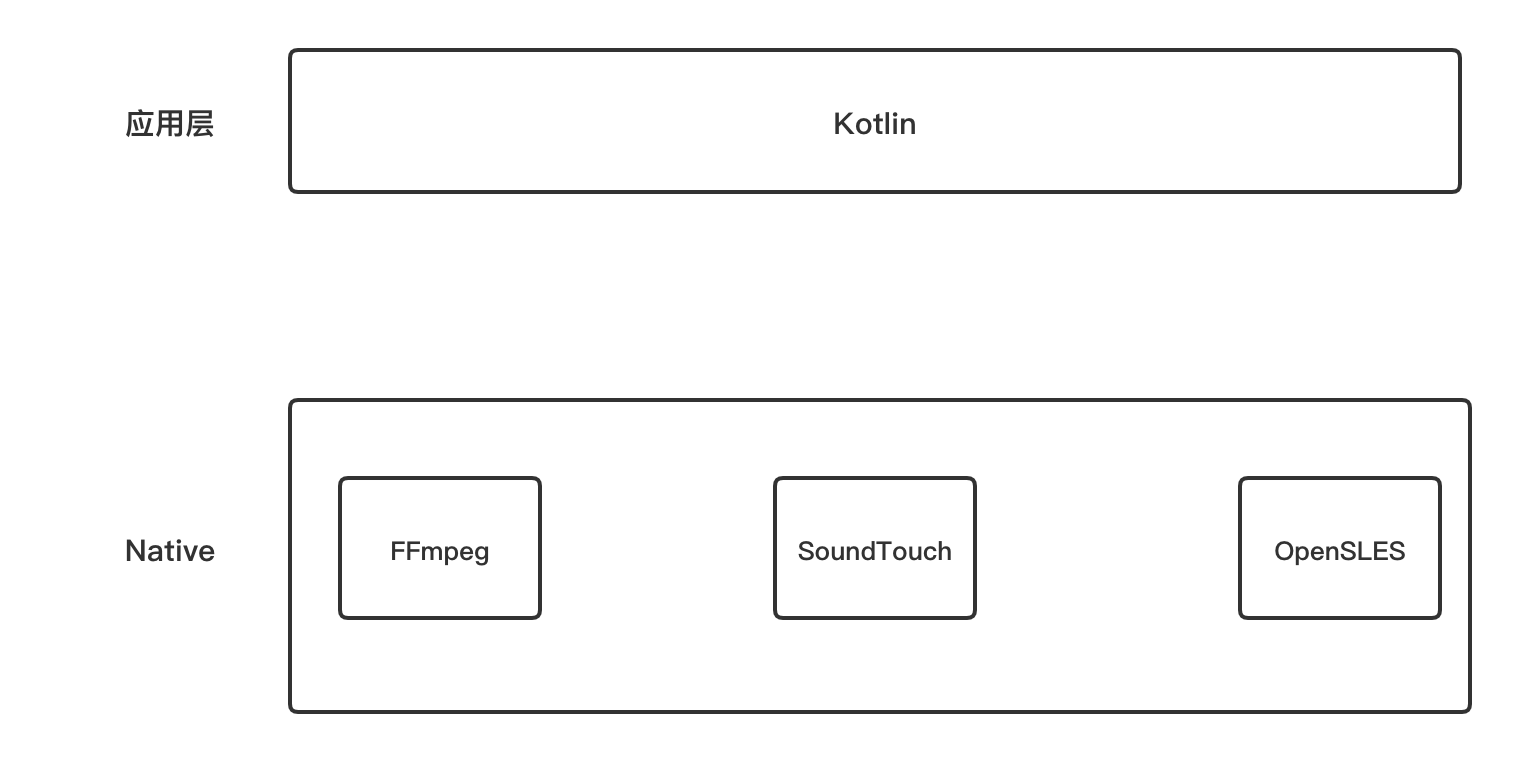
kotlin :
Kotlin语言是由 JetBrains 公司开发,2010 面世,2017 年正式在谷歌 I/O 大会上推荐 Kotlin 作为 Android 开发语言。
FFmpeg :
FFmpeg 是一套可以用来记录、转换数字音频、视频,并能将其转化为流的开源计算机程序。采用LGPL或GPL许可证。它提供了录制、转换以及流化音视频的完整解决方案。
可以在 PCM 音频裸流基础上对音频变调变速
OpenSLES :
OpenSL ES( 嵌入式系统的开放声音库 )是一种免版税,跨平台,硬件加速的 C语言 音频 API, 用于2D和3D音频。它提供对 3D位置音频 和 MIDI 播放等功能的访问。它是为移动和游戏行业的开发人员设计的,致力于使跨多个平台的应用程序轻松移植。
FFmpeg 初始化
编译 FFmpeg 可以参考我之前写的文章 音视频学习 (六) 一键编译 32/64 位 FFmpeg 4.2.2
这里我们就按照 FFmpeg 初始化流程来进行介绍 API 如下所示:
//1. 分配一个 AVFormatContext。
AVFormatContext *avformat_alloc_context(void);
//对应的释放
void avformat_free_context(AVFormatContext *s);

//2. 打开输入流,读取头部信息,一般包含有音频,视频流信息也可能有弹幕信息
int avformat_open_input(AVFormatContext **ps, const char *url, ff_const59 AVInputFormat *fmt, AVDictionary **options);
//对应的关闭流信息,释放所有内容资源
void avformat_close_input(AVFormatContext **s);


//3. 读取媒体文件的数据包以获取流信息。返回 >=0 则成功
int avformat_find_stream_info(AVFormatContext *ic, AVDictionary **options);
//3.1 拿到当前流的数量信息,一般会有音频,视频,或者弹幕
int number = (*AVFormatContext)->nb_streams
//3.2 遍历拿到对应的 stream
//视频流
if ((*pFormatCtx)->streams && (*pFormatCtx)->streams[i]->codecpar->codec_type == AVMEDIA_TYPE_VIDEO)
//语音流
 if ((*pFormatCtx)->streams[i]->codecpar->codec_type == AVMEDIA_TYPE_AUDIO)
//其它流类型
enum AVMediaType {
    AVMEDIA_TYPE_UNKNOWN = -1,  ///< Usually treated as AVMEDIA_TYPE_DATA
    AVMEDIA_TYPE_VIDEO,
    AVMEDIA_TYPE_AUDIO,
    AVMEDIA_TYPE_DATA,          ///< Opaque data information usually continuous
    AVMEDIA_TYPE_SUBTITLE,
    AVMEDIA_TYPE_ATTACHMENT,    ///< Opaque data information usually sparse
    AVMEDIA_TYPE_NB
};

//4. 根据 AVCodecID 拿到已经注册的解码器
AVCodec *avcodec_find_decoder(enum AVCodecID id);

//5. 分配一个 AVCodecContext
AVCodecContext *avcodec_alloc_context3(const AVCodec *codec);
//对应的释放
void avcodec_free_context(AVCodecContext **avctx);

//6. 给解码器设置参数
int avcodec_parameters_to_context(AVCodecContext *codec,
                                  const AVCodecParameters *par);

//7. 打开解码器 is 0 success
int avcodec_open2(AVCodecContext *avctx, const AVCodec *codec, AVDictionary **options);
以上 7 步如果没有问题证明编解码器打开成功,可以进行下一步操作。
FFmpeg 读取音频帧
这里还是介绍 API 使用:
//1. 分配一个 AVPacket
AVPacket *av_packet_alloc(void);
//结果必须释放
void av_packet_free(AVPacket **pkt);

//2. 读取待解码数据包
int av_read_frame(AVFormatContext *s, AVPacket *pkt);
对,就是这么简单,就调用 3 个 API 然后循环读取,送入待解码队列中。
FFmpeg 解码音频为 PCM
这里相当于是读取待解码队列中的数据,进行解码为 PCM 数据
//1. 将待解码数据 AVPacket 送入解码器 0 is ok
int avcodec_send_packet(AVCodecContext *avctx, const AVPacket *avpkt);

//2. 分配一个 AVFrame 用于接收解码之后的数据
AVFrame *av_frame_alloc(void);
//对应的释放 API
void av_frame_free(AVFrame **frame);

//3. 接收解码之后的数据 0 is ok
int avcodec_receive_frame(AVCodecContext *avctx, AVFrame *frame);

//对解码之后的 PCM 进行统一重采样。规定一些格式,避免不统一而渲染异常
//4. 根据传入的参数来分配一个 SwrContext
struct SwrContext *swr_alloc_set_opts(struct SwrContext *s,
                                      int64_t out_ch_layout, enum AVSampleFormat out_sample_fmt, int out_sample_rate,
                                      int64_t  in_ch_layout, enum AVSampleFormat  in_sample_fmt, int  in_sample_rate,
                                      int log_offset, void *log_ctx);

//4.1 对 SwrContext 进行初始化
int swr_init(struct SwrContext *s);
//4.2 开始重采样
int swr_convert(struct SwrContext *s, uint8_t **out, int out_count,
                                const uint8_t **in , int in_count);
OpenSLES 渲染 PCM
这里还是以流程的形式介绍 API 含义
//1. 创建播放引擎
result = slCreateEngine(ŋineObject, 0, NULL, 0, NULL, NULL);
result = (*engineObject)->Realize(engineObject, SL_BOOLEAN_FALSE);
result = (*engineObject)->GetInterface(engineObject, SL_IID_ENGINE, ŋineEngine);

//2. 创建混音器
const SLInterfaceID mids[1] = {SL_IID_ENVIRONMENTALREVERB};
const SLboolean mreq[1] = {SL_BOOLEAN_FALSE};
result = (*outputMixObject)->Realize(outputMixObject, SL_BOOLEAN_FALSE);
result = (*outputMixObject)->GetInterface(outputMixObject, SL_IID_ENVIRONMENTALREVERB,
                                              &outputMixEnvironmentalReverb);
    if (SL_RESULT_SUCCESS == result) {
        result = (*outputMixEnvironmentalReverb)->SetEnvironmentalReverbProperties(
                outputMixEnvironmentalReverb, &reverbSettings);
        (void) result;
    }
SLDataLocator_OutputMix outputMix = {SL_DATALOCATOR_OUTPUTMIX, outputMixObject};
SLDataSink audioSnk = {&outputMix, 0};

//3. 配置PCM格式信息
SLDataLocator_AndroidSimpleBufferQueue android_queue = {SL_DATALOCATOR_ANDROIDSIMPLEBUFFERQUEUE, 2};

    SLDataFormat_PCM pcm = {
            SL_DATAFORMAT_PCM,//播放pcm格式的数据
            2,//2个声道(立体声)
            static_cast<SLuint32>(getCurSampleRate(sample_rate)),//44100hz的频率
            SL_PCMSAMPLEFORMAT_FIXED_16,//位数 16位
            SL_PCMSAMPLEFORMAT_FIXED_16,//和位数一致就行
            SL_SPEAKER_FRONT_LEFT | SL_SPEAKER_FRONT_RIGHT,//立体声(前左前右)
            SL_BYTEORDER_LITTLEENDIAN//结束标志
    };

    SLDataSource slDataSource = {∧roid_queue, &pcm};

    const SLInterfaceID ids[3] = {SL_IID_BUFFERQUEUE, SL_IID_VOLUME, SL_IID_MUTESOLO};
    const SLboolean req[3] = {SL_BOOLEAN_TRUE, SL_BOOLEAN_TRUE, SL_BOOLEAN_TRUE};

    result = (*engineEngine)->CreateAudioPlayer(engineEngine, &pcmPlayerObject, &slDataSource, &audioSnk,
                                                sizeof(ids) / sizeof(ids[0]), ids, req);


//4. 初始化播放器
result = (*pcmPlayerObject)->Realize(pcmPlayerObject, SL_BOOLEAN_FALSE);
result = (*pcmPlayerObject)->GetInterface(pcmPlayerObject, SL_IID_PLAY, &pcmPlayerPlay);

//5. 注册回调缓冲区 获取缓冲队列接口
(*pcmPlayerObject)->GetInterface(pcmPlayerObject, SL_IID_BUFFERQUEUE, &pcmBufferQueue);
(*pcmBufferQueue)->RegisterCallback(pcmBufferQueue, pcmBufferCallBack, this);

//6. 设置播放状态
(*pcmPlayerPlay)->SetPlayState(pcmPlayerPlay, SL_PLAYSTATE_PLAYING);

//7. 手动激活回调接口
pcmBufferCallBack(pcmBufferQueue, this);
初始化就是这 7 大步,那么渲染的话,就是在 pcmBufferCallBack
中进行设置,直接上代码吧:
void pcmBufferCallBack(SLAndroidSimpleBufferQueueItf bf, void *pVoid) {
    auto audioPlayer = static_cast<BaseAudioChannel *>(pVoid);
    if (!audioPlayer)
        return;
    if (audioPlayer->status && audioPlayer->status->exit)
        LOGE("looper  pcmBufferCallBack start");
    //拿到 PCM 原始数据
    int size = audioPlayer->getPCMData();

    //对 PCM 做变速变调操作。
    size = audioPlayer->setSoundTouchData();

...
            //8. 放入缓存,开始播放声音
		(*audioPlayer->pcmBufferQueue)->Enqueue(audioPlayer->pcmBufferQueue, audioPlayer->out_pcm_buffer, size);

...
}
对,没错。第八步就是真正将 PCM 放入 OpenSL ES 缓冲队列中,这里要注意,一点要等它的上一帧渲染完在放入下一帧 PCM 数据。
功能点实现:
声道选择
声道操作直接操作的是 OpenSLES 接口,具体 API 如下:
//1. 得到音频声道通道接口
(*pcmPlayerObject)->GetInterface(pcmPlayerObject, SL_IID_MUTESOLO, &pcmChannelModePlay);
//2. 设置音频通道
/**
 * 设置音频通道
 * @param channelMode
 */
void BaseAudioChannel::setChannelMode(int channelMode) {
    this->mChannelMode = channelMode;
    if (pcmChannelModePlay != NULL) {
        if (channelMode == 0)//右声道
        {
            (*pcmChannelModePlay)->SetChannelMute(pcmChannelModePlay, 1, false);
            (*pcmChannelModePlay)->SetChannelMute(pcmChannelModePlay, 0, true);
        } else if (channelMode == 1)//左声道
        {
            (*pcmChannelModePlay)->SetChannelMute(pcmChannelModePlay, 1, true);
            (*pcmChannelModePlay)->SetChannelMute(pcmChannelModePlay, 0, false);
        } else if (channelMode == 2)//立体声 通道为 2 也就是我们重采样设置的 AV_CH_LAYOUT_STEREO
        {
            (*pcmChannelModePlay)->SetChannelMute(pcmChannelModePlay, 1, false);
            (*pcmChannelModePlay)->SetChannelMute(pcmChannelModePlay, 0, false);
        }
    }
}
音量控制
声音音量控制这里还是基于的是 OpenSLES 接口,对应 API 如下:
//1. 拿到音频声音控制接口
(*pcmPlayerObject)->GetInterface(pcmPlayerObject, SL_IID_VOLUME, &pcmVolumePlay);
//2. 设置声音
/**
 * 平滑设置当前音量
 * @param volume
 */
void BaseAudioChannel::setVolume(int percent) {
    this->curVolume = percent;
    if (pcmVolumePlay != NULL) {
        if (percent > 30) {
            (*pcmVolumePlay)->SetVolumeLevel(pcmVolumePlay, (100 - percent) * -20);
        } else if (percent > 25) {
            (*pcmVolumePlay)->SetVolumeLevel(pcmVolumePlay, (100 - percent) * -22);
        } else if (percent > 20) {
            (*pcmVolumePlay)->SetVolumeLevel(pcmVolumePlay, (100 - percent) * -25);
        } else if (percent > 15) {
            (*pcmVolumePlay)->SetVolumeLevel(pcmVolumePlay, (100 - percent) * -28);
        } else if (percent > 10) {
            (*pcmVolumePlay)->SetVolumeLevel(pcmVolumePlay, (100 - percent) * -30);
        } else if (percent > 5) {
            (*pcmVolumePlay)->SetVolumeLevel(pcmVolumePlay, (100 - percent) * -34);
        } else if (percent > 3) {
            (*pcmVolumePlay)->SetVolumeLevel(pcmVolumePlay, (100 - percent) * -37);
        } else if (percent > 0) {
            (*pcmVolumePlay)->SetVolumeLevel(pcmVolumePlay, (100 - percent) * -40);
        } else {
            (*pcmVolumePlay)->SetVolumeLevel(pcmVolumePlay, (100 - percent) * -100);
        }
    }
}
语调语速设置
语调语速功能这里用的开源的 SoundTouch ,具体实现如下:
int BaseAudioChannel::setSoundTouchData() {
    int num = 0;
    while (status && !status->exit) {
        if (finished) {
            finished = false;
            if (this->mBufSize > 0 && this->out_pcm_buffer) {
                pthread_mutex_lock(μtexSpeed);
                soundTouch->putSamples(reinterpret_cast<const SAMPLETYPE *>(this->out_pcm_buffer), this->oldSize);
                num = soundTouch->receiveSamples(reinterpret_cast<SAMPLETYPE *>(this->out_pcm_buffer),
                                                 this->mBufSize / 4);
                pthread_mutex_unlock(μtexSpeed);
            } else {
                soundTouch->flush();
            }
        }
        if (num == 0) {
            finished = true;
            continue;
        }
        return num * 2 * 2;
    }

    return 0;
}
seek 指定在某个时间段播放
seek 功能直接调取的 FFmpeg API ,操作如下:
void BaseDecodec::seek(int number) {
    if (duration <= 0) {
        return;
    }
    if (number >= 0 && number <= number) {
        int64_t rel = number * AV_TIME_BASE;
        avcodec_flush_buffers(this->avCodecContext);
        avformat_seek_file(this->avFormatContext, -1, INT64_MIN, rel, INT64_MAX, 0);
    }
}
截取 PCM
截取 PCM 原理其实很简单,比如一段音频的总长为 500s ,我想要截取 300 - 400s 部分,那么我首先 seek(300)作为起点,如果解码帧的时间到了 500 那么就直接退出就 OK 了,是不是很简单。
这里我说下怎么获取时间:
//这是基本的时间单位(以秒为单位)表示其中的帧时间戳。
this->time_base = (*pFormatCtx)->streams[i]->time_base;

//1. 初始化 FFmpeg 读取流 header 信息可以获取
int audioDuration = (*pFormatCtx)->streams[i]->duration / AV_TIME_BASE;

//2. 读取待解码 AVPacket 包获取时间
int readCurAudioTime = avPacket->pts * av_q2d(time_base);

//3. 解码获取时间
int decodeAudioCurTime = avFrame->pts * av_q2d(time_base);
总结
到这里我们的音频处理库就讲解完了,对于音视频感兴趣的可以作为学习资料,因为我本人不喜欢弄 UI ,不然我可以仿照一个 网易云音乐的 UI + 我自己的音频处理库来做一个音频 APP 。当然你可以这样来搞。
文章中所有的代码已上传 GitHub
关于我
- Email: [email protected]
- 个人博客: https://www.devyk.top
- GitHub: https://github.com/yangkun19921001
- 掘金博客: https://juejin.im/user/578259398ac2470061f3a3fb/posts
扫码关注我的公众号,让我们离得更近一些!

Recommend
About Joyk
Aggregate valuable and interesting links.
Joyk means Joy of geeK