

Docker安全之TLS加密通讯解析与配置验证-未来已来,问君何在?
source link: https://blog.51cto.com/14557673/2491683
Go to the source link to view the article. You can view the picture content, updated content and better typesetting reading experience. If the link is broken, please click the button below to view the snapshot at that time.

Docker安全之TLS加密通讯解析与配置验证
TLS的基本概念
TLS(Transport Layer Security,安全传输层),TLS是建立在传输层TCP协议之上的协议,服务于应用层,它的前身是SSL(Secure Socket Layer,安全套接字层),它实现了将应用层的报文进行加密后再交由TCP进行传输的功能。
TLS协议具备三大特性:保密性(数据都是加密传输,预防第三方嗅探)、数据完整性(基于MAC校验机制)、双向认证支持(避免身份被冒充)
在docker中,建立TLS加密是为了防止链路劫持、会话劫持等问题导致 Docker 通信时被中 间人***,c/s 两端应该通过加密方式通讯。
图解TLS建立过程
TLS的C/S建立连接的过程图解(完整的即双向验证过程)
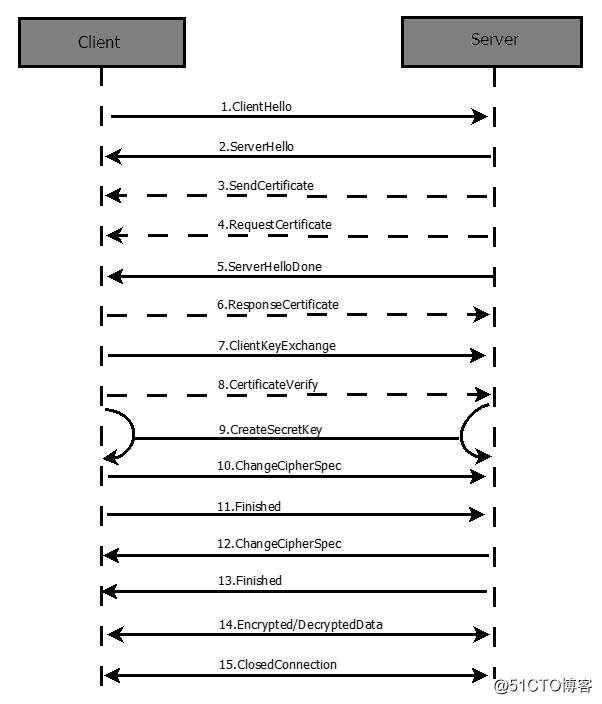
大体上是发送hello包,客户端发送认证和请求认证,对应的回应认证,其后进行对应的协商验证,生成信息,最后两边开始准备加密通信,双方使用客户端密钥通过对称加密算法对通信内容加密后进行双向通信,随着通讯结束,任意一方断开ssl连接的信息即可。
部署配置过程
所需基本环境
两台服务器,一台为server端一台为client端,都部署安装了docker-ce
1、准备工作:服务器节点上
#创建工作目录文件夹
[root@localhost ~]# mkdir /tls
[root@localhost ~]# cd /tls/
#设置主机名
[root@localhost tls]# hostnamectl set-hostname server
[root@localhost tls]# su
[root@server tls]# vim /etc/hosts
127.0.0.1   server
::1         localhost localhost.localdomain localhost6 localhost6.localdomain6
#进行测试
[root@server tls]# ping server
PING server (127.0.0.1) 56(84) bytes of data.
64 bytes from server (127.0.0.1): icmp_seq=1 ttl=64 time=0.033 ms
64 bytes from server (127.0.0.1): icmp_seq=2 ttl=64 time=0.029 ms
64 bytes from server (127.0.0.1): icmp_seq=3 ttl=64 time=0.031 ms
64 bytes from server (127.0.0.1): icmp_seq=4 ttl=64 time=0.084 ms
^C
--- server ping statistics ---
4 packets transmitted, 4 received, 0% packet loss, time 3012ms
rtt min/avg/max/mdev = 0.029/0.044/0.084/0.023 ms
2、创建ca秘钥证书和ca证书
#创建ca秘钥证书
[root@server tls]# openssl genrsa -aes256 -out ca-key.pem 4096
Generating RSA private key, 4096 bit long modulus
...........................................................................++
.................................++
e is 65537 (0x10001)
#下面需要进行,自己设置密码
Enter pass phrase for ca-key.pem:
Verifying - Enter pass phrase for ca-key.pem:

#创建ca证书
[root@server tls]# openssl req -new -x509 -days 1000 -key ca-key.pem -sha256 -subj "/CN=*" -out ca.pem
#下面需要进行交互输入你刚刚设置的密码即可
Enter pass phrase for ca-key.pem:
3、服务器私钥证书和生成签名私钥
#创建服务器私钥证书
[root@server tls]# openssl genrsa -out server-key.pem 4096
Generating RSA private key, 4096 bit long modulus
...........................................++
...........................................................................................++
e is 65537 (0x10001)

#利用上面创建的ca证书与服务器私钥生成签名私钥
[root@server tls]# openssl req -subj "/CN=*" -sha256 -new -key server-key.pem -out server.csr#使用上面创建的ca证书与私钥签名

#查看对应的证书
[root@server tls]# ls
ca-key.pem  ca.pem  server.csr  server-key.pem

#进行签名
[root@server tls]# openssl x509 -req -days 1000 -sha256 -in server.csr -CA ca.pem -CAkey ca-key.pem -CAcreateserial -out server-cert.pem
Signature ok
subject=/CN=*
Getting CA Private Key
#输入密码
Enter pass phrase for ca-key.pem:
[root@server tls]# ls
ca-key.pem  ca.pem  ca.srl  server-cert.pem  server.csr  server-key.pem
4、生成客户端密钥和进行客户端签名
#生成客户端密钥
[root@server tls]# openssl genrsa -out key.pem 4096
Generating RSA private key, 4096 bit long modulus
.........................................................................................................++
...............................................++
e is 65537 (0x10001)
#进行客户端签名
[root@server tls]# openssl req -subj "/CN=client" -new -key key.pem -out client.csr
5、创建配置文件来增强密钥
#增强密钥文件创建
[root@server tls]# echo extendedKeyUsage=clientAuth > extfile.cnf
#签名证书
[root@server tls]# openssl x509 -req -days 1000 -sha256 -in client.csr -CA ca.pem -CAkey ca-key.pem -CAcreateserial -out cert.pem -extfile extfile.cnf
Signature ok
subject=/CN=client
Getting CA Private Key
Enter pass phrase for ca-key.pem:
6、移除多余文件以及设置docker服务
[root@server tls]# rm -rf ca.srl client.csr extfile.cnf server.csr

[root@server tls]# vim /lib/systemd/system/docker.service
将低14行(准启动方式设置)进行修改后保存退出
14 ExecStart=/usr/bin/dockerd --tlsverify --tlscacert=/tls/ca.pem --tlscert=/tls/server-cert.pem --tlskey=/tls/server-ke    y.pem -H tcp://0.0.0.0:2376 -H unix:///var/run/docker.sock
7、重载服务和重启docker
[root@server tls]# systemctl daemon-reload
[root@server tls]# systemctl restart docker.service
8、将/tls/ca.pem /tls/cert.pem /tls/key.pem 三个文件复制到客户端主机
[root@server tls]# ls
ca-key.pem  ca.pem  cert.pem  key.pem  server-cert.pem  server-key.pem
[root@server tls]# scp ca.pem cert.pem key.pem [email protected]:/etc/docker
[email protected]'s password:
ca.pem                                                                                 100% 1765   894.4KB/s   00:00
cert.pem                                                                               100% 1696     1.7MB/s   00:00
key.pem                                                                                100% 3243     2.6MB/s   00:00
client端设置
1、查看远程复制过来的三个文件是否存在
[root@localhost ~]# ls /etc/docker/
ca.pem  cert.pem  daemon.json  key.json  key.pem
2、环境安装和设置主机名称以及hosts文件
[root@localhost ~]# systemctl status docker.service
● docker.service - Docker Application Container Engine
   Loaded: loaded (/usr/lib/systemd/system/docker.service; disabled; vendor preset: disabled)
   Active: active (running) since 四 2020-04-30 09:31:18 CST; 3min 20s ago
     Docs: https://docs.docker.com

[root@localhost ~]# hostnamectl set-hostname client
[root@localhost ~]# su
[root@client ~]# vim /etc/hosts
[root@client ~]# cat /etc/hosts
192.168.0.135 server
[root@client ~]# ping server
PING server (192.168.0.135) 56(84) bytes of data.
64 bytes from server (192.168.0.135): icmp_seq=1 ttl=64 time=0.444 ms
64 bytes from server (192.168.0.135): icmp_seq=2 ttl=64 time=0.345 ms
64 bytes from server (192.168.0.135): icmp_seq=3 ttl=64 time=1.09 ms
^C
--- server ping statistics ---
3 packets transmitted, 3 received, 0% packet loss, time 2002ms
rtt min/avg/max/mdev = 0.345/0.628/1.096/0.333 ms
3、进入/etc/docker目录查看server端的docker版本进行验证
[root@client docker]# docker --tlsverify --tlscacert=ca.pem --tlscert=cert.pem --tlskey=key.pem -H tcp://server:2376 version
Client: Docker Engine - Community
 Version:           19.03.8
 API version:       1.40
 Go version:        go1.12.17
 Git commit:        afacb8b
 Built:             Wed Mar 11 01:27:04 2020
 OS/Arch:           linux/amd64
 Experimental:      false
#上面是客户端,下面是服务器端
Server: Docker Engine - Community
 Engine:
  Version:          19.03.8
  API version:      1.40 (minimum version 1.12)
  Go version:       go1.12.17
  Git commit:       afacb8b
  Built:            Wed Mar 11 01:25:42 2020
  OS/Arch:          linux/amd64
  Experimental:     false
 containerd:
  Version:          1.2.13
  GitCommit:        7ad184331fa3e55e52b890ea95e65ba581ae3429
 runc:
  Version:          1.0.0-rc10
  GitCommit:        dc9208a3303feef5b3839f4323d9beb36df0a9dd
 docker-init:
  Version:          0.18.0
  GitCommit:        fec3683
以上docker容器的TLS加密通信及配置完了,下面进行一个简单的测试
在server端拉取一个镜像在client端查看
#拉取一个nginx镜像
[root@server tls]# docker pull nginx
Using default tag: latest
latest: Pulling from library/nginx
54fec2fa59d0: Pull complete
4ede6f09aefe: Pull complete
f9dc69acb465: Pull complete
Digest: sha256:86ae264c3f4acb99b2dee4d0098c40cb8c46dcf9e1148f05d3a51c4df6758c12
Status: Downloaded newer image for nginx:latest
docker.io/library/nginx:latest
[root@server tls]# docker images
REPOSITORY          TAG                 IMAGE ID            CREATED                  SIZE
nginx               latest              602e111c06b6        Less than a second ago   127MB

#在客户端查看镜像
[root@client docker]# docker --tlsverify --tlscacert=ca.pem --tlscert=cert.pem --tlskey=key.pem -H tcp://server:2376 images
REPOSITORY          TAG                 IMAGE ID            CREATED             SIZE
nginx               latest              602e111c06b6        6 days ago          127MB
测试无误(看镜像ID即可),谢谢阅读!
Recommend
About Joyk
Aggregate valuable and interesting links.
Joyk means Joy of geeK