

基于consul的docker容器服务发现及自动更新(原理+部署)-未来已来,问君何在?
source link: https://blog.51cto.com/14557673/2489953
Go to the source link to view the article. You can view the picture content, updated content and better typesetting reading experience. If the link is broken, please click the button below to view the snapshot at that time.
基于consul的docker容器服务发现及自动更新(原理+部署)
之前的文章大致上将docker入门级别的一些内容进行了讲述。本文开始深入讲解docker的其他内容,首先就来讲一讲docker容器服务发现和自动更新部分的原理和实际操作。
先唠唠嗑儿——讲一讲概念和优势(瞅两眼就行)
consul的介绍
由HashiCorp公司使用go语言开发的一个支持多数据中心分布式高可用的服务发现和配置共享的服务软件(开源)。
主要特点:
服务发现及配置;
支持健康检查,并且运行HTTP、GTPC和DNS协议调用API存储键值对;
采用Raft算法,保证服务的高可用
支持安全服务通信;
支持多数据中心;
consul agent
consul通过agent来运行的,agent分为server 和client两种类型,这两种类型基本上没有什么区别,server agent是将服务的消息存储,一般来说为了防止单点故障推荐使用3到5个来构建集群架构。
而client agent主要用于注销服务、健康检查及转发server agent的查询等,相当于一个代理,因此它必须要在集群的每台主机上运行。
一种服务或软件工具的产生必然有其使用场景和其优势,否则哪有其立足之地?
consul使用的场景
- Docker 容器的注册与配置共享
- Coreos 实例的注册与配置共享
- SaaS 应用的配置共享、服务发现和健康检查。
- vitess 集群
- 与 confd 服务集成,动态生成 nginx 和 haproxy 配置文件
consul优势(与其他服务工具对比)
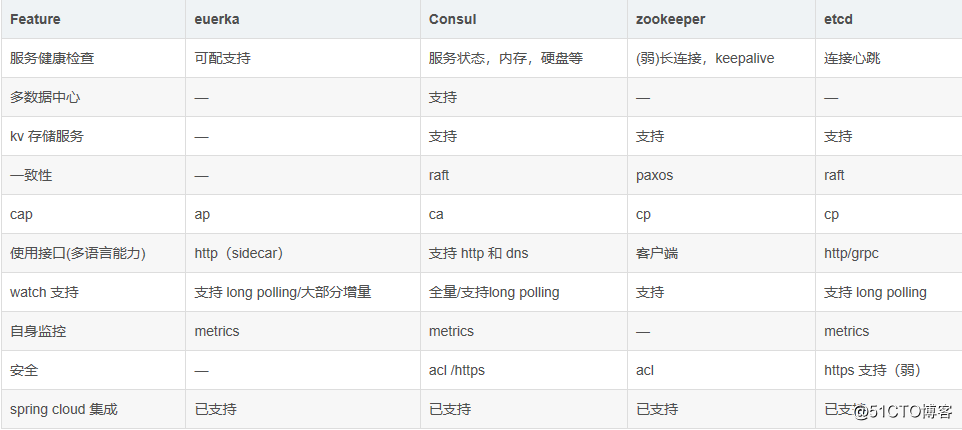
通过对比你就可以发现consul对比其他软件工具有自己的优势,而本文将使用其的场景是在docker中进行搭建。
再来看看consul发现和更新机制原理(可以结合实践部署理解)
通过一幅图就能够了解consul的特点和内部角色的工作机制,包括支持多数据中心,端口号,服务发现、配置和更新功能等等
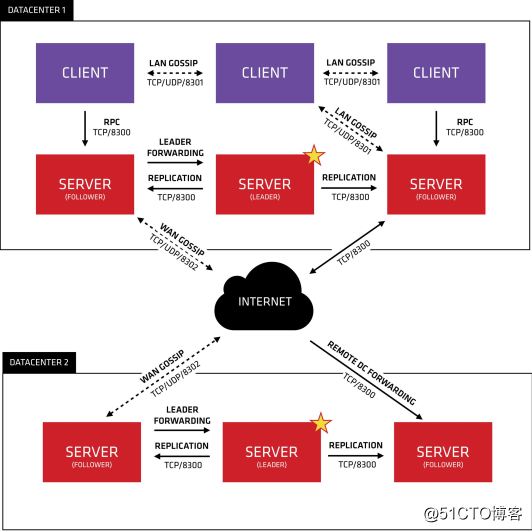
相关说明:
1. Consul Cluster由部署和运行了Consul Agent的节点组成。 在Cluster中有两种角色:Server和 Client。
2. Server和Client的角色和Consul Cluster上运行的应用服务无关, 是基于Consul层面的一种角色划分.
3. Consul Server: 用于维护Consul Cluster的状态信息, 实现数据一致性, 响应RPC请求。官方建议是: 至少要运行3个或者3个以上的Consul Server。 多个server之中需要选举一个leader, 这个选举过程Consul基于Raft协议实现. 多个Server节点上的Consul数据信息保持强一致性。 在局域网内与本地客户端通讯,通过广域网与其他数据中心通讯。Consul Client: 只维护自身的状态, 并将HTTP和DNS接口请求转发给服务端。
4. Consul 支持多数据中心, 多个数据中心要求每个数据中心都要安装一组Consul cluster,多个数据中心间基于gossip protocol协议来通讯, 使用Raft算法实现一致性
下面开始部署实践过程演示了
两台服务器
| ip | hostname | tools |
|---|---|---|
| 192.168.10.128/24 | consul-server | docker-ce(安装和启动docker服务)、consul、consul-template、nginx软件 |
| 192.168.10.129/24 | docker-service | docker-ce、registrator |
实现流程简述
第一项:部署操作验证consul的服务自动发现机制
第二项:部署操作验证consul的服务配置更新机制
下面开始进行第一项的验证部署流程
1、在consul-server节点上配置
#设置主机名、解压相关工具、优化工具使用
[root@localhost ~]# hostnamectl set-hostname consul-server
[root@localhost ~]# su
[root@consul-server ~]# cd /opt/
[root@consul-server opt]# ls
consul_0.9.2_linux_amd64.zip  consul-template_0.19.3_linux_amd64.zip  containerd  docker.sh  rh
[root@consul-server opt]# unzip consul_0.9.2_linux_amd64.zip
Archive:  consul_0.9.2_linux_amd64.zip
  inflating: consul
[root@consul-server opt]# unzip consul-template_0.19.3_linux_amd64.zip
Archive:  consul-template_0.19.3_linux_amd64.zip
  inflating: consul-template
[root@consul-server opt]# ls
consul  consul_0.9.2_linux_amd64.zip  consul-template  consul-template_0.19.3_linux_amd64.zip  containerd  docker.sh  rh
[root@consul-server opt]# mv consul /usr/bin
[root@consul-server opt]# mv consul-template /usr/bin
#创建工作目录
[root@consul-server opt]# mkdir /root/consul
[root@consul-server opt]# cd /root/consul/
[root@consul-server consul]# ls
2、在consul-server节点上部署consul
[root@consul-server consul]#  consul agent \
> -server \
> -bootstrap \
> -ui \
> -data-dir=/var/lib/consul-data \
> -bind=192.168.10.128 \
> -client=0.0.0.0 \
> -node=consul-server01 &> /var/log/consul.log &
[1] 6489
[root@consul-server consul]# jobs
[1]+  运行中               consul agent -server -bootstrap -ui -data-dir=/var/lib/consul-data -bind=192.168.10.128 -client=0.0.0.0 -node=consul-server01 &>/var/log/consul.log &
3、查看运行agent的日志:
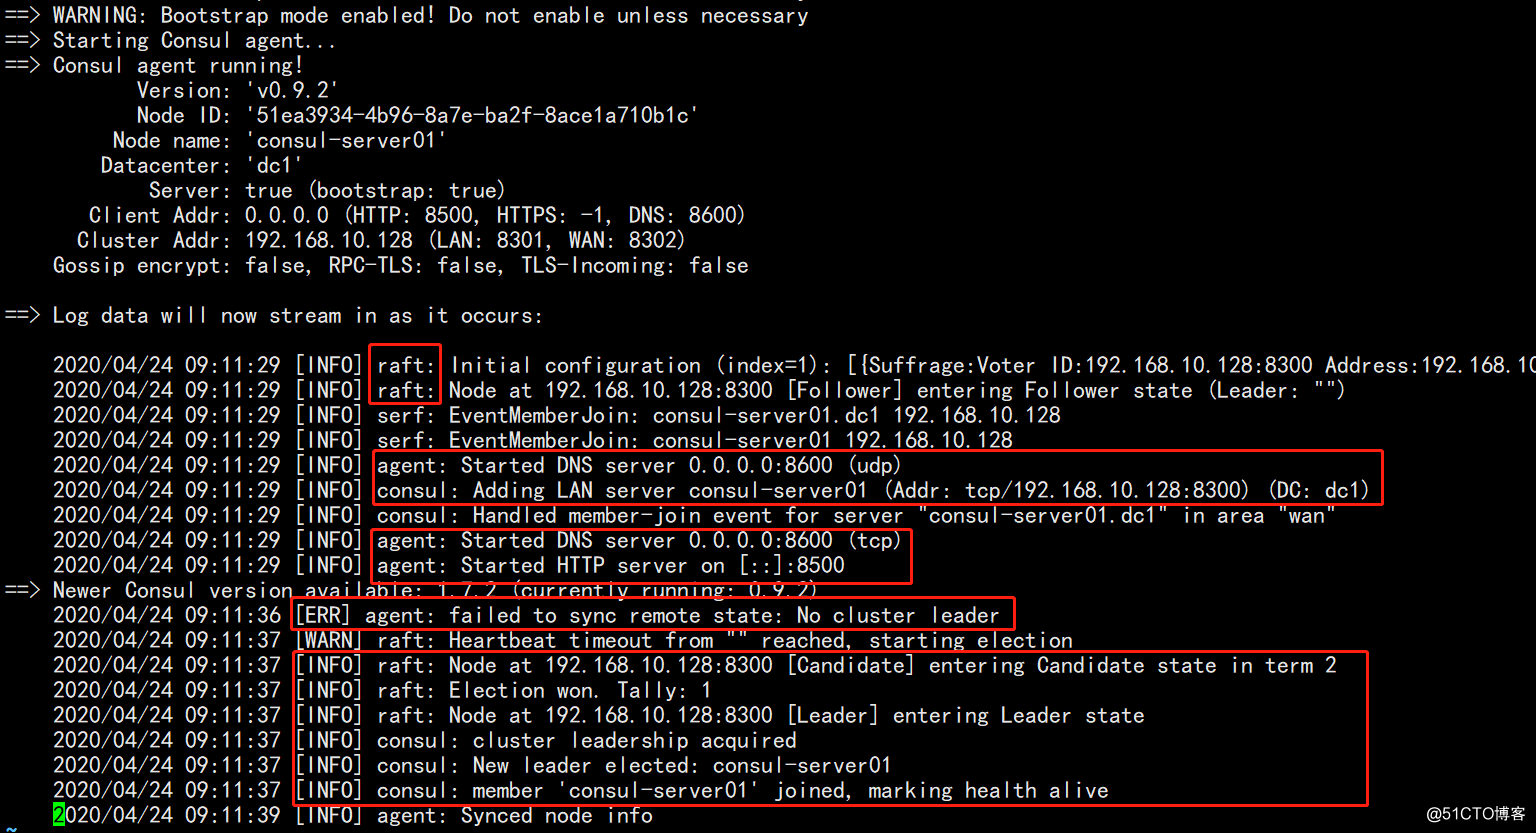
注意红色部分,在日志中体现了算法、代理功能开启、相关的端口协议等特点和信息,其中有一个ERR,此处暂时忽略(其实之后的信息可以发现已经解决了,会自动成为leader,因为这里是单节点,生产环境中推荐3或5个)
4、在docker-service节点上配置
[root@localhost ~]# hostnamectl set-hostname docker-service
[root@localhost ~]# su
#安装配置 gliderlabs/registrator
[root@docker-service ~]# docker run -d \
> --name=registrator \
> --net=host \
> -v /var/run/docker.sock:/tmp/docker.sock \
> --restart=always \
> gliderlabs/registrator:latest \
> -ip=192.168.10.129 \
> consul://192.168.10.128:8500
Unable to find image 'gliderlabs/registrator:latest' locally
latest: Pulling from gliderlabs/registrator
Image docker.io/gliderlabs/registrator:latest uses outdated schema1 manifest format. Please upgrade to a schema2 image for better future compatibility. More information at https://docs.docker.com/registry/spec/deprecated-schema-v1/
c87f684ee1c2: Pull complete
a0559c0b3676: Pull complete
a28552c49839: Pull complete
Digest: sha256:6e708681dd52e28f4f39d048ac75376c9a762c44b3d75b2824173f8364e52c10
Status: Downloaded newer image for gliderlabs/registrator:latest
befb4e5e2b4239a48bb85cedbdd061ef27996b31e3f323a4ba35d66b68286691
5、查看当前服务器节点上下载的镜像以及运行的容器

在当前服务器节点上运行两个nginx容器服务来测试consul服务的发现机制
[root@docker-service ~]# docker run -itd -p 88:80 --name nginx01 -h nginx-01 nginx:latest
Unable to find image 'nginx:latest' locally
latest: Pulling from library/nginx
54fec2fa59d0: Pull complete
4ede6f09aefe: Pull complete
f9dc69acb465: Pull complete
Digest: sha256:86ae264c3f4acb99b2dee4d0098c40cb8c46dcf9e1148f05d3a51c4df6758c12
Status: Downloaded newer image for nginx:latest
441d11db3bcf4bb47d758967661e27df2e9d5855ab540e01766236e8587fd1ae2
[root@docker-service ~]# docker run -itd -p 89:80 --name nginx02 -h nginx-02 nginx:latest
18508414acc2327d0df9aa570575a2369a239dd408a075eaa23fdfccfd14660f
[root@docker-service ~]# docker ps -a
CONTAINER ID        IMAGE                           COMMAND                  CREATED             STATUS              PORTS                NAMES
18508414acc2        nginx:latest                    "nginx -g 'daemon of…"   5 seconds ago       Up 4 seconds        0.0.0.0:89->80/tcp   nginx02
441d11db3bcf        nginx:latest                    "nginx -g 'daemon of…"   41 seconds ago      Up 40 seconds       0.0.0.0:88->80/tcp   nginx01
befb4e5e2b42        gliderlabs/registrator:latest   "/bin/registrator -i…"   4 minutes ago       Up 4 minutes                             registrator
测试运行的容器是否可以在浏览器中打开
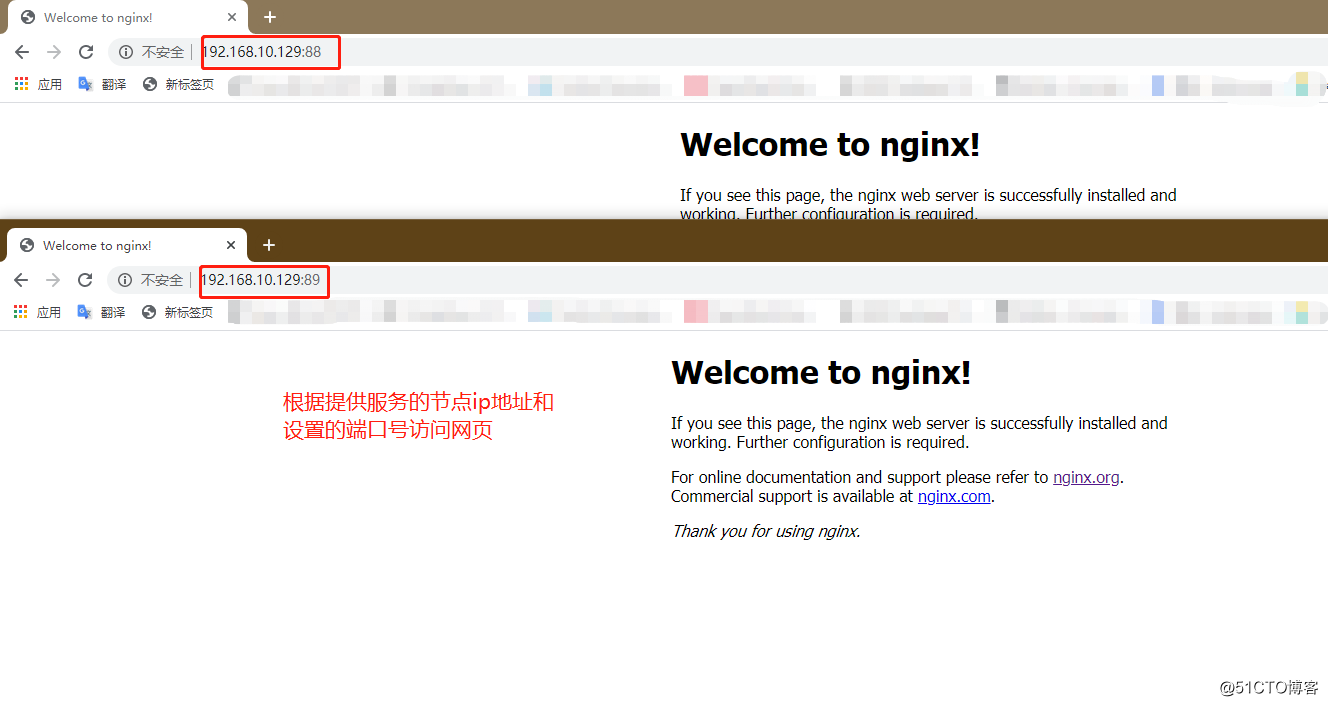
我们访问consul服务器节点ip地址及8500端口来查看验证consul的自动发现、注册机制
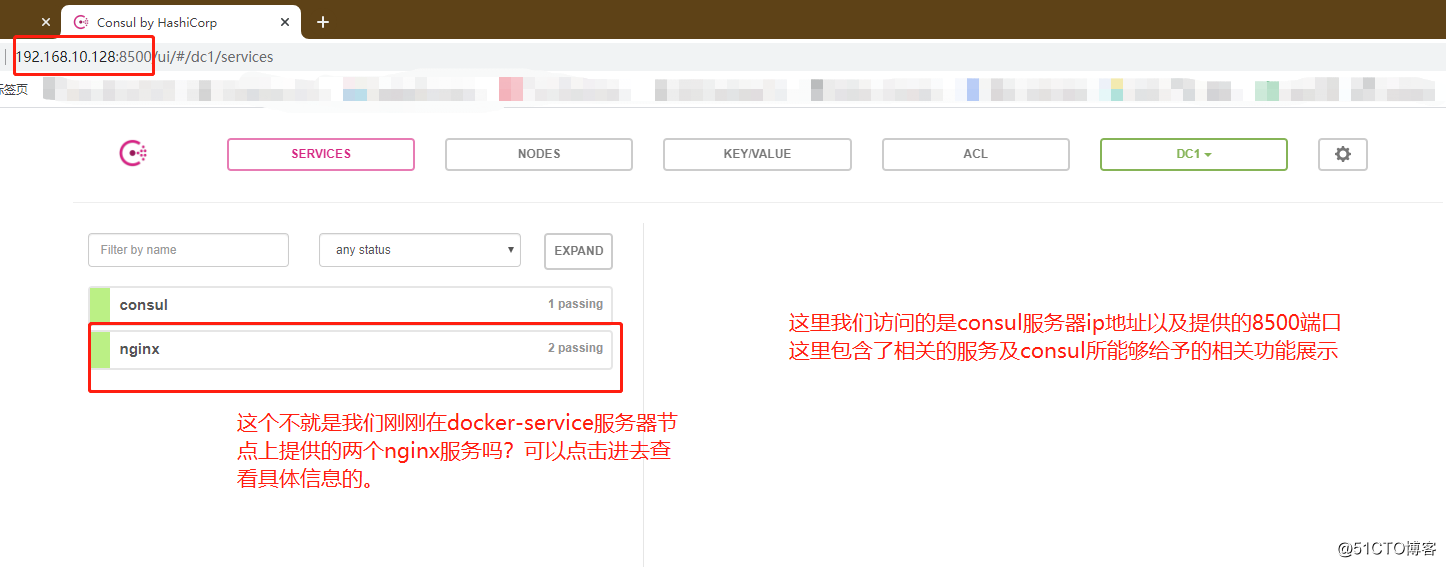
第一项验证完毕
当然,此时还不能通过直接访问consul服务器来访问后端的web服务页面
所以,接下来我们就需要来验证consul自动更新机制
第二项验证配置流程
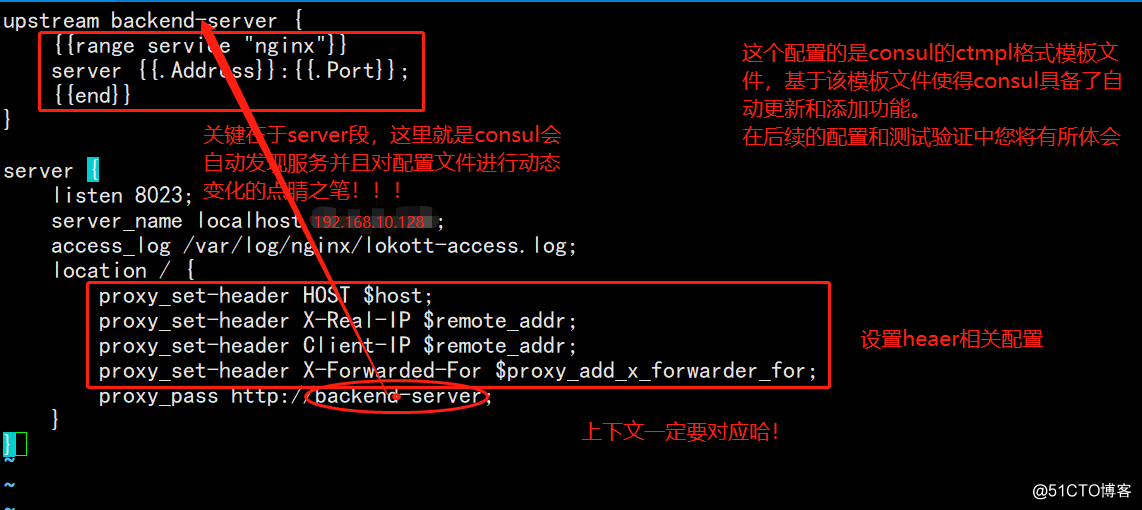
1、在consul-server节点上编写模板文件
[root@consul-server consul]# vim nginx.ctmpl
[root@consul-server consul]# cat nginx.ctmpl
upstream backend-server {
    {{range service "nginx"}}
    server {{.Address}}:{{.Port}};
    {{end}}
}

server {
    listen 8023;
    server_name localhost 192.168.10.128;
    access_log /var/log/nginx/lokott-access.log;
    location / {
    proxy_set_header HOST $host;
    proxy_set_header X-Real-IP $remote_addr;
    proxy_set_header Client-IP $remote_addr;
    proxy_set_header X-Forwarded-For $proxy_add_x_forwarder_for;
    #以上四行可以不设置,如果设置中出错,之后执行consul-template启动时会发生几种情况下的error
    #尤其是X-Forwarded-For配置项
    proxy_pass http://backend-server;
    }
}
图解上述文件相关说明:
2、这里我们需要手工编译安装nginx服务(这里就省略了吧!)直接给出启动的结果吧
[root@consul-server nginx-1.12.2]# ln -s /usr/local/nginx/sbin/nginx /usr/bin/
[root@consul-server nginx-1.12.2]# nginx -t
nginx: the configuration file /usr/local/nginx/conf/nginx.conf syntax is ok
nginx: configuration file /usr/local/nginx/conf/nginx.conf test is successful
[root@consul-server nginx-1.12.2]# nginx
[root@consul-server nginx-1.12.2]# netstat -natp | grep 80
tcp        0      0 0.0.0.0:80              0.0.0.0:*               LISTEN      44370/nginx: master
3、此时consul节点服务器上的nginx服务正常启动,我们此时需要配置nginx的配置文件
其实只要进入配置目录中创建一个vhost目录用来存放你的其他配置文件(解耦性高、容易维护更改扩展)以及创建日志目录(根据你的模板),随后在执行consul-template命令后以及访问web后会在对应的目录下生成配置文件和日志文件
对于主配置文件中只要添加一行代码即可,就是包含后面vhost目录下的所有配置文件
[root@consul-server nginx-1.12.2]# cd /usr/local/nginx/conf/
[root@consul-server conf]# mkdir /var/log/nginx
[root@consul-server conf]# mkdir vhost
[root@consul-server conf]# vim nginx.conf
#根据下图进行配置即可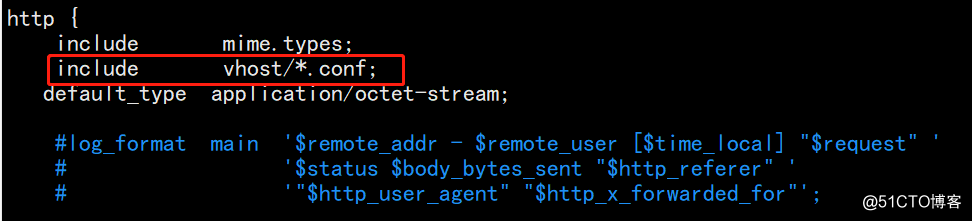
4、此时需要使用我们的consul-template工具来启动服务了
[root@consul-server consul]# consul-template -consul-addr 192.168.10.128:8500 -template "/root/consul/nginx.ctmpl:/usr/local/nginx/conf/vhost/lokott.conf:/usr/local/nginx/sbin/nginx -s reload" --log-level=info
2020/04/24 02:15:57.369809 [INFO] consul-template v0.19.3 (ebf2d3d)
2020/04/24 02:15:57.369819 [INFO] (runner) creating new runner (dry: false, once: false)
2020/04/24 02:15:57.370054 [INFO] (runner) creating watcher
2020/04/24 02:15:57.370345 [INFO] (runner) starting
2020/04/24 02:15:57.370352 [INFO] (runner) initiating run
2020/04/24 02:15:57.371539 [INFO] (runner) initiating run
2020/04/24 02:15:57.372779 [INFO] (runner) rendered "/root/consul/nginx.ctmpl" => "/usr/local/nginx/conf/vhost/lokott.conf"
2020/04/24 02:15:57.372800 [INFO] (runner) executing command "/usr/local/nginx/sbin/nginx -s reload" from "/root/consul/nginx.ctmpl" => "/usr/local/nginx/conf/vhost/lokott.conf"
2020/04/24 02:15:57.372843 [INFO] (child) spawning: /usr/local/nginx/sbin/nginx -s reload
此时我们开启另一个终端(terminal)来查看vhost中的文件
[root@consul-server ~]# cd /usr/local/nginx/conf/vhost/
[root@consul-server vhost]# cat lokott.conf
upstream backend-server {

    server 192.168.10.129:88;

    server 192.168.10.129:89;

}

server {
    listen 8023;
    server_name localhost 192.168.10.128;
    access_log /var/log/nginx/lokott-access.log;
    location / {
    proxy_set_header HOST $host;
    proxy_set_header X-Real-IP $remote_addr;
    proxy_set_header Client-IP $remote_addr;
    proxy_pass http://backend-server;
    }
}
此时会发现我们设置的docker容器服务(nginx应用服务)已经提供出来,并且是以轮循方式进行负载均衡,注意这里使用的是容器所提供的服务是由宿主机的ip地址,因为先前我们设置的网络模式(docker的网络模式可以参考我的另一篇博客:透过现象看本质——docker的网络模式、一边排障一边配置docker自定义网络(bridge模式))为host,因此这里容器是使用宿主机ip地址的。
此时我们可以通过浏览器直接访问consul服务器地址和你配置的端口号,验证是否可以访问nginx服务提供的web页面
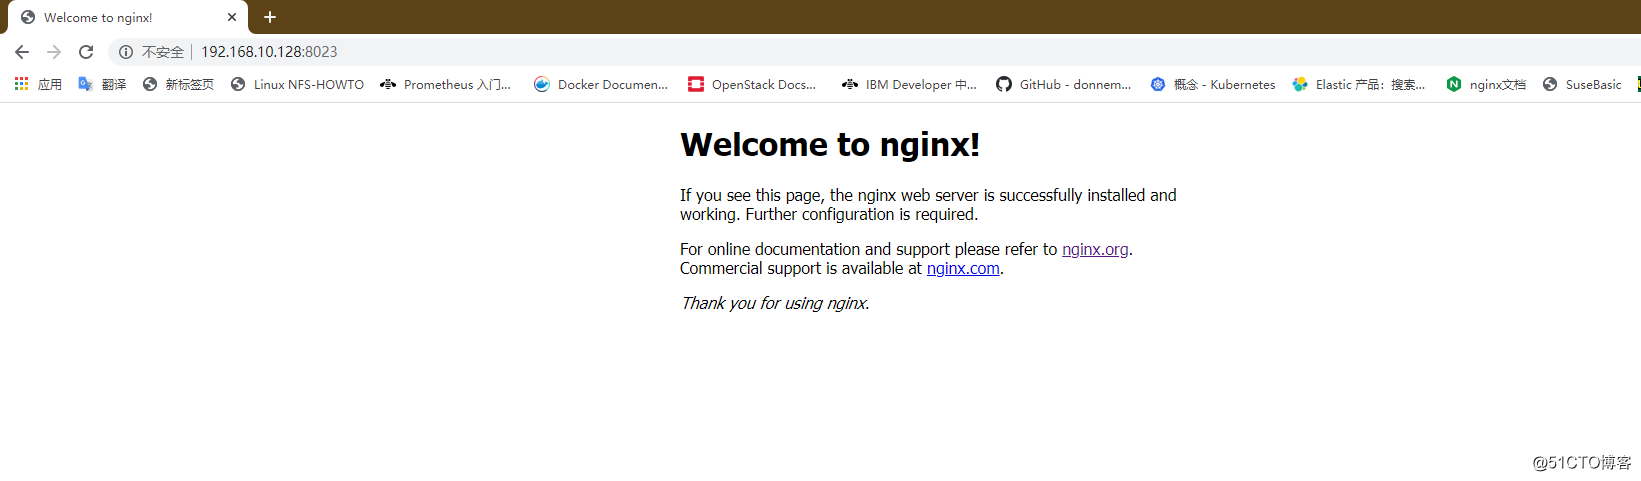
可以通过日志文件进行查看

然后我们在docker-service节点上再添加一个nginx服务,随后进行自动添加和更新配置的验证
[root@docker-service ~]# docker run -itd -p 90:80 --name nginx03 -h nginx-03 nginx:latest
144df900d69e682bf356c3b32d9aa043106327964c700cc99850ae2c1e7a5f3c
运行完该指令后,我们可以在consul-server的原始终端查看到信息,因为此时该服务一直在监控着
会发现多了一下几行
2020/04/24 02:27:46.318181 [INFO] (runner) initiating run
2020/04/24 02:27:46.319400 [INFO] (runner) rendered "/root/consul/nginx.ctmpl" => "/usr/local/nginx/conf/vhost/lokott.conf"
2020/04/24 02:27:46.319434 [INFO] (runner) executing command "/usr/local/nginx/sbin/nginx -s reload" from "/root/consul/nginx.ctmpl" => "/usr/local/nginx/conf/vhost/lokott.conf"
2020/04/24 02:27:46.319467 [INFO] (child) spawning: /usr/local/nginx/sbin/nginx -s reload
与此同时,lokott.conf文件也会随之变化
[root@consul-server vhost]# cat lokott.conf
upstream backend-server {

    server 192.168.10.129:88;

    server 192.168.10.129:89;

    server 192.168.10.129:90;

}

server {
    listen 8023;
    server_name localhost 192.168.10.128;
    access_log /var/log/nginx/lokott-access.log;
    location / {
    proxy_set_header HOST $host;
    proxy_set_header X-Real-IP $remote_addr;
    proxy_set_header Client-IP $remote_addr;
    proxy_pass http://backend-server;
    }
}
首先,需要明白基于consul构建docker容器提供服务的目的,就本文的nginx而言,可以灵活而快速地扩展配置更新服务,方便弹性伸缩;
其次,需要理清楚相关工具的使用以及其目的;
再者,搞清楚内部的一些端口服务以及对应协议,本文就不做罗列了。
后续的思考和验证
目前有三个nginx容器服务,如果此时有一个服务故障了会有什么现象,对运行命令终端和配置文件以及web ui界面内容(ip:8500)有什么影响呢?
模拟测试一下,可以停掉一个nginx容器服务
[root@docker-sevice ~]# docker stop test03
test03
终端会同时相关信息,而配置文件将会随之动态变化,踢出故障服务,那么可想而知,web UI界面也会动态变化,回到最初的两个nginx服务状态。可以自己验证查看了哈!
谢谢阅读!
Recommend
About Joyk
Aggregate valuable and interesting links.
Joyk means Joy of geeK