

Boost Your Command-Line Productivity With Fuzzy Finder
source link: https://medium.com/@vdeantoni/boost-your-command-line-productivity-with-fuzzy-finder-985aa162ba5d?source=friends_link&%3Bsk=f1fc4d89f07f33331e13dcdbd34f06f6
Go to the source link to view the article. You can view the picture content, updated content and better typesetting reading experience. If the link is broken, please click the button below to view the snapshot at that time.
Boost Your Command-Line Productivity With Fuzzy Finder
Level up your CLI skills with fzf
Apr 7th update:
* Added chrome bookmark browser for macOS
As developers, when coding, we spend most of our time on IDEs and/or text editors, and although they do a great job abstracting lower-level commands to build, test, run, and debug our code, eventually you will find yourself having to run a command or change a file through the command line.
You can get by just fine with built-in commands and POSIX utilities like pwd, ls, cd, mv, cp, rm, mkdir, touch,cat, grep, find, etc.
But if you want to boost your productivity when working with CLI tools, fzf is:
“An interactive Unix filter for the command line that can be used with any list; files, command history, processes, hostnames, bookmarks, git commits, etc.” — fzf

In this article, I will show you how to configure and customize fzf, along with examples of how it can be used as a productivity booster.
Installation
You can install fzf on Linux, macOS, and Windows. If you are on macOS or Linux, it’s available via Homebrew and Linuxbrew, to install it, run:
brew install fzf
For Windows and other options, visit the official installation page on GitHub.
It’s also recommended to install the key bindings and fuzzy completion:
$(brew --prefix)/opt/fzf/install
This will generate a file for bash and zsh (and source it in your .bashrc or .zshrc file) that includes three key bindings and the fuzzy completion alias.
Usage
To launch the interactive UI, run:
fzf
When no arguments are supplied, fzf launches an interactive finder with file suggestions provided by find.
You can then enter search terms separated by SPACE, navigate with Arrow-UP and Arrow-DOWN, select multiple files with TAB, and confirm by pressing ENTER. When done, the paths of the selected files will be printed on the screen.
In the example below, I run fzf, search for READ, select the files with TAB, and confirm with ENTER:
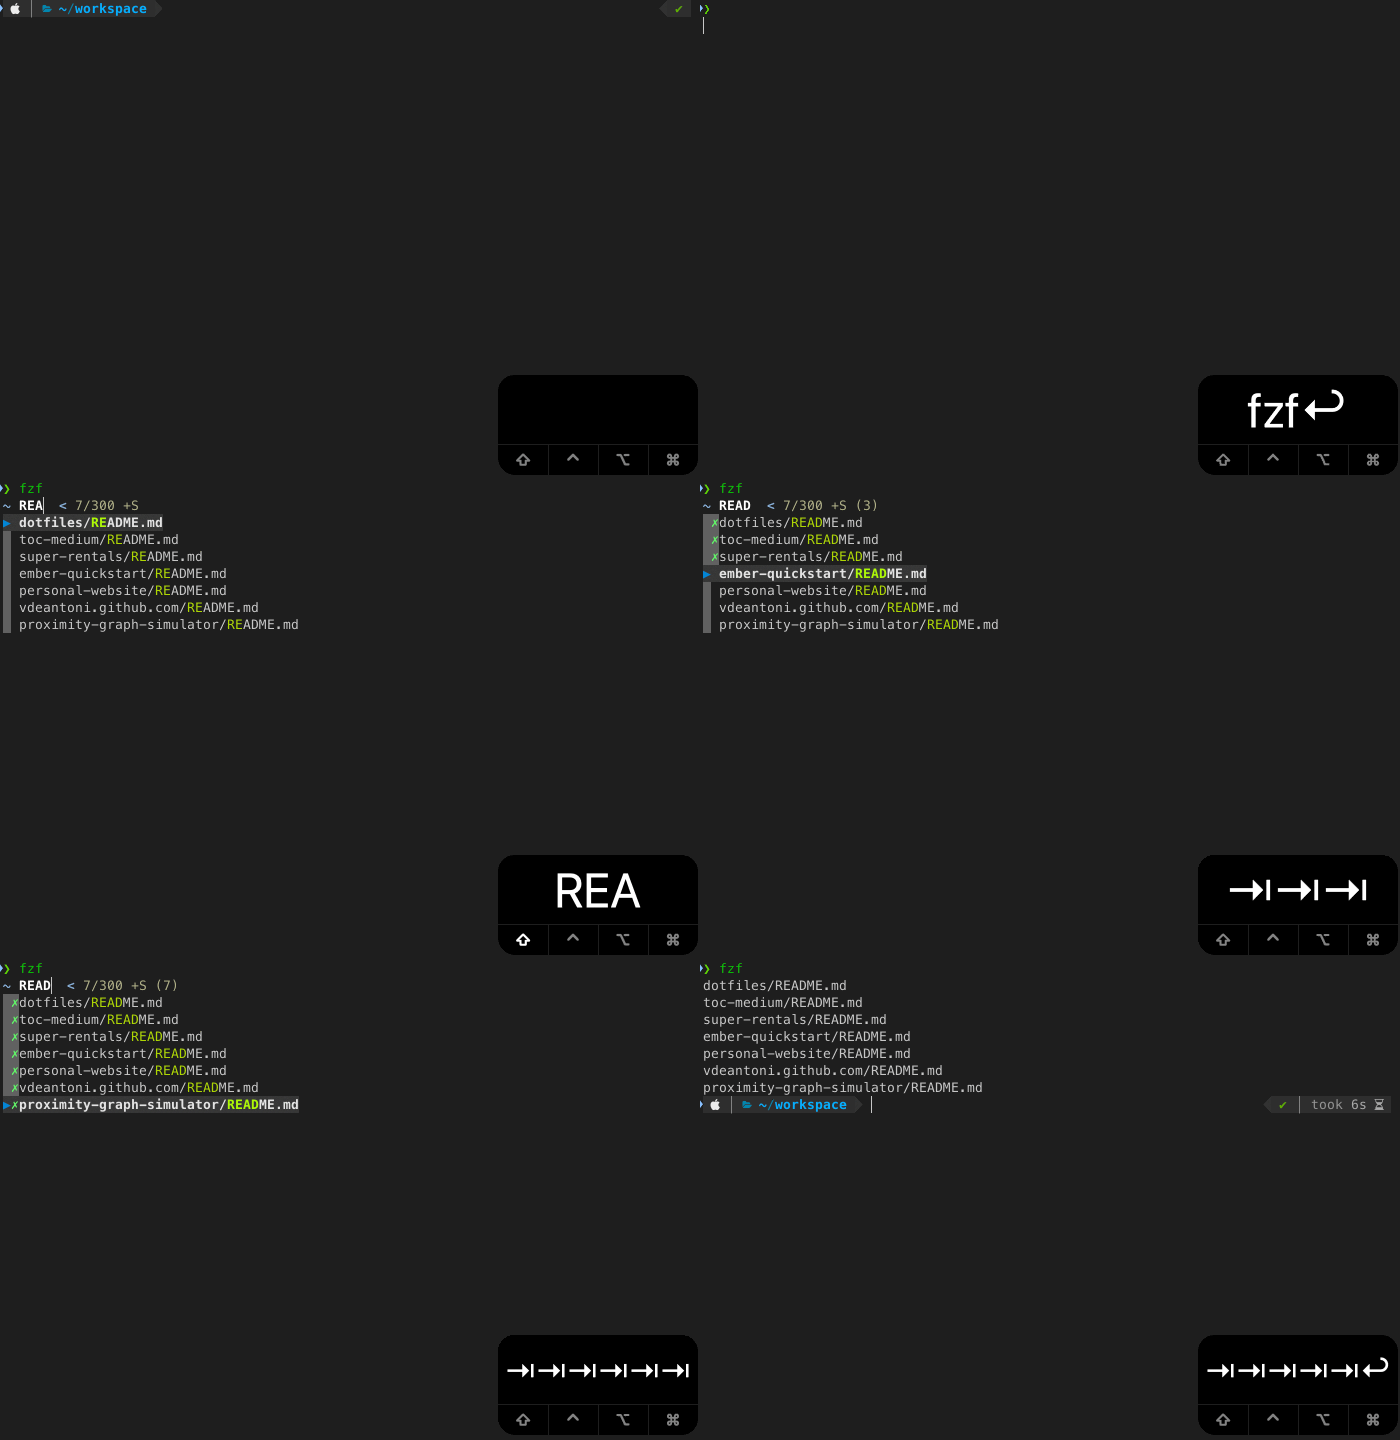
For single selection, TAB is not necessary. Just press ENTER when the desired entry is highlighted.
We can also use the output of fzf as an argument for another command:
vim $(fzf)
Because fzf can read a list from STDIN, process it, and write the selected items to STDOUT, things become more interesting when fzf is run in conjunction with other commands.
# npm search
npm search react | fzf# grep
grep -irl react * | fzf# PATH folders
echo $PATH | tr ':' '\n' | fzf
If you use zsh, you can add a global alias for | fzf:
alias -g Z='| fzf' # change Z to whatever you like
The same examples can then be written as:
npm search react Z
grep -irl react * Z
echo $PATH | tr ':' '\n' Z
Key bindings
The install script adds, by default, three key bindings:
- CTRL-T
Paste the selected files and directories onto the command line.
In the example below, I start by typing vim then CTRL-T, the fzf UI shows up letting me search for the file I wanted. Once I find the file, I press ENTER to return to my vim command with the file path.

You can select multiple files and directories with TAB and Shift-TAB, the paths will be all pasted onto the command line separated by a space. It’s very useful when you want to rm or cat multiple files.
2. CTRL-R
Paste the selected command from history onto the command line.
In the example below, I simply invoke the UI by pressing CTRL-R, and then I can search for any command previously executed, in this case, I was looking for the npm command to list all my globally installed packages without their dependencies.

3. ALT-C
Cd into the selected directory.
In the example below, I can quickly cd (without typing cd) to the src folder of my personal-website repo from my workspace folder.

If your terminal processes ALT-C as ç, you can add the following line to your .(ba|z)shrc file after the source commands:
bindkey "ç" fzf-cd-widget
Fuzzy completion alias
By default, the install script defines the fuzzy completion trigger as **.
If you, like me, use zsh, you probably use ** a lot as part of its filename generation (a.k.a. Glob) and that can be confusing, but worry not, we can easily customize it by setting FZF_COMPLETION_TRIGGER in your .zshrc file:
export FZF_COMPLETION_TRIGGER='**' # change ** to whatever you like
The fuzzy completion is aware of the command that precedes it, meaning the suggestions can change based on what you are trying to do:
# Directories under current directory (single-selection)
cd **<TAB># Files under your home directory (multi-selection)
vim ~/**<TAB># Host names are extracted from /etc/hosts and ~/.ssh/config
ssh **<TAB># Environment variables
unset **<TAB>
export **<TAB># Aliases
unalias **<TAB>
Also, fuzzy completion for PIDs is provided for kill command. In this case, there is no trigger sequence, just press the tab key after the kill command.
# Can select multiple processes with <TAB> or <Shift-TAB> keys
kill -9 <TAB>
There are some experimental APIs for customizing fuzzy completion and enabling it for other commands.
Search syntax
Besides the already discussed fuzzy search, fzf supports special tokens that change the way search terms are processed:
'wild: Exact match, return items that includewild.^music: Prefix-exact-match, return items that start withmusic..mp3$: Suffix-exact-match, return items that end with.mp3.!fire: Inverse-exact-match, return items that do not includefire.!^music: Inverse-prefix-exact-match, return items that do not start withmusic.!.mp3$: Inverse-suffix-exact-match, return items that do not end with.mp3.
Note that SPACE acts as an AND operator and | as an OR. For example, a query that matches entries that start with music and end with either mp3, wav, or flac would look like this:
^music mp3$ | wav$ | flac$
Customization
fzf offers a lot of options to configure the finder layout, preview window, key bindings for custom actions, and more. I’ll be covering a subset of options in this section, for the full list of options see the man page (man fzf).
Finder layout
The default layout displays from the bottom of the screen. I personally prefer reverse, which displays from the top of the screen. I also set height=80% so when the finder is up, I can still see the terminal for context.
You can see if for yourself by running:
fzf --layout=reverse --height=80%
Another option related to layout is info, I recommend setting it to inline. It saves an extra line having the information about the number of entries (whether or not sort is enabled, etc.) on the same line as the query.
Preview window
One of my favorite features of fzf. It allows you to preview the content of an entry (file, directory, environment variable, etc.).
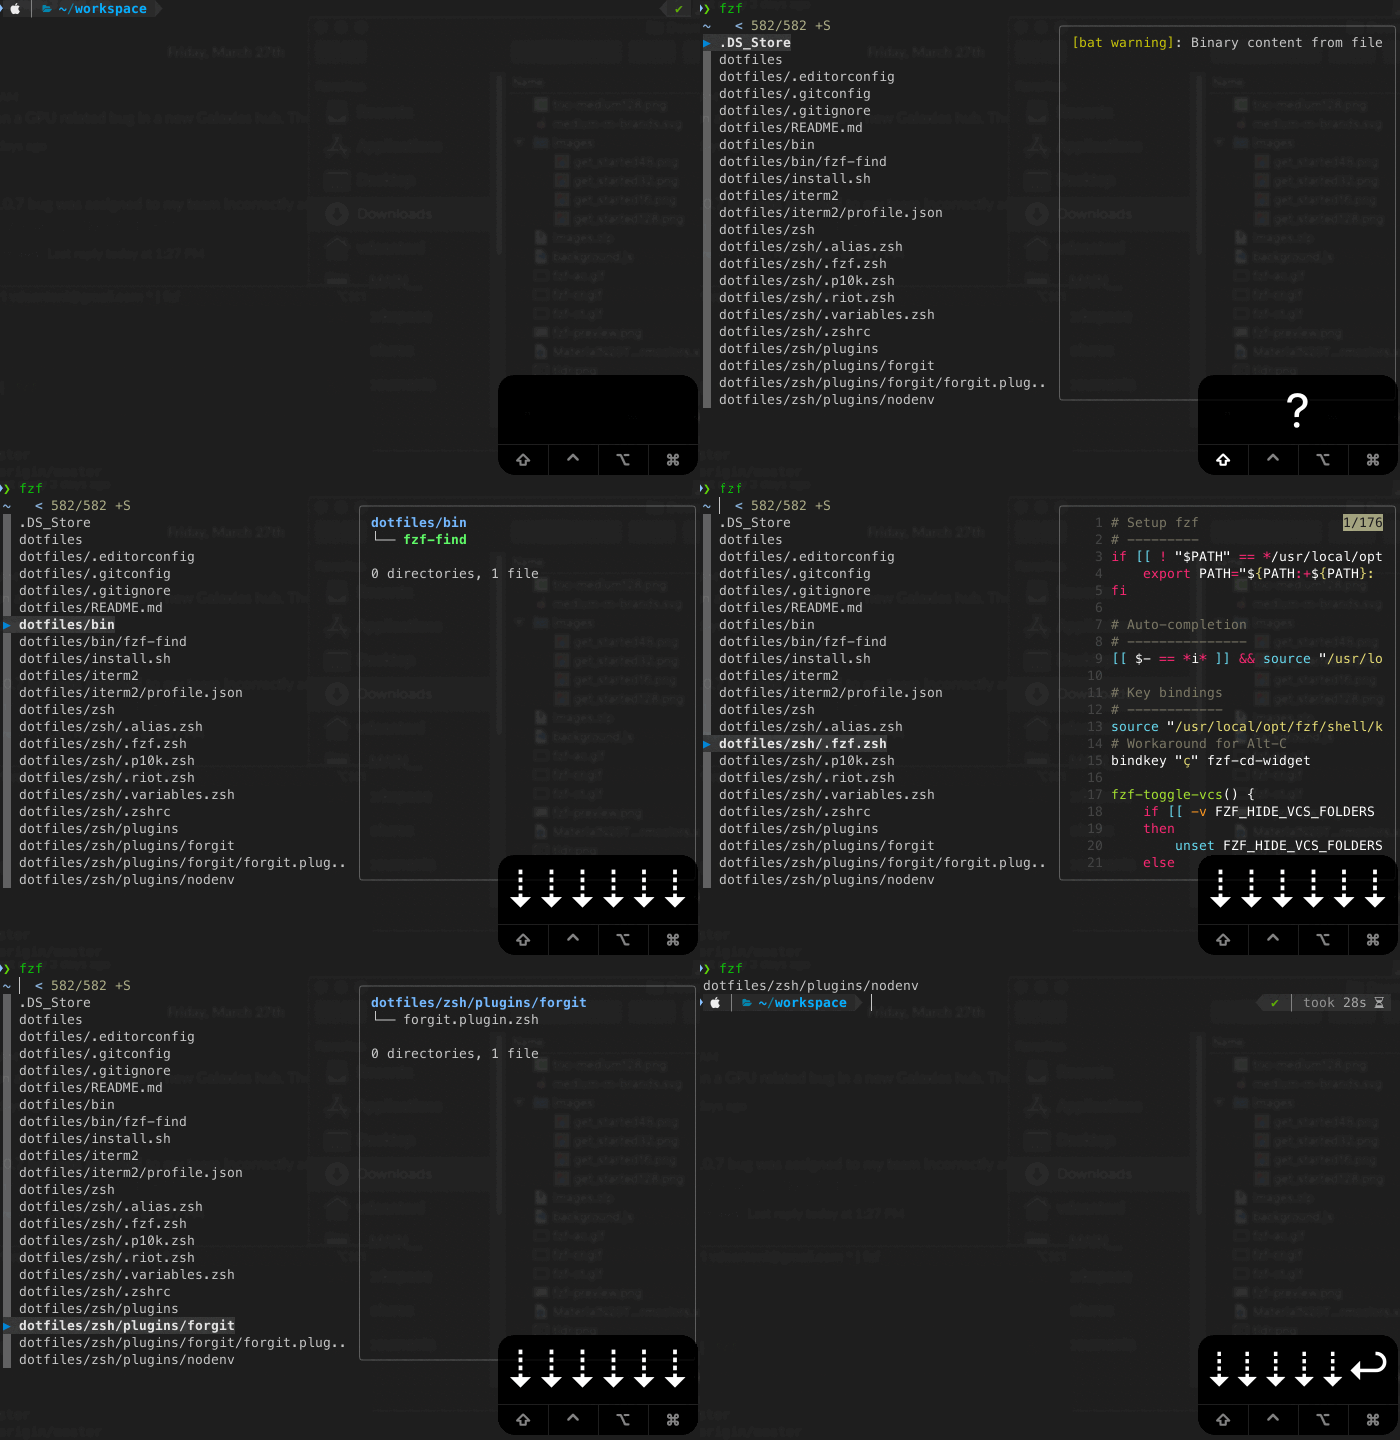
You can achieve that behavior with the following options:
fzf --preview '([[ -f {} ]] && (bat --style=numbers --color=always {} || cat {})) || ([[ -d {} ]] && (tree -C {} | less)) || echo {} 2> /dev/null | head -200'Let’s take a closer look at how that works:
The --preview option takes a command that is executed for the current line and its output is displayed on the preview window. The command can use the placeholder {} that will be replaced with the string of the current line.
There are more placeholders you can use like {+} , {q}, and {n}. Please refer to the man page (man fzf) for more information.
A simpler command that uses cat would look like this:
fzf --preview 'cat {}'So, going back to our more complex command, let’s break it up:
First, we check if the string is a file, and if so, we try to open it with bat (like cat but with syntax highlighting), if that fails, we fall back to cat:
([[ -f {} ]] && (bat --style=numbers --color=always {} || cat {}))If the string is not a file, we check if it is a directory. If so, we try to open it with tree, if that fails, we fall back to less:
([[ -d {} ]] && (tree -C {} | less))If it’s not a file or directory, our last resource is to echo it:
echo {}Finally, we redirect any errors to /dev/null and return the first 200 lines:
2> /dev/null | head -200
Color and UI configuration
There are four base schemes to choose from: dark, light, 16, and bw, and you can also set individual colors (ANSI color code or 24-bit color in #RRGGBB format) for 16 UI elements (i.e., text, background, gutter, border, etc.).
For example, the colors that I’ve been using:
fzf --color='hl:148,hl+:154,pointer:032,marker:010,bg+:237,gutter:008'
If you want to see what the ANSI colors are that you can use, run:
for i in {0..255}; do print -Pn "%K{$i} %k%F{$i}${(l:3::0:)i}%f " ${${(M)$((i%6)):#3}:+$'\n'}; doneThe prompt, pointer, and markers are also customizable:
fzf --prompt='~ ' --pointer='▶' --marker='✗'"
Key bindings
You can create key bindings for more than 40 different actions, including execute, which can be used to invoke any external command.
Some of the key bindings that I use are:
# Toggle preview window visibility with '?'
fzf --bind '?:toggle-preview'# Select all entries with 'CTRL-A'
fzf --bind 'ctrl-a:select-all'# Copy the selected entries to the clipboard with 'CTRL-Y'
--bind 'ctrl-y:execute-silent(echo {+} | pbcopy)'# Open the selected entries in vim with 'CTRL-E'
--bind 'ctrl-e:execute(echo {+} | xargs -o vim)'#Open the selected entries in vscode with 'CTRL-V'
--bind 'ctrl-v:execute(code {+})'
Setting options as default
Options can also be added to $FZF_DEFAULT_OPTS so that they are always applied, not only to fzf but also when using key bindings and fuzzy completion.
Combining all the options above we would have:
export FZF_DEFAULT_OPTS="
--layout=reverse
--info=inline
--height=80%
--multi
--preview-window=:hidden
--preview '([[ -f {} ]] && (bat --style=numbers --color=always {} || cat {})) || ([[ -d {} ]] && (tree -C {} | less)) || echo {} 2> /dev/null | head -200'
--color='hl:148,hl+:154,pointer:032,marker:010,bg+:237,gutter:008'
--prompt='∼ ' --pointer='▶' --marker='✓'
--bind '?:toggle-preview'
--bind 'ctrl-a:select-all'
--bind 'ctrl-y:execute-silent(echo {+} | pbcopy)'
--bind 'ctrl-e:execute(echo {+} | xargs -o vim)'
--bind 'ctrl-v:execute(code {+})'
"
A couple of things are new here:
multienables selecting more than one entry at a time.- It’s not recommended to have the preview window visible by default, thus we have
preview-window=:hidden. The visibility can then be toggled with?.
After adding that export to your .bashrc or .zshrc, every time you interact with fzf, those options will be added automatically.
Advanced Examples
Changing the default command
By default, fzf uses find to generate the file system entries. If you want to switch to a more user-friendly tool like fd, follow these steps:
Set the following environment variables:
# fzf's command
export FZF_DEFAULT_COMMAND="fd"# CTRL-T's command
export FZF_CTRL_T_COMMAND="$FZF_DEFAULT_COMMAND"# ALT-C's command
export FZF_ALT_C_COMMAND="$FZF_DEFAULT_COMMAND --type d"
Override the following functions used by fuzzy completion:
# for more info see fzf/shell/completion.zsh_fzf_compgen_path() {
    fd . "$1"
}_fzf_compgen_dir() {
    fd --type d . "$1"
}
With that, fd will power fzf, CTRL-T, ALT-C, and **.
I personally like to show hidden files, follow links, and exclude any .git and node_modules folders.
export FZF_DEFAULT_COMMAND="fd --hidden --follow --exclude '.git' --exclude 'node_modules'"
Make sure to check fd’s man page more options.
Forgit
Forgit is a utility tool powered by fzf for using Git interactively.

It adds a few aliases you can use:
ga: Interactivegit addselector.glo: Interactivegit logviewer.gd: Interactivegit diffviewer. For better diffs,deltais recommended.grh: Interactivegit reset HEAD <file>selector.gcf: Interactivegit checkout <file>selector.gss: Interactivegit stashviewer.gclean: Interactivegit cleanselector.
To install it, you need to download and source the plugin file for your shell. For other options see the official page.
One thing to keep in mind is that forgit defines its own default options for fzf and they might conflict with the ones you already have. If that is the case, you will need to remove some from the plugin file (e.g. https://github.com/wfxr/forgit/blob/master/forgit.plugin.zsh#L205-L213)
Searching file contents
Searching for patterns in files is one of those things that we do several times each day.
There are a few command-line tools that help with that, grep being probably the most popular one. I’ve been using ripgrep (rg). Besides being generally faster, by default, ripgrep will respect your .gitignore and automatically skip hidden files/directories and binary files.
Here’s a function fif by gbstan that combines ripgrep and fzf:
# find-in-file - usage: fif <SEARCH_TERM>
fif() {
  if [ ! "$#" -gt 0 ]; then
    echo "Need a string to search for!";
    return 1;
  fi  rg --files-with-matches --no-messages "$1" | fzf $FZF_PREVIEW_WINDOW --preview "rg --ignore-case --pretty --context 10 '$1' {}"
}
To use it, add its declaration to your .(ba|z)shrc file and run:
fif <SEARCH_TERM>
It will use rg to search files that match the pattern, then fzf to present the results, with the preview window showing the exact line.
Docker
If you use Docker, here are three functions you might find useful: da, ds, drm.
# Select a docker container to start and attach to
function da() {
  local cid
  cid=$(docker ps -a | sed 1d | fzf -1 -q "$1" | awk '{print $1}')

[ -n "$cid" ] && docker start "$cid" && docker attach "$cid"
}# Select a running docker container to stop
function ds() {
  local cid
  cid=$(docker ps | sed 1d | fzf -q "$1" | awk '{print $1}')

[ -n "$cid" ] && docker stop "$cid"
}# Select a docker container to remove
function drm() {
  local cid
  cid=$(docker ps -a | sed 1d | fzf -q "$1" | awk '{print $1}')

[ -n "$cid" ] && docker rm "$cid"
}
Homebrew
Check out these functions to help you manage Homebrew:
# Install (one or multiple) selected application(s)
# using "brew search" as source input
# mnemonic [B]rew [I]nstall [P]lugin
bip() {
  local inst=$(brew search | fzf -m)

if [[ $inst ]]; then
    for prog in $(echo $inst);
    do; brew install $prog; done;
  fi
}# Update (one or multiple) selected application(s)
# mnemonic [B]rew [U]pdate [P]lugin
bup() {
  local upd=$(brew leaves | fzf -m)

if [[ $upd ]]; then
    for prog in $(echo $upd);
    do; brew upgrade $prog; done;
  fi
}# Delete (one or multiple) selected application(s)
# mnemonic [B]rew [C]lean [P]lugin (e.g. uninstall)
bcp() {
  local uninst=$(brew leaves | fzf -m)

if [[ $uninst ]]; then
    for prog in $(echo $uninst);
    do; brew uninstall $prog; done;
  fi
}
And Homebrew Cask:
# Install or open the webpage for the selected application
# using brew cask search as input source
# and display a info quickview window for the currently marked application
install() {
    local token
    token=$(brew search --casks | fzf-tmux --query="$1" +m --preview 'brew cask info {}')

if [ "x$token" != "x" ]
    then
        echo "(I)nstall or open the (h)omepage of $token"
        read input
        if [ $input = "i" ] || [ $input = "I" ]; then
            brew cask install $token
        fi
        if [ $input = "h" ] || [ $input = "H" ]; then
            brew cask home $token
        fi
    fi
}# Uninstall or open the webpage for the selected application
# using brew list as input source (all brew cask installed applications)
# and display a info quickview window for the currently marked application
uninstall() {
    local token
    token=$(brew cask list | fzf-tmux --query="$1" +m --preview 'brew cask info {}')

if [ "x$token" != "x" ]
    then
        echo "(U)ninstall or open the (h)omepage of $token"
        read input
        if [ $input = "u" ] || [ $input = "U" ]; then
            brew cask uninstall $token
        fi
        if [ $input = "h" ] || [ $token = "h" ]; then
            brew cask home $token
        fi
    fi
}
npm-fzf, abbreviated npf, provides fuzzy search for some most commonly used npm commands with fzf (i.e. npm ls, npm search, npm run).
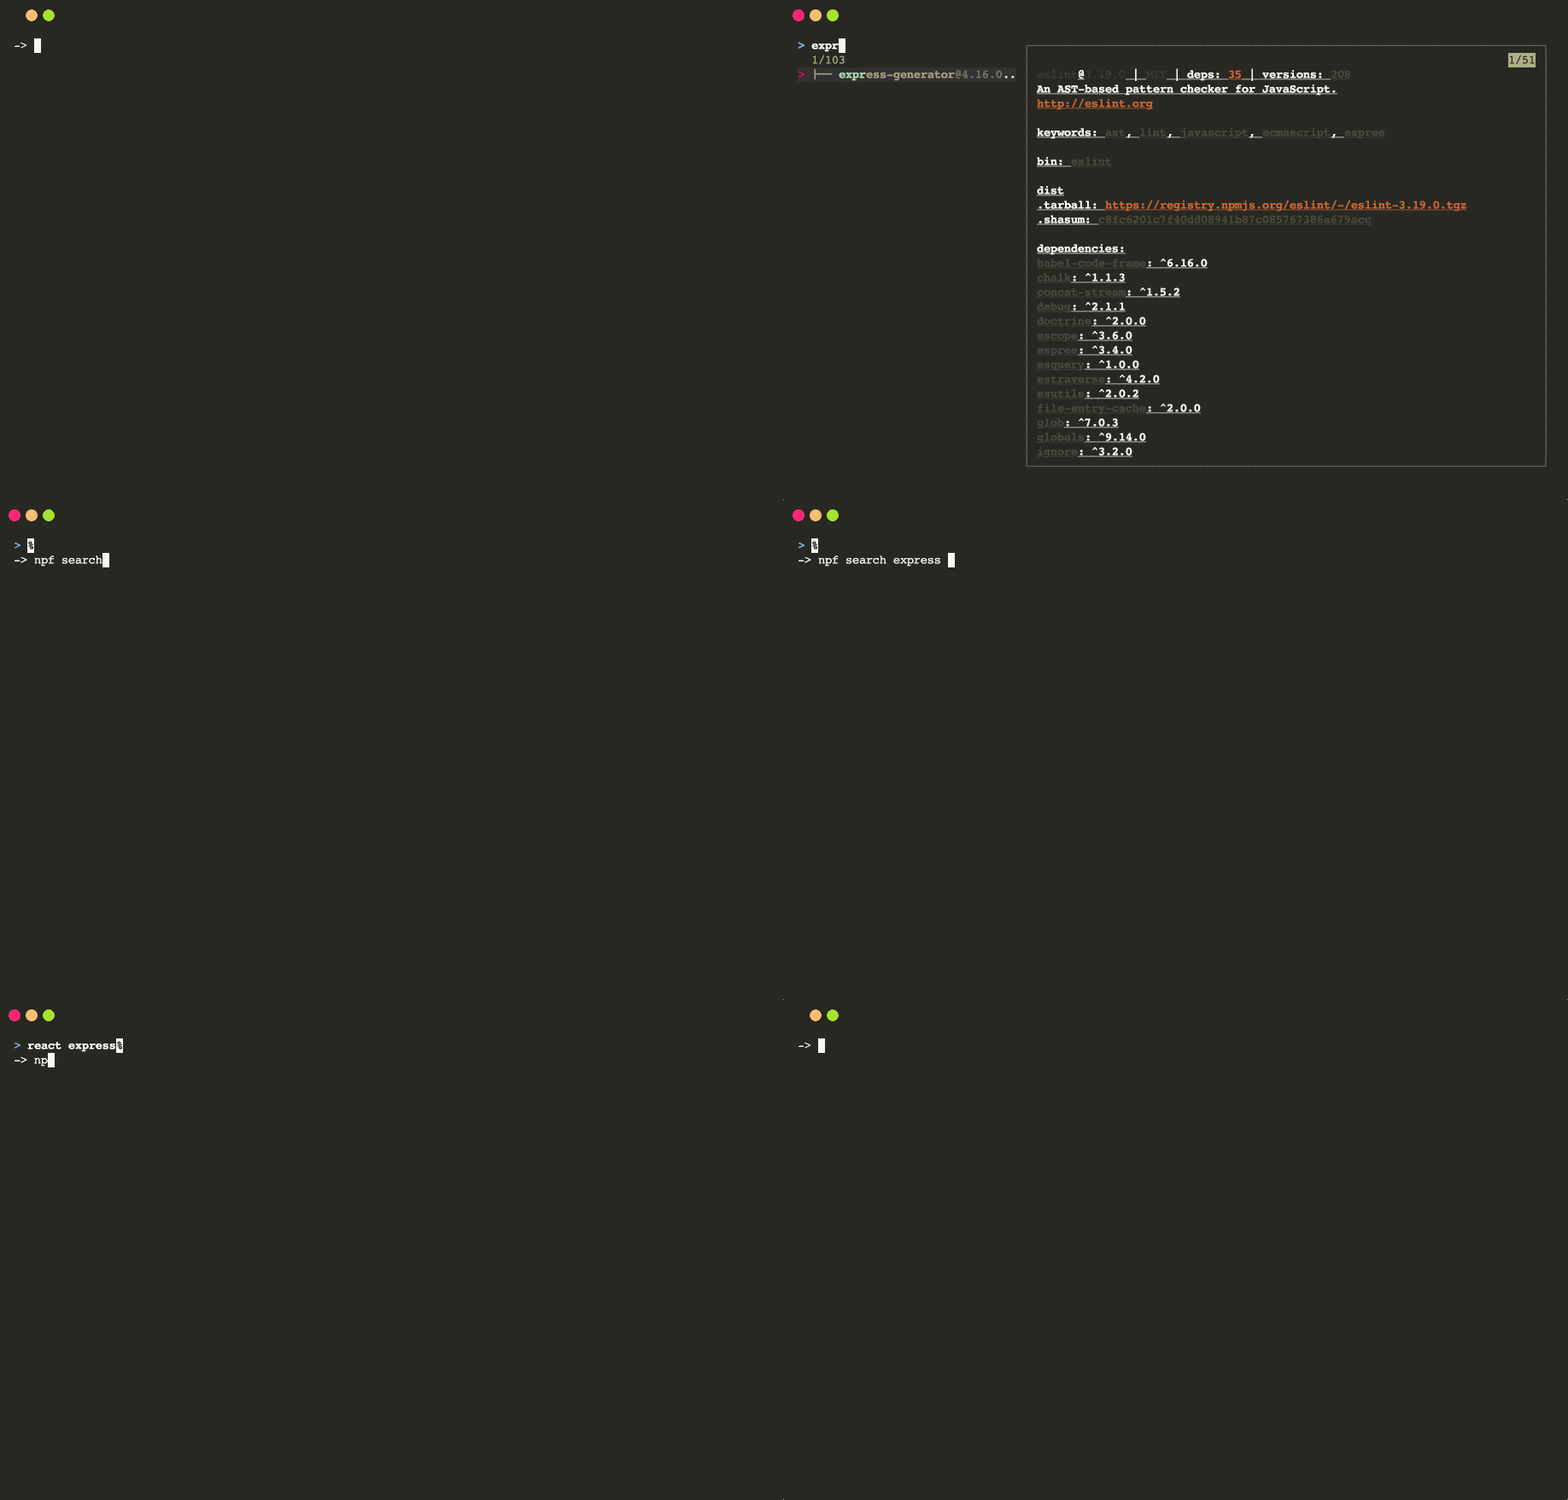
To install it, run:
npm install -g npm-fzf
The z command tracks your most visited directories and allows you to access them with very few keystrokes. If you use zsh and Oh My Zsh, to enable it, simply add z to your plugins list in your .zshrc:
plugins=(... z)
z learns as you navigate the file system using the command line.
For example, if at some point in time you visited the folder ~/workspace/my-project-1/cool-assets, z will keep track of it and will allow you to quickly come back to it from anywhere using a regex that matches the path:
z my-project-1
z project
z cool-assets
To make z even better, you can integrate it with fzf:
# like normal z when used with arguments but displays an fzf prompt when used without.
unalias z 2> /dev/null
z() {
    [ $# -gt 0 ] && _z "$*" && return
    cd "$(_z -l 2>&1 | fzf --height 40% --nth 2.. --reverse --inline-info +s --tac --query "${*##-* }" | sed 's/^[0-9,.]* *//')"
}
With this, z, with no arguments, brings up the finder with a list of your most-used directories!
Most of those examples were taken from fzf’s Wiki page, make sure to check it out and contribute!
Chrome bookmark browser (macOS)
Access your chrome bookmarks directly from your shell. Requires jq.
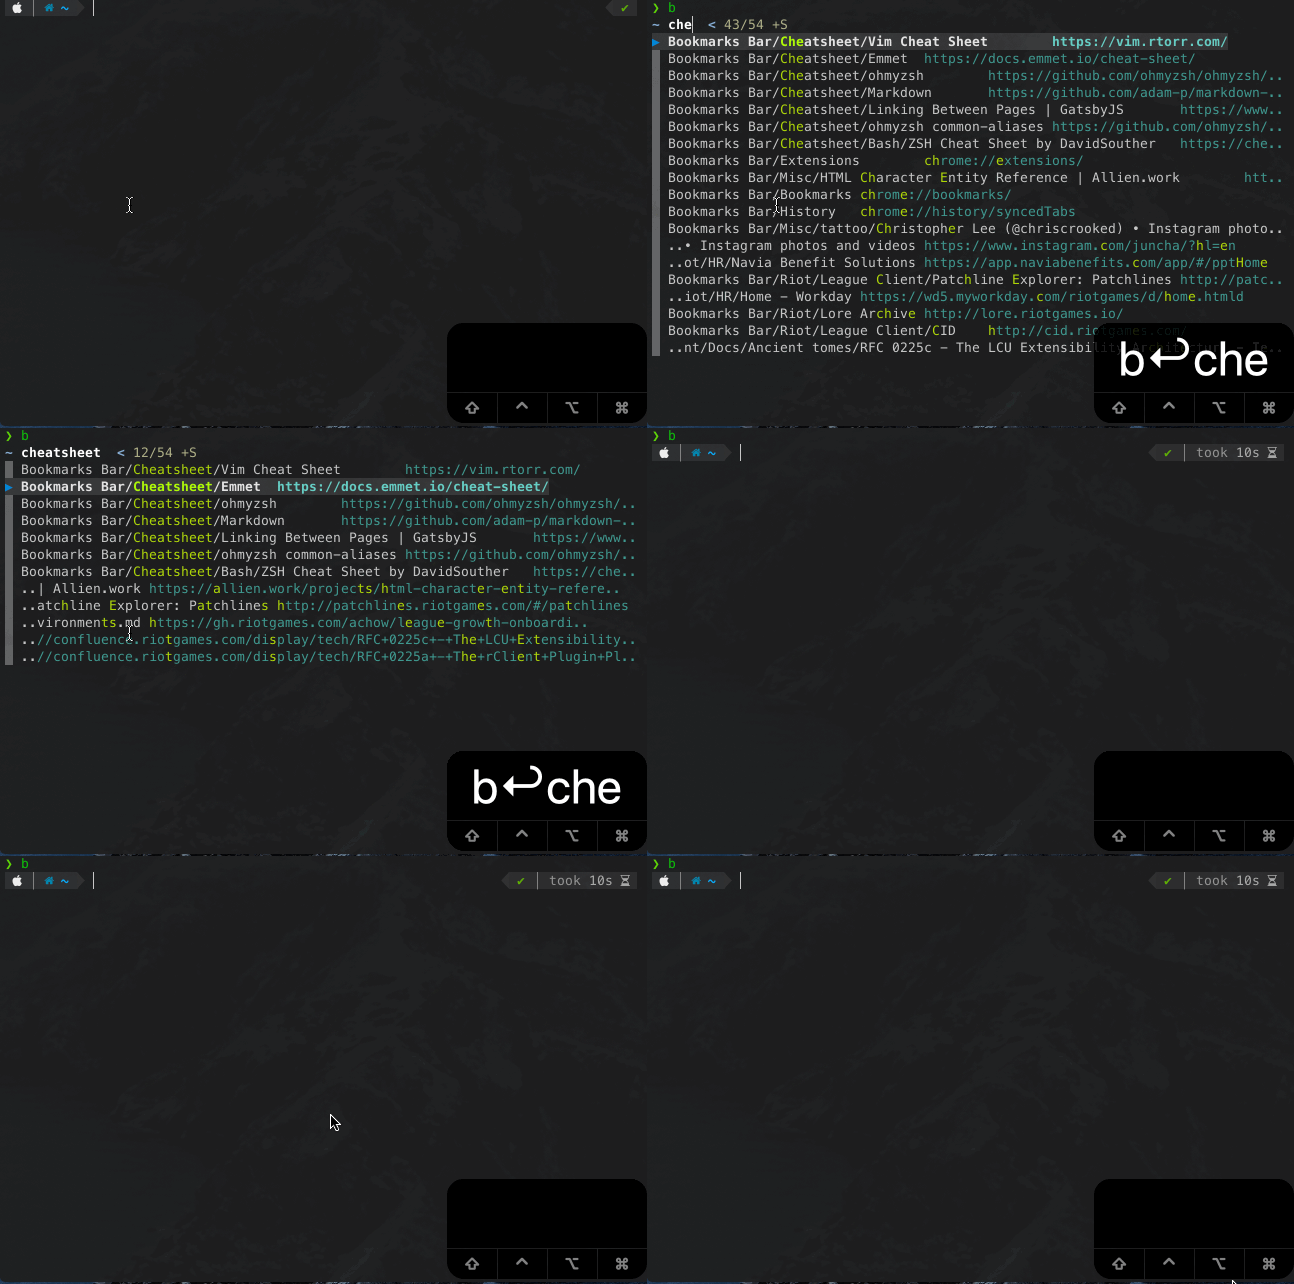
b() {
  local bookmarks_path=~/Library/Application\ Support/Google/Chrome/Default/Bookmarks  local jq_script='def ancestors: while(. | length >= 2; del(.[-1,-2])); . as $in | paths(.url?) as $key | $in | getpath($key) | {name,url, path: [$key[0:-2] | ancestors as $a | $in | getpath($a) | .name?] | reverse | join("/") } | .path + "/" + .name + "\t" + .url'  jq -r $jq_script < "$bookmarks_path" \
  | sed -E $'s/(.*)\t(.*)/\\1\t\x1b[36m\\2\x1b[m/g' \
  | fzf --ansi \
  | cut -d$'\t' -f2 \
  | xargs open
}
Similar Tools
Broot
Broot is a CLI tool that provides a better way to navigate directories.

To install it, run:
brew install broot
Conclusion
Thanks for reading, I hope you learned something new today.
Special thanks to Felipe Lima for introducing me to fzf!
Take care and I’ll see you next time.
Recommend
About Joyk
Aggregate valuable and interesting links.
Joyk means Joy of geeK