

# IT明星不是梦 #MySQL高可用集群之MHA (使用VIP向外网提供稳定服务)-A little pay
source link: https://blog.51cto.com/14638500/2473358
Go to the source link to view the article. You can view the picture content, updated content and better typesetting reading experience. If the link is broken, please click the button below to view the snapshot at that time.
MySQL高可用之MHA(VIP向外网提供服务)
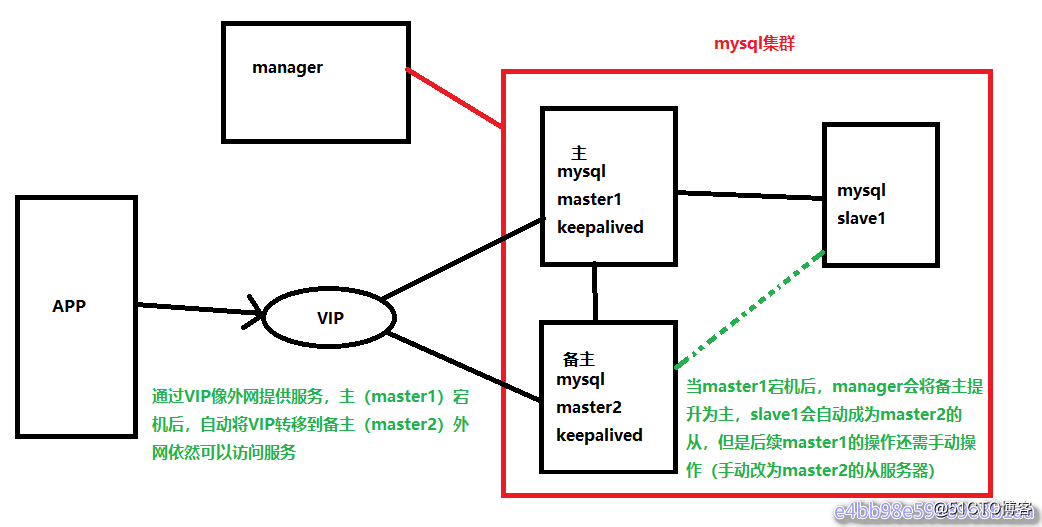
在MySQL高可用集群之MHA的环境中,因为有master1、还有一台备主(master2),IP地址不同,如果master1宕机了,备主(master2)向外网提供服务提供服务,却没有稳定的一个IP地址向外网提供服务,所以必须要引入VIP来向外网提供服务。
vip配置可以采用两种方式:
- 通过keepalived的方式管理虚拟ip的浮动;
- 通过脚本方式启动虚拟ip的方式(即不需要keepalived或者heartbeat类似的软件)。
实验环境基于上一个博客(MySQL高可用集群之MHA)部署:
| 主机 | 操作系统 | IP地址 |
|---|---|---|
| master1+keepalived | CentOS 7.3 | 192.168.1.1(VIP:192.168.1.100) |
| master2(备主)+keepalived | CentOS 7.3 | 192.168.1.8(VIP:192.168.1.100) |
| slave1 | CentOS 7.3 | 192.168.1.9 |
| manager | CentOS 7.3 | 192.168.1.3 |
案例中关闭防火墙、selinux
# systemctl stop firewalld
# setenforce 0
1、keepalived方式管理虚拟ip,keepalived配置方法如下:
下载软件进行并进行安装(两台master,准确的说一台是master,另外一台是备选master,在没有切换以前是slave)
在安装keepalived之前,先将环境还原成master1为主,master2和slave1为master1的从:
关闭master2的服务
[root@master2 ~]# systemctl stop mysqld查看master1的状态:
[root@master1 ~]# mysql -uroot -p123.com -e "show master status"开启master2的服务,设置为master1的从服务器
[root@master2 ~]# systemctl start mysqld
[root@master2 ~]# mysql -uroot -p123.com
mysql> change master to master_host='192.168.1.1',master_port=3306,master_log_file='myssql-bin.000002',master_log_pos=154,master_user='mharep',master_password='123.com';
mysql> start slave;
mysql> show slave status\G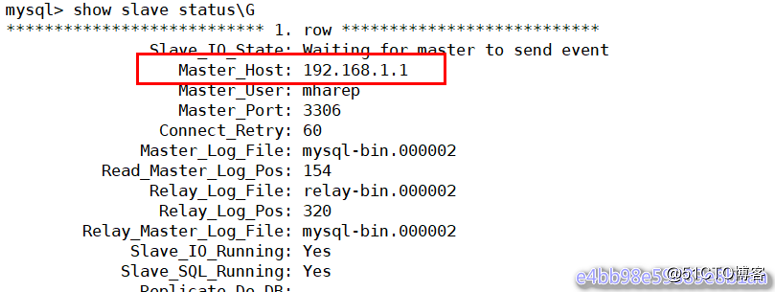
启动MHA
[root@manager ~]# rm -f /masterha/app1/app1.failover.complete
[root@manager ~]# nohup masterha_manager --conf=/etc/masterha/app1.cnf &> /tmp/mha_manager.log &
[root@manager ~]#  masterha_check_status --conf=/etc/masterha/app1.cnf
app1 (pid:26410) is running(0:PING_OK), master:192.168.1.1
在master1和master2上安装软件包keepalived 安装keepalived软件包与服务控制 在编译安装Keepalived之前,必须先安装内核开发包kernel-devel以及openssl-devel、popt-devel等支持库。(master1、master2)
# yum -y install kernel-devle popt-devel openssl-devel若没有安装则通过rpm或yum工具进行安装
编译安装Keepalived (master1、master2)
使用指定的linux内核位置对keepalived进行配置,并将安装路径指定为根目录,这样就无需额外创建链接文件了,配置完成后,依次执行make、make install进行安装。
# cd /usr/local/src
# wget https://www.keepalived.org/software/keepalived-2.0.20.tar.gz
# tar zxf keepalived-2.0.20.tar.gz
# cd keepalived-2.0.20/
# ./configure --prefix=/ && make && make install
# systemctl enable keepalived
使用keepalived服务
执行make install操作之后,会自动生成/etc/init.d/keepalived脚本文件,但还需要手动添加为系统服务,这样就可以使用service、chkconfig工具来对keepalived服务程序进行管理了。
针对keepalived的防火墙规则:
策略:
# firewall-cmd --direct --permanent --add-rule ipv4 filter OUTPUT 0 --in-interface ens33 --destination 224.0.0.18 --protocol vrrp -j ACCEPT
# firewall-cmd --direct --permanent --add-rule ipv4 filter INPUT 0 --in-interface ens33 --destination 224.0.0.18 --protocol vrrp -j ACCEPT
# firewall-cmd --reload
或关闭:
# systemctl stop firewalld
修改Keepalived的配置文件(在master1上配置)
[root@master1 keepalived-2.0.20]# vim /etc/keepalived/keepalived.conf
! Configuration File for keepalived

global_defs {
   router_id LVS_DEVEL1
}

vrrp_instance VI_1 {
    state BACKUP
    interface ens33
    virtual_router_id 51
    priority 100
    advert_int 1
    authentication {
        auth_type PASS
        auth_pass 1111
    }
    virtual_ipaddress {
        192.168.1.100
    }
}
在候选master上配置(master2)
[root@master2 keepalived-2.0.20]# vim /etc/keepalived/keepalived.conf
! Configuration File for keepalived

global_defs {
   router_id LVS_DEVEL2
}

vrrp_instance VI_1 {
    state BACKUP
    interface ens33
    virtual_router_id 51
    priority 50
    advert_int 1
    authentication {
        auth_type PASS
        auth_pass 1111
    }
    virtual_ipaddress {
        192.168.1.100
    }
}
启动keepalived服务,在master上启动并查看日志
[root@master1 keepalived-2.0.20]# systemctl start keepalived
[root@master1 keepalived-2.0.20]# ps -ef |grep keep
[root@master1 keepalived-2.0.20]# ip a |grep 100
[root@master1 keepalived-2.0.20]# tail -f /var/log/messages
在另外一台服务器,候选master(master2)上启动keepalived服务,并观察
[root@master2 keepalived-2.0.20]# systemctl start keepalived
[root@master2 keepalived-2.0.20]# tail -f /var/log/messages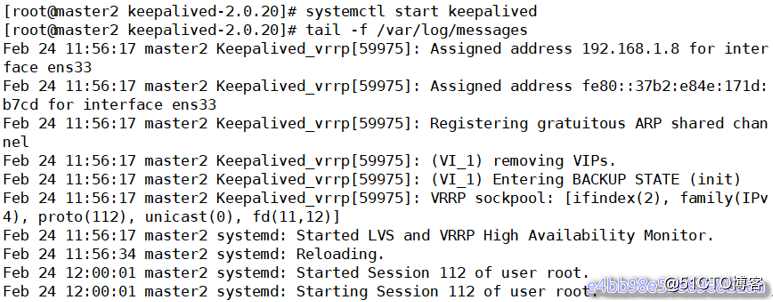
keepalived已经配置成功
注意:上面两台服务器的keepalived都设置为了BACKUP模式,在keepalived中有2种模式,分别是master->backup模式和backup->backup模式。这两种模式有很大区别。
- 在master->backup模式下,一旦主库宕机,虚拟ip会自动漂移到从库,当主库修复后,keepalived启动后,还会把虚拟ip抢占过来,即使设置了非抢占模式(nopreempt)抢占ip的动作也会发生。
- 在backup->backup模式下,当主库宕机后虚拟ip会自动漂移到从库上,当原主库恢复和keepalived服务启动后,并不会抢占新主的虚拟ip,即使是优先级高于从库的优先级别,也不会发生抢占。为了减少ip漂移次数,通常是把修复好的主库当做新的备库。
MHA引入keepalived(MySQL服务进程挂掉时通过MHA 停止keepalived): 要想把keepalived服务引入MHA,我们只需要修改切换时触发的脚本文件master_ip_failover即可,在该脚本中添加在master发生宕机时对keepalived的处理。
编辑脚本/scripts/master_ip_failover,修改后如下。
[root@manager ~]# cp /scripts/master_ip_failover /scripts/master_ip_failover.bak
[root@manager ~]# cd /scripts/
[root@manager scripts]# vi master_ip_failover
#!/usr/bin/env perl

use strict;
use warnings FATAL => 'all';

use Getopt::Long;

my (
    $command,$ssh_user,$orig_master_host,$orig_master_ip,$orig_master_port, $new_master_host,$new_master_ip,$new_master_port
);

my $vip = '192.168.1.100';       //VIP地址
my $ssh_start_vip = "systemctl start keepalived.service";     //启动
my $ssh_stop_vip = "systemctl stop keepalived.service";     //停止

GetOptions(
    'command=s'          => \$command,
    'ssh_user=s'         => \$ssh_user,
    'orig_master_host=s' => \$orig_master_host,
    'orig_master_ip=s'   => \$orig_master_ip,
    'orig_master_port=i' => \$orig_master_port,
    'new_master_host=s'  => \$new_master_host,
    'new_master_ip=s'    => \$new_master_ip,
    'new_master_port=i'  => \$new_master_port,
);

exit &main();

sub main {

print "\n\nIN SCRIPT TEST====$ssh_stop_vip==$ssh_start_vip===\n\n";

    if ( $command eq "stop" || $command eq "stopssh" ) {

        my $exit_code = 1;
        eval {
            print "Disabling the VIP on old master: $orig_master_host \n";
            &stop_vip();
            $exit_code = 0;
        };
        if ($@) {
            warn "Got Error: $@\n";
            exit $exit_code;
        }
        exit $exit_code;
    }
    elsif ( $command eq "start" ) {

        my $exit_code = 10;
        eval {
            print "Enabling the VIP - $vip on the new master - $new_master_host \n";
            &start_vip();
            $exit_code = 0;
        };
        if ($@) {
            warn $@;
            exit $exit_code;
        }
        exit $exit_code;
    }
    elsif ( $command eq "status" ) {
        print "Checking the Status of the script.. OK \n";
        #`ssh $ssh_user\@cluster1 \" $ssh_start_vip \"`;
        exit 0;
    }
    else {
        &usage();
        exit 1;
    }
}

# A simple system call that enable the VIP on the new master
sub start_vip() {
    `ssh $ssh_user\@$new_master_host \" $ssh_start_vip \"`;
}
# A simple system call that disable the VIP on the old_master
sub stop_vip() {
     return 0  unless  ($ssh_user);
    `ssh $ssh_user\@$orig_master_host \" $ssh_stop_vip \"`;
}

sub usage {
    print
    "Usage: master_ip_failover --command=start|stop|stopssh|status --orig_master_host=host --orig_master_ip=ip --orig_master_port=port --new_master_host=host --new_master_ip=ip --new_master_port=port\n";
}
[root@manager scripts]# chmod +x /scripts/master_ip_failover  //增加执行权限
接下来在/etc/masterha/app1.cnf中调用故障切换脚本:
停止MHA:
[root@manager scripts]# masterha_stop --conf=/etc/masterha/app1.cnf

在配置文件/etc/masterha/app1.cnf 中启用下面的参数(在[server default下面添加])
[root@manager scripts]# vim /etc/masterha/app1.cnf
master_ip_failover_script=/scripts/master_ip_failover

启动MHA:
[root@manager scripts]# nohup masterha_manager --conf=/etc/masterha/app1.cnf &> /tmp/mha_manager.log &
[root@manager scripts]#  masterha_check_status --conf=/etc/masterha/app1.cnf
app1 (pid:25971) is running(0:PING_OK), master:192.168.1.1

再检查集群状态,看是否会报错
[root@manager scripts]# masterha_check_repl --conf=/etc/masterha/app1.cnf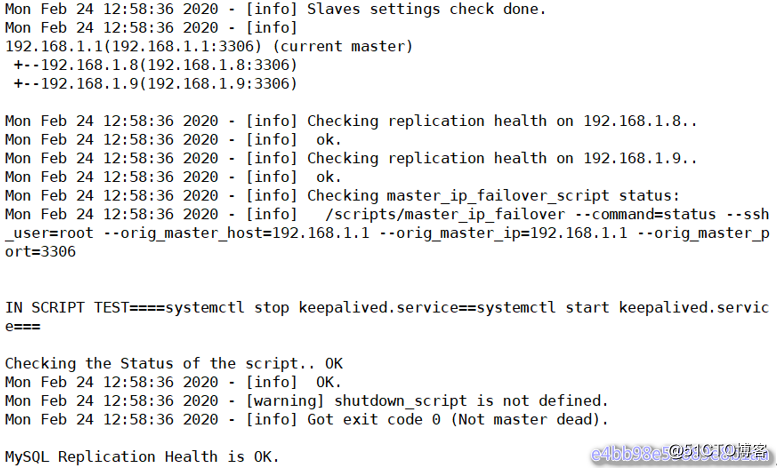
可以看见已经没有报错了。 /scripts/master_ip_failover添加或者修改的内容意思是当主库数据库发生故障时,会触发MHA切换,MHA Manager会停掉主库上的keepalived服务,触发虚拟ip漂移到备选从库,从而完成切换。 当然可以在keepalived里面引入脚本,这个脚本监控mysql是否正常运行,如果不正常,则调用该脚本杀掉keepalived进程(参考MySQL 高可用性keepalived+mysql双主)。
测试: 在master1上停止mysqld服务 到slave1查看slave的状态:
[root@master1 keepalived-2.0.20]# systemctl stop mysqld
[root@slave1 ~]#  mysql -uroot -p123.com -e "show slave status\G"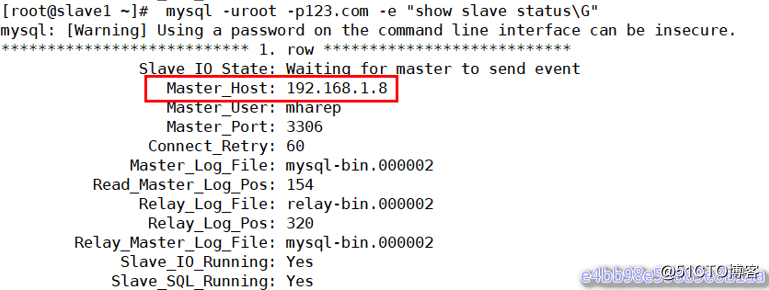
从上图可以看出slave指向了新的master服务器192.168.1.8(master2)(在故障切换前指向的是192.168.1.1(master1))
查看VIP绑定:
在master1上查看vip绑定
[root@master1 keepalived-2.0.20]# ip a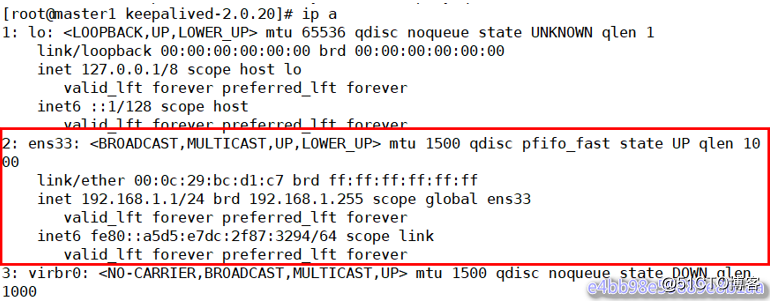
在master2上查看VIP绑定
[root@master2 keepalived-2.0.20]# ip a
从上面的显示结果可以看出vip地址漂移到了192.168.1.8 主从切换后续工作
重构: 重构就是主挂了,切换到备主上,备主变成了主,因此重构的一种方案原主库修复成一个新的slave
主库切换后,把原主库修复成新从库,原主库数据文件完整的情况下,可通过以下方式找出最后执行的CHANGE MASTER命令:
[root@manager scripts]# grep "CHANGE MASTER TO MASTER" /masterha/app1/manager.log |tail -1
Mon Feb 24 13:00:18 2020 - [info]  All other slaves should start replication from here. Statement should be: CHANGE MASTER TO MASTER_HOST='192.168.1.8', MASTER_PORT=3306, MASTER_LOG_FILE='mysql-bin.000002', MASTER_LOG_POS=154, MASTER_USER='mharep', MASTER_PASSWORD='xxx';
将192.168.1.1(master1)修复成192.168.1.8(master2)的从库:
mysql> CHANGE MASTER TO MASTER_HOST='192.168.1.8', MASTER_PORT=3306, MASTER_LOG_FILE='mysql-bin.000002', MASTER_LOG_POS=154, MASTER_USER='mharep', MASTER_PASSWORD='123.com';
mysql> start slave;
mysql> show slave status\G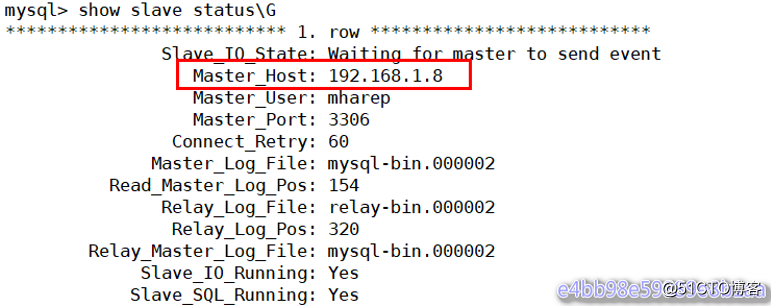
启动mha manager:
[root@manager scripts]# rm -f /masterha/app1/app1.failover.complete
[root@manager scripts]# nohup masterha_manager --conf=/etc/masterha/app1.cnf --igonre_fail_on_start &> /tmp/mha_manager.log &
[1] 27249
[root@manager scripts]# masterha_check_status --conf=/etc/masterha/app1.cnf
app1 (pid:27249) is running(0:PING_OK), master:192.168.1.8
[root@manager scripts]# masterha_check_repl --conf=/etc/masterha/app1.cnf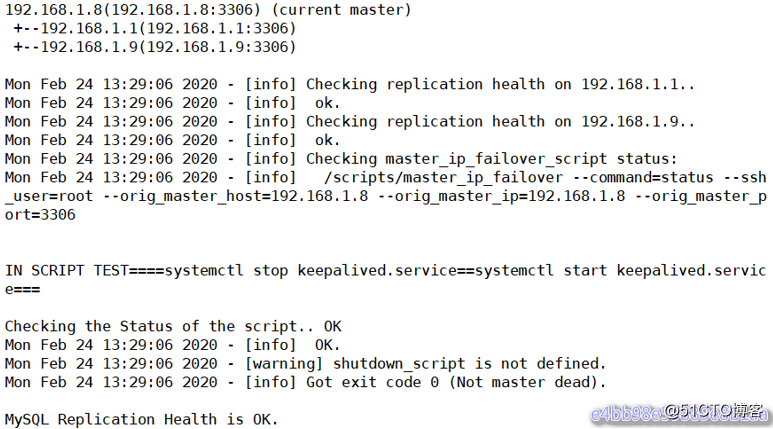
但是为了防止脑裂(当两台高可用服务器在指定的时间内,无法互相检测到对方心跳而各自启动故障转移功能,取得了资源以及服务的所有权,而此时的两台高可用服务器对都还活着并作正常运行,这样就会导致同一个服务在两端同时启动而发生冲突的严重问题,最严重的就是两台主机同时占用一个VIP的地址(类似双端导入概念),当用户写入数据的时候可能会分别写入到两端,这样可能会导致服务器两端的数据不一致或造成数据的丢失,这种情况就称为裂脑,也有的人称之为分区集群或者大脑垂直分隔)推荐生产环境采用脚本的方式来管理虚拟ip,而不是使用keepalived来完成。
2、通过脚本实现VIP切换
通过脚本的方式管理VIP。这里是修改/scripts/master_ip_failover,也可以使用其他的语言完成,比如php语言。使用php脚本编写的failover这里就不介绍了。修改完成后内容如下,而且如果使用脚本管理vip的话,需要手动在master服务器上绑定一个vip
关闭上一个案例的keepalived服务(master1、master2)# systemctl stop keepalived
因为现在192.168.1.8(master2)是主,所以要在现在的主上绑定VIP
[root@master2 ~]# ifconfig ens33:0 192.168.1.100/24
[root@master2 ~]# ifconfig ens33:0
在mha-manager上修改/scripts/ master_ip_failover,内容如下
[root@manager scripts]# vim master_ip_failover
 12 my $vip = '192.168.1.100';
 13 my $key = '0';
 14 my $ssh_start_vip = "/sbin/ifconfig ens33:$key $vip";
 15 my $ssh_stop_vip = "/sbin/ifconfig ens33:$key down";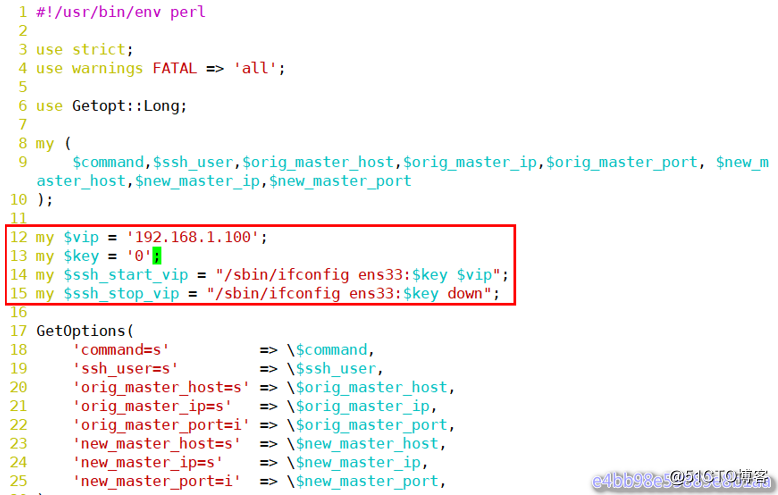
集群配置文件:
[root@manager scripts]# vim /etc/masterha/app1.cnf
master_ip_failover_script=/scripts/master_ip_failover
停止MHA:
[root@manager scripts]# masterha_stop --conf=/etc/masterha/app1.cnf启动MHA:
[root@manager scripts]# nohup masterha_manager --conf=/etc/masterha/app1.cnf &> /tmp/mha_manager.log &
[1] 28588
再检查集群状态,看是否会报错
[root@manager scripts]# masterha_check_status --conf=/etc/masterha/app1.cnf
app1 (pid:28588) is running(0:PING_OK), master:192.168.1.8
测试:
在master(master2)上停掉mysql服务
[root@master2 ~]# systemctl stop mysqld到slave1查看slave状态:
[root@slave1 ~]# mysql -uroot -p123.com -e "show slave status\G"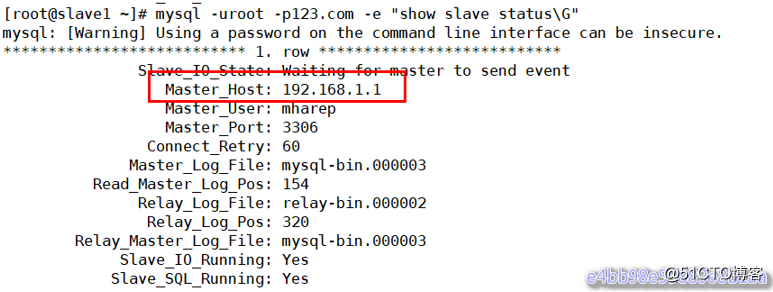
从上图可以看出slave指向了新的master服务器(192.168.1.1)
查看VIP:
[root@master1 ~]# ip a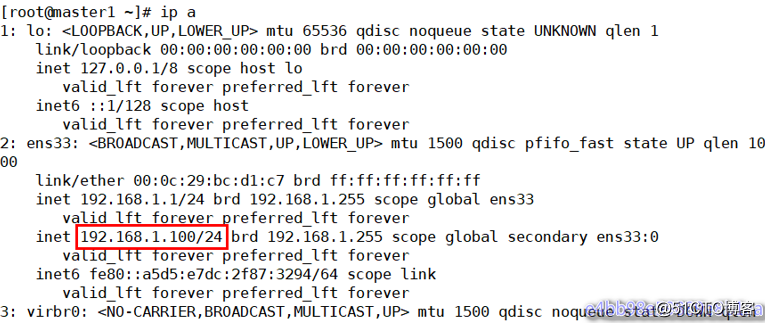
[root@master2 ~]# ip a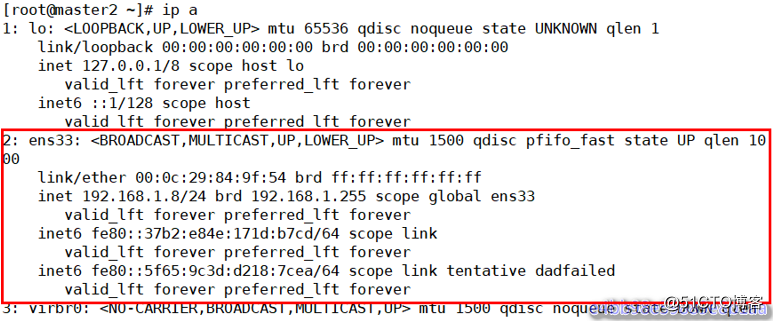
使用VIP访问mysql:
[root@master1 ~]# mysql -umanager -p123.com -h192.168.1.100 -P3306
从上图可以看到master2(原来的master)释放了VIP,master1(新的master)接管了VIP地址 主从切换后续工作 主库切换后,把原主库修复成新从库,相关操作请参考前面相关操作。为了防止脑裂发生,推荐生产环境采用脚本的方式来管理虚拟ip,而不是使用keepalived来完成。到此为止,基本MHA集群已经配置完毕。
MHA软件由两部分组成,Manager工具包和Node工具包,具体的说明如下。
Manager工具包主要包括以下几个工具:
- masterha_check_ssh:检查MHA的SSH配置状况
- masterha_check_repl:检查MySQL复制状况
- masterha_manger:启动MHA masterha_check_status检测当前MHA运行状态
- masterha_master_monitor:检测master是否宕机masterha_master_switch 控制故障转移(自动或者手动)
- masterha_conf_host:添加或删除配置的server信息
Node工具包(这些工具通常由MHA Manager的脚本触发,无需人为操作)主要包括以下几个工具:
- save_binary_logs:保存和复制master的二进制日志
- apply_diff_relay_logs:识别差异的中继日志事件并将其差异的事件应用于其他的
- slave filter_mysqlbinlog:去除不必要的ROLLBACK事件(MHA已不再使用这个工具)
- purge_relay_logs:清除中继日志(不会阻塞SQL线程)
Recommend
About Joyk
Aggregate valuable and interesting links.
Joyk means Joy of geeK