

部署jumpserver-0207.
source link: https://blog.51cto.com/14400213/2472358
Go to the source link to view the article. You can view the picture content, updated content and better typesetting reading experience. If the link is broken, please click the button below to view the snapshot at that time.

博文结构
jumpserver介绍
安装jumpserver
一.jumpserver
- Jumpserver是一款由Python编写开源的跳板机(堡垒机系统),实现了跳板机的应有的功能,基于ssh协议来管理服务器资源,客户端不需要安装jumpserver客户端软件程序。
* 堡垒机介绍
在特定网络环境中(如内网和外网),为了保证公司网络中的服务器数据不受外界的和破坏,运用各种技术手段收集和监控公司服务器的状态,安全时间、以便集中报警,并且及时处理。
我们又把堡垒机叫做跳板机,简易的跳板机功能简单,主要核心功能是远程登陆服务器和日志审计比较优秀的开源软件jumpserver,功能齐全如: 认证、授权、审计、自动化、资产管理(内网服务器资源分配)等。* Jumpserver的特点
1.完全开源;
2.Python编写,易于二次开发
3.实现跳板机的基本功能、认证、授权、审计
4.集成了Ansiable,实现批量操作命令等
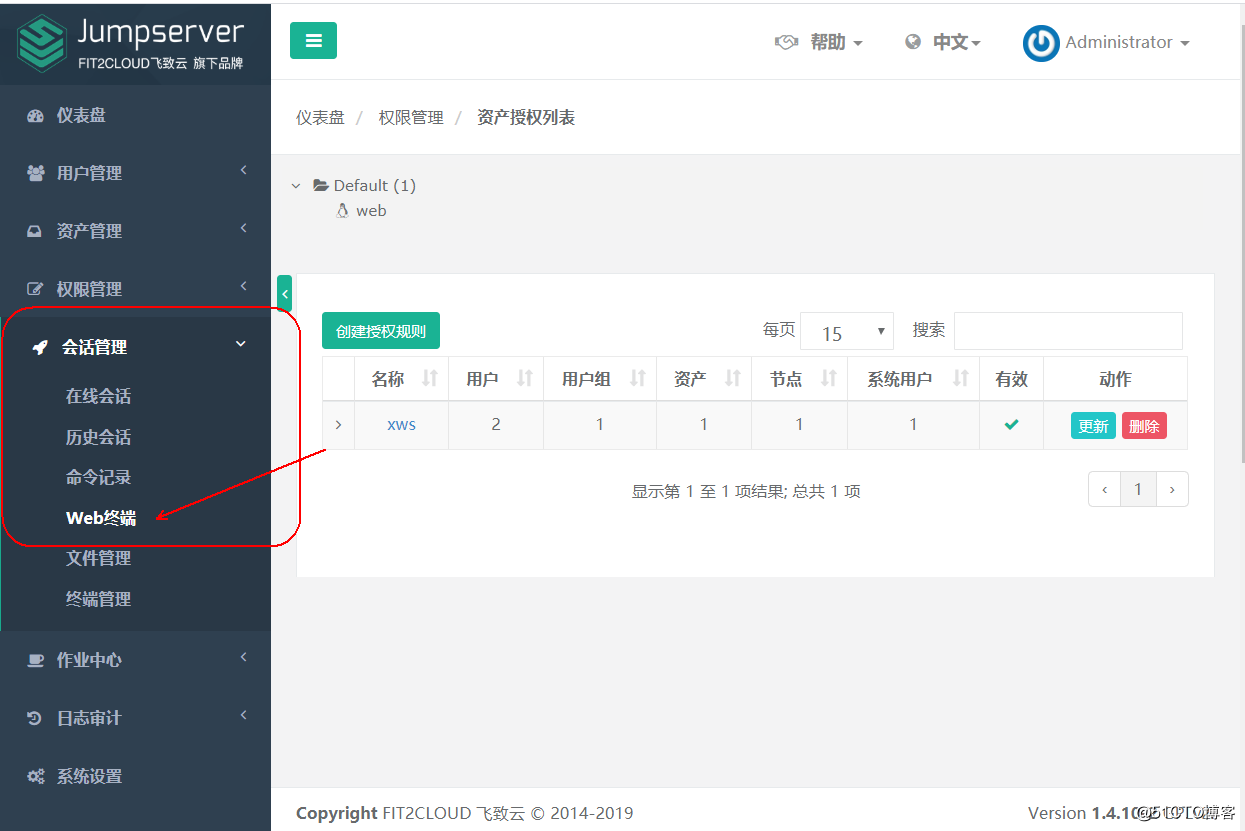
5.支持web终端
6.Bootstrap编写,界面美观
7.自动收集硬件信息
8.录像回放、命令搜索、实时监控
* Jump架构图
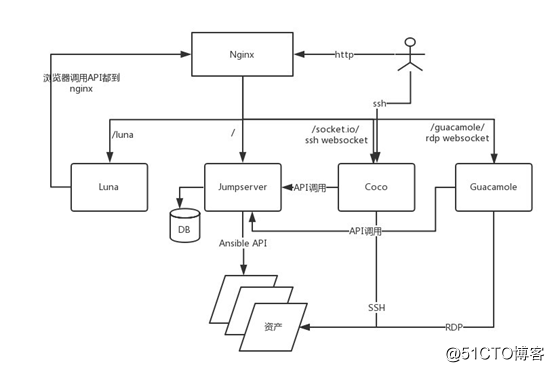
用户通过浏览器访问到nginx代理服务器页面,nginx服务器在jump架构中是作为一台代理服务器,用来代理jumpserver程序、coco程序、luna程序、guacamole程序的web页面,方便用户使用,如果不采用nginx做代理服务器的话,用户访问页面时比较麻烦(如coco程序需要用到8080端口、guncamole需要别的端口,使用起来不方便,而且后续的页面跳转有可能会导致not found),nginx调取luna程序设置终端采用ssh协议连接后端资产(后端服务器)。
Jumpserver组件说明
Jumpserver:jumpserver的管理后台
Coco:实现了ssh server 和 web终端的组件,提供ssh和websocket接口
Luna:是web Terminal 的前端(用来展示给用户和与用户进行交互)前端页面都是由该项目完成的
Guacamole:apache的跳板机项目,jumpserver使用其组件实现RDP(远程桌面)功,能,jumpserver在guacamole中添加额外插件,不修改其本身,实现调用
二.安装jumpserver
安装硬件介绍centos 7 4G以上内存 至少双核处理器
安装依赖环境:python3.6以上版本 后端数据库 redis
- 修改字符集,支持中文字符
[root@localhost ~]# localedef -c -f UTF-8 -i zh_CN zh_CN.UTF-8
// -c 强制执行  -f 指定设置的字符集   -i  从那个源
[root@localhost ~]# export LC_ALL=zh_CN.UTF-8
// 将字符集设置成环境变量
[root@localhost ~]# echo 'LANG="zh_CN.UTF-8"' > /etc/locale.conf
// 加入到字符配置文件
安装python环境
[root@bogon ~]#  yum -y install wget sqlite-devel xz gcc automake zlib-devel openssl-devel epel-release git
[root@bogon ~]# tar xf Python-3.6.1.tar.xz -C /usr/src/
[root@bogon ~]# cd /usr/src/Python-3.6.1/
[root@bogon Python-3.6.1]# ./configure   && make &&  make  install
创建python运行虚拟环境
[root@bogon ~]# cd /opt/
[root@bogon opt]# python3 -m venv py3 // venv python中的虚拟环境   py3虚拟环境名称
[root@bogon opt]# source /opt/py3/bin/activate
(py3) [root@bogon opt]#
自动载入python虚拟环境设置
(py3) [root@bogon opt]# cd /opt/
(py3) [root@bogon opt]# git clone https://github.com/kennethreitz/autoenv.git
//将github网站的项目克隆到本地
项目路径https://github.com/kennethreitz/autoenv
正克隆到 'autoenv'...
remote: Enumerating objects: 16, done.
remote: Counting objects: 100% (16/16), done.
remote: Compressing objects: 100% (13/13), done.
remote: Total 688 (delta 5), reused 9 (delta 3), pack-reused 672
接收对象中: 100% (688/688), 111.91 KiB | 108.00 KiB/s, done.
处理 delta 中: 100% (362/362), done.
(py3) [root@bogon opt]# echo 'source /opt/autoenv/activate.sh' >>  /root/.bashrc
(py3) [root@bogon opt]# source ~/.bashrc
(py3) [root@bogon opt]#
安装jumpserver
(py3) [root@bogon requirements]# unzip jumpserver.zip
(py3) [root@bogon requirements]# echo "source /opt/py3/bin/activate" > /opt/jumpserver/.env
(py3) [root@bogon requirements]# cd jumpserver/      //安装依赖包rpm
//输入y
(py3) [root@bogon requirements]# yum -y install $(cat rpm_requirements.txt)
(py3) [root@bogon requirements]# pip install --upgrade pip
Collecting pip
  Downloading https://files.pythonhosted.org/packages/54/0c/d01aa759fdc501a58f431eb594a17495f15b88da142ce14b5845662c13f3/pip-20.0.2-py2.py3-none-any.whl (1.4MB)
    100% |████████████████████████████████| 1.4MB 883kB/s
Installing collected packages: pip
  Found existing installation: pip 9.0.1
    Uninstalling pip-9.0.1:
      Successfully uninstalled pip-9.0.1
Successfully installed pip-20.0.2
(py3) [root@bogon requirements]# pip install wheel
Collecting wheel
  Downloading wheel-0.34.2-py2.py3-none-any.whl (26 kB)
Installing collected packages: wheel
Successfully installed wheel-0.34.2
(py3) [root@bogon requirements]# pip install -r requirements.txt -i https://mirrors.aliyun.com/pypi/simple/
//pip  install <安装包名> -r 将文件里面的内容当作安装包 -i 指定连接下载安装包
Pip是python中安装软件包的命令,相当于yum命令
(安装需要等待几分钟)
安装mariadb与redis
(py3) [root@bogon requirements]# yum -y install mariadb mariadb-devel mariadb-server
(py3) [root@bogon requirements]# systemctl start mariadb
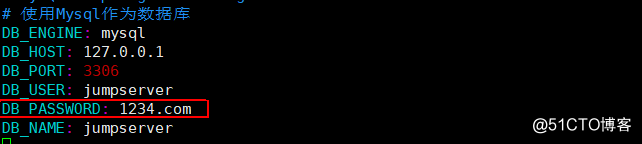
(py3) [root@bogon requirements]# mysqladmin -u root password 1234.com
(py3) [root@bogon requirements]# mysql -u root -p1234.com
//登陆数据库创建jumpserver库用来存放jumpserver数据
MariaDB [(none)]> create database jumpserver default charset 'utf8' ;
//创建一个名为jumpserver的数据库
MariaDB [(none)]> grant all on jumpserver.* to [email protected] identified by '1234.com';
//jumpserver对数据库拥有所有权限,密码为123.com
MariaDB [(none)]> flush privileges;
MariaDB [(none)]> exit
(py3) [root@bogon requirements]# ss -lnt | grep 3306
LISTEN 0 50 *:3306 *:* (py3) [root@bogon requirements]# yum -y install redis
(py3) [root@bogon requirements]# systemctl start redis
(py3) [root@bogon requirements]# netstat -anpt | grep redis
tcp 0 0 127.0.0.1:6379 0.0.0.0:* LISTEN 75890/redis-server 配置jumpserver文件
(py3) [root@bogon requirements]# cd /opt/jumpserver/
(py3) [root@bogon jumpserver]# cp config_example.yml config.yml
//生成SECRET_KEY写入配置文件
(py3) [root@bogon jumpserver]# cat /dev/urandom | tr -dc A-Za-z0-9 | head -c 50
//把这个命令生成得码复制到配置文件
(py3) [root@bogon jumpserver]# cat /dev/urandom | tr -dc A-Za-z0-9 | head -c 16
//把这个命令生成得码复制到配置文件


安装coco组件并配置
(py3) [root@bogon requirements]#  unzip coco.zip
(py3) [root@bogon requirements]# cd coco
(py3) [root@bogon requirements]#  echo "source /opt/py3/bin/activate" > /opt/coco/.env
(py3) [root@bogon requirements]# cd requirements/
(py3) [root@bogon requirements]# yum -y install $(cat rpm_requirements.txt)
(py3) [root@bogon requirements]# pip install -r requirements.txt
(py3) [root@bogon requirements]# cd ..
(py3) [root@bogon coco]#  cp config_example.yml config.yml
(py3) [root@bogon coco]# vim /opt/jumpserver/config.yml
//把这个文件中得16位码复制上
(py3) [root@bogon coco]# vim config.yml 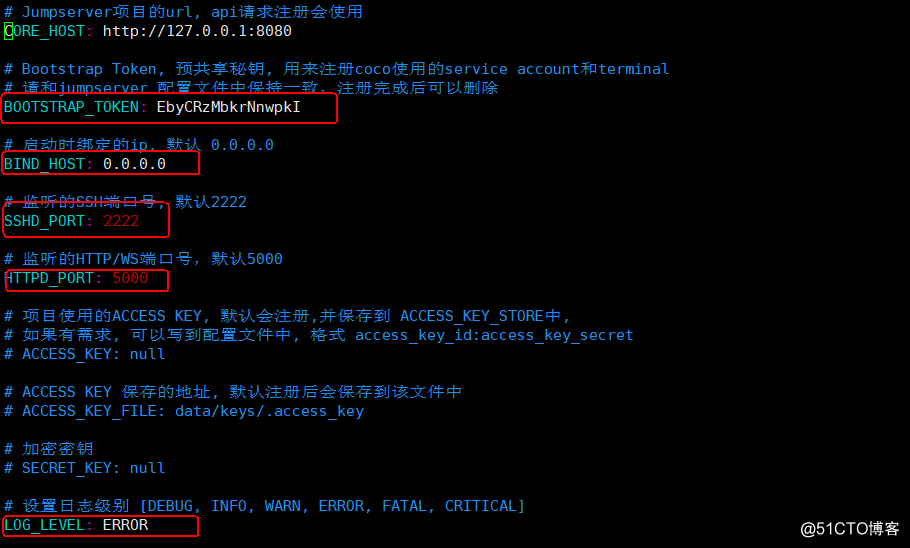
(py3) [root@bogon coco]# ./cocod  start -d
Use eventlet dispatch
Start coco process
(py3) [root@bogon coco]# netstat -anpt | grep 2222
tcp        0      0 0.0.0.0:2222            0.0.0.0:*               LISTEN      33439/python3
安装guacamole及luna
(py3) [root@jumpserver ~]# yum install -y yum-utils device-mapper-persistent-data lvm2
(py3) [root@jumpserver ~]# yum-config-manager  --add-repo http://mirrors.aliyun.com/docker-ce/linux/centos/docker-ce.repo
(py3) [root@jumpserver ~]#  yum makecache fast
(py3) [root@jumpserver ~]# yum -y install docker-ce
(py3) [root@jumpserver ~]# systemctl start docker
(py3) [root@jumpserver ~]# docker load < guacamole.tar
(py3) [root@jumpserver ~]# docker run --name jms_guacamole -d \
 -p 8081:8080 -v /opt/guacamole/key:/config/guacamole/key \
 -e JUMPSERVER_KEY_DIR=/config/guacamole/key \
 -e JUMPSERVER_SERVER=http://192.168.1.10:8080 \
 jumpserver/guacamole:latest
(py3) [root@jumpserver ~]# ss -lnt | grep 8081
LISTEN     0      128         :::8081                    :::*
(py3) [root@jumpserver ~]# tar zxf luna.tar.gz -C /opt
安装nginx
(py3) [root@jumpserver ~]# tar zxf nginx-1.2.4.tar.gz -C /usr/src
(py3) [root@jumpserver ~]# cd /usr/src/nginx-1.2.4/
(py3) [root@jumpserver nginx-1.2.4]# ./configure && make && make install
(py3) [root@jumpserver nginx-1.2.4]# ln -sf /usr/local/nginx/sbin/nginx /usr/local/bin/
(py3) [root@jumpserver nginx-1.2.4]# cd /usr/local/nginx/conf/
(py3) [root@jumpserver conf]# cp nginx.conf nginx.conf.bak
(py3) [root@jumpserver conf]# mv /root/nginx.conf .
mv:是否覆盖"./nginx.conf"? y
        //博文开头得软件包中得nginx.conf复制到这个nginx主配置文件中就可以了
(py3) [root@jumpserver conf]# nginx -t
nginx: the configuration file /usr/local/nginx/conf/nginx.conf syntax is ok
nginx: configuration file /usr/local/nginx/conf/nginx.conf test is successful
(py3) [root@jumpserver conf]# nginx
(py3) [root@jumpserver conf]# ss -lnt | grep -w 80
LISTEN     0      128          *:80                       *:              ``
客户端测试
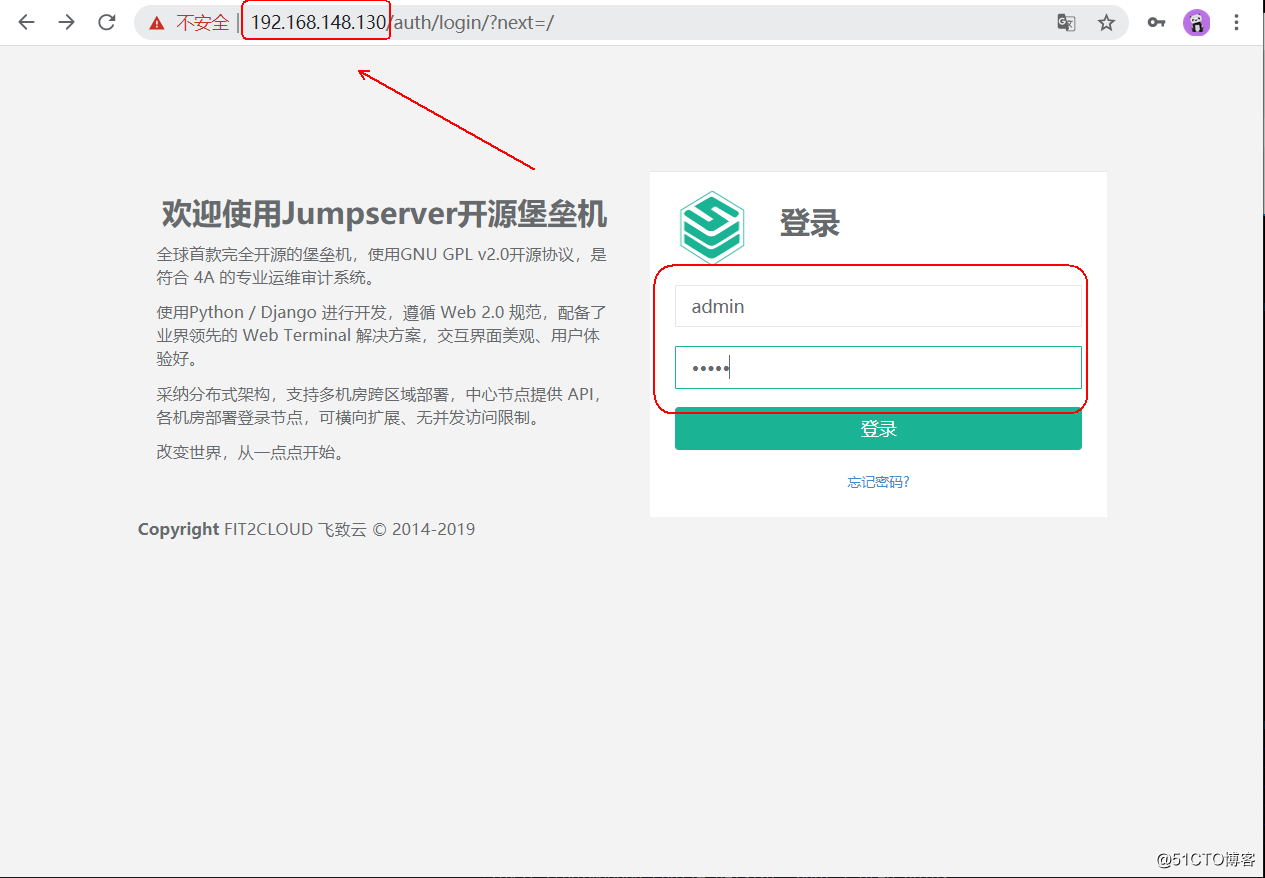
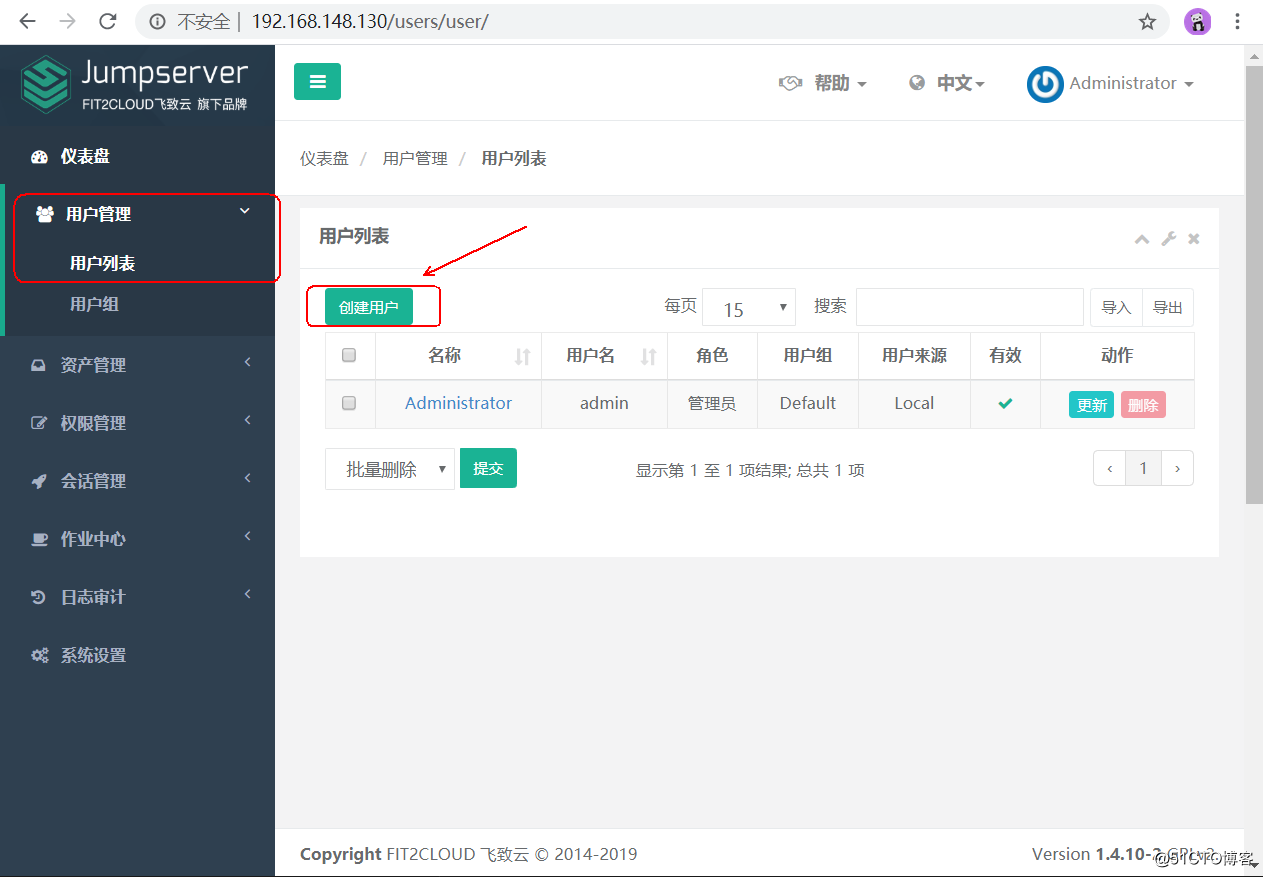
创建普通用户


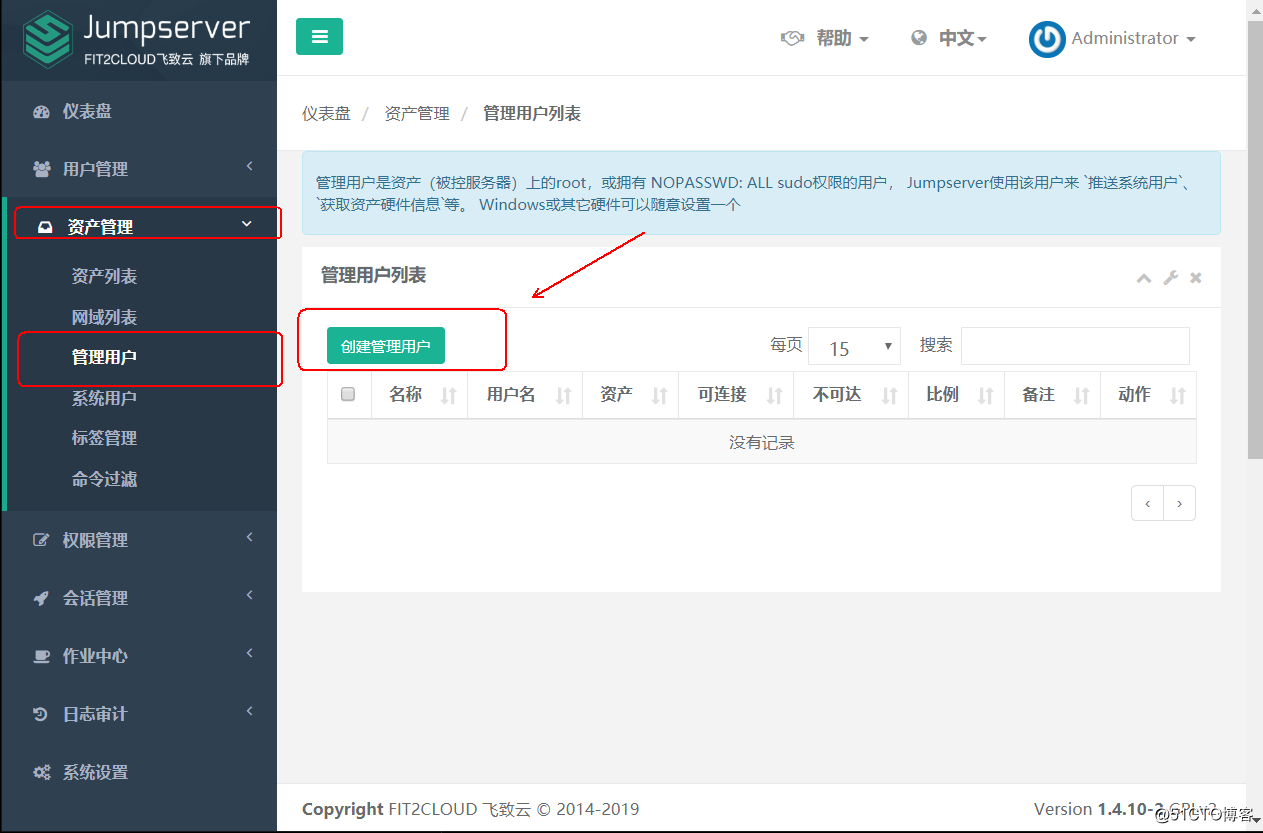
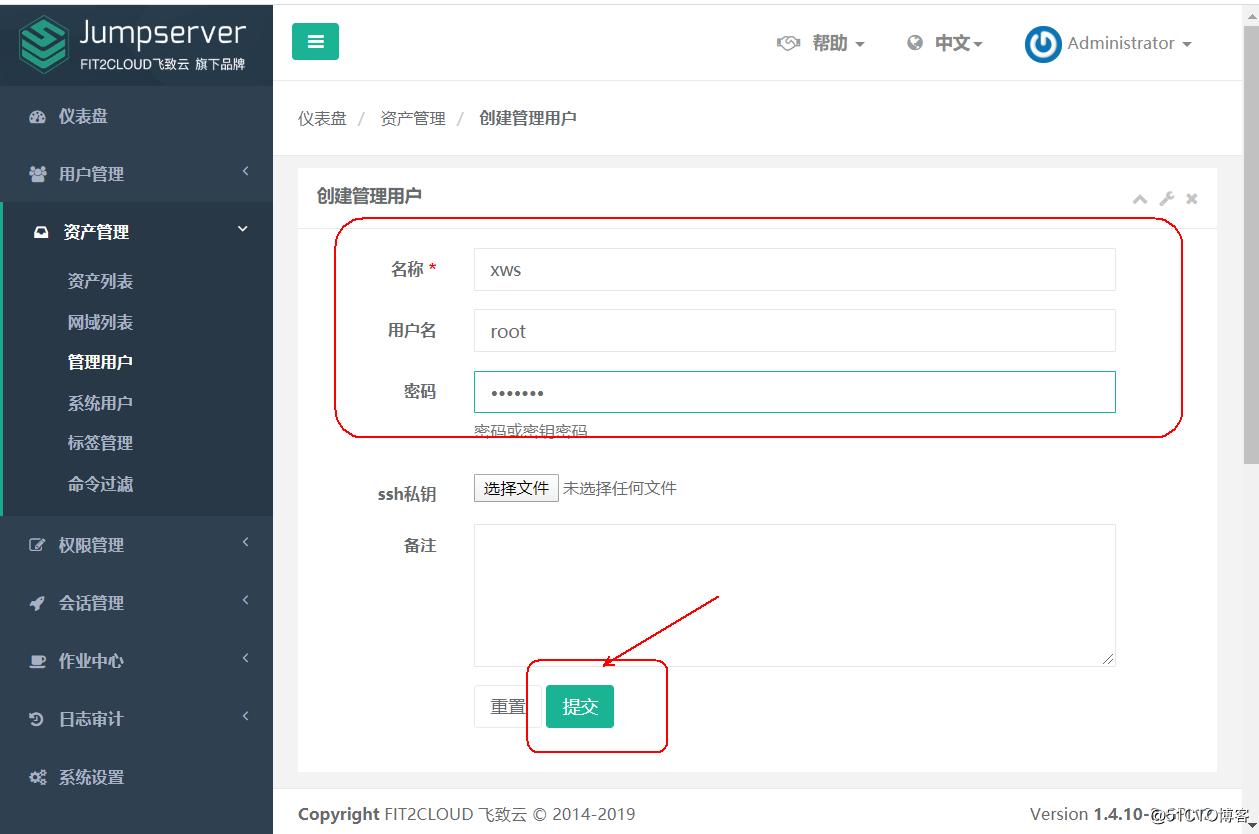
创建管理用户
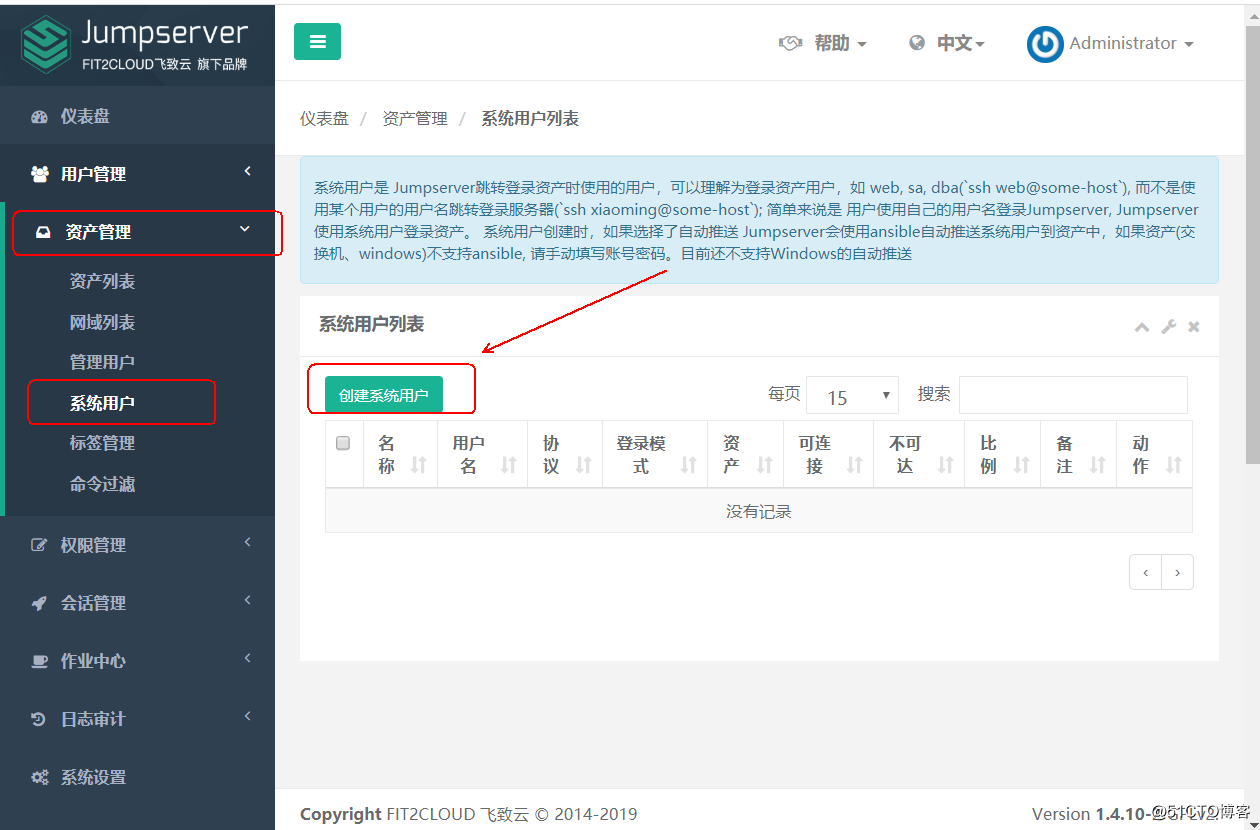
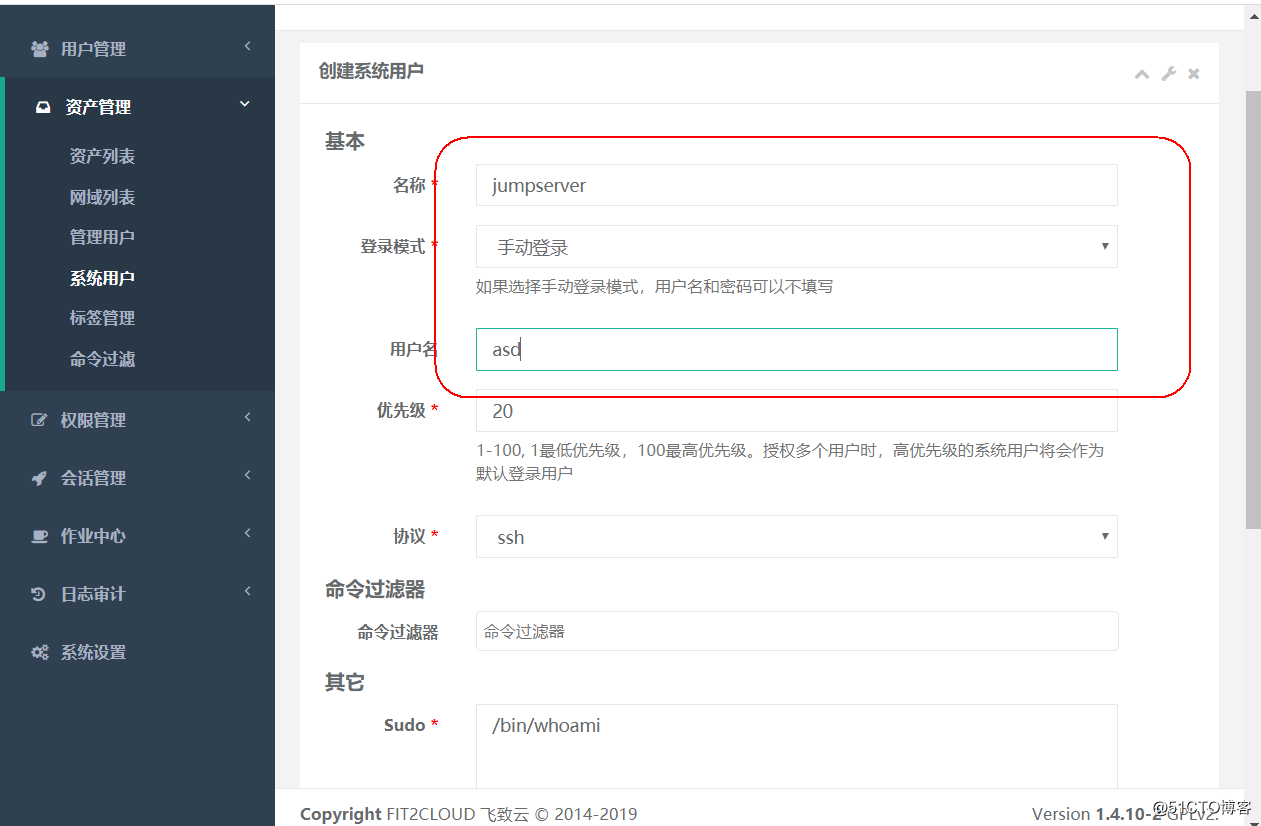
创建系统用户
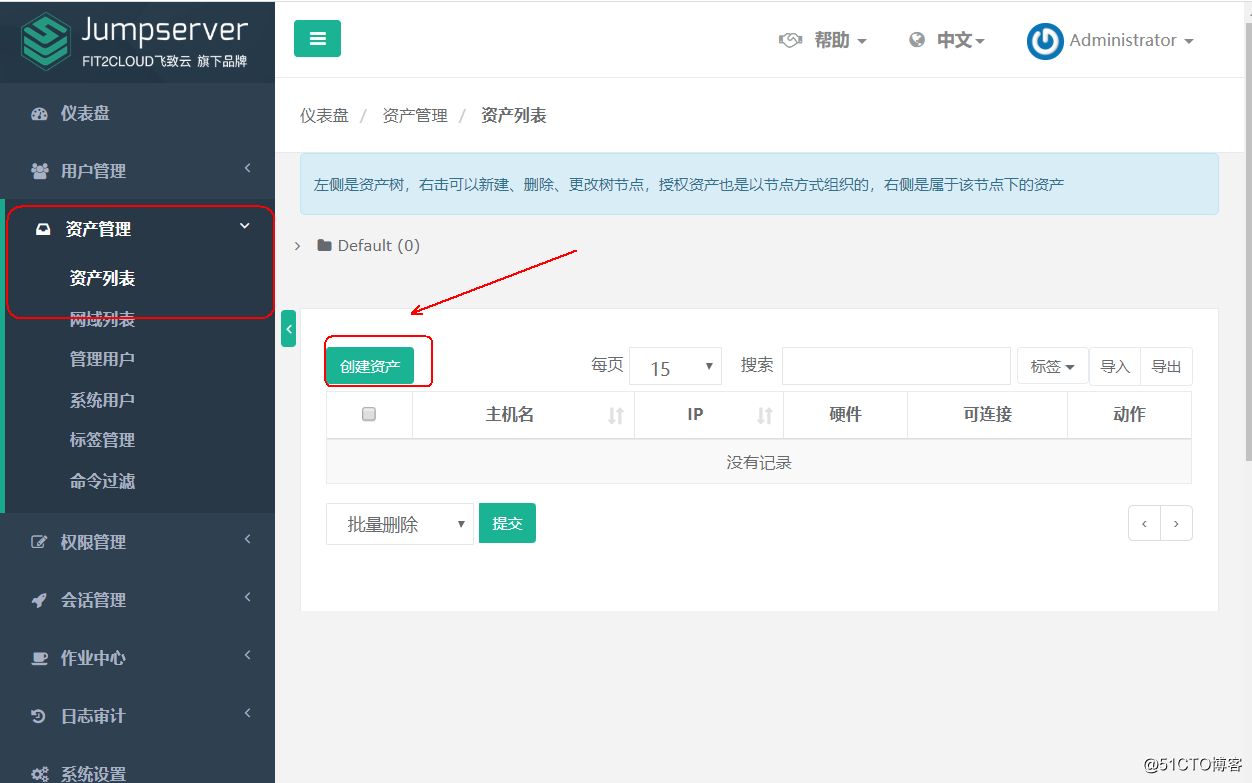
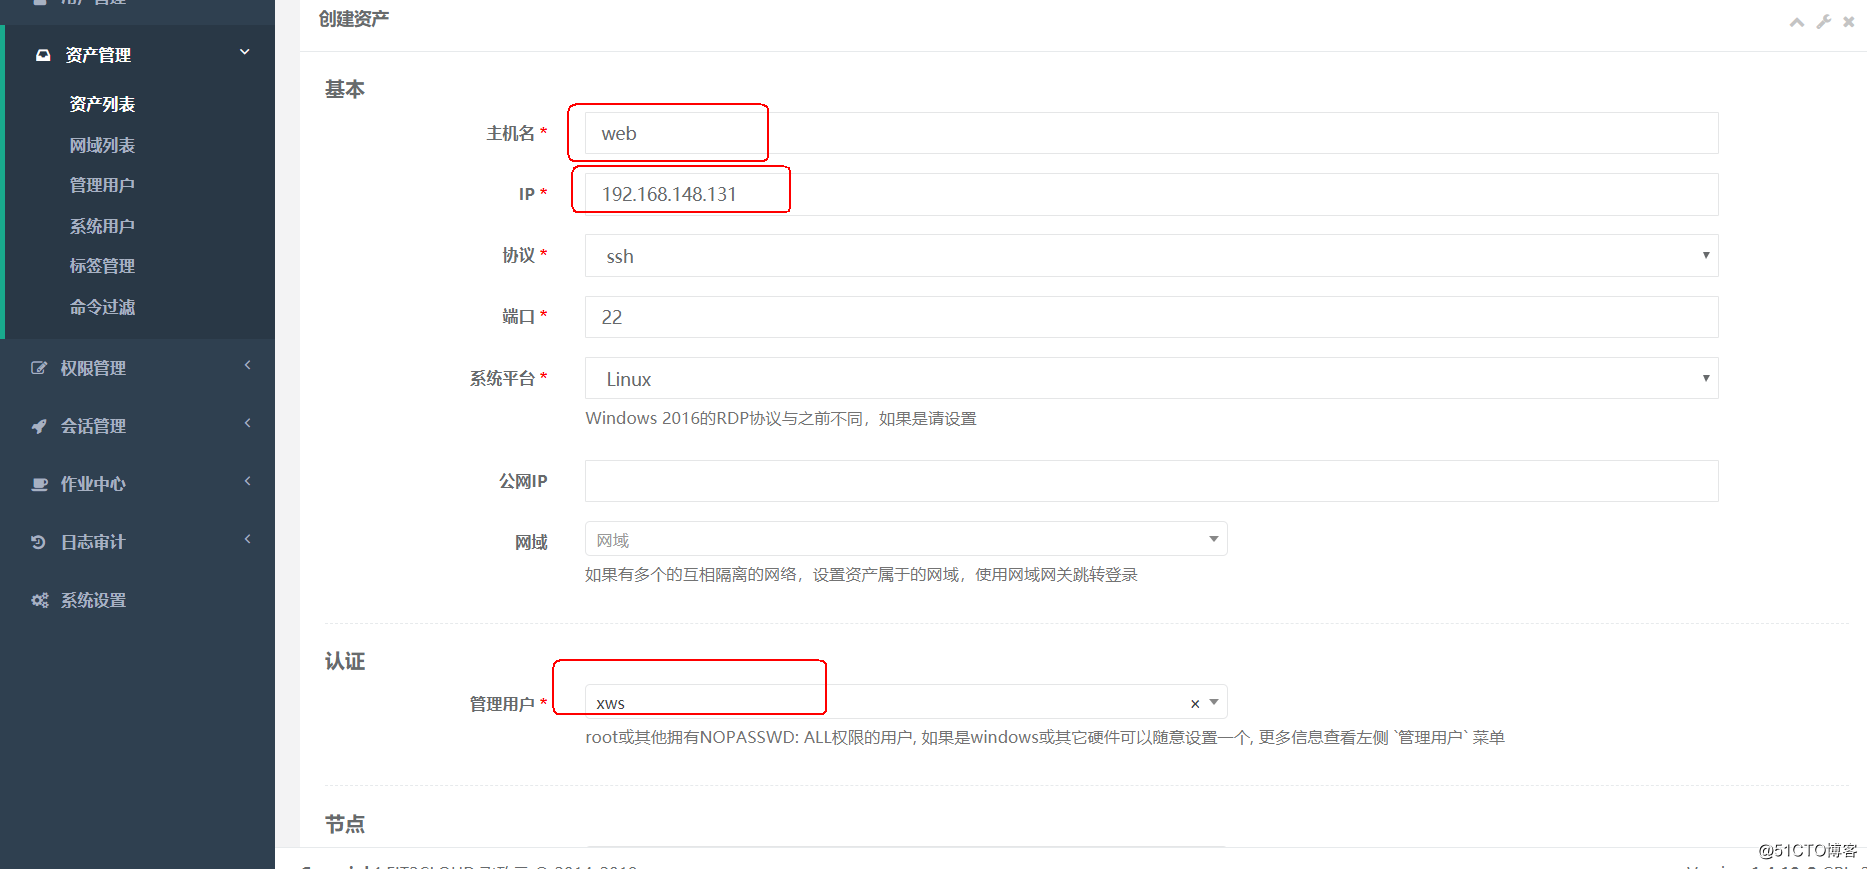
创建后端资产
实验环境,所以就开启一台虚拟机192.168.1.131作为测试(web页面的客户端与后端资产肯定不在同一网段,因为用户是通过公网登录到jumpserver才可以对后端服务器进行操作的)!
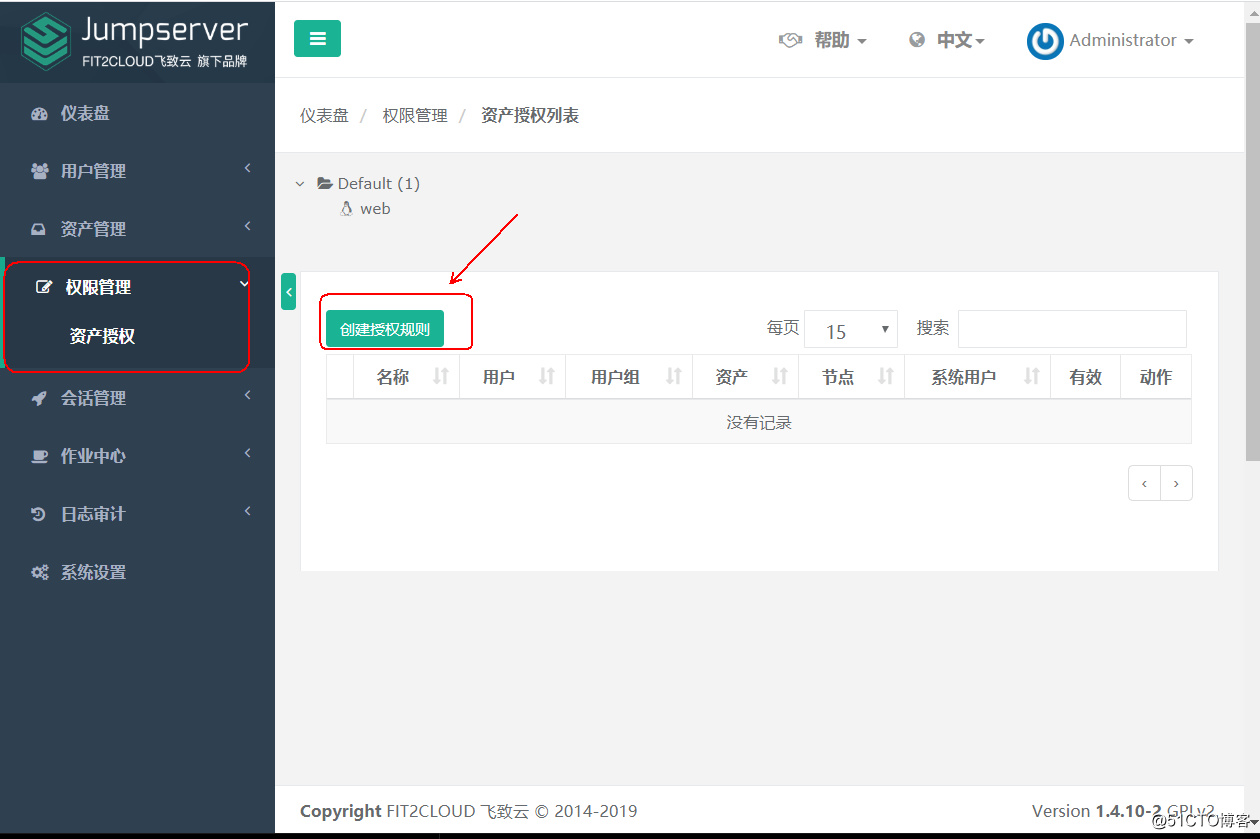
创建授权规则

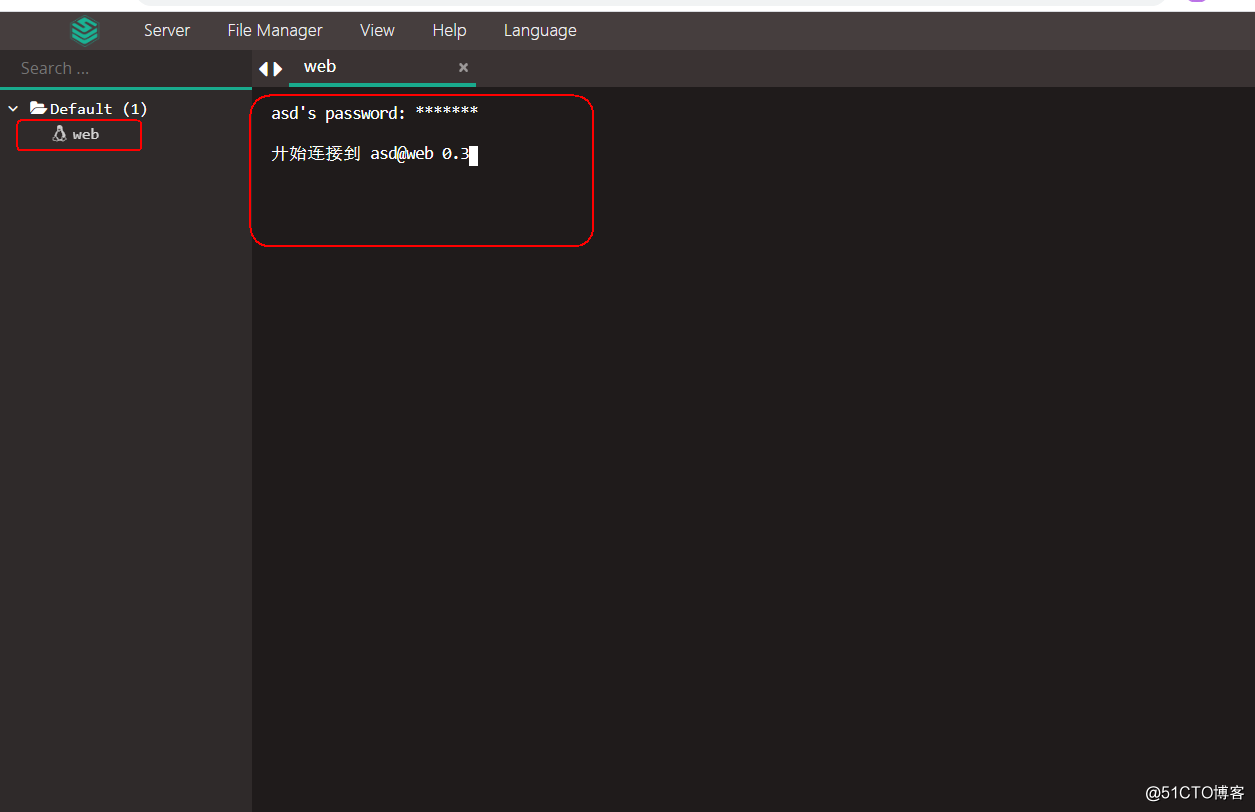
连接后端资产
Recommend
-
59
README.md Jumpserver
-
80
Jumpserver-VerificationCode介绍项目地址:Jumpserver-VerificationCode本项目为jumpserver添加了企业微信验证码功能使用方法3个脚本放置与jumpserver根目录修改/etc/passwd中的init.sh修改为NewInit.sh效果图
-
62
jumpserver安装与配置参考jumpserver官网http://docs.jumpserver.org/zh/docs/step_by_step.html一、准备python3和python虚拟环境1.1安装依赖包yum -y install wget sqlite-devel xz gcc automake zlib-devel openssl-devel epel-release gi
-
37
相信各位对堡垒机(跳板机)不会陌生,为了保证服务器安全,加个堡垒机,所有ssh连接都通过堡垒机来完成,堡垒机也需要有身份认证、授权、访问控制、日志审计等功能。Jumpserver是全球首款完全开源的堡垒机,是符合4A的专业运维审计系统。Jumpserver使用Python/Djan...
-
25
由于Jumpserver 本身不支持Reids高可用部署,采用Redis 哨兵模式实现Redis自身主备节点数据同步以及故障切换,但Jumpserver无法感知Redis主节点的IP切换,因此本文采用Redis 哨兵模式+Keepalived浮动IP的方式实现Redis的高可用,通过Keepalived监控Redis主节点的故...
-
17
121 孤荷凌寒自学第 0207 天_区块链第 121 天 NFT018 941xue · 于 发布 · 32 次阅读 孤荷凌寒自学第0207天 区块链学习第1...
-
15
前言 今天复现了jumpserver的最新RCE,可能是年纪大了有点激动发出来有点急。不过塔王紧跟着就把文章整理好了不得不说很专业。想了想也包不住多久,就干脆发公众号出来好了。主要是学到了不少东西,前排感谢rr、7师傅还有群里的其他师傅。...
-
13
影响版本 漏洞分析 简便的方法是,根据影响版本可以得到的信息是,v2.6.2是安全的,所以只需要在github上对比v2.6.2和v2.6...
-
9
关于开源堡垒机jumpserver_1.2的一些体验记录 |坐而言不如起而行! 二丫讲梵 > 意犹未尽 >
-
8
带货 ← 远古比喜马拉雅还要庞大的超级山脉,它们的没落恰和生物两次大爆发同时发生
About Joyk
Aggregate valuable and interesting links.
Joyk means Joy of geeK