

A Simple Guide to Convolutional Neural Networks
source link: https://towardsdatascience.com/a-simple-guide-to-convolutional-neural-networks-751789e7bd88?gi=b8f790f00632
Go to the source link to view the article. You can view the picture content, updated content and better typesetting reading experience. If the link is broken, please click the button below to view the snapshot at that time.

A Simple Guide to Convolutional Neural Networks
Convolutional Neural Networks demystified without any of the fancy tech jargon!
Jan 19 ·8min read

Cars can recognize road signs. Facebook knows your best friends names. You can use your face to unlock your phone. This is all done by magic.
I’m just joking, there is no magic here, just plain, old math. But serious talk though, all the stuff I just mentioned are examples of a convolutional neural network.
But before diving into the code for a convolutional network, let’s get an understanding of what a convolutional neural network (CNN) is and how it works.
Part 0: What is a CNN? Why should we use it?
So why would we use a CNN over another type of neural network, say, a multi-layer perceptron? This is because CNNs are able to extract the features of an image, which an algorithm like a multi-layer perceptron (MLP) or a recursive neural network (RNN) does not have the ability to do.
The architecture of a convolutional neural network looks something like this:

We should note a couple of things from this. The network starts off with 2 convolutional and max-pooling layers , followed with 2 fully connected layers which end with an output layer. The convolution +max pooling layers is where the images are recognized (features are extracted), and the fully connected layers are where the images are classified into predefined classes.
Part 1: Image Recognition
The first part in a convolutional neural network filters an image to extract features from the image, then it pools the extracted feature to reduce the size of the data and finally adds an activation function so that the network is a non-linear function. This can be summed to convolution + pooling + activation layers.
Convolution
A filter is a matrix which extracts features from an image (this is where the learning takes place). The dot product between the filter values and the image pixel values is forms the convolution layer.
The filter tensor is a matrix of weights. The values in the filter matrix are updated each time the network performs backpropagation. However, the dimensions of the filter matrix are determined explicitly by the programmer.

In a CNN, there are many different filters which extract various features in an image. As we progress through the network, the features extracted from an image get more and more specific. Let’s take a stop sign for example.
Since a filter in the first layer is used to detect a feature that can be easily recognized, this could be the octagonal shape of the stop sign. A filter in the second layer would be used to detect something more specific, like the text “STOP”. A filter in the third layer could be used to detect something even more specific, like the letter “S” in “STOP”.
In Keras (a deep learning framework in Tensorflow ), code for the first convolution layer would look something like this:
Note: I won’t go too much in-depth of how the code works, but I’ll talk a bit about the architecture.
So here, my convolution layer is 16 X 16 X 3, with a 5 X 5 filter. The programmer must explicitly define the dimensions of the filter, but the values in the filter are self-learned by the network.
Pooling
After the image is has passed through the first filter, it will then go on to the pooling layer. A pooling layer reduces the size of the filter layer, which allows us to train the model faster. Also, it prevents overfitting by dropping unwanted values in the filter tensor.
A popular pooling method is called Max Pooling . It is the same process as filtering but this time we take the maximum value instead of the dot product. Check out the animation below:

Re-Lu
Now, we’re going to ramp up the math. Re-Lu (Rectified Linear Unit) is a common activation function used in neural networks. An activation function is used to add non-linearity to the neural network. This allows us to solve much more complex problems than if our network is just a linear function. If we never had an activation function in our network, it would be a simple linear regression algorithm.

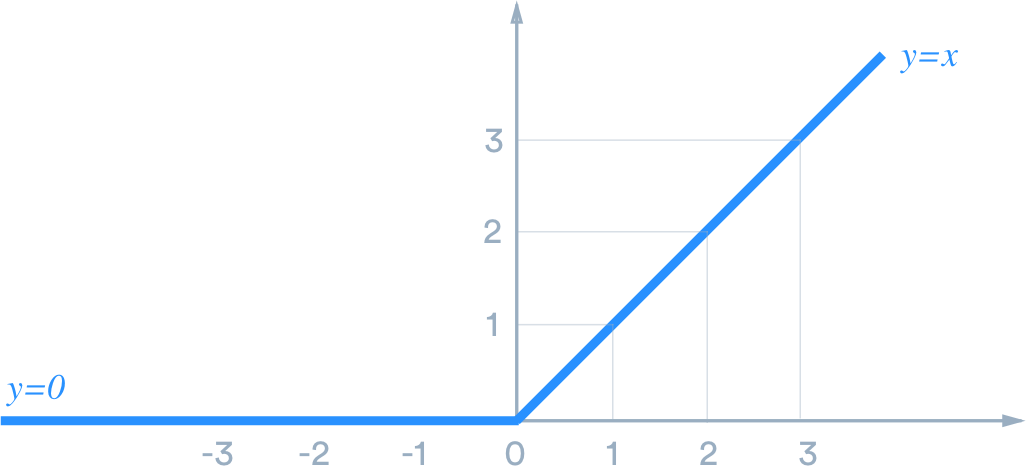
The Re-Lu activation function is a function that will only return values if the value is greater than zero, helping decrease the training time.
Part 2: Image Classification
Now that all the features of the image have been extracted by the convolutional layers, its time to classify the images.
In a fully connected layer, every neuron shares a connection with all the other neurons in the layer before and after it. That’s why its called a “Fully Connected” layer. Here is what they look like:

Flattening
Before entering our convoluted input into a dense (fully-connected) layer, we must flatten the tensor (our input). Flattening is turning our multi-dimensional input tensor input a 1-D input tensor. For example, say the final convolutional layer outputs a (28, 28, 3) tensor. Flattening this output would give the next layer an input of (2352, 1). 2352 comes from multiplying 28 X 28 X 3, which are the dimensions of the previous output tensor.

This means that there are 2352 total pixels in the image. Flattening allows us to analyse every single pixel since now, every single pixel in the image has its own neuron.
Dropout
After the input is flattened, it passes through the dense layer. The dense layer does its thing, and then right before we reach the final dense layer, we do something called dropout . Dropping out neurons is randomly setting some of the output neurons to zero, just to speed up the training and backpropagation process, and to prevent overfitting our network.
Part 3: Training the Network
You just learned how to build a CNN, but what use is an untrained network! To master the art of CNN’s, you must know how to train them too. In this article, I’ll talk about the loss function and the optimizer that is used in a CNN.
Loss Function
Simply put, a loss function is a way of calculating how accurate the data is. The goal of any optimization problem (any neural network) is to minimize the cost function.
There are various types of loss functions. In CNN’s, the loss function used is Cross-Entropy. Cross-Entropy calculates the difference between the probability distribution (can be a vector, matrix, tensor, etc.) of the network’s output and the probability distribution of the labels.
In our case (in a CNN), the data is represented in a vector. The cross-entropy loss calculates the difference between each element in the label vector (y) and the network’s output vector (X), and then sum all those up to return the total loss for the network.

The formula stated there includes some really intense mathematical notation, so if you want to go deeper in the maths, I suggest you go to the link below. However, you don’t need to be fluent with the maths to write a CNN (especially in frameworks like Keras or Pytorch, since you only have to write “loss=cross_entropy ”, and Keras/Pytorch will take care of the rest).
Optimization
Optimization in machine learning is finding the best weights/biases which will return the lowest cost (loss). An optimizer is an algorithm that does exactly this. In CNN’s (and most other deep neural nets), we use the Adam optimizer.
If you’re really interested in learning more about the Adam optimizer, put your statistics and calculus helmets on, and click the link below.
Like before, you don’t need to understand the nitty-gritty math behind how the optimizer works. In Keras, using the Adam optimizer is literally one line of code ( optimizer=“Adam”)
That’s a Wrap!
Awesome! You now know the basics of a CNN, so now you should choose a CNN project that you’re really passionate about so you can go and apply what you just learned. In the meantime, check out the awesome tutorial down below where I learned how to write a road sign classifier!
Key Takeaways
Just to summarize all of this up:
- A CNN is a type of deep neural network often used to on image data and for complex classification problems.
- The architecture of a CNN involves various types of layers, which include: Convolution, Max Pooling, Dense, Dropout.
- The Convolution layers extract feature info from the image by multiplying a filter matrix with the image tensor, creating a filtered layer of the image. This is where all the learning takes place
- Then, the filtered layer is pooled (the size of the filtered layer is reduced). This is done through Max Pooling.
- After the image passes through a couple convolution + max-pooling layers, it gets flattened and enters into the Dense layer.
- After the dense layer does its thing, a couple of the neurons are randomly dropped to prevent overfitting.
- We use the Adam optimizer and Cross-Entropy loss to train our model.
Now its time to build your very own CNN!
Recommend
About Joyk
Aggregate valuable and interesting links.
Joyk means Joy of geeK