作者简介:宋波,从事SDN方向的ODL开发工作,4年有余
前言:如果有同学不想看长篇大论,直接上手代码的,请移步至文章末尾,有github项目链接,大家可以自行下载,查看、编译以及运行,项目中关键的地方都加入了充分的注释和说明。
本文主要阐述五个opendaylight项目中常用技术点:
1.RPC
2.datastore数据库
3.datachangelistener数据监听
4.notification通知的发送与接收
5.集群环境中remote-RPC(routed-rpc)远程rpc开发与使用
对应本文讲解的业务:
1.定义学生的数据库datastore
2.Rpc能够创建学生并存入数据库中
3.监听学生数据库
4.发送一个学生逃课的通知notification,接收通知后将学生从数据库中移除
5.实现以IP为ID的remote-rpc远程rpc
1、工程框架搭建
从boron版本开始,ODL官方文档提供了项目骨架生成指导。搭建框架不再需要去一步步创建maven项目,不用添加各种配置文件,不用找各种依赖。
项目通过mvn命令远程仓库获取demo-project一键生成项目框架(可linux,可PC。maven安装不再说明):
官方示例:
mvn archetype:generate -DarchetypeGroupId=org.opendaylight.controller -DarchetypeArtifactId=opendaylight-startup-archetype \
-DarchetypeRepository=https://nexus.opendaylight.org/content/repositories/<opendaylight.release | opendaylight.snapshot>/ \
-DarchetypeCatalog=remote -DarchetypeVersion=<Archetype-Version>
mvn archetype:generate-DarchetypeGroupId=org.opendaylight.controller-DarchetypeArtifactId=opendaylight-startup-archetype\
-DarchetypeRepository=https://nexus.opendaylight.org/content/repositories/<opendaylight.release | opendaylight.snapshot>/ \
-DarchetypeCatalog=remote-DarchetypeVersion=<Archetype-Version>
我选的参数是release/ 1.5.4,对应构建oxygen-sr4版本项目
mvn archetype:generate -DarchetypeGroupId=org.opendaylight.controller -DarchetypeArtifactId=opendaylight-startup-archetype \
-DarchetypeRepository=https://nexus.opendaylight.org/content/repositories/opendaylight.release/ \
-DarchetypeCatalog=remote -DarchetypeVersion=1.5.4
mvn archetype:generate-DarchetypeGroupId=org.opendaylight.controller-DarchetypeArtifactId=opendaylight-startup-archetype\
-DarchetypeRepository=https://nexus.opendaylight.org/content/repositories/opendaylight.release/ \
-DarchetypeCatalog=remote-DarchetypeVersion=1.5.4
骨架生成是远程获取,请保证你的网络畅通,可能比较慢,看网速。
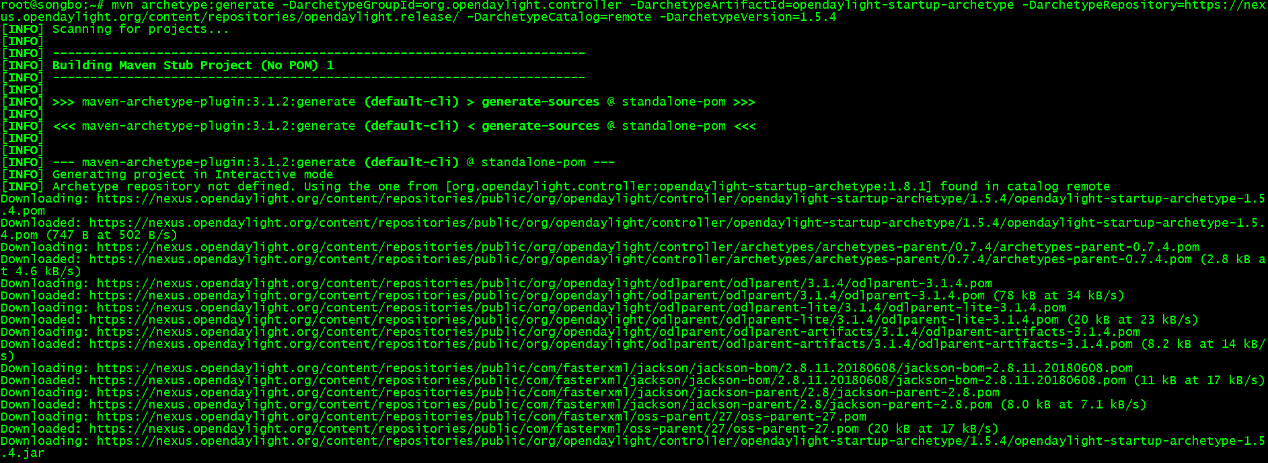
骨架下载过程
填写你的项目属性:
官方示例:
Define value for property 'groupId': : org.opendaylight.example
Define value for property 'artifactId': : example
Define value for property 'version': 1.0-SNAPSHOT: : 1.0.0-SNAPSHOT
Define value for property 'package': org.opendaylight.example: :
Define value for property 'classPrefix': ${artifactId.substring(0,1).toUpperCase()}${artifactId.substring(1)}
Define value for property 'copyright': : Copyright (c) 2015 Yoyodyne, Inc.
Define value forproperty'groupId'::org.opendaylight.example
Define value forproperty'artifactId'::example
Define value forproperty'version': 1.0-SNAPSHOT::1.0.0-SNAPSHOT
Define value forproperty'package': org.opendaylight.example::
Define value forproperty'classPrefix': ${artifactId.substring(0,1).toUpperCase()}${artifactId.substring(1)}
Define value forproperty'copyright'::Copyright(c)2015Yoyodyne,Inc.
我只填写了'groupId'和'artifactId',其他默认:
Define value for property 'groupId': com.odl.hello
Define value for property 'artifactId': hello
[INFO] Using property: version = 0.1.0
Define value for property 'package' com.odl.hello: :
Define value for property 'classPrefix' Hello: :
Define value for property 'copyright':
Define value forproperty'groupId':com.odl.hello
Define value forproperty'artifactId':hello
[INFO]Using property:version=0.1.0
Define value forproperty'package'com.odl.hello::
Define value forproperty'classPrefix'Hello::
Define value forproperty'copyright':

骨架构建完成
骨架生成后会有一个hello项目文件夹,如下图:
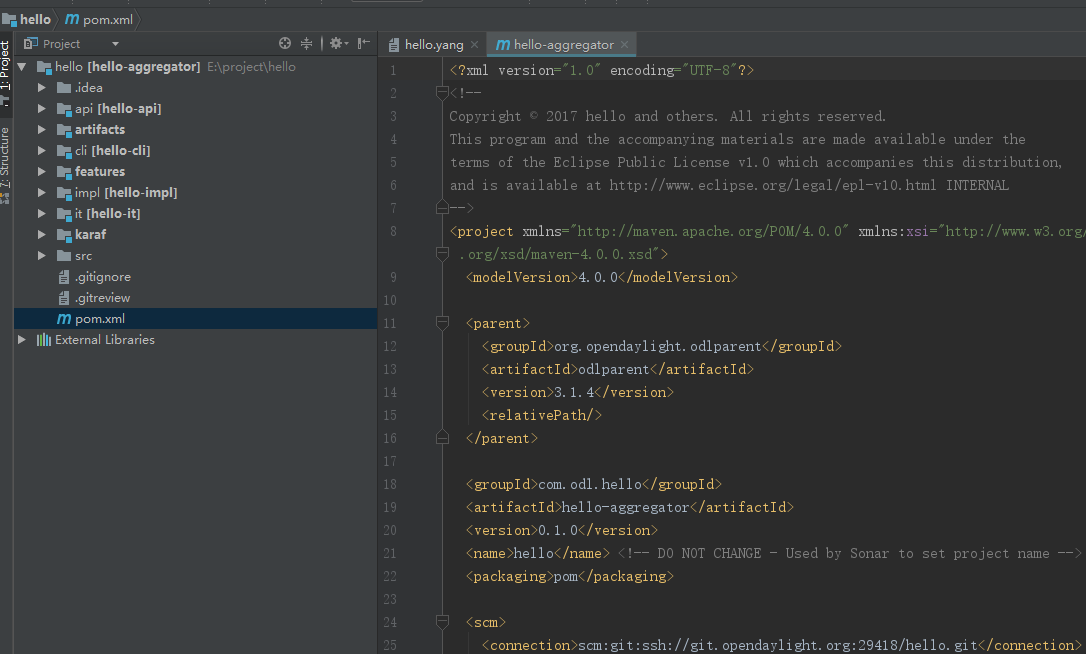
工程概况
骨架生成的模块很全面,我觉得只是demo的话比较冗余,所以精简了一下。
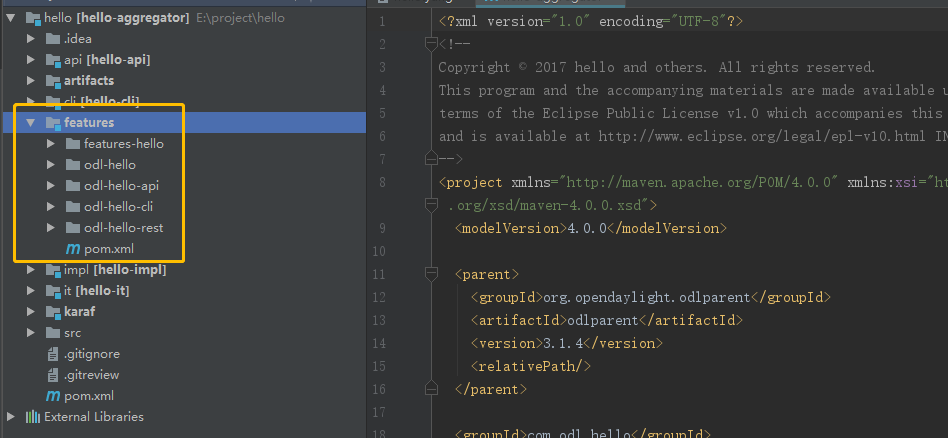
主要删掉了artifacts(声明一些版本号,公共依赖),cli(提供控制台命令),it(测试),src(不知道干嘛用的,看了很多源码也没见过类似结构的目录)。features裁掉子feature,只保留主feature。
默认的features定义:
骨架生成feature
裁剪后只保留了主feature,如图:
简化后的feature
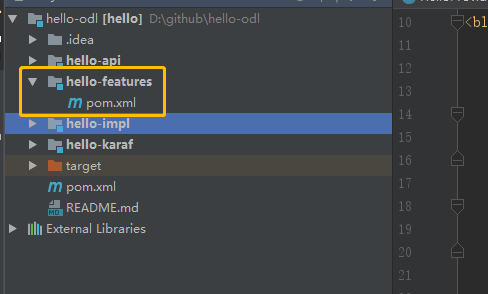
因为本文中骨架生成的内容是为了给大家演示重新运行的,所以跟后续讲解的内容会有点差异,以代码为准。
提醒大家,虽然现在骨架是一键式生成,但是新接触ODL的同学一定要去理解模块分工以及各种配置和依赖的作用,这对大家理解ODL很有帮助。
官方骨架生成方法参阅文尾链接:ODL官方开发指导文档。
2、开发
这里会按照功能来描述,如果是按模块,所有功能杂在一起不方便理解。
2.1 blueprint & provider
在开发impl实现类模块中需要引用的odl服务是通过蓝图来注入的,在运行过程中模块的加载和注销也都是通过蓝图。所以在开发前先理解蓝图blueprint的作用以及和provider类两者之间的关系非常重要。
先看看自动生成的骨架给我们带来了什么?
第一个是yang,现在只包含最基础的信息。Yang文件是工程的基地base,官方释意ODL是以YANGMODEL模型驱动开发,后续的功能都要在这里定义。

Yang文件
生产者provider类,工程的入口,和蓝图联动。后续要添加初始化的功能及数据。
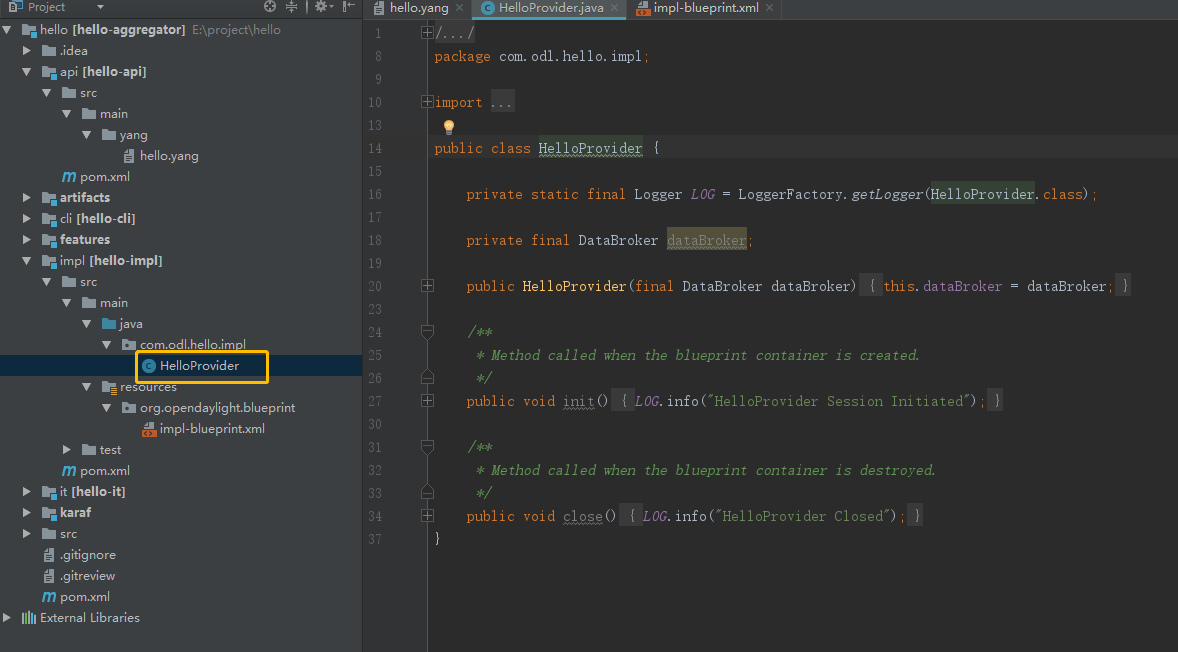
生产者provider类
蓝图blueprint,服务的注册,和生产者联动。后续要引用服务并向生产者注入。
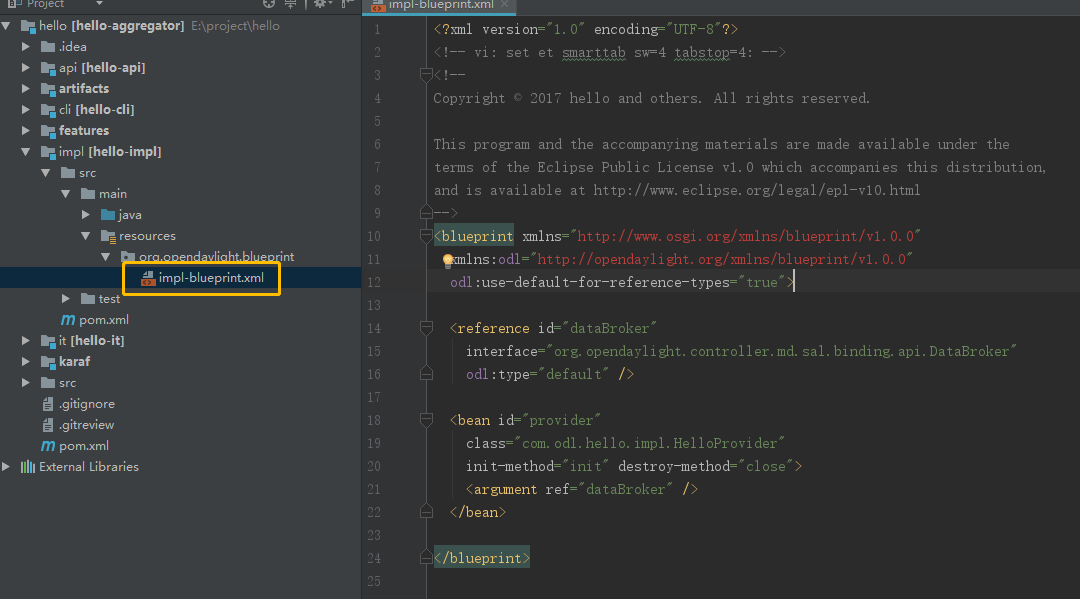
蓝图blueprint
初始的provider类中已经包含了构造方法,databroker,初始化方法init和注销方法close。这些方法的调用和对象的初始化赋值是通过蓝图。
两者关系做了个简图,如下:

蓝图和生产者关系
Init和close是在feature的安装和卸载时(odl启动和停止)会触发。Init通常里面会添加初始化的服务注册。Close添加资源的注销。
ODL启动加载的顺序:odl启动-> 加载feature-> 加载blueprint-> 加载provider-> 加载impl 到这里,所有代码和工程已经active和ready。
了解两者的作用关系很关键,后续要说的功能和技术点都会用到,对于刚刚接触odl来说,懂了这些,就可以把业务做得融会贯通了,业务代码并不是最难的。
2.2 datastore
从这里开始,我将以github工程代码来讲解,大家可以下载照着看。
每个功能我会按照yang – blueprint – impl - rest的流程来讲解。
Yang:学生的数据库,定义了students的list,引用了grouping student。养成常写grouping的习惯,不仅是yang文件可以复用,在写java代码时也是可以复用的。
grouping student {
leaf number {
type uint16;
}
leaf name {
type string;
}
leaf age {
type uint16;
}
leaf sex {
type enumeration
{
enum "boy"
{
value 0;
}
enum "girl"
{
value 1;
}
}
}
}
container students-data {
list students
{
key number;
uses student;
}
}
1
2
3
4
5
6
7
8
9
10
11
12
13
14
15
16
17
18
19
20
21
22
23
24
25
26
27
28
29
30
31
32
33
34
35
36
groupingstudent{
leafnumber{
type uint16;
}
leafname{
type string;
}
leafage{
type uint16;
}
leafsex{
typeenumeration
{
enum"boy"
{
value0;
}
enum"girl"
{
value1;
}
}
}
}
containerstudents-data{
liststudents
{
key number;
uses student;
}
}
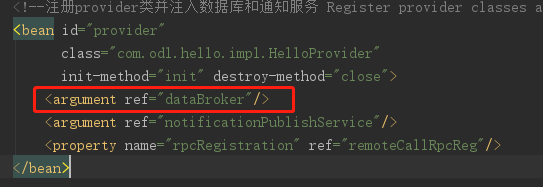
blueprint:之前已经提过,provider中的databroker是个空对象,初始化是通过蓝图来注入,再看一下之前提的关系图。

蓝图&生产者
引用odl的“databroker”,然后在蓝图构造方法注入。
<reference id="dataBroker"
interface="org.opendaylight.controller.md.sal.binding.api.DataBroker"
odl:type="default"/>
<reference id="dataBroker"
interface="org.opendaylight.controller.md.sal.binding.api.DataBroker"
odl:type="default"/>
Impl:创建Transaction(databroker获取),创建数据ID(根据yang文件生成),操作(put,merge,delete,read)。
WriteTransaction wt = HelloProvider.getDataBroker().newWriteOnlyTransaction();
InstanceIdentifier<Students> studentsIid = InstanceIdentifier.builder(StudentsData.class).child(Students
.class, new StudentsKey(input
.getNumber())).build();
Students students = new StudentsBuilder(input).build();
wt.put(LogicalDatastoreType.CONFIGURATION, studentsIid, students);
try {
wt.submit().checkedGet();
} catch (TransactionCommitFailedException e) {
LOG.error("addStudent error with exc:", e);
return Futures.immediateFuture(RpcResultBuilder.<Void>failed().withError(RpcError.ErrorType.RPC,
"addStudent fail !").build());
}
WriteTransaction wt=HelloProvider.getDataBroker().newWriteOnlyTransaction();
InstanceIdentifier<Students>studentsIid=InstanceIdentifier.builder(StudentsData.class).child(Students
.class,newStudentsKey(input
.getNumber())).build();
Students students=newStudentsBuilder(input).build();
wt.put(LogicalDatastoreType.CONFIGURATION,studentsIid,students);
try{
wt.submit().checkedGet();
}catch(TransactionCommitFailedExceptione){
LOG.error("addStudent error with exc:",e);
returnFutures.immediateFuture(RpcResultBuilder.<Void>failed().withError(RpcError.ErrorType.RPC,
"addStudent fail !").build());
}
官方提供两种提交请求方式:一是异步侦听提交状态 ListenableFuture,这个方式方便针对提交结果做不同业务处理。
Futures.addCallback( writeTx.submit(), new FutureCallback<Void>() {
public void onSuccess( Void result ) {
LOG.debug("Transaction committed successfully.");
}
public void onFailure( Throwable t ) {
LOG.error("Commit failed.",e);
}
});
Futures.addCallback(writeTx.submit(),newFutureCallback<Void>(){
publicvoidonSuccess(Voidresult){
LOG.debug("Transaction committed successfully.");
}
publicvoidonFailure(Throwablet){
LOG.error("Commit failed.",e);
}
});
二是阻塞提交 checkedGet(),这个方式是等待数据操作完成后,方法才返回,否则一直阻塞。
try {
writeTx.submit().checkedGet();
} catch (TransactionCommitFailedException e) {
LOG.error("Commit failed.",e);
}
try{
writeTx.submit().checkedGet();
}catch(TransactionCommitFailedExceptione){
LOG.error("Commit failed.",e);
}
我用的是第二种,大家根据自己的业务选择提交方式。
Rest:Container定义好之后会自动生成增删改查的数据接口,演示一下PUT接口。

PUT添加数据
Put是添加整个container的内容,会把之前的数据覆盖,如果是增量添加,用post。
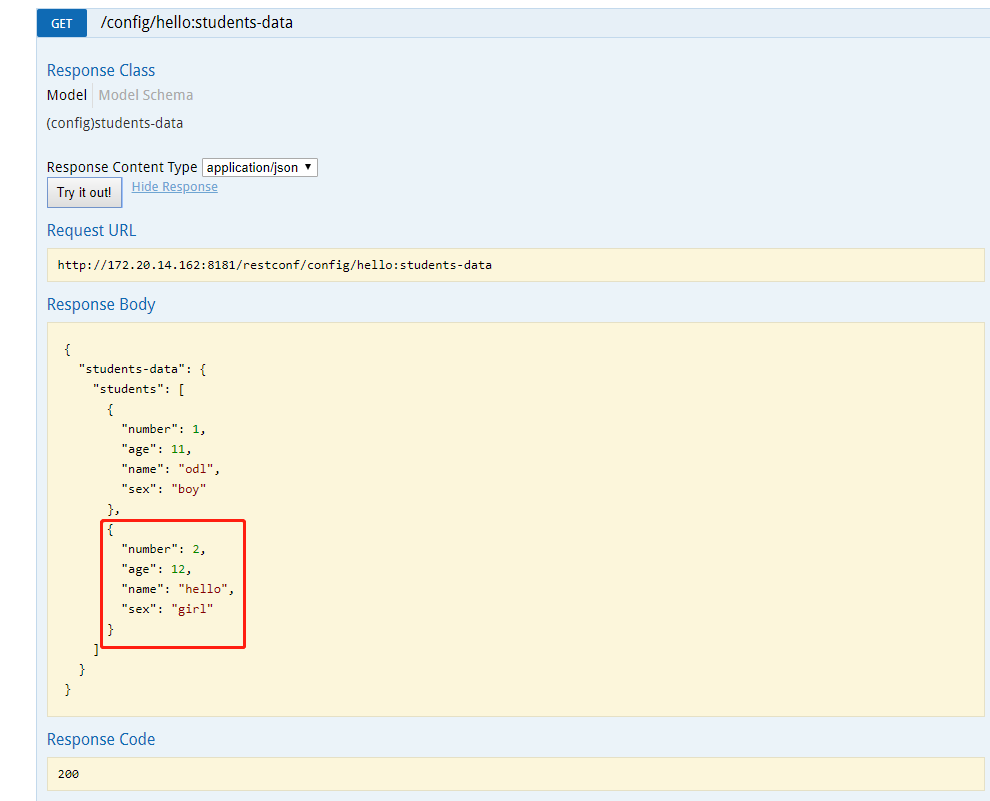
get:查看刚刚put的数据已经成功添加。
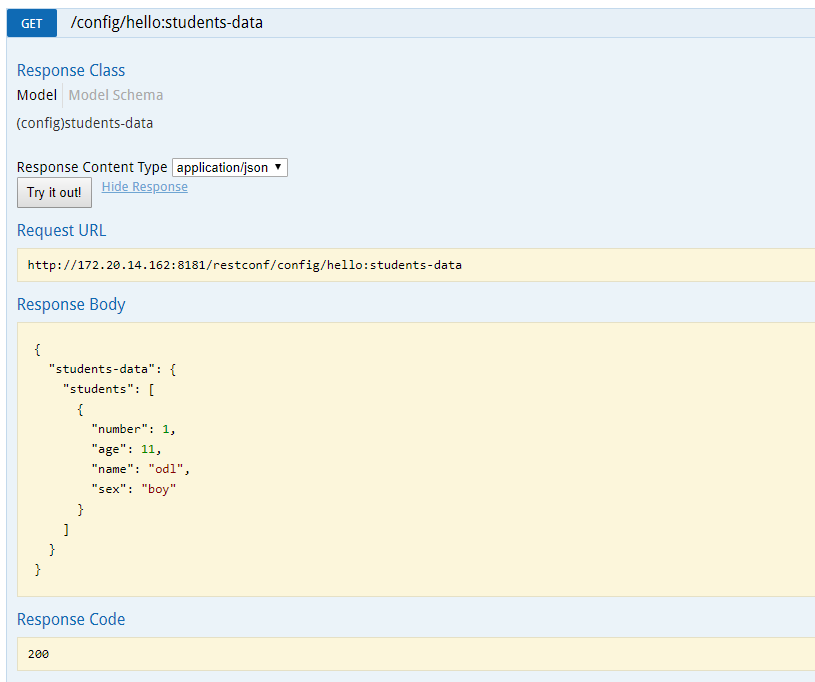
GET查询数据
2.3 RPC
Yang:功能是添加一个student的信息到数据库。
rpc add-student {
input {
uses student;
}
}
rpcadd-student{
input{
uses student;
}
}
Rpc的两个重要元素就是input和output,类似于方法的入参,返参。
这个rpc只有input,没有定义output。input和output都是可选的,两者都可以为空。
input复用了grouping student。前文有grouping的详细信息。
编译之后会生成rpc的service服务类:
public interface HelloService
extends
RpcService
{
@CheckReturnValue
Future<RpcResult<java.lang.Void>> addStudent(AddStudentInput input);
publicinterfaceHelloService
extends
RpcService
{
@CheckReturnValue
Future<RpcResult<java.lang.Void>>addStudent(AddStudentInput input);
Blueprint:
这里要先看一下rpc的实现类impl。这个impl类是用来专门实现rpc业务,不是yang自动生成的,需要我们自己定义。
/**
* @Description hello 实现rpc的类 消费者 Class Consumers Implementing RPC
* @Author
* @Date 2019/7/2 15:21
* @Version 1.0
**/
public class HelloImpl implements HelloService {
/**
* @Description hello 实现rpc的类 消费者 Class Consumers Implementing RPC
* @Author
* @Date 2019/7/2 15:21
* @Version 1.0
**/
publicclassHelloImplimplementsHelloService{
实现上节提到的yang文件生成的service服务类。
再看蓝图:创建rpc实现类impl的bean,然后注册rpc实现类服务。
<!--注册实现类并注入rpc服务 Register implementation classes and inject RPC services-->
<bean id="helloImpl" class="com.odl.hello.impl.HelloImpl"/>
<odl:rpc-implementation ref="helloImpl"/>
<!--注册实现类并注入rpc服务Register implementation classes andinject RPC services-->
<bean id="helloImpl"class="com.odl.hello.impl.HelloImpl"/>
<odl:rpc-implementation ref="helloImpl"/>
Impl:impl实现service之后,会自动生成重写rpc的方法。
只要在方法里实现需要的业务即可。
本示例是输入student信息然后添加到数据库。
/**
* @Description hello 实现rpc的类 消费者 Class Consumers Implementing RPC
* @Author
* @Date 2019/7/2 15:21
* @Version 1.0
**/
public class HelloImpl implements HelloService {
private static final Logger LOG = LoggerFactory.getLogger(HelloImpl.class);
/**
* RPC
* add student info to data-store
* 添加单个学生信息到数据库中
*
* @param input student info
* @return void
*/
@Override
public Future<RpcResult<Void>> addStudent(AddStudentInput input) {
WriteTransaction wt = HelloProvider.getDataBroker().newWriteOnlyTransaction();
InstanceIdentifier<Students> studentsIid = InstanceIdentifier.builder(StudentsData.class).child(Students
.class, new StudentsKey(input
.getNumber())).build();
Students students = new StudentsBuilder(input).build();
wt.put(LogicalDatastoreType.CONFIGURATION, studentsIid, students);
try {
wt.submit().checkedGet();
} catch (TransactionCommitFailedException e) {
LOG.error("addStudent error with exc:", e);
return Futures.immediateFuture(RpcResultBuilder.<Void>failed().withError(RpcError.ErrorType.RPC,
"addStudent fail !").build());
}
return Futures.immediateFuture(RpcResultBuilder.<Void>success().build());
}
1
2
3
4
5
6
7
8
9
10
11
12
13
14
15
16
17
18
19
20
21
22
23
24
25
26
27
28
29
30
31
32
33
34
/**
* @Description hello 实现rpc的类 消费者 Class Consumers Implementing RPC
* @Author
* @Date 2019/7/2 15:21
* @Version 1.0
**/
publicclassHelloImplimplementsHelloService{
privatestaticfinalLogger LOG=LoggerFactory.getLogger(HelloImpl.class);
/**
* RPC
* add student info to data-store
* 添加单个学生信息到数据库中
*
* @param input student info
* @return void
*/
@Override
publicFuture<RpcResult<Void>>addStudent(AddStudentInput input){
WriteTransaction wt=HelloProvider.getDataBroker().newWriteOnlyTransaction();
InstanceIdentifier<Students>studentsIid=InstanceIdentifier.builder(StudentsData.class).child(Students
.class,newStudentsKey(input
.getNumber())).build();
Students students=newStudentsBuilder(input).build();
wt.put(LogicalDatastoreType.CONFIGURATION,studentsIid,students);
try{
wt.submit().checkedGet();
}catch(TransactionCommitFailedExceptione){
LOG.error("addStudent error with exc:",e);
returnFutures.immediateFuture(RpcResultBuilder.<Void>failed().withError(RpcError.ErrorType.RPC,
"addStudent fail !").build());
}
returnFutures.immediateFuture(RpcResultBuilder.<Void>success().build());
}
Rest:调用添加学生信息的rpc

调用RPC
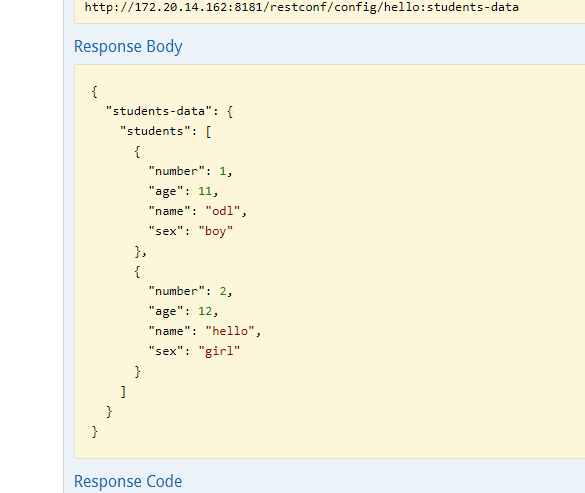
GET查看数据库,已成功添加。
查看RPC调用之后的数据库
2.4 datachangelistener
数据监听,有两类,三个动作:
两类:
- 普通监听DataTreeChangeListener 在集群环境中,数据库变化只有数据分片的主成员才能监听到。
- 集群监听ClusteredDataTreeChangeListener 在集群环境中,数据库变化所有成员都能监听到。
使用方法就是实现上述不同的监听服务类。本文演示的是普通监听。
三个动作:
- write 数据添加
- update 数据更新
- delete 数据删除
三个动作在开发中普通和集群监听没有区别。
Yang:无(要说有的话,只能勉强说是student container了,但实际上只是监听这个数据库,并不是说靠它创建监听)
Blueprint:无
Impl:
首先创建监听实现类实现监听服务类。
/**
* @Description 数据监听器 监听student数据库 Data listener listens on student database
* @Date 2019/7/31 9:44
* @Version 1.0
**/
public class HelloStudentDataListener implements AutoCloseable, DataTreeChangeListener<StudentsData> {
private static final Logger LOG = LoggerFactory.getLogger(HelloStudentDataListener.class);
private ListenerRegistration listenerRegistration;
public HelloStudentDataListener() {
this.init();
}
public void init() {
/**
* 实例化数据ID 并将其注册到ODL监听器中Instantiate the data ID and register it in the ODL listener
*/
DataTreeIdentifier<StudentsData> studentDataTreeChangeListener = new DataTreeIdentifier<>(LogicalDatastoreType.CONFIGURATION,
InstanceIdentifier.builder(StudentsData.class).build());
listenerRegistration = HelloProvider.getDataBroker().registerDataTreeChangeListener(studentDataTreeChangeListener, this);
LOG.info("HelloStudentDataListener init start.");
}
1
2
3
4
5
6
7
8
9
10
11
12
13
14
15
16
17
18
19
20
21
/**
* @Description 数据监听器 监听student数据库 Data listener listens on student database
* @Date 2019/7/31 9:44
* @Version 1.0
**/
publicclassHelloStudentDataListener implementsAutoCloseable,DataTreeChangeListener<StudentsData>{
privatestaticfinalLogger LOG=LoggerFactory.getLogger(HelloStudentDataListener.class);
privateListenerRegistration listenerRegistration;
publicHelloStudentDataListener(){
this.init();
}
publicvoidinit(){
/**
* 实例化数据ID 并将其注册到ODL监听器中Instantiate the data ID and register it in the ODL listener
*/
DataTreeIdentifier<StudentsData>studentDataTreeChangeListener=newDataTreeIdentifier<>(LogicalDatastoreType.CONFIGURATION,
InstanceIdentifier.builder(StudentsData.class).build());
listenerRegistration=HelloProvider.getDataBroker().registerDataTreeChangeListener(studentDataTreeChangeListener,this);
LOG.info("HelloStudentDataListener init start.");
}
创建监听注册listenerRegistration,然后使用它来注册监听的student数据库。
注意注册的动作是写在init方法里的,而init方法是构造方法调用的。上文说了blueprint并没有这块的配置,那构造方法是谁调用的呢?下面就说到provider类,由它来调用,或者说是初始化。
Provider 创建helloStudentDataListener对象。
public class HelloProvider {
private static final Logger LOG = LoggerFactory.getLogger(HelloProvider.class);
private HelloStudentDataListener helloStudentDataListener;
publicclassHelloProvider{
privatestaticfinalLogger LOG=LoggerFactory.getLogger(HelloProvider.class);
privateHelloStudentDataListener helloStudentDataListener;
然后在provider的init方法里做helloStudentDataListener对象的初始化。
Provider的init方法是蓝图调用的,这下就通顺了。
准备工作做完,最后看业务代码部分:
@Override
public void onDataTreeChanged(@Nonnull Collection<DataTreeModification<StudentsData>> changes) {
LOG.info("{} data tree changed.", getClass().getSimpleName());
for (final DataTreeModification<StudentsData> change : changes) {
final DataObjectModification<StudentsData> rootChange = change.getRootNode();
switch (rootChange.getModificationType()) {
case WRITE:
handleWrite(rootChange.getDataBefore(), rootChange.getDataAfter());
break;
case DELETE:
handleDelete(rootChange.getDataBefore(), rootChange.getDataAfter());
break;
case SUBTREE_MODIFIED:
handleSubtreeModify(rootChange.getDataBefore(), rootChange.getDataAfter());
break;
default:
handleSubtreeModify(rootChange.getDataBefore(), rootChange.getDataAfter());
}
}
}
1
2
3
4
5
6
7
8
9
10
11
12
13
14
15
16
17
18
19
20
@Override
publicvoidonDataTreeChanged(@NonnullCollection<DataTreeModification<StudentsData>>changes){
LOG.info("{} data tree changed.",getClass().getSimpleName());
for(finalDataTreeModification<StudentsData>change:changes){
finalDataObjectModification<StudentsData>rootChange=change.getRootNode();
switch(rootChange.getModificationType()){
caseWRITE:
handleWrite(rootChange.getDataBefore(),rootChange.getDataAfter());
break;
caseDELETE:
handleDelete(rootChange.getDataBefore(),rootChange.getDataAfter());
break;
caseSUBTREE_MODIFIED:
handleSubtreeModify(rootChange.getDataBefore(),rootChange.getDataAfter());
break;
default:
handleSubtreeModify(rootChange.getDataBefore(),rootChange.getDataAfter());
}
}
}
在实现监听服务类后重写监听方法。
方法入参是changes,其实就是数据的变化情况,它会带着变化前DataBefore和变化后DataAfter的数据。这里照着代码按上述说的三个监听动作,根据你的业务分别写上你的“数据变化引起的反应”就可以了。
这里我只写了一些日志。
Rest:不截图了,就是向数据库添加数据,用rpc或者container生成的接口都行。
添加后日志打印:

数据监听日志
演示是集群环境,这是主的日志。因为我用的是普通监听,所以其他成员没有反应。如果有想看集群监听效果的,可以自己改下试试。
2.5 notification
先说通知和数据监听的区别,两者都有监听类listen,但是通知还要定义发送publish。
数据监听是被动的监听数据,效率比较低,没有针对性。
通知是需要主动发出,然后再监听,效率高,有针对性。
比如说上文的student监听,如果业务上只需关注student的age属性变化,但是其他属性发生变化时依然能够监听到,然后不得不做一些判断,过滤。而通知只需要在发生变化时发送notification即可。
Yang:先说业务,发送一个学生告警的通知,接收到通知后将学生从数据库移除。
notification student-play-truant {
description "A student play truant has been detected";
leaf number {
type uint16;
}
leaf name {
type string;
}
leaf lesson {
type string;
}
leaf reason {
type string;
}
}
1
2
3
4
5
6
7
8
9
10
11
12
13
14
15
16
17
18
notificationstudent-play-truant{
description"A student play truant has been detected";
leafnumber{
type uint16;
}
leafname{
type string;
}
leaflesson{
type string;
}
leafreason{
type string;
}
}
编译后生成监听服务类HelloListener。
blueprint:
发送通知部分:
在蓝图中先引用声明通知发送服务。
<reference id="notificationPublishService"
interface="org.opendaylight.controller.md.sal.binding.api.NotificationPublishService"
odl:type="default"/>
<reference id="notificationPublishService"
interface="org.opendaylight.controller.md.sal.binding.api.NotificationPublishService"
odl:type="default"/>
将发送服务加到provider的bean。
通知发送服务
和databroker一样,对应的在provider类中作为构造方法参数。

provider中通知发送服务
接收通知部分:
和rpc类似,先定义接收通知的类并实现上文提到的HelloListener。
/**
* @Description HelloNotificationListener 接收通知的类 Classes that receive notifications
* @Author
* @Date 2019/7/3 9:13
* @Version 1.0
**/
public class HelloNotificationListener implements HelloListener {
/**
* @Description HelloNotificationListener 接收通知的类 Classes that receive notifications
* @Author
* @Date 2019/7/3 9:13
* @Version 1.0
**/
publicclassHelloNotificationListenerimplementsHelloListener{
定义接收通知的bean,对应上文的接收通知类,并引用通知监听服务。
<!--注册接收通知的类,并注入notification服务 Register the class that receives notifications and inject notification services-->
<bean id="helloNotificationListener" class="com.odl.hello.impl.HelloNotificationListener"/>
<odl:notification-listener ref="helloNotificationListener"/>
<!--注册接收通知的类,并注入notification服务Register the classthat receives notifications andinject notification services-->
<bean id="helloNotificationListener"class="com.odl.hello.impl.HelloNotificationListener"/>
<odl:notification-listener ref="helloNotificationListener"/>
Impl:
发送通知部分:
发送通知的服务上文已经说明在provider类中定义,只需要在业务代码调用notificationPublishService对象发送通知信息就可以了。
本文定义了一个rpc专门用于发送通知,注意这个rpc不是必要的,通知在哪里发送都可以,这里只是为了方便演示。
/**
* notification
* publishStudentNotification
* 发布学生逃课的信息
*
* @param input NotificationInfo
* @return void
*/
@Override
public Future<RpcResult<Void>> publishStudentNotification(PublishStudentNotificationInput input) {
StudentPlayTruant studentPlayTruant = new StudentPlayTruantBuilder()
.setLesson(input.getLesson())
.setName(input.getName())
.setNumber(input.getNumber())
.setReason(input.getReason())
.build();
HelloProvider.getNotificationPublishService().offerNotification(studentPlayTruant);
return Futures.immediateFuture(RpcResultBuilder.<Void>success().build());
}
1
2
3
4
5
6
7
8
9
10
11
12
13
14
15
16
17
18
19
/**
* notification
* publishStudentNotification
* 发布学生逃课的信息
*
* @param input NotificationInfo
* @return void
*/
@Override
publicFuture<RpcResult<Void>>publishStudentNotification(PublishStudentNotificationInput input){
StudentPlayTruant studentPlayTruant=newStudentPlayTruantBuilder()
.setLesson(input.getLesson())
.setName(input.getName())
.setNumber(input.getNumber())
.setReason(input.getReason())
.build();
HelloProvider.getNotificationPublishService().offerNotification(studentPlayTruant);
returnFutures.immediateFuture(RpcResultBuilder.<Void>success().build());
}
接收通知部分:
实现HelloListener,重写监听方法,根据收到的学生逃课信息,将其从数据库中删除。
/**
* receive notification
* 收到学生缺课的通知 将其从数据库中移除
*
* @param notification play truant
*/
@Override
public void onStudentPlayTruant(StudentPlayTruant notification) {
WriteTransaction wt = HelloProvider.getDataBroker().newWriteOnlyTransaction();
InstanceIdentifier<Students> studentsIid = InstanceIdentifier.builder(StudentsData.class).
child(Students.class, new StudentsKey(notification.getNumber())).build();
wt.delete(LogicalDatastoreType.CONFIGURATION, studentsIid);
try {
wt.submit().checkedGet();
} catch (TransactionCommitFailedException e) {
LOG.error("onStudentPlayTruant error exc:", e);
}
}
}
1
2
3
4
5
6
7
8
9
10
11
12
13
14
15
16
17
18
19
/**
* receive notification
* 收到学生缺课的通知 将其从数据库中移除
*
* @param notification play truant
*/
@Override
publicvoidonStudentPlayTruant(StudentPlayTruant notification){
WriteTransaction wt=HelloProvider.getDataBroker().newWriteOnlyTransaction();
InstanceIdentifier<Students>studentsIid=InstanceIdentifier.builder(StudentsData.class).
child(Students.class,newStudentsKey(notification.getNumber())).build();
wt.delete(LogicalDatastoreType.CONFIGURATION,studentsIid);
try{
wt.submit().checkedGet();
}catch(TransactionCommitFailedExceptione){
LOG.error("onStudentPlayTruant error exc:",e);
}
}
}
Rest:
先看操作前的数据
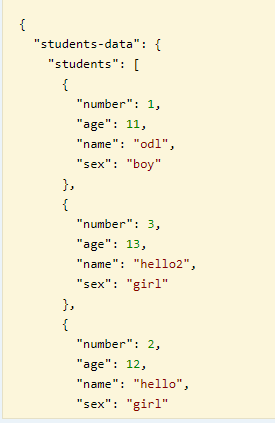
发送通知前数据
发送number3学生的逃课信息。
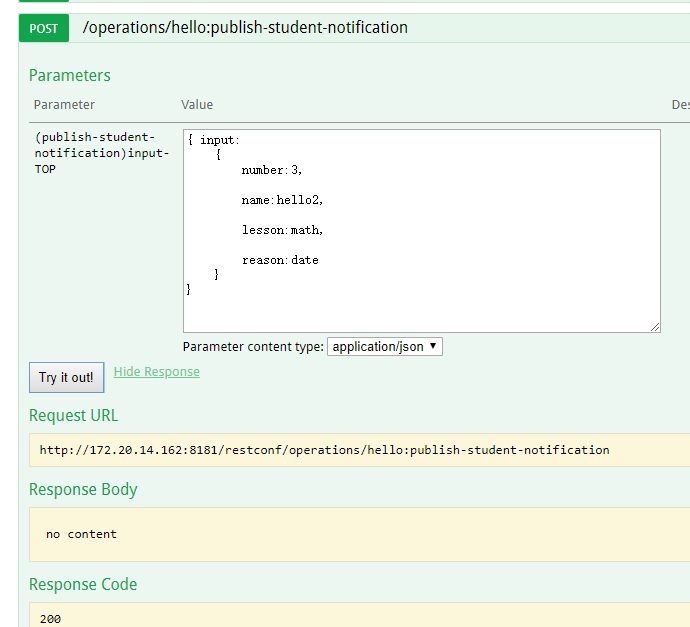
调用发送通知的RPC
再查看数据库,数据库已被删除,说明通知发送并处理成功。
发送通知后数据
2.6 remote-rpc
远程rpc的作用:在集群环境中,北向一般会集成HA提供一个VIP供前端或者用户使用,发送的请求到达哪台集群节点是根据算法随机的。如果是想访问一台特定节点的接口怎么办?
这里就可以使用remote-rpc了,给每个节点一个id,访问的时候把id带上,请求不论发给哪个节点,最后业务都会routed到指定节点处理。
官方的controller指导手册中称为routed RPC,并讲解了开发流程。但是看着没有代码那么清晰,我是参照samples中的实例来写的。
Yang:定义特有的属性作为节点“id”。
identity controller-ip {
description "A controller-ip is a classifier for member elements which allows an RPC to provide a service on behalf of a particular element in the data tree.";
}
identitycontroller-ip{
description"A controller-ip is a classifier for member elements which allows an RPC to provide a service on behalf of a particular element in the data tree.";
}
定义属性的新类型,类型是数据库的路径IID(instance-identifier)。
typedef member-ip-ref {
type instance-identifier;
description "A reference that points to an hello:controller-ips/controller-ip-list in the data tree.";
}
typedefmember-ip-ref{
type instance-identifier;
description"A reference that points to an hello:controller-ips/controller-ip-list in the data tree.";
}
节点属性列表数据库
container controller-ips {
description "Top-level container for all controller";
list controller-ip-list {
key "ip";
leaf ip {
type string;
}
}
}
containercontroller-ips{
description"Top-level container for all controller";
listcontroller-ip-list{
key"ip";
leafip{
type string;
}
}
}
远程rpc,input类型是引用了刚刚定义的新类型。Output随意。
rpc remote-call{
input {
leaf controller-ip {
ext:context-reference "controller-ip";
type member-ip-ref;
}
}
output {
leaf msg {
type string;
}
}
}
rpcremote-call{
input{
leafcontroller-ip{
ext:context-reference"controller-ip";
type member-ip-ref;
}
}
output{
leafmsg{
type string;
}
}
}
Ext的作用:官方解释是为了定义路由RPC 的在数据树中的概念位置,需要使用context- reference(原文是context-instance)yang-ext模型的扩展进行建模。这里“controller-ip”要和identity controller-ip对应。更多解释可以参阅官方文档controller,文末有链接。
Blueprint:
远程rpc还在写在之前的rpc类helloImpl里,这里要单独注入远程rpc。
Provider类中声明远程rpc注册对象,并放到provider的bean中。

蓝图中远程rpc注册服务
Impl:
远程rpc的注册,Provider类中声明rpcRegistration。
private BindingAwareBroker.RoutedRpcRegistration<HelloService> rpcRegistration;
privateBindingAwareBroker.RoutedRpcRegistration<HelloService>rpcRegistration;
在初始化方法中通过rpcRegistration注册节点特殊属性“id”。也就是将当前节点的IP作为自己的key进行注册。
两个参数:类是yang中定义的identity,对象就是就是数据逻辑路径。
本地ip的获取是通过properties配置文件读取的,文件存放在hello-karaf的config文件中。
localIp = Property.getProperties(IP_PATH).getOrDefault(IP, "");
final InstanceIdentifier.InstanceIdentifierBuilder<ControllerIpList> controllerIpListIID =
InstanceIdentifier.builder(ControllerIps.class).child(ControllerIpList.class, new ControllerIpListKey
(localIp));
final InstanceIdentifier<ControllerIpList> controllerIpIID = controllerIpListIID.build();
rpcRegistration.registerPath(ControllerIp.class, controllerIpIID);
localIp=Property.getProperties(IP_PATH).getOrDefault(IP,"");
finalInstanceIdentifier.InstanceIdentifierBuilder<ControllerIpList>controllerIpListIID=
InstanceIdentifier.builder(ControllerIps.class).child(ControllerIpList.class,newControllerIpListKey
(localIp));
finalInstanceIdentifier<ControllerIpList>controllerIpIID=controllerIpListIID.build();
rpcRegistration.registerPath(ControllerIp.class,controllerIpIID);
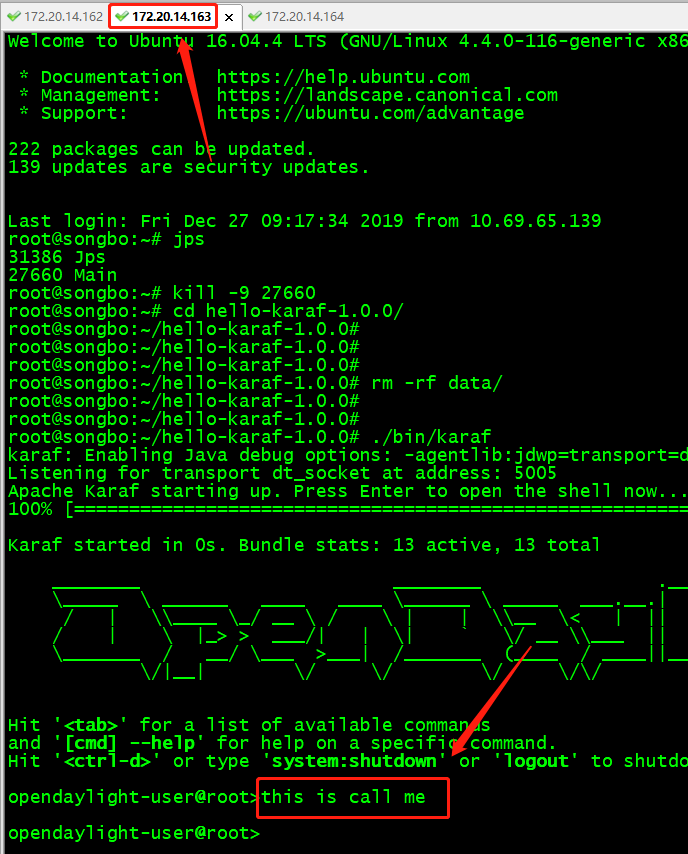
到这里,相当于准备工作已经完成。最后说最简单的业务代码。打印日志,然后返回带有当前节点IP的返回信息。
@Override
public Future<RpcResult<RemoteCallOutput>> remoteCall(RemoteCallInput input) {
System.out.println("this is call me");
LOG.info("this is call me");
RemoteCallOutput remoteCallOutput = new RemoteCallOutputBuilder()
.setMsg("hello remote call. This is"+HelloProvider.localIp)
.build();
return Futures.immediateFuture(RpcResultBuilder.<RemoteCallOutput>success().withResult(remoteCallOutput)
.build());
}
@Override
publicFuture<RpcResult<RemoteCallOutput>>remoteCall(RemoteCallInput input){
System.out.println("this is call me");
LOG.info("this is call me");
RemoteCallOutput remoteCallOutput=newRemoteCallOutputBuilder()
.setMsg("hello remote call. This is"+HelloProvider.localIp)
.build();
returnFutures.immediateFuture(RpcResultBuilder.<RemoteCallOutput>success().withResult(remoteCallOutput)
.build());
}
Rest:
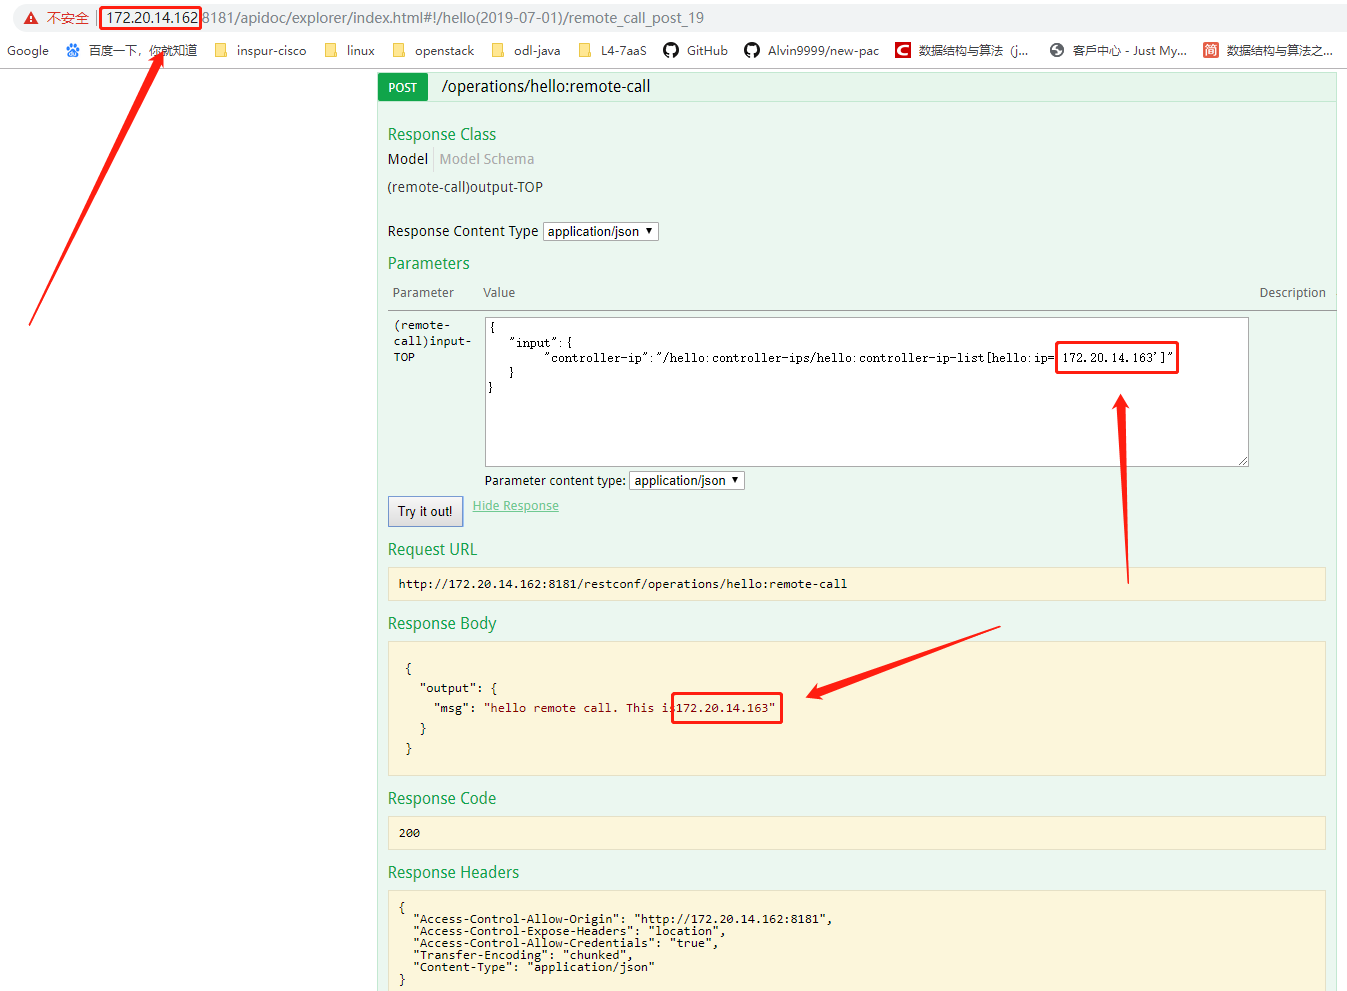
调用远程RPC
远程RPC日志打印
可以看到,我使用的是162节点的rest,发送的IID参数是163。执行的结果返回是163,业务日志也是打印在163的控制台。说明remote(routed)rpc请求成功。
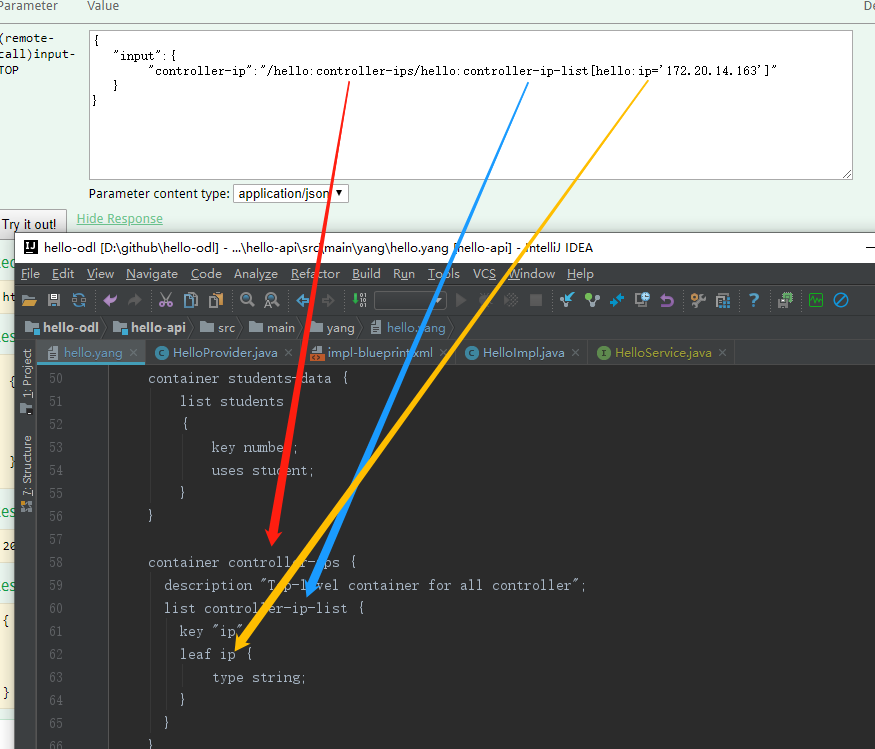
其他:解释一下远程rpc的 input参数。
{
"input":{
"controller-ip":"/hello:controller-ips/hello:controller-ip-list[hello:ip='172.20.14.163']"
}
}
{
"input":{
"controller-ip":"/hello:controller-ips/hello:controller-ip-list[hello:ip='172.20.14.163']"
}
}
其实就是数据路径。
hello是yang文件的名字,后面依次属性关系看下图:
input和container关系
项目编译完之后,ODL包在hello-karaf的target目录下。但是包内不包含集群配置脚本和ip.properties文件,我单独把它放在了hello-karaf的config文件夹中。编译之后记得把两个集群配置文件放进odl的bin目录。ip.properties放在odl的etc目录。

集群配置文件
集群配置方法:环境是162.163.164 分别作为集群节点1.2.3
配置方法是:节点编号 + 按顺序的排列IP。
在162节点:
./configure_cluster.sh 1 172.20.14.162 172.20.14.163 172.20.14.164
在163节点:
./configure_cluster.sh 2 172.20.14.162 172.20.14.163 172.20.14.164
在164节点:
./configure_cluster.sh 3 172.20.14.162 172.20.14.163 172.20.14.164
到此,所有内容讲解结束。(feature,karaf实在说不动了,feature已经精简到一个,应该非常好理解了,望谅解。)
讲解还是比较偏向新手同学的,没有特别专业的解释,也没有太多原理性的东西。说的错误和有争议的地方希望大家指正,讨论。
最后希望大家在阅读后都能有所收获,谢谢!
相关链接:
本文示例项目Github地址:
https://github.com/willsongbo/hello-odl
Yang rfc7950:
https://tools.ietf.org/pdf/rfc7950.pdf
osgi-blueprint:
http://aries.apache.org/documentation/tutorials/blueprinthelloworldtutorial.html
ODL官方Controller文档:
https://docs.opendaylight.org/en/stable-nitrogen/developer-guide/controller.html
ODL官方开发指导文档:
https://docs.opendaylight.org/en/stable-oxygen/developer-guide/developing-apps-on-the-opendaylight-controller.html
ODL官方集群配置指导文档:
https://docs.opendaylight.org/en/stable-neon/getting-started-guide/clustering.html
<reference id="dataBroker"
interface="org.opendaylight.controller.md.sal.binding.api.DataBroker"
odl:type="default"/>
<reference id="dataBroker"
interface="org.opendaylight.controller.md.sal.binding.api.DataBroker"
odl:type="default"/>

