

My App Crashed, Now What? [FREE]
source link: https://www.raywenderlich.com/6334294-my-app-crashed-now-what
Go to the source link to view the article. You can view the picture content, updated content and better typesetting reading experience. If the link is broken, please click the button below to view the snapshot at that time.
Update note : Ehab Amer updated this tutorial for iOS 13, Xcode 11 and Swift 5.1. Matthijs Hollemans wrote the original.
App crashes are a natural part of the development cycle. The challenge is to understand the real reason behind the crash and apply the proper fix, not just hide the crash.
In this tutorial, you’ll look at some crash examples, investigate them, understand why they happened and, finally, fix them once and for all.
Before you get started, it’s valuable to know some details about Swift so you understand more about the errors you face:
- Swift uses static typing , meaning the compiler knows the type of a value at compile time.
- It ensures you initialize variables before using them.
-
It also notifies you of possible
nilvalues and makes sure you’re aware of how you use them in your code.
You’ll understand more about these points as you fix the project. Now, it’s time to get busy.
Getting Started
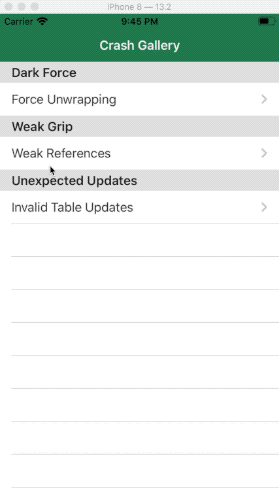
Download the starter project for this tutorial by using the Download Materials button at the top or bottom of this page. You’ll find a project called CrashGallery .
The project shows some common scenarios that cause your app to crash. It’s built specifically to demonstrate these scenarios and help you understand them.
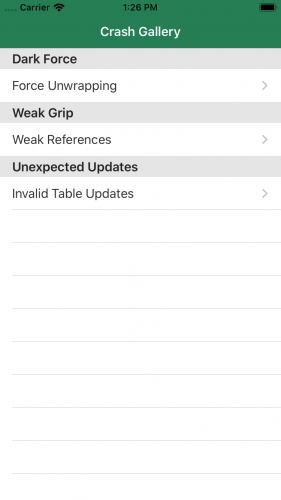
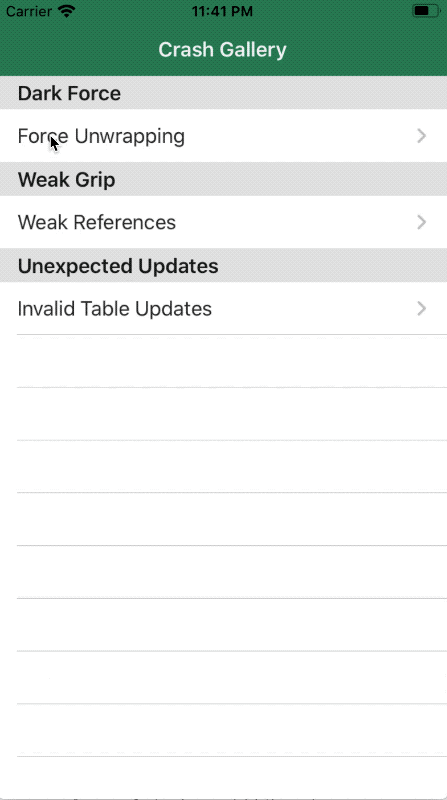
The gallery has three exhibits on display with different crash scenarios:
-
Force Unwrapping
: Shows some cases of improper use of
nilvalues. - Weak References : Explains the reference chain in your UI from the storyboard and how you could accidentally break the reference chain and crash the app.
-
Invalid Table Updates
: Shows an example of a common logical discrepancy with
UITableViewthat will crash your app.
You’re going to work through each of these crash scenarios to learn how to find them and how to fix them when you do. But before you start looking at crashes and their causes, take a moment to review three important tools to help you track down crashes when they happen.
Tools to Help You Fix and Resolve Crashes
Pinpointing the cause of a crash can be tricky. Luckily, there are some helpful tools that make this job much easier. Your first step in this tutorial is to get to know three of the most important.
Breakpoints
The first handy tool you’ll cover is breakpoints , which make your app pause its execution on a specified line so you can investigate the status of the objects at that point.
To create a breakpoint on any line, simply click on the line number in your source file where you want the execution to stop.
But what if you’re not sure which line you should look at?
Whenever an app that ran from Xcode crashes, the debugger shows you the line that crashed. Sometimes, however, that line won’t be meaningful. There’s another kind of breakpoint that’s handy for situations like this: the exception breakpoint .
The exception breakpoint automatically stops the app when a crash happens and shows you the line that caused it. Now, that’s not always the line you need to fix. The crash might be due to a mistake a few lines earlier, but this line is where the app says “Hey… I can’t proceed anymore.”
To add an exception breakpoint, open the Debug navigator and click the + in the navigator’s lower left corner. Choose Exception Breakpoint… from resulting menu. Click anywhere outside the resulting dialog to set the breakpoint.
Note : Exception breakpoints are triggered by things going wrong in the Objective-C runtime, which in most cases means things internal to UIKit. Most Swift crashes will make the debugger stop on the actual line you’re looking for.
Console Log
The Console Log
is at the bottom of the Xcode window. It’ll display plenty of useful logs while the app is running. Whenever your app crashes, you’ll find a log message that contains information on the nature of the crash, whether it was an index out of range exception, a nil
reference or something else.
The log also contains information on warnings, so pay attention to it even if your app isn’t crashing. It could highlight something that can help you make your app better. :]
This window will be completely empty while the app isn’t running. It’ll start showing logs when you run the app.

Variables View
The third valuable tool for investigating crashes is the Variables View . Similar to the Console Log , it’ll be completely empty when the app isn’t running — but it’ll also stay empty when your app is executing.
The view will only show the values of the variables in the current scope when your execution pauses, which goes hand-in-hand with breakpoints .

The Console Log also shows the values of variables, but the Variables View is more visual and shows you all the variables instead of just one. It’s more useful in many cases, so it’s good to be familiar with both.

Console Log printing the value of a variable that is also present in the Variables View.
Variables View can show more than just text information. It can show the visual content of a UI element.
Now that you know the tools you need to fix this broken app, build and run the starter app and take a look at the first exhibit.
The Infamous nil
Swift introduced optionals , which mean an object or an expression may have a value, or it may not. You can’t assume that you’ll always have a value. This is the most common reason for your app to crash.
In the first exhibit, you’ll see some of these situations, but it’s good to understand first what Xcode has to offer to help you identify where your crashes are, what’s happening and why. That’s quite a bit of detective work. :]
Exhibit A: Dark Force – Force Unwrapping
Build and run the app, then open the first item — titled Force Unwrapping — in the gallery screen.
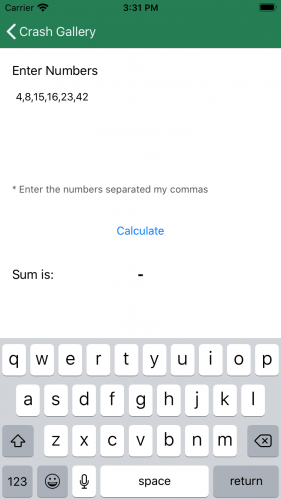
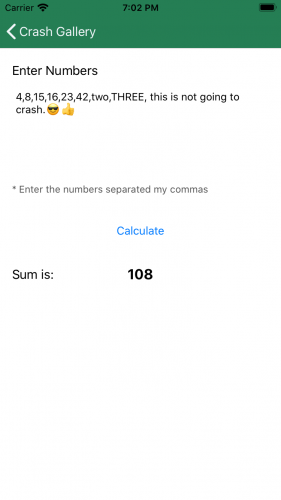
This screen’s task is to compute the sum of the numbers written at the top. The top text view has numbers from the television show “ Lost ” entered and separated by commas.
The sum of the numbers will appear on the screen when you tap the Calculate button. Give it a shot.
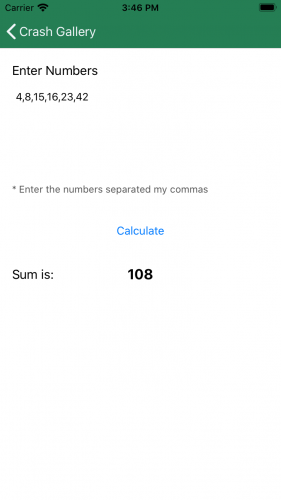
Great, so it works as you intended. Now, play around with it and add ,two
at the end of the numbers sequence:

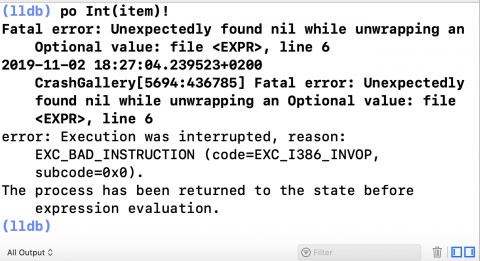
Tap Calculate and see what happens… It crashes.
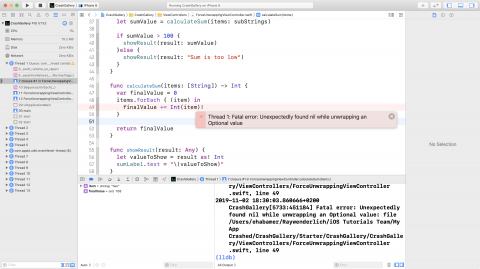
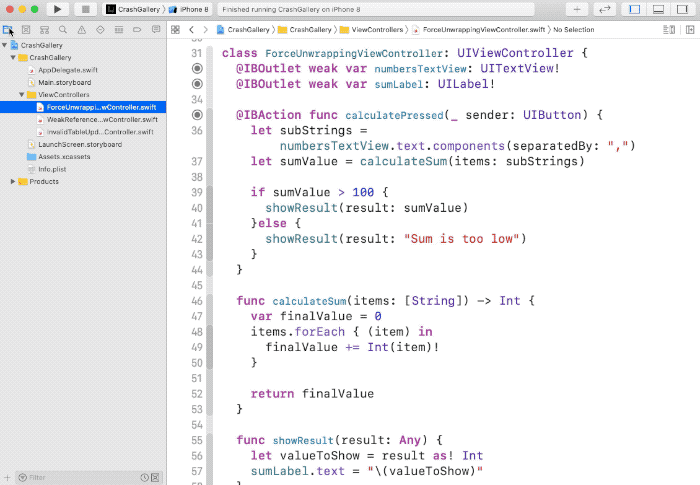
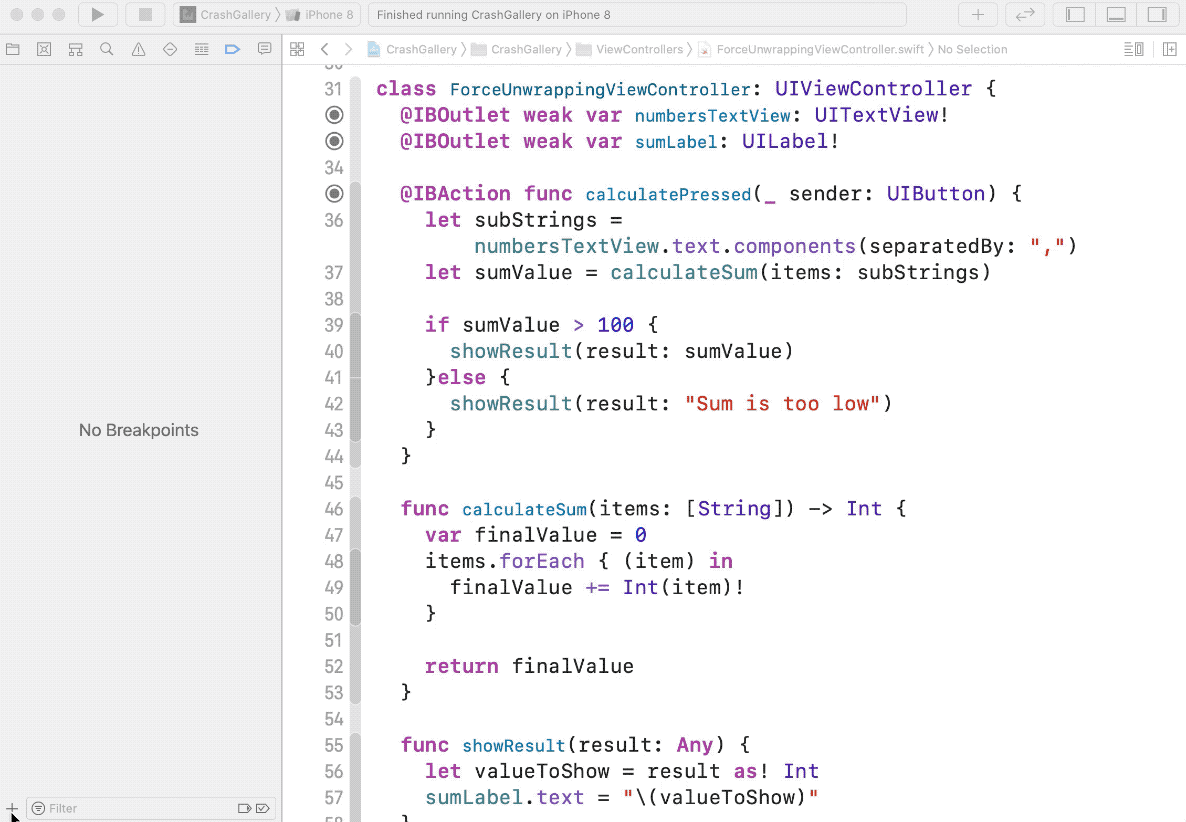
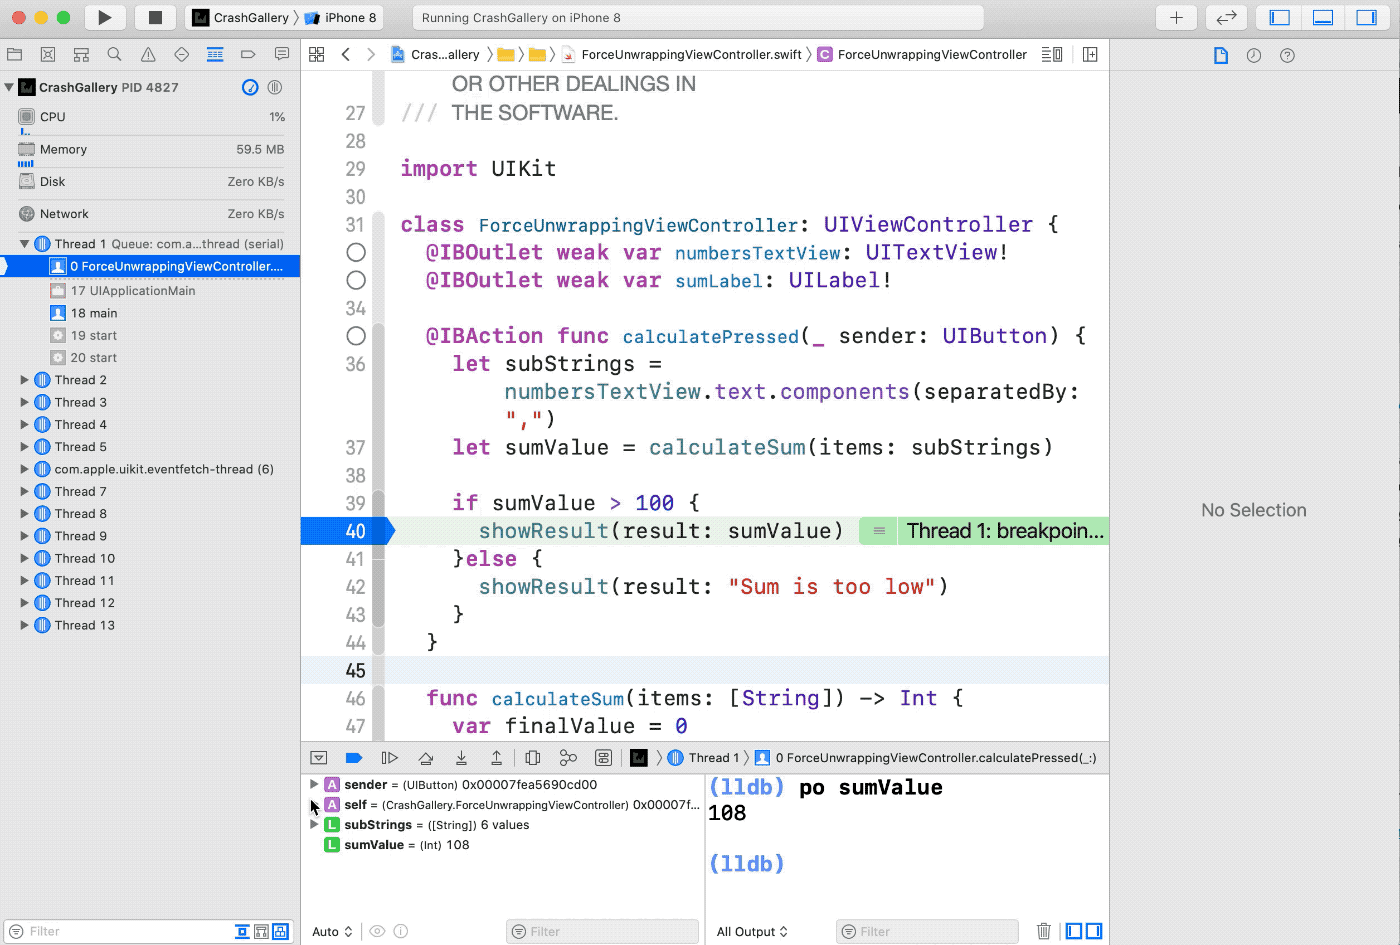
The crash is in ForceUnwrappingViewController.swift on line number 49. Have a look at what Xcode shows you — there’s a red highlight on the line that triggered the crash.
The Console Log
has information on the crash and the Variables View
shows the values of item
and finalValue
within the scope of calculateSum(items:)
.
The value of item
is "two"
, so when you converted it to an Int
it failed, giving a nil
value. The force unwrapping by the !
operator caused the crash.
Proving Your Case
Don’t take this as a fact; question it and make sure that’s really what caused the crash. When you fix a crash, you don’t want to do it by trial and error. You want to be 110% sure you’re fixing what’s broken.
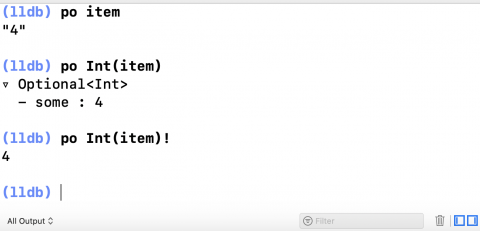
To test your theory, type this command in the Console Log :
po Int(item)
The po
command you entered before the expression stands for print object
, which is an LLDB command to print the description of an object. You can also use p
, but the result in the console will look slightly different.
The console output will be nil :
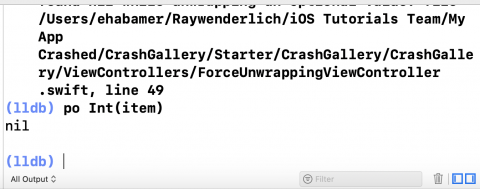
So Int(item)
is nil
, and when you execute po Int(item)!
you get some additional information.
This result is the same as the error written on the crash, so you’re definitely right about the source of the crash.
But wait! How does it work for the other values?
Add a breakpoint on the same line that caused the crash and restart the app. Remember to write ,two
before you calculate the sum.
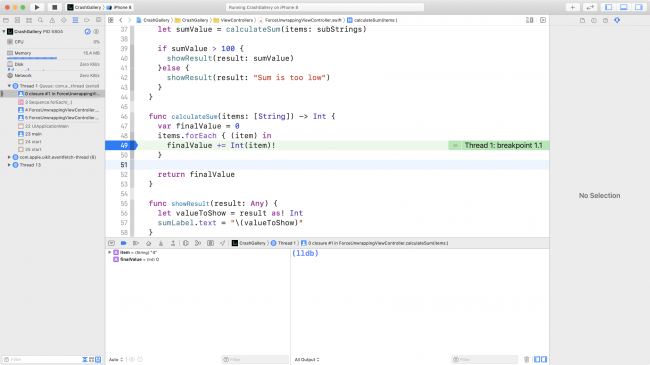
The value of item
on the breakpoint is 4
and the result of Int(item)
gives a value instead of nil
.
Finding the Right Solution
Int(_:)
worked when the value of item
is 4
, but it won’t work when it’s two
. In other words, it works when the value is a string
with numeric digits, but not with alphabetical letters, even when they form the name of the number.
To fix this crash, replace the following line of code in calculateSum(items:)
:
finalValue += Int(item)!
With this block of code:
if let intValue = Int(item) {
  finalValue += intValue
}
The code above checks that the result of Int(item)
isn’t nil
before using it, which makes it safe from crashes.
Disable the breakpoint by clicking on the blue arrow and it will become semi-transparent blue. Build and run and add any kind of text you want in the text field after the numbers.
It doesn’t crash anymore, but is it completely fixed? Instead of adding the numbers, delete the last one and try again.
The app crashed again in ForceUnwrappingViewController.swift on line 58.
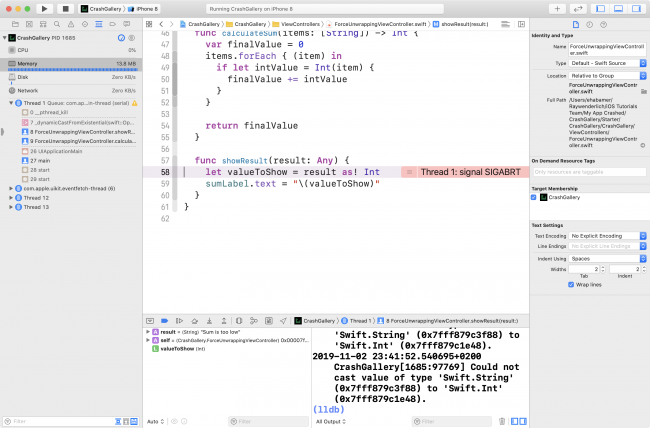
The relevant message from the log is:
Could not cast value of type 'Swift.String' (0x7fff879c3f88) to 'Swift.Int' (0x7fff879c1e48).
The crashing line is forcing a cast on result
as an Int
, while the value you provided is a String
. That means valueToShow
is nil
and when you force unwrap it, the app crashes, similar to the crash above that you have already fixed.
calculateSum(items:)
will only show the sum if the total is more than 100. Otherwise, the message should be “Sum is too low”
.
This is a straightforward fix. Replace the code inside showResult(result:)
with this block of code:
if let intValue = result as? Int {
  sumLabel.text = "\(intValue)"
} else if let stringValue = result as? String {
  sumLabel.text = stringValue
}
Here, you check if you can cast result
to an Int
, then create a String
of its value and add it to the label. You use the value as it is if you can cast it to a String
.
Build and run. You’ll see the error message, “Sum is too low” when the total is below 100.
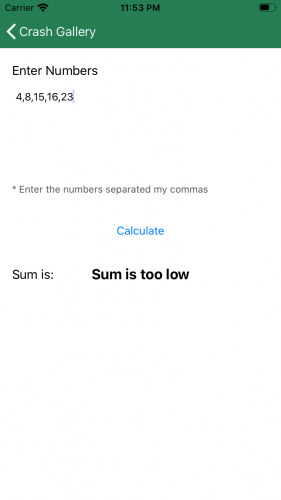
Exhibit B: Weak Grip — Weak References
The second crash you’re going to fix involves an unusual way of showing and hiding views.

The Weak References screen is a simple form with two steps, where the second step is only active if the answer to the first question is “yes.”
Note : There are many ways you can achieve the same result other than the one shown in this app. The intention is to show a made-up scenario that causes a crash, not to make a form that works well.
When you turn off the switch, the second question disappears, but when you turn it on again… there’s the crash.
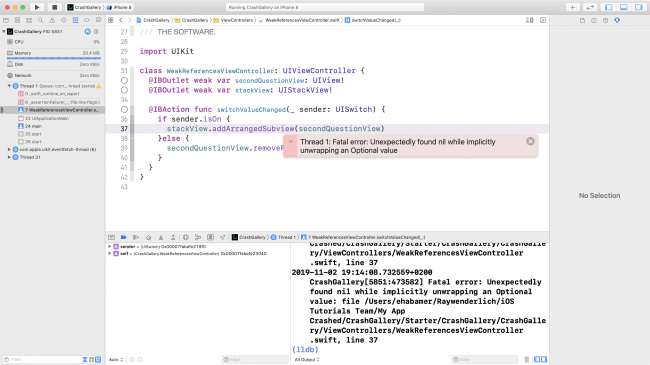
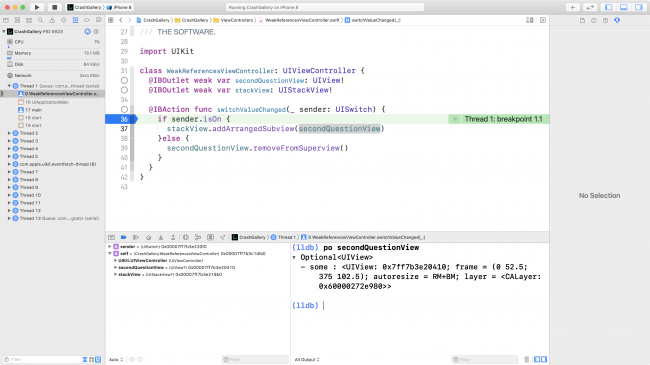
The app crashed in WeakReferencesViewController.swift line 37.
WeakReferencesViewController
has three items:
-
An
IBOutletto thestackView. -
An
IBOutletto thesecondQuestionView. -
An
IBActiontoswitchValueChanged(_:), where you change the value of the switch to remove thesecondQuestionViewor to add it back at the bottom of thestackView.
There are two ways to figure out why Xcode is showing nil
: Explore the values from the Variables View
or check the values of the two variables found on the crashing line from the Console Log
.
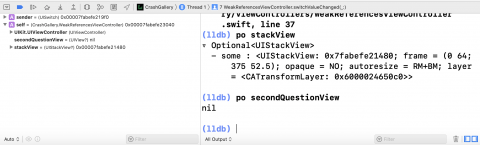
From what the debugger output says, the value of secondQuestionView
is nil
, but why? Add a breakpoint on the first line of switchValueChanged(_:)
and restart the app to start investigating.
Build and run.
secondQuestionView
isn’t nil
when you turn off the switch. However, when you turn it on again after the view disappears, it’s already nil
.
Understanding the Crash
The reason for that is because of the reference chain
in UIKit
. Each view has a strong reference
to the subviews presented inside it. As long as secondQuestionView
is in the on-screen view hierarchy, something will be holding a strong reference to it.
So when you removed the secondQuestionView
from its superview, you broke that tie. And looking at the IBOutlet
definition of secondQuestionView
, you’ll find it’s marked as weak
. Thus, it deallocated from memory and its reference changed to nil
since no one was holding it to prevent it from doing so.
Once you remove the weak
keyword from the secondQuestionView
declaration, the crash will disappear. You can do the same for stackView
as a precaution, but it will have no effect on the crash since you never remove the stackView
from the superview.
Remove the weak
keywords, then build and run to try the scenario again.
You’ll see that the form works fine now. The view appears and disappears as required.
Exhibit C: Unexpected Updates — Invalid Table Updates
The third crash is slightly different from the previous ones. It’s more of a data mismatch.
Open the third item, called Invalid Table Updates , on the gallery screen to start your investigation.
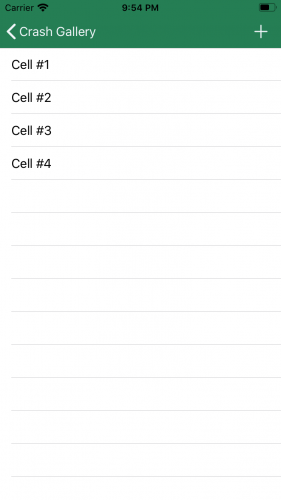
This screen has a table view with four cells. Each cell has its number written on it. There’s also a small button in the top-right corner to add more cells.
Go ahead and press that button. As you may have expected, there’s a crash. But… which line is crashing? And what’s all that in the log?
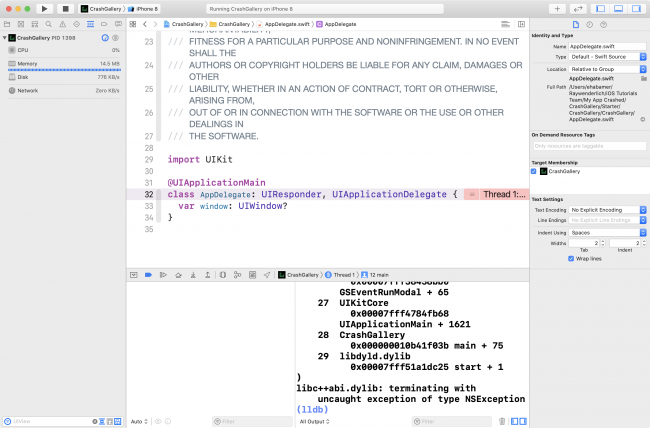
Xcode stopped in AppDelegate.swift on line 32.
Add an exception breakpoint to your project, then build and run to see the difference.

This time, Xcode stopped in InvalidTableUpdatesViewController.swift on line 37. The log is empty and has no information provided because the breakpoint stopped right before the exception happened. This is a different kind of crash than the previous ones.
When you press the Continue button, Xcode will return to the class declaration line in AppDelegate.swift and the log will have the crash information.

The log contains information about the crash and the stack trace information for when the crash happened. Most of the time, you won’t need the stack trace information when you are debugging from Xcode and have your exception breakpoint enabled. Take a look at the crash information.
*** Terminating app due to uncaught exception 'NSInternalInconsistencyException', reason: 'attempt to insert row 4 into section 0, but there are only 4 rows in section 0 after the update.
A Wider View of the Problem
Before checking the line of the crash itself, you should understand the purpose of addPressed()
. The three lines do the following:
-
Create an
IndexPathobject after the last row in section0. Index 4 represents the fifth item, since indices start from 0. -
Tell the
tableViewto insert a new row atnewIndex. -
Add the new row to the
itemsListdata source array.
First, look at the flow: It makes sense and it’s correct. But Xcode just told you that it’s not. So what’s wrong with it?
Narrowing Down the Problem
The exception breakpoint stopped at the second line, so the app didn’t add the new row to itemsList
. At this point, it seems like a straightforward fix — add the new item to the itemsList
before inserting it in the tableView
. It helps to understand more about the line that caused the crash.
Make sure you’ve enabled the exception breakpoint, then build and run and open the same screen again.
Open InvalidTableUpdatesViewController.swift
and add breakpoints on line 37, which caused the crash, and on line 44, which is the return
of tableView(_:numberOfRowsInSection:)
. Press the Add
button so the app stops on the first breakpoint, then press Continue
. Now, look at the call stack on the left:

Notice that insertRows(at:with:)
made a call internally to tableView(_:numberOfRowsInSection:)
to check the new size of itemsList
. Since itemsList
hadn’t updated yet, the tableView
didn’t find anything added to it which put it in an inconsistent state.
In other words, you told the tableView
there’s a new item, but the tableView
didn’t find that itemsList
grew.
This is a proof of the table view’s behavior. Move the line of code where you add the item to itemsList
, between the other two lines. addPressed()
should now look like this:
@IBAction func addPressed() {
  let newIndex = IndexPath(row: itemsList.count, section: 0)
  itemsList.append((itemsList.last ?? 0) + 1)
  tableView.insertRows(at: [newIndex], with: .automatic)
}
This updates the data source before updating the view. Build and run, then press the Add button to see if everything works:

Awesome, now you’ve fixed all three screens in the app. But there’s still one more point about app crashes you should know about.
Assertions
Assertions are manually-triggered crashes you can insert into your own code. The obvious question that comes to mind is: Why would you write code to crash your own app?
That’s a very good question. However illogical it may seem, you’ll understand why this is helpful in a moment. :]
Imagine you’re writing a complicated piece of code, and there are some flows in your logic that no one should reach because reaching them means something fatally wrong has happened.
These situations are ideal for assertions . They’ll help you, or anyone else using your code, discover that something’s not working properly during development .
Writing Your Own Reusable Code
Writing a framework is also a good example where assertions can be useful. You can raise an assertion if another developer provides irrational input to your framework that won’t perform as expected.
An example of when this is handy is in ForceUnwrappingViewController.swift
. Nothing will happen in showResult(result:)
if result
doesn’t cast to Int
or String
, and whoever is using your code won’t know what’s going on right away. Of course they’re doing something wrong, but wouldn’t it be awesome if the code was smart enough to tell them what?
To try it out, add this block of code at the end of showResult(result:)
:
else {
  assertionFailure("Only Int or Strings are accepted in this function")
}
You raise an assertion if result
isn’t an Int
or a String
. Add this line of code at the end of calculatePressed(_:)
to see how it works:
showResult(result: UIView())
Here, you send showResult(result:)
a very unexpected value… a UIView
!
Build and run, open the Force Unwrapping screen and press the Calculate button.
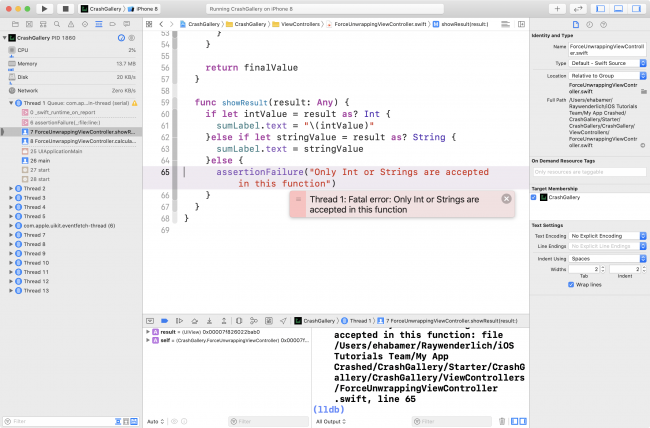
Your app crashed in ForceUnwrappingViewController.swift on line 65.
As expected, the crash line is the assertion call, but you haven’t fully answered the question. Should crashing code be in the final app on the AppStore if the developer doesn’t cover all cases?
The answer to the question is: It doesn’t matter. :]
The assertions do indeed exist in your final product, but it’ll be as if they aren’t there at all.
Assertions only work while your app is building under the debug configuration. Assertions won’t do anything under the release configuration, which is how you’ll build your app when you upload it on the AppStore.
Want to see it for yourself? You’ll try it out in the next step.
Changing Your Build Configuration
Click the CrashGallery target in the upper-left corner of your Xcode window to try it out. Select Edit Scheme from the drop-down menu, then choose Run from the left-hand side of the new window and select Release from Build Configuration .
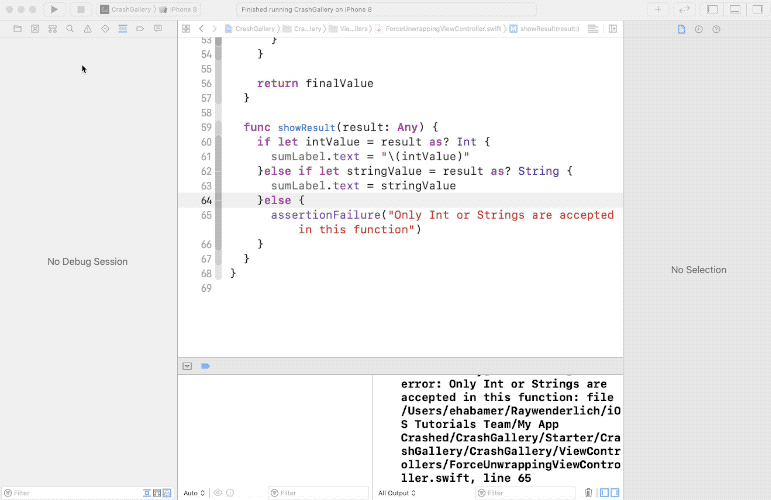
Build and run, then press the Calculate button once more.

No crashes, no assertions. It worked normally. Your code didn’t do anything when it got an unexpected value, so this step had no effect.
But also note that the release configuration isn’t for debugging. You’ll find that when you debug with Release selected, Xcode won’t behave as expected. It might show the wrong line executing, the Variables View might not show any values or the Console Log may not evaluate expressions you print.
Use this configuration if you want to measure performance, not for code tracing and debugging.
Assertions are a handy tool to help your fellow developers or yourself fix things before you forget them. But don’t overuse them, as they can become more annoying than helpful.
Note
: Use preconditionFailure(_:file:line:)
or fatalError(_:file:line:)
instead of assertionFailure(_:file:line:)
to make your app crash under the release configuration.
Where to Go From Here?
Download the finished project for this tutorial by using the Download Materials button at the top or bottom of this page.
You’ve seen how crashes are a normal part of developing your app. You should even see them as an opportunity to learn more about the framework you’re using.
Do your best to get the most information about why a crash happened. There are multiple ways to fix each crash, and some solutions may be better than others. The more you understand the problem, the better match the solution you choose will be.
You can learn more about debugging from the video course, Beginning iOS Debugging .
I hope you enjoyed this tutorial! If you have any questions or comments, please join the forum discussion below. :]
Recommend
About Joyk
Aggregate valuable and interesting links.
Joyk means Joy of geeK