

Documenting endpoints with OpenAPI 3 - Javalin - A lightweight Java and Kotlin w...
source link: https://javalin.io/tutorials/openapi-example?language=kotlin
Go to the source link to view the article. You can view the picture content, updated content and better typesetting reading experience. If the link is broken, please click the button below to view the snapshot at that time.
Documenting endpoints with OpenAPI 3
Jan 3, 2020
• Written by David Åse
Reading time: 10-25 min
The source code for this tutorial can be found on
GitHub.
Please fork/clone and look while you read.
What you will learn
This tutorial will teach you how to use the Javalin OpenAPI plugin to create an OpenAPI spec (previously known as a “Swagger spec”). The OpenAPI spec is an API description format for REST APIs, which is readable for both humans and machines. A spec can be used to generate web based documentation and API clients for all major languages, saving a lot of time for API consumers.
We will build a User CRUD API with five operations and generate an OpenAPI spec for it.
The example snippets contain both Java and Kotlin code,
and a project for each language is available on
GitHub.
Dependencies
First, we need to create a Maven project with our dependencies: (→ Tutorial)
<dependencies>
    <dependency>
        <groupId>io.javalin</groupId>
        <artifactId>javalin</artifactId>
        <version>3.7.0</version>
    </dependency>
    <dependency>
        <groupId>org.slf4j</groupId>
        <artifactId>slf4j-simple</artifactId>
        <version>1.7.28</version>
    </dependency>
    <dependency>
        <groupId>io.swagger.core.v3</groupId>
        <artifactId>swagger-core</artifactId>
        <version>2.0.9</version>
    </dependency>
    <dependency>
        <groupId>org.webjars</groupId>
        <artifactId>swagger-ui</artifactId>
        <version>3.24.3</version>
    </dependency>
    <dependency>
        <groupId>org.webjars.npm</groupId>
        <artifactId>redoc</artifactId>
        <version>2.0.0-rc.2</version>
    </dependency>
    <dependency>
        <groupId>com.fasterxml.jackson.module</groupId>
        <artifactId>jackson-module-kotlin</artifactId> <!-- only required if you use Kotlin -->
        <version>2.10.1</version>
    </dependency>
    <dependency>
        <groupId>com.fasterxml.jackson.core</groupId>
        <artifactId>jackson-databind</artifactId> <!-- only required if you use Java -->
        <version>2.10.1</version>
    </dependency>
    <dependency>
        <groupId>io.github.classgraph</groupId>
        <artifactId>classgraph</artifactId> <!-- only required for annotated static handlers in Java -->
        <version>4.8.34</version>
    </dependency>
</dependencies>Most of these are necessary for both Kotlin and Java, the few which aren’t have been commented.
ReDoc and Swagger UI are two different presentation UIs for OpenAPI specs.
Usually you would only include one of these, but both are included in the example project so
you can try them out and see which one you like. You can view the full POM on GitHub.
Building the API
Let’s define our Main class. This is where we will be putting our server and our OpenAPI config:
- Kotlin
package io.javalin.example.kotlin

import io.javalin.Javalin
import io.javalin.apibuilder.ApiBuilder.*
import io.javalin.example.kotlin.user.UserController
import io.javalin.plugin.openapi.OpenApiOptions
import io.javalin.plugin.openapi.OpenApiPlugin
import io.javalin.plugin.openapi.ui.ReDocOptions
import io.javalin.plugin.openapi.ui.SwaggerOptions
import io.swagger.v3.oas.models.info.Info

fun main() {

    Javalin.create {
        it.registerPlugin(getConfiguredOpenApiPlugin())
        it.defaultContentType = "application/json"
    }.routes {
        path("users") {
            get(UserController::getAll)
            post(UserController::create)
            path(":userId") {
                get(UserController::getOne)
                patch(UserController::update)
                delete(UserController::delete)
            }
        }
    }.start(7001)

    println("Check out ReDoc docs at http://localhost:7001/redoc")
    println("Check out Swagger UI docs at http://localhost:7001/swagger-ui")

}

fun getConfiguredOpenApiPlugin() = OpenApiPlugin(
    OpenApiOptions(
        Info().apply {
            version("1.0")
            description("User API")
        }
    ).apply {
        path("/swagger-docs") // endpoint for OpenAPI json
        swagger(SwaggerOptions("/swagger-ui")) // endpoint for swagger-ui
        reDoc(ReDocOptions("/redoc")) // endpoint for redoc
        defaultDocumentation { doc ->
            doc.json("500", ErrorResponse::class.java)
            doc.json("503", ErrorResponse::class.java)
        }
    }
)We enable the OpenAPI plugin by calling registerPlugin(getConfiguredOpenApiPlugin()),
and we do all our configuration in that method. As mentioned earlier, we will enable
both ReDoc and Swagger UI in our OpenApiOptions (to generate web UIs for our API),
but you’ll most likely only use one of these in production. We will also set a couple of
default responses (500, 503) that will apply to all our endpoints.
The API definition in the snippet above references something called UserController,
which doesn’t exist. Let’s create a skeleton:
- Kotlin
package io.javalin.example.kotlin.user

import io.javalin.http.Context

object UserController {

    fun create(ctx: Context) {
    }

    fun getAll(ctx: Context) {
    }

    fun getOne(ctx: Context) {
    }

    fun update(ctx: Context) {
    }

    fun delete(ctx: Context) {
    }

}This defines a simple CRUD API for User objects.
If you run the code as it is now, Javalin will generate the following documentation:

Hey, that’s pretty good! It doesn’t contain detailed information about the
different requests or responses, but the basics are already in place.
You can see the five different endpoints, their verbs and path params, and the
default responses (500, 503) that we specified in our Main class earlier.
The ErrorResponse we referenced for those two status codes is also listed as a Schema.
Adding annotations
While what we have currently is better than nothing, it doesn’t say much about how the endpoints actually behave. To improve the documentation we can add annotations to the handlers.
Let’s start with Get users:
- Kotlin
@OpenApi(
    summary = "Get all users",
    operationId = "getAllUsers",
    tags = ["User"],
    responses = [OpenApiResponse("200", [OpenApiContent(Array<User>::class)])]
)
fun getAll(ctx: Context) {
    ctx.json(UserService.getAll())
}We’ve created a UserService and a User class.
This is not too relevant for OpenAPI, so we’re not showing them in the tutorial,
but everything is available on GitHub.
Let’s go through the different properties:
- summary - Will be used as a title, both in web docs and in client docs
- operationId - If you generate a client from the OpenAPI spec, this will be the method name
- tags - Used to group endpoints
- responses - Describes the status codes and data models the endpoint can respond with.
This particular endpoint can only answer with an array of
Userobjects (or the defaults 500/503 we defined earlier)
Let’s see what our docs look like now if we restart the server:
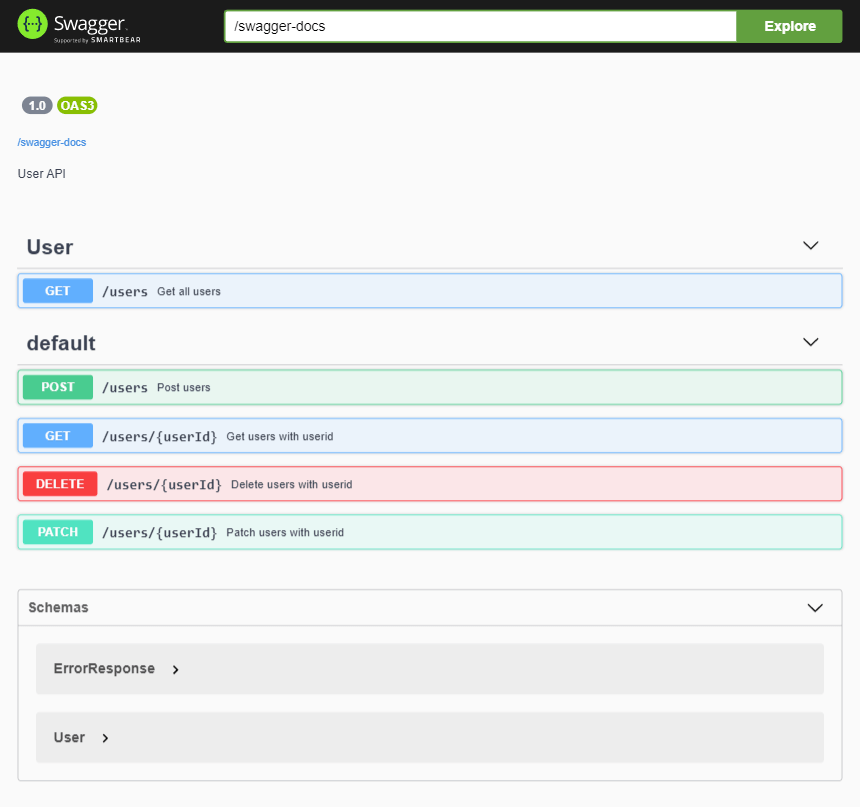
Cool! The title has been updated to match our annotation, a new User category
has been added, and a Schema for User objects is available (under ErrorResponse).
We can explore the Get all users endpoint further by clicking on it:
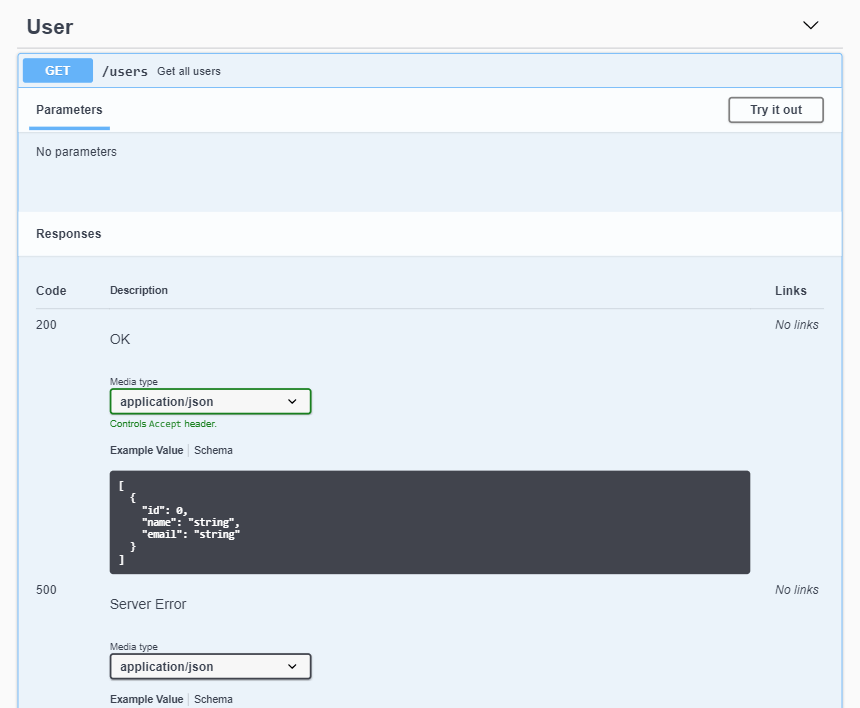
We see that it takes no parameters, and that it will respond either with a 200 and an array of User objects, or
with 500/503 and an ErrorResponse.
If you’ve cloned the repo, you can try clicking the Try it out button now,
which will give you an array of four users.
Let’s document the Update user endpoint, which takes some input and has multiple responses:
- Kotlin
@OpenApi(
    summary = "Update user by ID",
    operationId = "updateUserById",
    tags = ["User"],
    pathParams = [OpenApiParam("userId", Int::class, "The user ID")],
    requestBody = OpenApiRequestBody([OpenApiContent(NewUserRequest::class)]),
    responses = [
        OpenApiResponse("204"),
        OpenApiResponse("400", [OpenApiContent(ErrorResponse::class)]),
        OpenApiResponse("404", [OpenApiContent(ErrorResponse::class)])
    ]
)Compared to the endpoint we documented earlier, this one has two more properties:
- pathParams - These define Javalin path-parameters. There is also
queryParamsandformParams. - requestBody - This endpoint expects a JSON object as the request body
This endpoint also has two more responses:
- If you provide an invalid
userIdorNewUserRequestobject you will get a 400. - If you try to update a non-existent user you will get a 404.
That’s pretty much it!
The example repo
contains a fully working API, so if you clone it you can play around with the Try it out
button for each endpoint.
Conclusion
This was my first experience using OpenAPI, and documenting endpoints was surprisingly easy, thanks to the great job Tobias Walle has done on the plugin.
The OpenAPI plugin also supports a programmatic DSL which is a bit more flexible and reusable, but I prefer keeping documentation more like a comment than actual code.
Addendum
Since we now have a OpenAPI spec it’s easy to generate clients, and this addendum will show you how. Client generation works the same for Kotlin, Java, or any other languages. Simply add a Maven plugin:
<plugin>
    <groupId>org.openapitools</groupId>
    <artifactId>openapi-generator-maven-plugin</artifactId>
    <version>4.2.2</version>
    <executions>
        <execution>
            <goals>
                <goal>generate</goal>
            </goals>
            <configuration>
                <inputSpec>${project.basedir}/src/main/resources/api.json</inputSpec>
                <language>kotlin</language>
                <configOptions>
                    <sourceFolder>src/gen/java/main</sourceFolder>
                </configOptions>
            </configuration>
        </execution>
    </executions>
</plugin>You will have to download and save your spec somewhere, and depending on what options you use (language, serializer, etc) and how your project is set up, you will have to add dependencies to your POM.
I only generated a client for Kotlin since the clients have different dependencies
but you can just switch kotlin to java in the plugin config above to get a Java client.
Using the client is very straightforward in Kotlin:
package io.javalin.example.kotlin.client

import org.openapitools.client.apis.UserApi
import org.openapitools.client.infrastructure.ClientException
import org.openapitools.client.infrastructure.ServerException
import org.openapitools.client.models.NewUserRequest

// This file uses a client which is auto-generated from OpenAPI spec.
// To use it, first start Main.kt so the server is running.

private val apiInstance = UserApi("http://localhost:7001")

fun main() {

    try {
        apiInstance.getAllUsers().forEach { println(it) }
    } catch (e: ServerException) {
        println("5xx response calling UserApi#getAllUsers")
    }

    try {
        val newUserRequest = NewUserRequest("Elaine", "[email protected]")
        apiInstance.createUser(newUserRequest)
        println("Added new user: ${newUserRequest.name}")
        apiInstance.getAllUsers().forEach { println(it) }
    } catch (e: ClientException) {
        println("4xx response calling UserApi#createUser")
    } catch (e: ServerException) {
        println("5xx response calling UserApi#createUser")
    }

}That’s it. The OpenAPI generator (https://github.com/OpenAPITools/openapi-generator) supports a ton of different languages, and will generate markdown docs for for the clients too.
Have fun!
Thanks for reading
If you find any errors, please edit this page on GitHub.
The full source code for this tutorial can also be found on GitHub.
Recommend
About Joyk
Aggregate valuable and interesting links.
Joyk means Joy of geeK