
60

GitHub - timwhitez/crawlergo_x_XRAY: 360/0Kee-Team/crawlergo动态爬虫结合长亭XRAY...
source link: https://github.com/timwhitez/crawlergo_x_XRAY
Go to the source link to view the article. You can view the picture content, updated content and better typesetting reading experience. If the link is broken, please click the button below to view the snapshot at that time.
README.md
crawlergo_x_XRAY
360 0Kee-Team 的 crawlergo动态爬虫 结合 长亭XRAY扫描器的被动扫描功能 (其它被动扫描器同理)
https://github.com/0Kee-Team/crawlergo
https://github.com/chaitin/xray
介绍
一直想找一个小巧强大的爬虫配合xray的被动扫描使用,曾经有过自己写爬虫的想法,奈何自己太菜写一半感觉还没有awvs的爬虫好用
360 0Kee-Teem最近公开了他们自己产品中使用的动态爬虫模块,经过一番摸索发现正合我意,就写了这个脚本
由于该爬虫并未开放代理功能并且有一些从页面抓取的链接不会访问,所以我采用的官方推荐的方法,爬取完成后解析输出的json再使用python的request库去逐个访问
大概逻辑为:
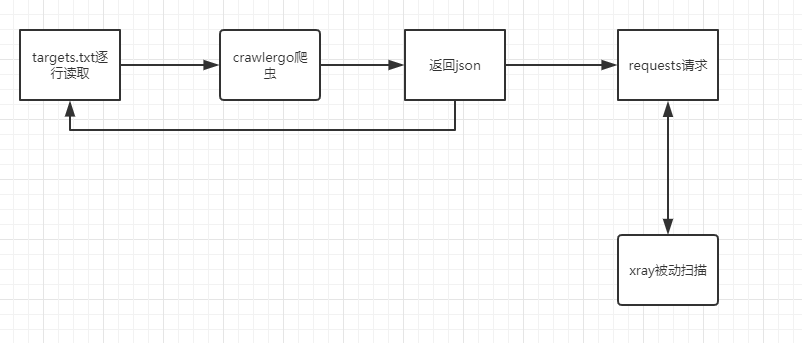
爬取和请求的过程使用了多线程和队列使得请求不会阻塞下一个页面的爬取
用法
1. 下载xray最新的release, 下载crawlergo最新的release
注意,是下载编译好的文件而不是git clone它的库
2. 把launcher.py和targets.txt放在crawlergo.exe同目录下
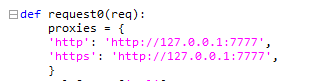
3. 配置好并启动xray被动扫描(脚本默认配置为127.0.0.1:7777)若修改端口请同时修改launcher.py文件中的proxies

配置参数详见XRAY官方文档
4. 配置好launcher.py的cmd变量中的crawlergo爬虫配置(主要是chrome路径改为本地路径), 默认为:
./crawlergo -c C:\Program Files (x86)\Google\Chrome\Application\chrome.exe -t 20 -f smart --fuzz-path --output-mode json target

配置参数详见crawlergo官方文档
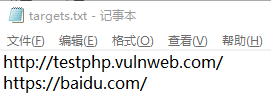
5. 把目标url写进targets.txt,一行一个url
6. 用python3运行launcher.py ( XRAY被动扫描为启动的状态 )
7. 生成的sub_domains.txt为爬虫爬到的子域名, crawl_result.txt为爬虫爬到的url
Recommend
About Joyk
Aggregate valuable and interesting links.
Joyk means Joy of geeK