

Branching and Release Strategies - Xebia Engineering Blog - Medium
source link: https://medium.com/xebia-engineering/branching-and-release-strategies-119e60241345
Go to the source link to view the article. You can view the picture content, updated content and better typesetting reading experience. If the link is broken, please click the button below to view the snapshot at that time.

Branching and Release Strategies
As a fresher, it was new to understand the release system adopted by my team. My interest lay in getting familiar with this system of successfully building, testing and delivering a feature, and understanding the need for a versioning strategy.
In this blog, I’ll be briefing about the following things:
- The scheme of semantic versioning.
- The significance of a version number.
I will elaborate this with the help of an example branch and release strategy. It will cover the versioning strategy we follow from one environment to another and eventually releasing our code to the production.
Semantic Versioning
Before moving to the branch and release strategy let us talk about what Semantic Versioning is.

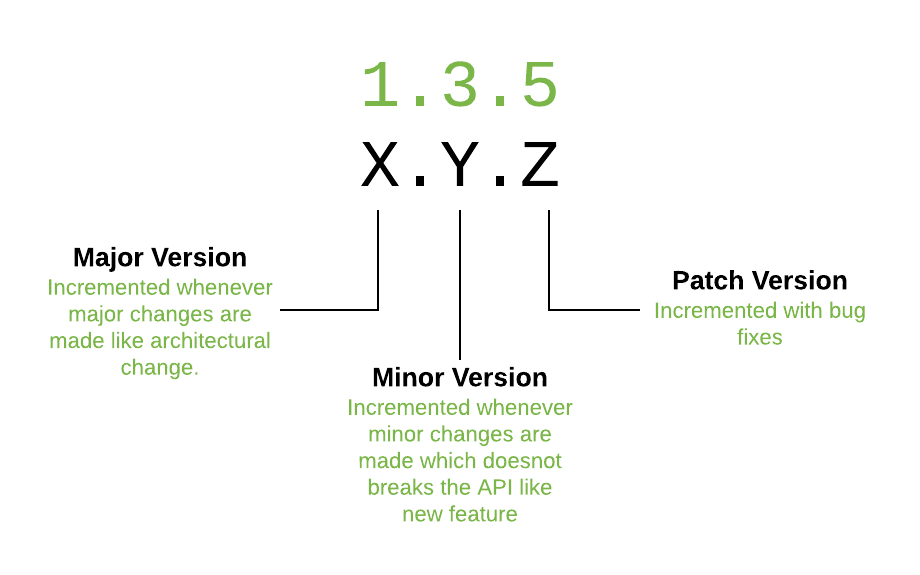
Semantic Versioning is a 3-component number in the format of X.Y.Z, where: X stands for a major release, Y for minor and Z for a patch.
Major Release — Increment the first digit from left by 1 if the new feature breaks backward compatibility and we say that it is a major release.
Minor Release — Increment the middle digit by 1 if the new feature doesn’t break any existing features and is compatible with the application in its current state, calling it a minor release.
Patch Release — Increment the last digit by 1 if you’re publishing bug/patch fixes to your application. Patch release is frequent and is also given in case we face bugs at production.
Strategy we follow

^ Don’t get confused by the diagram. Continue reading to break this down a little more and understand each part of the flow chart.
We have a single git repository with three branches namely QA, UAT, and Master. Whenever a new feature is built, the developer decides if it is a minor or a major release depending upon its compatibility. If not, we take it as patch release by default. However, we have generated a Jenkins pipeline where we can change release type in case it turns out to be minor while creating tags.
We use microservice architecture so, whenever a new service is deployed its version will be 1.0.0-alpha-x and 1.0.0-beta-x on QA and UAT environment respectively taking it to the production as 1.0.0. Later in this blog, you will get to know more about tags, continue reading.
Let us consider we have an already existing service with a previous release version as 1.3.2 which is now built with some new feature that does not break backward compatibility and thus is a minor release.

1. In the first step, code for the new feature is added and built from the QA branch which is tagged as 1.4.0-alpha-4
where 1.4.0 is major.minor.patch version number — minor number is incremented by 1 as it is a minor release, alpha tells that the tag is formed from QA branch and 4 is build number which increases each time the service is built.
2. In the second step, we deploy this tag on the QA environment.
QA testing will be done to know whether the feature is working fine or not and only after successful sign-off we merge code in the UAT branch and proceed with the fourth step.

4. In the fourth step, code is built from the UAT branch and tagged as 1.4.0-beta-6
where 1.4.0 is major.minor.patch version number, beta tells that the tag is formed from UAT branch and 6 is build number which increases with every time the service is build.
5. This tag is now deployed on the UAT environment.
Note: Both alpha and beta tags are not required in further steps but are used to roll back on the previous stable version on QA and UAT environment respectively.
Again, testing is done and in case any, bugs are reported to the developer. If all went well, we merge the code in master and proceed with the seventh step.

7. Code is now merged in Master branch, built and tagged as 1.4.0
8. Deploying this tag on the Prod environment. Which is our release tag as shown in the ninth step
Previous Release version — 1.3.2
Current Release version — 1.4.0

10. We have generated a Jenkins pipeline that automatically bumps QA and UAT branch with the next version to be released as soon as deployment is done on production. We consider it to be a patch release by default however, we can change it if required. If the release version is 1.4.0 then it automatically bumps to 1.4.1 for QA and UAT.
In case we encounter a bug in production, developer looks into it and check if this bug is a small fix and can be resolved in no time, if yes, we go ahead and do it by giving a patch release making release version now as 1.4.1 followed by automatic bumping of tags as 1.4.2-alpha-1 and 1.4.2-beta-1 on QA and UAT branch respectively.
If the issue encountered is big enough to be solved on spot then we roll back to the previous stable release which is 1.3.2 so that the production is not hampered.
Wrapping up

We have used Gradle as a build tool and semantic versioning is achieved using axion plugin. I will explain how to use the axion plugin in detail in my next blog. Happy Reading!
Recommend
About Joyk
Aggregate valuable and interesting links.
Joyk means Joy of geeK