

White Labeling Android Apps: Getting Started [FREE]
source link: https://www.raywenderlich.com/5175277-white-labeling-android-apps-getting-started
Go to the source link to view the article. You can view the picture content, updated content and better typesetting reading experience. If the link is broken, please click the button below to view the snapshot at that time.
In this fast-moving era of technology, everything has a mobile app. Because of this, almost everyone wants to compete in the mobile market by developing an app like those that are already popular. Apps like Uber, Lyft and Free Now are examples of that.
Now, imagine that you’ve developed an app for a client and another client comes to you with the same requirement… what would you do? Would you recreate your codebase for the other client from scratch?

No, that would be a bad idea. It would take a lot of your time to essentially rewrite the app that you’ve basically already written. A more cost-effective approach is white labeling . In this tutorial, you’ll learn how to white label Android apps using Android flavors, or build variants.
Getting Started
You’ll start out with an app called Animaldom , which consists of a grid view of pictures of animals.
Download the project from the top or bottom of this tutorial by clicking the Download Materials button. Fire up Android Studio and open the Starter Project .
After Gradle builds, run the app and you’ll see something like this:

Now, assume the client wants you to develop the same app, but for cats and call it catsPlanet . What would you do in such a case?

The easiest way to do this would be to use white labeling .
What Is White Labeling?
White labeling is when a company takes a product or service developed by another company and rebrands it as their own. White labeling in Android simply means taking an existing app and rebranding it or customizing it by changing the app’s icon, theme, styles, name, APIs, etc. The way this is usually done is that the developer, or producer, sells the app to the company wanting to brand it as their own, often at a reduced cost than to custom build the entire app.
To white label Android apps, you need to add product flavors to the project.
What Are Product Flavors?
Product flavors let you create multiple variants of an app while still using its existing codebase. A variant doesn’t just mean you can change the color theme or the logo of the app. It also means you can hide or show specific features you want in other variants. To do this, you need to define some rules in the build.gradle , which you’ll learn more about later in this tutorial.
Flavor Dimensions
Flavor dimensions let you create groups of flavors that you can combine with flavors of other dimensions. For example, if you have an app that you want to build twice, each with different API endpoints, then using flavor dimensions would be a good idea. You would have one flavor that uses the first set of API endpoint, and a second flavor for the other endpoints. You can mix and match these flavors with flavors from other flavor dimensions, for example, if you wanted a different build for both animaldom and catsPlanet. See the following code example:
flavorDimensions 'version', 'api'
productFlavors {

  animaldom {
    dimension 'version'
  }

  catsPlanet {
    dimension 'version'
    applicationId "com.raywenderlich.android.catsPlanet"
  }

  development {
    dimension 'api'
    // set up development environment url
    // ...
  }

  production {
    dimension 'api'
    // set up production environment url
    // ...
  }
}
This sets up two different flavor dimensions: version and api . From the example above, you can think of this as api for the differing API endpoints and version for animaldom versus catsPlanet builds. You have two flavors for the version flavor dimension: animaldom and catsPlanet , then two for the api dimension: development and production . These flavors can be combined, along with build types for debug and release, as you’ll see below.
This generates a total of eight build variants. For Animaldom, you have:
- animaldomDevelopmentDebug
- animaldomDevelopmentRelease
- animaldomProductionDebug
- animaldomProductionRelease
For catsPlanet, you have:
- catsPlanetDevelopmentDebug
- catsPlanetDevelopmentRelease
- catsPlanetProductionDebug
- catsPlanetProductionRelease
Ever since Gradle plugin 3.0.0, you need to assign a flavor dimension once you define a flavor. If you only define one dimension, all the configurations for the flavors belong to that dimension by default.
What Is a Build Type?
A build type is the configuration for the mode of the project you want to build. The two default build types are debug and release . Like product flavors, build types are also defined in build.gradle , which is also where the certificate signing for release mode APK is. Here’s how you define a build type:
buildTypes {
  release {
    minifyEnabled false
    proguardFiles getDefaultProguardFile(
      'proguard-android-optimize.txt'), 'proguard-rules.pro'
  }
}
Now, it’s time to get started with some code!

Adding Flavors to the App
There are two ways you can add flavors to your app:
- From the project structure.
- From build.gradle .
Adding Flavors From the Project Structure
Click File ▸ Project Structure then click on Build Variants on the left-hand side of the dialog that appears.

Then click on the + button under the Flavor tab and select Add Dimension .

Type version and click OK . This will add the flavor dimension version to the list of dimensions. After that, click the + button again and select Add Product Flavor .

Type in animaldom and click OK . You’ll see the following view:

You can keep all of the defaults for this. Click OK to add animaldom to your project.
Now, go back to Project Structure and add a new product flavor. Name it catsPlanet .

For the Application ID add com.raywenderlich.android.catsPlanet and click OK .
After Gradle syncs, you’ll see four build variants in the Build Variants tab on the left.

If that tab isn’t visible, enable it by navigating to View ▸ Tool Windows ▸ Build Variants .

Adding Flavors From build.gradle
Note : If you followed along in the previous section, you don’t need to add any code here since it was automatically added in the previous step. However, it’s recommended you continue reading so you understand the generated code.
Open the app’s build.gradle
file and add the following code inside the android
tag, after the buildTypes
tag:
//1
flavorDimensions 'version'
productFlavors {
  //2
  animaldom {
    dimension 'version'
  }
  //3
  catsPlanet {
    dimension 'version'
    applicationId "com.raywenderlich.android.catsPlanet"
  }
}
Here’s what each part of this code does:
- Here, you define the necessary flavor dimension. To keep it simple, you just name it version because you are only developing a different version of the same app.
- You create this flavor to keep the original version, Animaldom, intact as a separate flavor.
- The new flavor, catsPlanet, needs to be a different app. Therefore, it needs a different app ID. You don’t have to specify the dimension you only have one dimension in your project.
Your next step will be to set up separate directories for each of your apps.
Restructuring Directories
One way to control what the app looks like for each flavor is to use directories. Switch to Project view in Android Studio. Your project structure should look like this:

Your next task is to restructure your project. However, before you do, you should understand the code.
You can see there are three initial classes:
-
MainActivty
: A simple activity with a
RecyclerView. -
RecyclerAdapter
: An adapter for the
RecyclerView. - Animals : Returns the list of animal pictures from the resource.
The datasource of the app is in Animals.kt . This datasource is specific to Animaldom , so you’ll move this directory soon. You’ll create a separate Animals.kt file for Cats Planet , and then the structure will look something like:
- src/main/java : Will contain the MainActivity.kt and RecyclerAdapter.kt files.
- src/animaldom/java : Will hold the Animals.kt file and the res directory will contain the assets.
- src/catsPlanet/java This will contain a new Animals.kt file. Its res directory will contain the new assets.
So now it’s time to make some new directories.
Setting Up a Java Directory
For your first step, go to Project View , right-click on src and select New ▸ Directory . Name the directory animaldom then click OK . This will create a directory with the name animaldom . After that, right-click on the animaldom directory and then select New ▸ Folder ▸ Java Folder .

You’ll see the following dialog:

Check the box titled Change Folder Location .

In New Folder Location , enter src/animaldom/java then click Finish .
Now, your directory structure should look like this:

Setting Up the Animaldom Directory
Inside your newly created java directory, create a package by right-clicking on java . Then navigate to New ▸ Package and type com.raywenderlich.android.animaldom . Finally, click OK to confirm.
Next, create a res directory by right-clicking on animaldom and selecting New ▸ Folder ▸ Res Folder .
Your directory structure should now look like this:

Next, move Animals.kt from main to your newly-created package inside animaldom/java/com.raywenderlich.android.animaldom . Make sure you move it, not copy it. If you copy Animals.kt to the Animaldom package, you’ll need to delete it from the main package.
Finally, copy the mipmap-* and values directories from res of main to the res of animaldom . Also delete the files inside of the mipmap-xhdpi folder in the main resource directory.
At the end of all this, your structure should look like this:

Build and run your app. It should work just fine and you should be able to see the list of animals, just like before.
Now that you have the directories set up for Animaldom, it’s time to configure catsPlanet’s directory.
Configuring the CatsPlanet Directory
Start by going to your Project view again, right-clicking on src and selecting New ▸ Directory . Name the directory catsPlanet and select OK .
The, right-click on your catsPlanet directory to create a java folder, same as before but with the catsPlanet path instead.
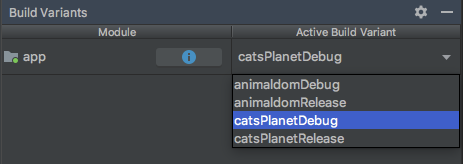
Then, switch from Project view to Android view. In the Build Variants pane, select the catsPlanetDebug variant:
Next, right-click on the Java folder and create a new package: com.raywenderlich.android.animaldom . If prompted to choose a destination directory, choose app ▸ src ▸ catsPlanet ▸ java .

If you’re wondering why you need to create two packages with the same identifier, it’s to be sure that the main app can access Animals.kt , regardless of the flavor you’re currently using.
To give catsPlanet access to the animals files, create a res directory for it by selecting New ▸ Folder ▸ Res Folder . Then, inside your package, create a new Kotlin file and name it Animals.kt .
Now, switch back to the Project view. Copy all the contents of the mipmap-* and values directories from the main resource package to the catsPlanet’s resource package.
The structure should now look like this.

Change the app_name to Cats Planet inside of strings.xml , which you’ll find in the resource directory of catsPlanet .

Adding Some Kitty Assets
In the Download Materials folder, there’s a folder named Cats Assets . Copy all the assets with the name cat_*.jpg into the mipmap-xhdpi of catsPlanet folder. If they’re there, you can delete the other animal photos that are in the folder. Your directory structure for catsPlanet will look like this:

Then, open the Animals.kt file you made under catsPlanet and add the following code:
object Animals {
  fun getAnimals(): ArrayList<Int> {
    return arrayListOf(
        R.mipmap.cat_one, R.mipmap.cat_two, R.mipmap.cat_three,
        R.mipmap.cat_four, R.mipmap.cat_five, R.mipmap.cat_six,
        R.mipmap.cat_seven, R.mipmap.cat_eight,
        R.mipmap.cat_nine, R.mipmap.cat_ten
    )
  }
}
This function simply returns a list of the IDs of the cats’ assets, just like the one in Animaldom.
Finally, select the catsPlanetDebug build variant in the Build Variants tab, then build and run. You should see the following:

Separate Logo for Cats Planet
Now, it’s time to give Cats Planet a separate logo. In the Cats Assets folder, there’s a launcher icon. Use the launcher icon generator to create launcher icons in any resolution. Once you’re done, replace all the icons in catsPlanet’s res folder with the ones you just created. Then build and run the app.

And that’s it. You have successfully added a different flavor to your existing app.

Pat yourself on the back!
Where to Go From Here?
After reading this tutorial, you should have a better understanding of white labeling and product flavors. You can download the final project by using the Download Materials button at the top or bottom of this tutorial.
This tutorial showed you one way to use flavors to white label your app, but it’s not the only way. For example, instead of creating separate folders for each flavor, you can make use of BuildConfig .
BuildConfig
is an auto-generated class. It has a const
FLAVOR
, which changes according to the build variant you select. For more information, see the official documentation
.
The tutorial above is just one example of how you can use flavors, but there are many more. For example, you can also use them to make free and paid versions of apps.
If you want to learn more, have a look at the links below:
- Configuring Build Variants
- Gradle Tips and Tricks for Android
- Gradle Tutorial for Android: Getting Started
Feel free to share your feedback or ask any questions in the comments section below or the forums.
Recommend
About Joyk
Aggregate valuable and interesting links.
Joyk means Joy of geeK