

Linux curl 常用示例 - 踏歌行666
source link: https://www.cnblogs.com/zhanglianghhh/p/11330682.html
Go to the source link to view the article. You can view the picture content, updated content and better typesetting reading experience. If the link is broken, please click the button below to view the snapshot at that time.
本篇文章包含了curl的常用案例使用。
如果想了解curl选项的详细说明,请参考前一篇文章「Linux curl 命令详解」。
常见网页访问示例
访问一个网页
1 curl https://www.baidu.com
执行后,相关的网页信息会打印出来
进度条展示
有时候我们不需要进度表展示,而需要进度条展示。比如:下载文件时。
可以通过 -#, --progress-bar 选项实现。
1 [root@iZ28xbsfvc4Z 20190713]# curl https://www.baidu.com | head -n1  # 进度表显示
2   % Total    % Received % Xferd  Average Speed   Time    Time     Time  Current
3                                  Dload  Upload   Total   Spent    Left  Speed
4 100  2443  100  2443    0     0  11662      0 --:--:-- --:--:-- --:--:-- 11688
5 <!DOCTYPE html>
6 [root@iZ28xbsfvc4Z 20190713]# curl -# https://www.baidu.com | head -n1  # 进度条显示
7 ######################################################################## 100.0%
8 <!DOCTYPE html>
静默模式与错误信息打印
当我们做一些操作时,可能会出现进度表。这时我们可以使用 -s, --silent 静默模式去掉这些不必要的信息。
如果使用 -s, --silent 时,还需要打印错误信息,那么还需要使用 -S, --show-error 选项。
静默模式示例
1 [root@iZ28xbsfvc4Z ~]# curl https://www.baidu.com | head -n1
2   % Total    % Received % Xferd  Average Speed   Time    Time     Time  Current
3                                  Dload  Upload   Total   Spent    Left  Speed
4 100  2443  100  2443    0     0  11874      0 --:--:-- --:--:-- --:--:-- 11859
5 <!DOCTYPE html>
6 [root@iZ28xbsfvc4Z ~]# curl -s https://www.baidu.com | head -n1
7 <!DOCTYPE html>
静默模式结合错误信息打印
1 [root@iZ28xbsfvc4Z 20190713]# curl -s https://140.205.16.113/
2 [root@iZ28xbsfvc4Z 20190713]#
3 [root@iZ28xbsfvc4Z 20190713]# curl -sS https://140.205.16.113/
4 curl: (51) Unable to communicate securely with peer: requested domain name does not match the server's certificate.
显示详细操作信息
使用 -v, --verbose 选项实现。
以 > 开头的行表示curl发送的”header data”;< 表示curl接收到的通常情况下隐藏的”header data”;而以 * 开头的行表示curl提供的附加信息。
 1 [root@iZ28xbsfvc4Z 20190712]# curl -v https://www.baidu.com
 2 * About to connect() to www.baidu.com port 443 (#0)
 3 *   Trying 180.101.49.12...
 4 * Connected to www.baidu.com (180.101.49.12) port 443 (#0)
 5 * Initializing NSS with certpath: sql:/etc/pki/nssdb
 6 *   CAfile: /etc/pki/tls/certs/ca-bundle.crt
 7   CApath: none
 8 * SSL connection using TLS_ECDHE_RSA_WITH_AES_128_GCM_SHA256
 9 * Server certificate:
10 *     subject: CN=baidu.com,O="Beijing Baidu Netcom Science Technology Co., Ltd",OU=service operation department,L=beijing,ST=beijing,C=CN
11 *     start date: May 09 01:22:02 2019 GMT
12 *     expire date: Jun 25 05:31:02 2020 GMT
13 *     common name: baidu.com
14 *     issuer: CN=GlobalSign Organization Validation CA - SHA256 - G2,O=GlobalSign nv-sa,C=BE
15 > GET / HTTP/1.1
16 > User-Agent: curl/7.29.0
17 > Host: www.baidu.com
18 > Accept: */*
19 >
20 < HTTP/1.1 200 OK
21 < Accept-Ranges: bytes
22 < Cache-Control: private, no-cache, no-store, proxy-revalidate, no-transform
23 < Connection: Keep-Alive
24 < Content-Length: 2443
25 < Content-Type: text/html
26 < Date: Fri, 12 Jul 2019 08:26:23 GMT
27 < Etag: "588603eb-98b"
28 < Last-Modified: Mon, 23 Jan 2017 13:23:55 GMT
29 < Pragma: no-cache
30 < Server: bfe/1.0.8.18
31 < Set-Cookie: BDORZ=27315; max-age=86400; domain=.baidu.com; path=/
32 <
33 <!DOCTYPE html>
34 ………………  # curl 网页的具体信息
指定访问的请求方法
当然curl默认使用GET方式访问。使用了 -d, --data <data> 选项,那么会默认为 POST方法访问。如果此时还想实现 GET 访问,那么可以使用 -G, --get 选项强制curl 使用GET方法访问。
同时 -X, --request <command> 选项也可以指定访问方法。
POST请求和数据传输
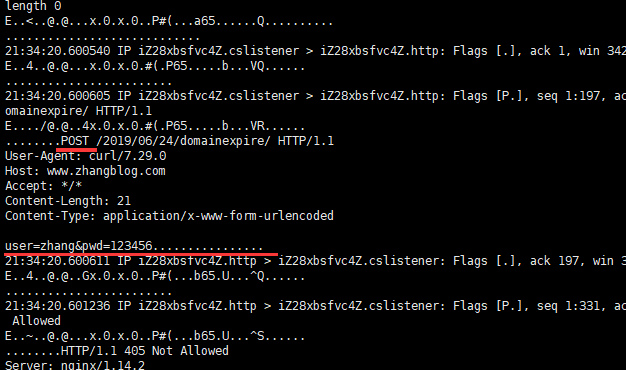
为了抓包查看信息所以使用了 --local-port <num>[-num] 选项,在实际应用中不需要该选项。
 1 [root@iZ28xbsfvc4Z ~]# curl -sv --local-port 9000 -X POST -d 'user=zhang&pwd=123456' http://www.zhangblog.com/2019/06/24/domainexpire/ | head -n1
 2 ## 或者
 3 [root@iZ28xbsfvc4Z ~]# curl -sv --local-port 9000 -d 'user=zhang&pwd=123456' http://www.zhangblog.com/2019/06/24/domainexpire/ | head -n1
 4 * About to connect() to www.zhangblog.com port 80 (#0)
 5 *   Trying 120.27.48.179...
 6 * Connected to www.zhangblog.com (120.27.48.179) port 80 (#0)
 7 > POST /2019/06/24/domainexpire/ HTTP/1.1  # POST 请求方法
 8 > User-Agent: curl/7.29.0
 9 > Host: www.zhangblog.com
10 > Accept: */*
11 > Content-Length: 21
12 > Content-Type: application/x-www-form-urlencoded
13 >
14 } [data not shown]
15 * upload completely sent off: 21 out of 21 bytes
16 < HTTP/1.1 405 Not Allowed
17 < Server: nginx/1.14.2
18 < Date: Thu, 18 Jul 2019 07:56:23 GMT
19 < Content-Type: text/html
20 < Content-Length: 173
21 < Connection: keep-alive
22 <
23 { [data not shown]
24 * Connection #0 to host www.zhangblog.com left intact
25 <html>
抓包信息
1 [root@iZ28xbsfvc4Z tcpdump]# tcpdump -i any port 9000 -A -s 0
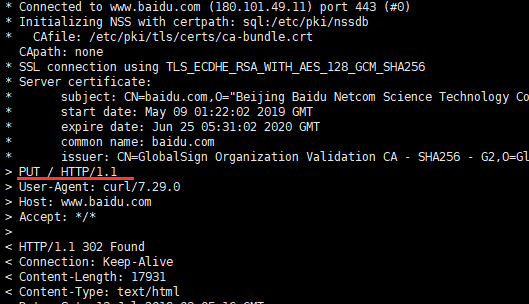
指定请求方法
1 curl -vs -X POST https://www.baidu.com | head -n1

1 curl -vs -X PUT https://www.baidu.com | head -n1
保存访问网页
使用linux的重定向功能保存
1 curl www.baidu.com >> baidu.html
使用curl的大O选项
通过 -O, --remote-name 选项实现。
1 [root@iZ28xbsfvc4Z 20190712]# curl -O https://www.baidu.com   # 使用了 -O 选项,必须指定到具体的文件  错误使用
2 curl: Remote file name has no length!
3 curl: try 'curl --help' or 'curl --manual' for more information
4 [root@iZ28xbsfvc4Z 20190712]# curl -O https://www.baidu.com/index.html   # 使用了 -O 选项,必须指定到具体的文件  正确使用
5   % Total    % Received % Xferd  Average Speed   Time    Time     Time  Current
6                                  Dload  Upload   Total   Spent    Left  Speed
7 100  2443  100  2443    0     0  13289      0 --:--:-- --:--:-- --:--:-- 13349
使用curl的小o选项
通过 -o, --output <file> 选项实现。
 1 [root@iZ28xbsfvc4Z 20190713]# curl -o sina.txt https://www.sina.com.cn/   # 单个操作
 2 [root@iZ28xbsfvc4Z 20190713]# ll
 3 -rw-r--r-- 1 root root   154 Jul 13 21:06 sina.txt
 4 [root@iZ28xbsfvc4Z 20190703]# curl "http://www.{baidu,douban}.com" -o "site_#1.txt"  # 批量操作,注意curl 的地址需要用引号括起来
 5 [1/2]: http://www.baidu.com --> site_baidu.txt
 6   % Total    % Received % Xferd  Average Speed   Time    Time     Time  Current
 7                                  Dload  Upload   Total   Spent    Left  Speed
 8 100  2381  100  2381    0     0  46045      0 --:--:-- --:--:-- --:--:-- 46686
 9
10 [2/2]: http://www.douban.com --> site_douban.txt
11 100   162  100   162    0     0   3173      0 --:--:-- --:--:-- --:--:--  3173
12 [root@iZ28xbsfvc4Z 20190703]#
13 [root@iZ28xbsfvc4Z 20190703]# ll
14 total 220
15 -rw-r--r-- 1 root root  2381 Jul  4 16:53 site_baidu.txt
16 -rw-r--r-- 1 root root   162 Jul  4 16:53 site_douban.txt
允许不安全访问
当我们使用curl进行https访问访问时,如果SSL证书是我们自签发的证书,那么这个时候需要使用 -k, --insecure 选项,允许不安全的访问。
 1 [root@iZ28xbsfvc4Z ~]# curl https://140.205.16.113/  # 被拒绝
 2 curl: (51) Unable to communicate securely with peer: requested domain name does not match the server's certificate.
 3 [root@iZ28xbsfvc4Z ~]#
 4 [root@iZ28xbsfvc4Z ~]# curl -k https://140.205.16.113/  # 允许执行不安全的证书连接
 5 <!DOCTYPE HTML PUBLIC "-//IETF//DTD HTML 2.0//EN">
 6 <html>
 7 <head><title>403 Forbidden</title></head>
 8 <body bgcolor="white">
 9 <h1>403 Forbidden</h1>
10 <p>You don't have permission to access the URL on this server.<hr/>Powered by Tengine</body>
11 </html>
获取HTTP响应状态码
在脚本中,这是很常见的测试网站是否正常的用法。
通过 -w, --write-out <format> 选项实现。
1 [root@iZ28xbsfvc4Z 20190713]# curl -o /dev/null -s -w %{http_code} https://baidu.com
2 302[root@iZ28xbsfvc4Z 20190713]#
3 [root@iZ28xbsfvc4Z 20190713]#
4 [root@iZ28xbsfvc4Z 20190713]# curl -o /dev/null -s -w %{http_code} https://www.baidu.com
5 200[root@iZ28xbsfvc4Z 20190713]#
指定proxy服务器以及其端口
很多时候上网需要用到代理服务器(比如是使用代理服务器上网或者因为使用curl别人网站而被别人屏蔽IP地址的时候),幸运的是curl通过使用 -x, --proxy <[protocol://][user:password@]proxyhost[:port]> 选项来支持设置代理。
1 curl -x 192.168.100.100:1080 https://www.baidu.com
模仿浏览器访问
有些网站需要使用特定的浏览器去访问他们,有些还需要使用某些特定的浏览器版本。我们可以通过 -A, --user-agent <agent string> 或者 -H, --header <header> 选项实现模拟浏览器访问。
1 curl -A "Mozilla/5.0 (Windows NT 10.0; Win64; x64) Chrome/75.0.3770.999" http://www.zhangblog.com/2019/06/24/domainexpire/
2 或者
3 curl -H 'User-Agent: Mozilla/5.0' http://www.zhangblog.com/2019/06/24/domainexpire/
伪造referer(盗链)
有些网站的网页对http访问的链接来源做了访问限制,这些限制几乎都是通过referer来实现的。
比如:要求是先访问首页,然后再访问首页中的邮箱页面,这时访问邮箱的referer地址就是访问首页成功后的页面地址。如果服务器发现对邮箱页面访问的referer地址不是首页的地址,就断定那是个盗连了。
可以通过 -e, --referer 或则 -H, --header <header> 实现伪造 referer 。
1 curl -e 'https://www.baidu.com' http://www.zhangblog.com/2019/06/24/domainexpire/
2 或者
3 curl -H 'Referer: https://www.baidu.com' http://www.zhangblog.com/2019/06/24/domainexpire/
构造HTTP请求头
可以通过 -H, --header <header> 实现构造http请求头。
1 curl -H 'Connection: keep-alive' -H 'Referer: https://sina.com.cn' -H 'User-Agent: Mozilla/1.0' http://www.zhangblog.com/2019/06/24/domainexpire/
保存响应头信息
可以通过 -D, --dump-header <file> 选项实现。
1 [root@iZ28xbsfvc4Z 20190703]# curl -D baidu_header.info www.baidu.com
2 ………………
3 [root@iZ28xbsfvc4Z 20190703]# ll
4 total 4
5 -rw-r--r-- 1 root root 400 Jul  3 10:11 baidu_header.info  # 生成的头文件
--connect-timeout <seconds> 连接服务端的超时时间。这只限制了连接阶段,一旦curl连接了此选项就不再使用了。
1 # 当前 https://www.zhangXX.com 是国外服务器,访问受限
2 [root@iZ28xbsfvc4Z ~]# curl --connect-timeout 10 https://www.zhangXX.com | head
3   % Total    % Received % Xferd  Average Speed   Time    Time     Time  Current
4                                  Dload  Upload   Total   Spent    Left  Speed
5   0     0    0     0    0     0      0      0 --:--:--  0:00:10 --:--:--     0
6 curl: (28) Connection timed out after 10001 milliseconds
-m, --max-time <seconds> 允许整个操作花费的最大时间(以秒为单位)。这对于防止由于网络或链接变慢而导致批处理作业挂起数小时非常有用。
 1 [root@iZ28xbsfvc4Z ~]# curl -m 10 --limit-rate 5 http://www.baidu.com/ | head  # 超过10秒后,断开连接
 2   % Total    % Received % Xferd  Average Speed   Time    Time     Time  Current
 3                                  Dload  Upload   Total   Spent    Left  Speed
 4   2  2381    2    50    0     0      4      0  0:09:55  0:00:10  0:09:45     4
 5 curl: (28) Operation timed out after 10103 milliseconds with 50 out of 2381 bytes received
 6 <!DOCTYPE html>
 7 <!--STATUS OK--><html> <head><met
 8 ### 或
 9 [root@iZ28xbsfvc4Z ~]# curl -m 10 https://www.zhangXX.com | head   # 超过10秒后,断开连接
10   % Total    % Received % Xferd  Average Speed   Time    Time     Time  Current
11                                  Dload  Upload   Total   Spent    Left  Speed
12   0     0    0     0    0     0      0      0 --:--:--  0:00:10 --:--:--     0
13 curl: (28) Connection timed out after 10001 milliseconds
显示抓取错误
当我们请求访问失败时或者没有该网页时,网站一般都会给出一个错误的提示页面。
如果我们不需要这个错误页面,只想得到简洁的错误信息。那么可以通过 -f, --fail 选项实现。
 1 [root@iZ28xbsfvc4Z 20190713]# curl http://www.zhangblog.com/201912312
 2 <html>
 3 <head><title>404 Not Found</title></head>
 4 <body bgcolor="white">
 5 <center><h1>404 Not Found</h1></center>
 6 <hr><center>nginx/1.14.2</center>
 7 </body>
 8 </html>
 9 [root@iZ28xbsfvc4Z 20190713]# curl -f http://www.zhangblog.com/201912312  # 得到更简洁的错误信息
10 curl: (22) The requested URL returned error: 404 Not Found
表单登录与cookie使用
参见:「Linux curl 表单登录或提交与cookie使用」
文件上传与下载
涉及 FTP 服务,简单快速搭建可参考:《CentOS7下安装FTP服务》「https://www.cnblogs.com/zhi-leaf/p/5983550.html」
网页文件下载
1 # 以进度条展示,而不是进度表展示
2 [root@iZ28xbsfvc4Z 20190715]# curl -# -o tmp.data2 http://www.zhangblog.com/uploads/tmp/tmp.data
3 ######################################################################## 100.0%
FTP文件下载
说明1:其中 ftp1 用户是ftp服务端的账号,具体家目录是:/mnt/ftp1
说明2:当我们使用 curl 通过 FTP 进行下载时,后面跟的路径都是:当前使用的 ftp 账号家目录为基础的相对路径,然后找到的目标文件。
示例1
1 # 其中 tmp.data 的绝对路径是:/mnt/ftp1/tmpdata/tmp.data ;ftp1 账号的家目录是:/mnt/ftp1
2 # 说明:/tmpdata/tmp.data 这个路径是针对 ftp1 账号的家目录而言的
3 [yun@nginx_proxy01 20190715]$ curl -O ftp://ftp1:[email protected]:21/tmpdata/tmp.data
4 # 或者
5 [yun@nginx_proxy01 20190715]$ curl -O -u ftp1:123456 ftp://172.16.1.195:21/tmpdata/tmp.data
6   % Total    % Received % Xferd  Average Speed   Time    Time     Time  Current
7                                  Dload  Upload   Total   Spent    Left  Speed
8 100 2048M  100 2048M    0     0  39.5M      0  0:00:51  0:00:51 --:--:--  143M
示例2
1 # 其中 nginx-1.14.2.tar.gz 的绝对路径是:/tmp/nginx-1.14.2.tar.gz ;ftp1 账号的家目录是:/mnt/ftp1
2 # 说明:/../../tmp/nginx-1.14.2.tar.gz 这个路径是针对 ftp1 账号的家目录而言的
3 [yun@nginx_proxy01 20190715]$ curl -O ftp://ftp1:[email protected]:21/../../tmp/nginx-1.14.2.tar.gz
4 # 或者
5 [yun@nginx_proxy01 20190715]$ curl -O -u ftp1:123456 ftp://172.16.1.195:21/../../tmp/nginx-1.14.2.tar.gz
6   % Total    % Received % Xferd  Average Speed   Time    Time     Time  Current
7                                  Dload  Upload   Total   Spent    Left  Speed
8 100  991k  100  991k    0     0  5910k      0 --:--:-- --:--:-- --:--:-- 5937k
FTP文件上传
可以通过 -T, --upload-file <file> 选项实现。
说明1:其中 ftp1 用户是ftp服务端的账号,具体家目录是:/mnt/ftp1
1 # 其中 tmp_client.data 是客户端本地文件;
2 # /tmpdata/ 这个路径是针对 ftp1 账号的家目录而言的,且上传时该目录必须是存在的,否则上传失败。
3 # 因此上传后文件在ftp服务端的绝对路径是:/mnt/ftp1/tmpdata/tmp_client.data
4 [yun@nginx_proxy01 20190715]$ curl -T tmp_client.data ftp://ftp1:[email protected]:21/tmpdata/
5 # 或者
6 [yun@nginx_proxy01 20190715]$ curl -T tmp_client.data -u ftp1:123456 ftp://172.16.1.195:21/tmpdata/
7   % Total    % Received % Xferd  Average Speed   Time    Time     Time  Current
8                                  Dload  Upload   Total   Spent    Left  Speed
9 100 2048M    0     0  100 2048M      0  95.4M  0:00:21  0:00:21 --:--:-- 49.3M
使用 -C, --continue-at <offset> 选项实现。其中使用 “-C -“「注意有空格和无空格的情况」,告诉curl自动找出在哪里/如何恢复传输。
网页端断点续传下载
1 curl -C - -o tmp.data http://www.zhangblog.com/uploads/tmp/tmp.data # 下载一个 2G 的文件
FTP断点续传下载
细节就不多说了,可参见上面的「FTP文件下载」
1 curl -C - -o tmp.data1 ftp://ftp1:[email protected]:21/tmpdata/tmp.data  # 下载一个 2G 的文件
2 # 或则
3 curl -C - -o tmp.data1 -u ftp1:123456 ftp://172.16.1.195:21/tmpdata/tmp.data  # 下载一个 2G 的文件
有时文件比较大,或者难以迅速传输,而利用分段传输,可以实现稳定、高效并且有保障的传输,更具有实用性,同时容易对差错文件进行更正。
可使用 -r, --range <range> 选项实现。
如下示例使用了同一张图片,大小为 18196 字节。
网页端分段下载
分段下载
 1 [root@iZ28xbsfvc4Z 20190715]# curl -I http://www.zhangblog.com/uploads/hexo/00.jpg   # 查看文件大小
 2 HTTP/1.1 200 OK
 3 Server: nginx/1.14.2
 4 Date: Mon, 15 Jul 2019 03:23:44 GMT
 5 Content-Type: image/jpeg
 6 Content-Length: 18196   # 文件大小
 7 Last-Modified: Fri, 05 Jul 2019 08:04:58 GMT
 8 Connection: keep-alive
 9 ETag: "5d1f04aa-4714"
10 Accept-Ranges: bytes
11 ### 分段下载一个文件
12 [root@iZ28xbsfvc4Z 20190715]# curl -r 0-499   -o 00-jpg.part1 http://www.zhangblog.com/uploads/hexo/00.jpg
13 [root@iZ28xbsfvc4Z 20190715]# curl -r 500-999 -o 00-jpg.part2 http://www.zhangblog.com/uploads/hexo/00.jpg
14 [root@iZ28xbsfvc4Z 20190715]# curl -r 1000-   -o 00-jpg.part3 http://www.zhangblog.com/uploads/hexo/00.jpg
查看下载文件
1 [root@iZ28xbsfvc4Z 20190715]# ll
2 total 36
3 -rw-r--r-- 1 root root   500 Jul 15 11:25 00-jpg.part1
4 -rw-r--r-- 1 root root   500 Jul 15 11:25 00-jpg.part2
5 -rw-r--r-- 1 root root 17196 Jul 15 11:26 00-jpg.part3
文件合并
1 [root@iZ28xbsfvc4Z 20190715]# cat 00-jpg.part1 00-jpg.part2 00-jpg.part3 > 00.jpg
2 [root@iZ28xbsfvc4Z 20190715]# ll 00.jpg
3 total 56
4 -rw-r--r-- 1 root root 18196 Jul 15 11:29 00.jpg
FTP分段下载
分段下载
1 [yun@nginx_proxy01 20190715]$ curl -r 0-499   -o 00-jpg.part1 ftp://ftp1:[email protected]:21/tmpdata/00.jpg
2 [yun@nginx_proxy01 20190715]$ curl -r 500-999 -o 00-jpg.part2 ftp://ftp1:[email protected]:21/tmpdata/00.jpg
3 [yun@nginx_proxy01 20190715]$ curl -r 1000-   -o 00-jpg.part3 ftp://ftp1:[email protected]:21/tmpdata/00.jpg
查看下载文件
1 [yun@nginx_proxy01 20190715]$ ll 00-jpg.part*
2 -rw-rw-r-- 1 yun yun   500 Jul 15 17:59 00-jpg.part1
3 -rw-rw-r-- 1 yun yun   500 Jul 15 18:00 00-jpg.part2
4 -rw-rw-r-- 1 yun yun 17196 Jul 15 18:00 00-jpg.part3
文件合并
1 [yun@nginx_proxy01 20190715]$ cat 00-jpg.part1 00-jpg.part2 00-jpg.part3 > 00.jpg
2 [yun@nginx_proxy01 20190715]$ ll 00.jpg
3 -rw-rw-r-- 1 yun yun 18196 Jul 15 18:02 00.jpg
如果觉得不错就点个赞呗 (-^O^-) !
———END———-

Recommend
About Joyk
Aggregate valuable and interesting links.
Joyk means Joy of geeK