

部署SonarQube代码检测服务以及jenkins实现代码自动测试、自动部署-何1991的博客
source link: https://blog.51cto.com/14234542/2424703
Go to the source link to view the article. You can view the picture content, updated content and better typesetting reading experience. If the link is broken, please click the button below to view the snapshot at that time.

1.SonarQube部署前的内核参数等配置以及java环境配置
1)修改内核参数配置,使满足环境要求
[root@sonarqube ~]# vim /etc/sysctl.conf
vm.max_map_count=262144
fs.file-max=65536
[root@sonarqube ~]# sysctl -p  #生效修改的内核参数
……
vm.max_map_count = 262144
fs.file-max = 65536
2)修改本机安全策略参数限制
[root@sonarqube ~]# vim /etc/security/limits.conf
……
sonarqube - nofile 65536
sonarqube - nproc  2048
3)配置java环境(至少jdk-8或openjdk-8版本)
[root@sonarqube ~]# ls /usr/local/src/
 jdk-8u211-linux-x64.tar.gz
[root@sonarqube src]# tar xvf jdk-8u211-linux-x64.tar.gz
[root@sonarqube src]#ln  -sv jdk1.8.0_211  jdk
[root@sonarqube src]#ln  -sv   jdk
[root@sonarqube src]# ln -sv /usr/local/src/jdk/bin/*  /usr/bin
[root@sonarqube src]# vim /etc/profile
……
export export LANG="en_US.utf-8"
export JAVA_HOME=/usr/local/jdk
export PATH=$JAVA_HOME/bin:$JAVA_HOME/jre/bin:$PATH
export CLASSPATH=$JAVA_HOME/lib:$JAVA_HOME/jre/lib:$JAVA_HOME/lib/tools.jar
[root@sonarqube src]# source /etc/profile  #将java环境变量生效
2.数据库准备(sonarqube7.9版本不再支持mysql,以sonarqube6.7为例,并要求至少mysql5.6以上,这里使用mysql5.7版本)
1)官网下载mysql社区版配置yum源仓库的rpm包(下载前需要注册oracle账号)
https://dev.mysql.com/downloads/repo/yum/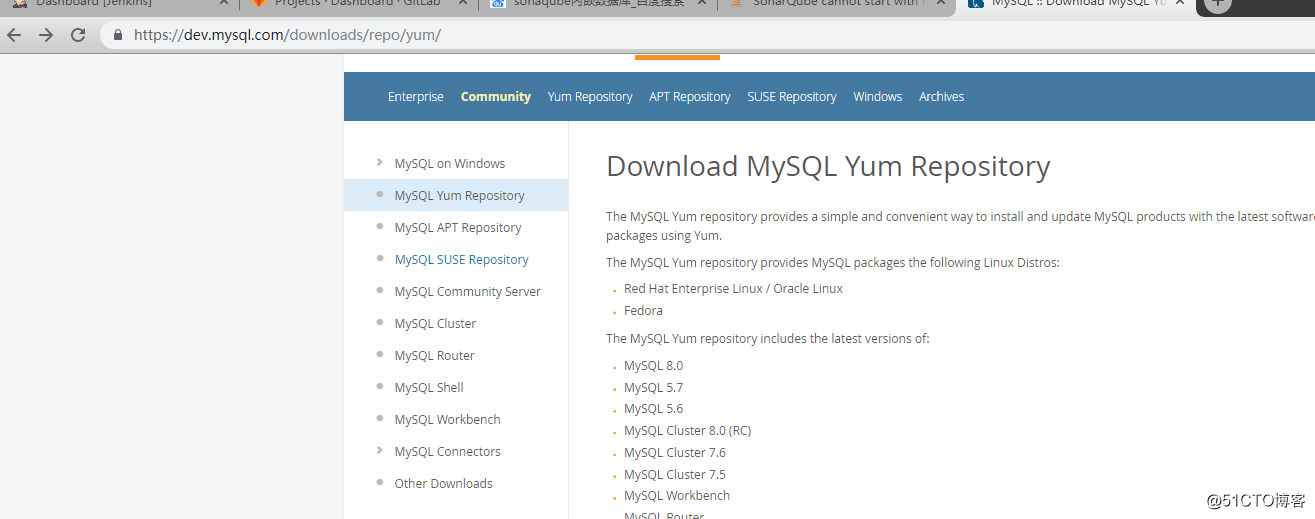

2)安装mysql的yum仓库源
[root@sonarqube mysql.repos]# ls
mysql80-community-release-el7-3.noarch.rpm
[root@sonarqube mysql.repos]# rpm -ivh mysql80-community-release-el7-3.noarch.rpm
warning: mysql80-community-release-el7-3.noarch.rpm: Header V3 DSA/SHA1 Signature, key ID 5072e1f5: NOKEY
Preparing...                          ################################# [100%]
Updating / installing...
     1:mysql80-community-release-el7-3  ################################# [100%]
3)查看安装的yum仓库源
root@sonarqube yum.repos.d]# ls
CentOS-Base.repo  epel.repo  mysql-community.repo  mysql-community-source.repo
4)查看yum子仓库中被禁用的和启用的mysql版本,默认最新版 MySQL 8.0是开启的(yum安装时也是默认最新版),其他版本默认禁用
[root@sonarqube yum.repos.d]# yum repolist all | grep mysql
mysql-cluster-7.5-community/x86_64 MySQL Cluster 7.5 Community   disabled
mysql-cluster-7.5-community-source MySQL Cluster 7.5 Community - disabled
mysql-cluster-7.6-community/x86_64 MySQL Cluster 7.6 Community   disabled
mysql-cluster-7.6-community-source MySQL Cluster 7.6 Community - disabled
mysql-cluster-8.0-community/x86_64 MySQL Cluster 8.0 Community   disabled
mysql-cluster-8.0-community-source MySQL Cluster 8.0 Community - disabled
mysql-connectors-community/x86_64  MySQL Connectors Community    enabled:    118
mysql-connectors-community-source  MySQL Connectors Community -  disabled
mysql-tools-community/x86_64       MySQL Tools Community         enabled:     95
mysql-tools-community-source       MySQL Tools Community - Sourc disabled
mysql-tools-preview/x86_64         MySQL Tools Preview           disabled
mysql-tools-preview-source         MySQL Tools Preview - Source  disabled
mysql55-community/x86_64           MySQL 5.5 Community Server    disabled
mysql55-community-source           MySQL 5.5 Community Server -  disabled
mysql56-community/x86_64           MySQL 5.6 Community Server    disabled
mysql56-community-source           MySQL 5.6 Community Server -  disabled
mysql57-community/x86_64           MySQL 5.7 Community Server    disabled
mysql57-community-source           MySQL 5.7 Community Server -  disabled
mysql80-community/x86_64           MySQL 8.0 Community Server    enabled:    129
mysql80-community-source           MySQL 8.0 Community Server -  disabled
5)yum-config-manager命令依赖于yum-utils.noarch包
[root@sonarqube yum.repos.d]# yum install yum-utils.noarch6)下载mysql-5.7版本,则需启用子仓库的mysql-5.7版本,并将 MySQL 8.0版子仓库禁用,让yum安装默认下载5.7版本
[root@sonarqube yum.repos.d]# yum-config-manager --enable mysql57-community
[root@sonarqube yum.repos.d]# yum-config-manager --disable mysql80-community
7)再次查看子仓库源,发现mysql-5.7版本子仓库源已启用
[root@sonarqube yum.repos.d]# yum repolist all | grep mysql
mysql55-community/x86_64           MySQL 5.5 Community Server    disabled
mysql55-community-source           MySQL 5.5 Community Server -  disabled
mysql56-community/x86_64           MySQL 5.6 Community Server    disabled
mysql56-community-source           MySQL 5.6 Community Server -  disabled
mysql57-community/x86_64           MySQL 5.7 Community Server    enabled:    364
mysql57-community-source           MySQL 5.7 Community Server -  disabled
mysql80-community/x86_64           MySQL 8.0 Community Server    disabled
mysql80-community-source           MySQL 8.0 Community Server -  disabled
8)下载mysql,此时默认下载mysql-5.7版本
[root@sonarqube ~]# yum install mysql mysql-server -y9)修改mysql数据库默认数据存储路径,准备msyql数据指定的存储目录
[root@sonarqube ~]# mkdir /data/mysql  #数据存储目录
[root@sonarqube ~]# mkdir /data/binlog/bin -pv  #二进制日志存储目录
[root@sonarqube ~]# mkdir /data/socket/    # 套接字目录
10)分别授权
[root@sonarqube ~]# chown mysql.mysql -R /data/mysql
[root@sonarqube ~]#  chown mysql.mysql -R /data/logbin/
[root@sonarqube ~]#  chown mysql.mysql -R /data/socket/
11)查看目录权限
[root@sonarqube ~]# ll /data
total 0
drwxr-xr-x 3 mysql mysql  52 Aug  2 00:15 binlog
drwxr-x--- 5 mysql mysql 314 Aug  2 00:16 mysql
drwxr-xr-x 2 mysql mysql   6 Aug  2 00:19 socket
12)mysql配置文件修改
[root@sonarqube ~]# grep '^[a-z]' /etc/my.cnf
log_bin=/data/binlog/bin
server_id=1
datadir=/data/mysql
socket=/data/socket/mysql.sock
……
13)启动服务
[root@sonarqube ~]# systemctl restart mysqld14)查看启动的端口服务
[root@sonarqube ~]# ss -tnlp
State       Recv-Q Send-Q                      Local Address:Port                                     Peer Address:Port
LISTEN      0      128                                     *:22                                                  *:*                   users:(("sshd",pid=3710,fd=3))
LISTEN      0      100                             127.0.0.1:25                                                  *:*                   users:(("master",pid=3991,fd=13))
LISTEN      0      80                                     :::3306                                               :::*                   users:(("mysqld",pid=22395,fd=24))
LISTEN      0      128                                    :::22                                                 :::*                   users:(("sshd",pid=3710,fd=4))
LISTEN      0      100                                   ::1:25                                                 :::*                   users:(("master",pid=3991,fd=14))
15)由于套接字路径已改,直接进入数据库是默认是指定套接字路径/var/lib/mysql/mysql.sock,需指定更改后的路径
[root@sonarqube ~]# mysql
ERROR 2002 (HY000): Can't connect to local MySQL server through socket '/var/lib/mysql/mysql.sock' (2)
16)指定更改后的路径,还需要输入数据库临时密码
[root@sonarqube ~]# mysql -S /data/socket/mysql.sock
ERROR 1045 (28000): Access denied for user 'root'@'localhost' (using password: NO)
17)数据库启动后会在日志文件中生成一个临时密码,输入临时密码即可登录数据库
[root@sonarqube ~]# grep 'temporary password' /var/log/mysqld.log
2019-08-01T16:29:12.727126Z 1 [Note] A temporary password is generated for root@localhost: ?B9v5Eg7eost
[root@sonarqube ~]# mysql -S /data/socket/mysql.sock -p?B9v5Eg7eost   #进入数据库访问
……
Server version: 5.7.27-log

Copyright (c) 2000, 2019, Oracle and/or its affiliates. All rights reserved.

Oracle is a registered trademark of Oracle Corporation and/or its
affiliates. Other names may be trademarks of their respective
owners.

Type 'help;' or '\h' for help. Type '\c' to clear the current input statement.

mysql>
18)再修改密码替代临时密码,即可访问数据中信息(密码至少8个字符以上且必须包含有字母、数字、字符,至少含有一个大写字母)
mysql> ALTER USER 'root'@'localhost' IDENTIFIED BY 'Jie?123456';
Query OK, 0 rows affected (0.01 sec)
mysql> show databases;
+--------------------+
| Database           |
+--------------------+
| information_schema |
| mysql              |
| performance_schema |
| sys                |
+--------------------+
4 rows in set (0.00 sec)
19)创建sonarqube数据库并授权sonarque用户
mysql> create database sonarqube default character set utf8 collate utf8_general_ci;
mysql> grant all on sonarqube.* to sonarqube@'192.168.1.31' identified by 'Jie?123456
Query OK, 0 rows affected, 1 warning (0.00 sec)
20)用sonarqube用户登录mysql数据库测试是否能进入数据库
[root@sonarqube ~]# mysql -usonarqube -pJie?123456 -S /data/socket/mysql.sock -h192.168.1.31
mysql: [Warning] Using a password on the command line interface can be insecure.
Welcome to the MySQL monitor.  Commands end with ; or \g.
Your MySQL connection id is 5
Server version: 5.7.27-log MySQL Community Server (GPL)

Copyright (c) 2000, 2019, Oracle and/or its affiliates. All rights reserved.

Oracle is a registered trademark of Oracle Corporation and/or its
affiliates. Other names may be trademarks of their respective
owners.

Type 'help;' or '\h' for help. Type '\c' to clear the current input statement.

mysql> show databases;
+--------------------+
| Database           |
+--------------------+
| information_schema |
| sonarqube          |
+--------------------+
2 rows in set (0.00 sec)
3.sonarqube-6.7的安装配置
1)下载源码压缩包
[root@sonarqube ~]# ls /apps/sonarqube
sonarqube-6.7.7.zip
2)解压sonarqube源码包,并创建软连接
[root@sonarqube sonarqube]# unzip sonarqube-6.7.7.zip
[root@sonarqube sonarqube]# ln -sv sonarqube-6.7.7 sonarqube
‘sonarqube’ -> ‘sonarqube-6.7.7’
3)创建用户以及更改目录的属主属组
[root@sonarqube sonarqube]# useradd  sonarqube
[root@sonarqube sonarqube]# chown sonarqube.sonarqube -R /apps/sonarqube/
4)配置sonarqube配置文件
[root@sonarqube conf]# su - sonarqube
Last login: Mon Jul 29 13:48:33 CST 2019 on pts/1
[sonarqube@sonarqube ~]$ cd /apps/sonarqube/sonarqube
[sonarqube@sonarqube sonarqube]$ grep '^[a-Z]' conf/sonar.properties
sonar.jdbc.username=sonarqube  #登录数据库的授权用户
sonar.jdbc.password=Jie?123456  #登录数据库的密码
sonar.jdbc.url=jdbc:mysql://192.168.1.31:3306/sonarqube?useUnicode=true&characterEncoding=utf8&rewriteBatchedStatements=true&useConfigs=maxPerformance&useSSL=false
#jdbc:mysql://192.168.1.31:3306/sonarqube 中的sonarqube为创建的数据库名称
sonar.web.host=0.0.0.0   #sonarqube服务监听本机所有ip
sonar.web.port=9000   #sonarqube服务启动时监听的端口
5)启动sonarqube服务
[sonarqube@sonarqube sonarqube]$ ./bin/linux-x86-64/sonar.sh  start
Starting SonarQube...
Started SonarQube.
6)在查看sonarqube服务启动状态,发现无法启动,去查看日志文件中的报错
[sonarqube@sonarqube sonarqube]$ ./bin/linux-x86-64/sonar.sh status
SonarQube is not running.
7)查看sonarqube服务的日志文件,发现报错是由于内存分配不足导致服务无法启动,
[root@sonarqube logs]# tail -30 sonar.log
......
Java HotSpot(TM) 64-Bit Server VM warning: INFO: os::commit_memory(0x00000000e0000000, 89653248, 0) failed; error='Cannot allocate memory' (errno=12)
......
8)关闭虚拟机,将内存调大,至少3G以上,在重新启动sonaqube服务并查看运行状态
[sonarqube@sonarqube sonarqube]$ ./bin/linux-x86-64/sonar.sh  start  启动服务
Starting SonarQube...
Started SonarQube.
[sonarqube@sonarqube sonarqube]$ ./bin/linux-x86-64/sonar.sh status  #发现服务已启动
SonarQube is running (5380).
9)查看监听的9000端口
[sonarqube@sonarqube sonarqube]$ ss -tnlp
State Recv-Q Send-Q Local Address:Port Peer Address:Port
LISTEN 0 128 *:111 *:*
LISTEN 0 128 *:22 *:*
LISTEN 0 100 127.0.0.1:25 *:*
LISTEN 0 1 127.0.0.1:32000 *:*
users:(("java",pid=10447,fd=4))
LISTEN 0 25 :::9000 :::*
users:(("java",pid=10544,fd=116))
LISTEN 0 128 ::ffff:127.0.0.1:9001 :::*
users:(("java",pid=10467,fd=100))
LISTEN 0 80 :::3306 :::*
LISTEN 0 128 :::111 :::*
LISTEN 0 128 :::22 :::*
LISTEN 0 100 ::1:25 :::*
LISTEN 0 50 ::ffff:127.0.0.1:9092 :::*
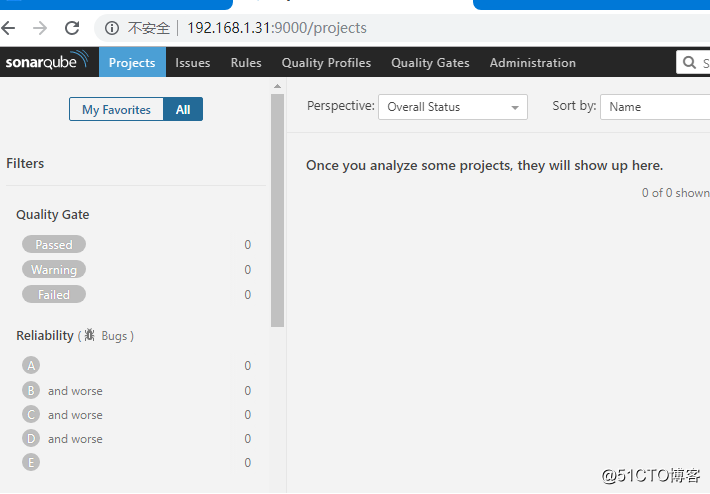
users:(("java",pid=10544,fd=148))10)浏览器访问sonarqube
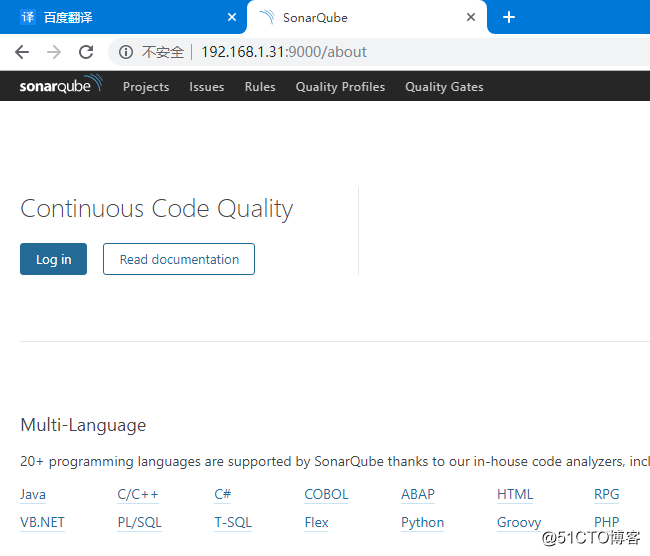
11)登录的用户名及密码均默认为admin
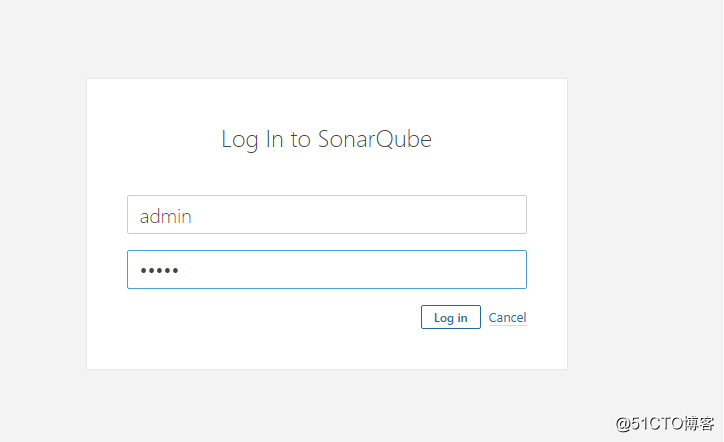
12)成功登录sonarqube的web页面
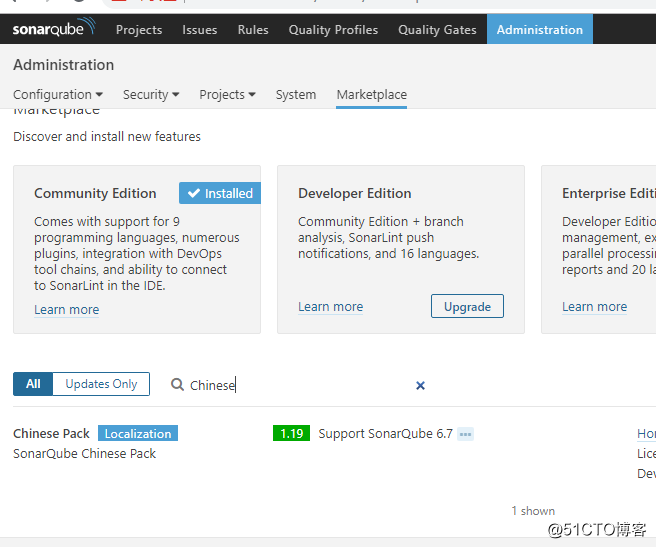
4.安装中文插件,显示为中文界面
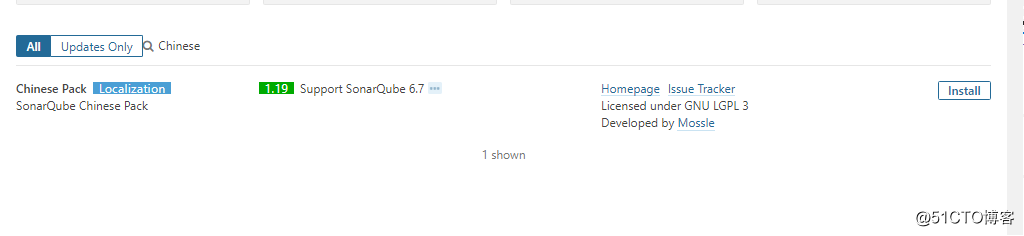
1)点击administration→Marketplace,直接搜索中文插件
2)在点击安装install
3)重新启动服务
[sonarqube@sonarqube linux-x86-64]$ ./sonar.sh restart4)再次访问时,显示中文界面
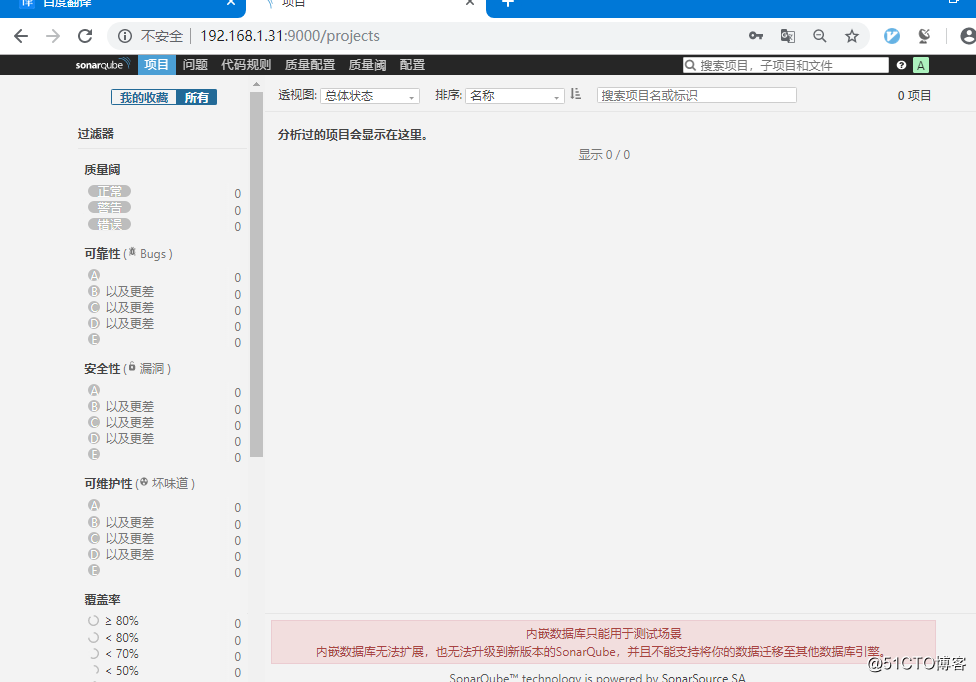
5)查看安装的中文包插件
[sonarqube@sonarqube sonarqube]$ ll extensions/plugins/
……
-rw-r--r-- 1 sonarqube sonarqube 38307 Jul 29 15:05 sonar-l10n-zh-plugin-1.19.jar
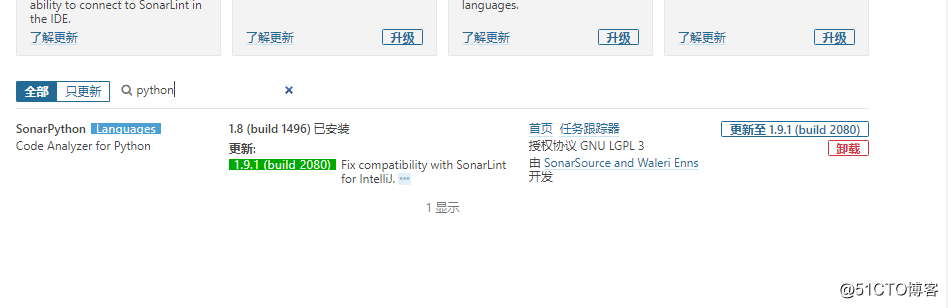
……6)安装python、java、php等开发语言插件,才能扫描相关语言代码


5.部署扫描器sonar-scanner(sonarqube通过扫描器扫描代码)
1)scanner二进制×××地址
https://binaries.sonarsource.com/Distribution/sonar-scanner-cli2)下载扫描器到指定目录下
[root@sonarqube sonarscanner]# pwd
/apps/sonarscanner
[root@sonarqube sonarscanner]# ll -h
total 41M
-rw-r--r-- 1 root root 41M Jul 22 19:31 sonar-scanner-cli-4.0.0.1744-linux.zip
3)解压扫描器二进制源码并创建软连接
[root@sonarqube sonarscanner]# unzip sonar-scanner-cli-4.0.0.1744-linux.zip
[root@sonarqube sonarscanner]# ls
sonar-scanner-4.0.0.1744-linux  sonar-scanner-cli-4.0.0.1744-linux.zip
[root@sonarqube sonarscanner]# ln -sv sonar-scanner-4.0.0.1744-linux sonar-scanner
‘sonar-scanner’ -> ‘sonar-scanner-4.0.0.1744-linux’
4)修改配置文件
[root@sonarqube sonar-scanner]# vim conf/sonar-scanner.properties
……
#----- Default SonarQube server
sonar.host.url=http://192.168.1.31:9000

#----- Default source code encoding
sonar.sourceEncoding=UTF-8
5)准备一个测试代码压缩包并解压到当前目录下
[root@sonarqube code-test]# pwd
/apps/code-test
[root@sonarqube code-test]# ll -h
total 6.5M
-rw-r--r-- 1 root root 6.5M Nov 21  2018 sonar-examples-master.zip
[root@sonarqube code-test]# unzip sonar-examples-master.zip
6)切换到测试源码的路径下
[root@sonarqube php-sonar-runner]# pwd
/apps/code-test/sonar-examples-master/projects/languages/php/php-sonar-runner
[root@sonarqube php-sonar-runner]# ll
total 12
-rw-r--r-- 1 root root 453 Jul 25  2016 README.md
-rw-r--r-- 1 root root 331 Jul 25  2016 sonar-project.properties
drwxr-xr-x 2 root root  22 Jul 25  2016 src
-rw-r--r-- 1 root root 272 Jul 25  2016 validation.txt
7)默认生成的代码配置文件
[root@sonarqube php-sonar-runner]# cat sonar-project.properties
# Required metadata
sonar.projectKey=org.sonarqube:php-simple-sq-scanner  #自定义额项目key
sonar.projectName=PHP :: Simple Project :: SonarQube Scanner #项目的名称
sonar.projectVersion=1.0   #项目的版本号

# Comma-separated paths to directories with sources (required)
sonar.sources=src   #源码路径

# Language
sonar.language=php  #源码的类型为PHP代码

# Encoding of the source files
sonar.sourceEncoding=UTF-8  #编码的格式
8)在当前的代码路径下执行扫描
[root@sonarqube php-sonar-runner]# /apps/sonarscanner/sonar-scanner/bin/sonar-scanner
……
tly specify it.
INFO: Calculating CPD for 1 file
INFO: CPD calculation finished
INFO: Analysis report generated in 213ms, dir size=34 KB
INFO: Analysis reports compressed in 42ms, zip size=10 KB
INFO: Analysis report uploaded in 3108ms
INFO: ANALYSIS SUCCESSFUL, you can browse http://192.168.1.31:9000/dashboard/index/org.sonarqube:php-simple-sq-scanner
INFO: Note that you will be able to access the updated dashboard once the server has processed the submitted analysis report
INFO: More about the report processing at http://192.168.1.31:9000/api/ce/task?id=AWw9AEUVHii-ILef0qYq
INFO: Task total time: 17.226 s
INFO: ------------------------------------------------------------------------
INFO: EXECUTION SUCCESS
INFO: ------------------------------------------------------------------------
INFO: Total time: 29.467s
INFO: Final Memory: 7M/115M
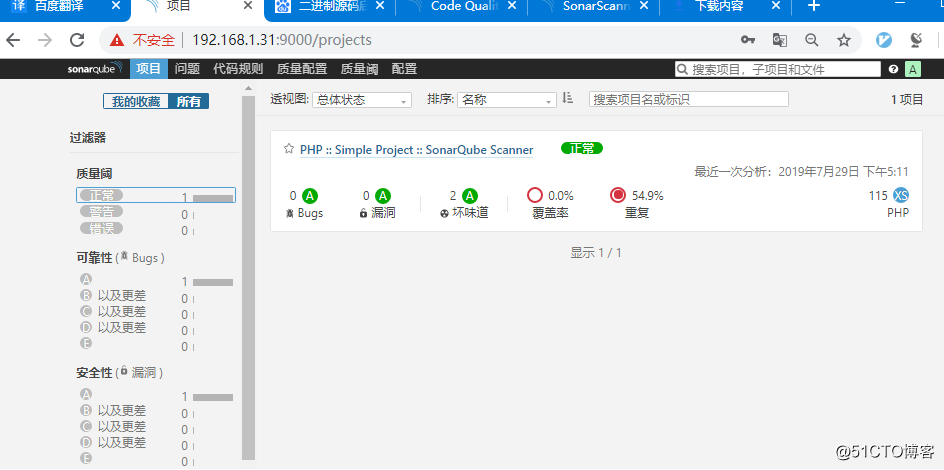
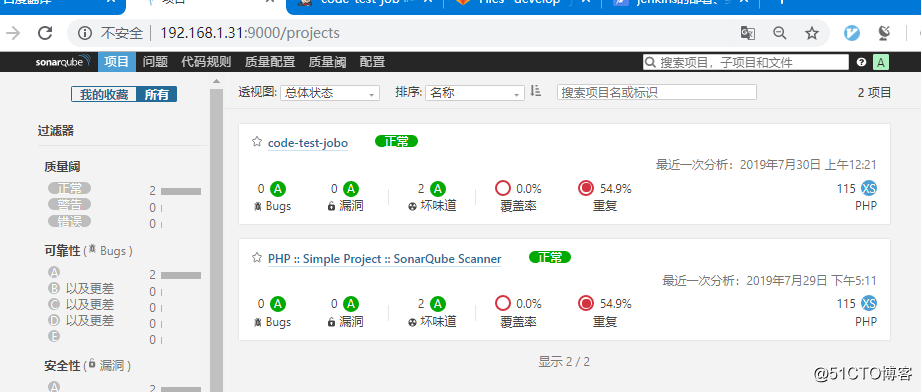
INFO: ------------------------------------------------------------------------9)web端查看扫描后生成的记录
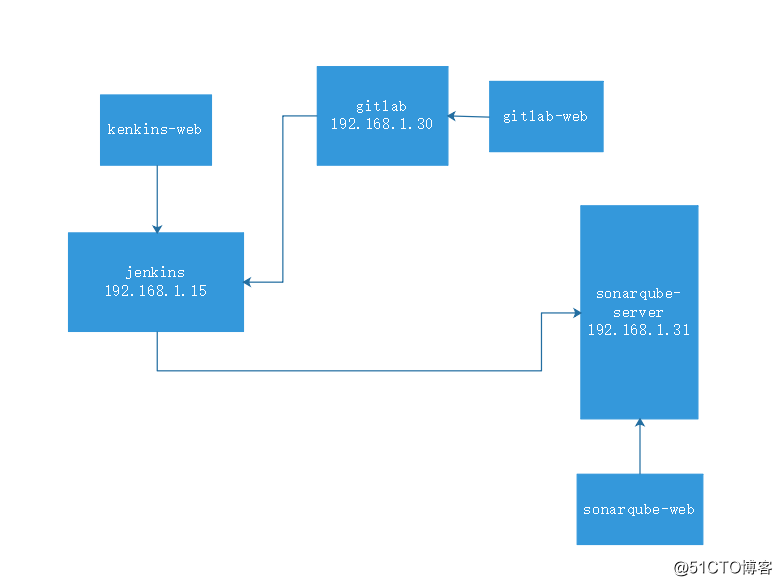
6.jenkins配置sonarqube-scanner并实现jenkins代码的自动测试、自动部署
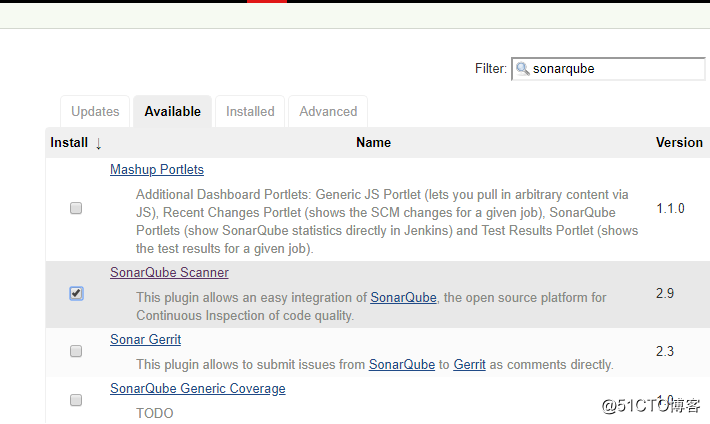
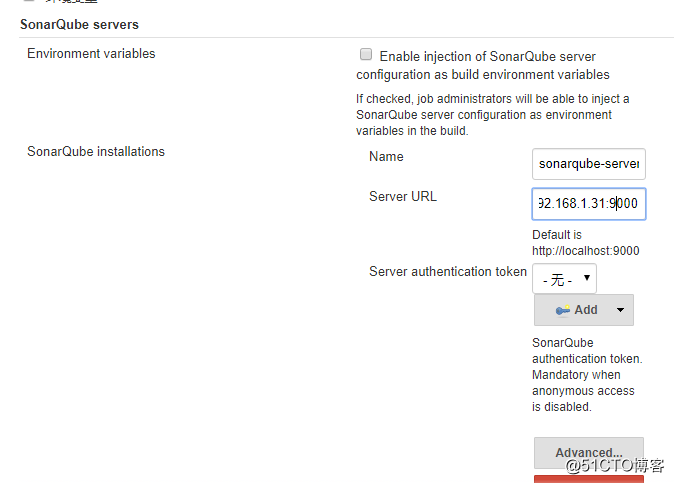
1)安装扫描器插件
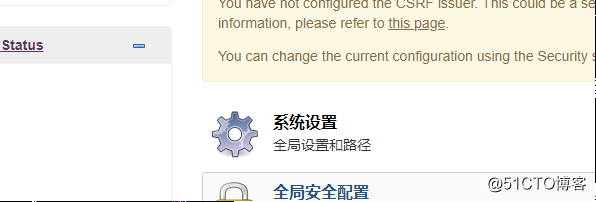
2)点击系统设置设置sonarqube服务
3)添加sonarqube服务并自定义服务名称以及url地址
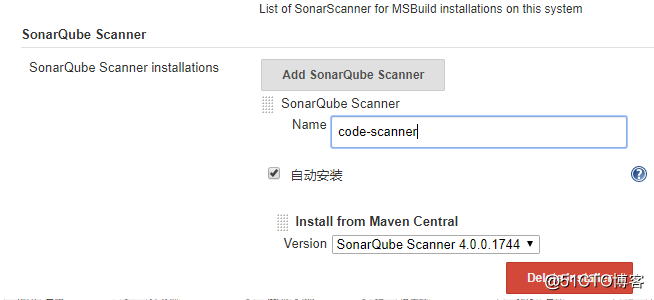
4)自动安装scanner扫描器
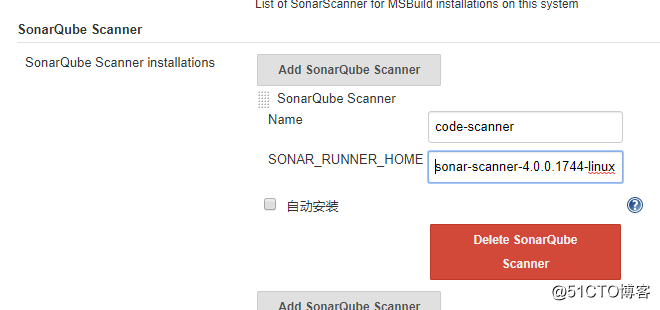
5)若已安装scanner扫描器则无需自动安装,直接添加扫描器的工作目录即可
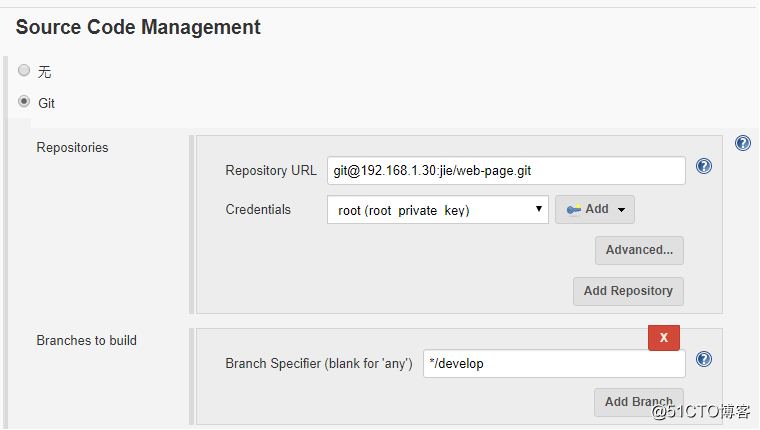
6)在jenkins创建一个新项目code-test-job

7)配置此项目的configure
指定gitlab仓库源、认证方式
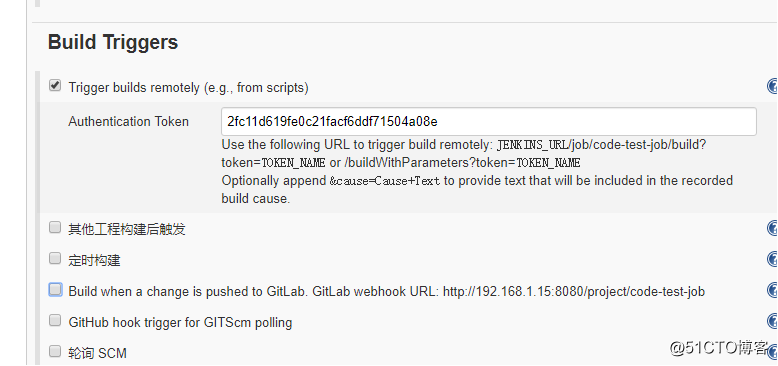
构建触发的口令秘钥
代码扫描的配置参数,其指定检测代码的类型、编码格式、路径等

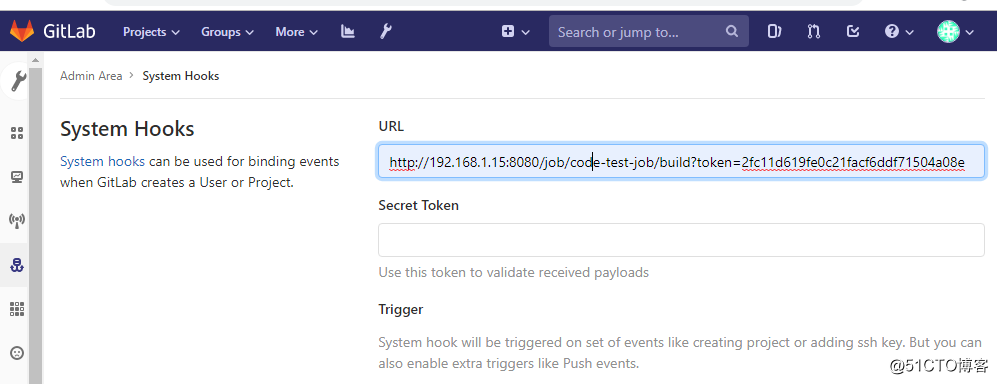
8)在gitlab服务器中对的系统钩子添加jenkins认证地址,以实现自动触发jenkins的项目构建
9)克隆gitlab仓库代码并修改代码,再上传至gitlab仓库触发jenkins项目构建
指定克隆develop分支代码
root@ubuntu1804:/data/src# git clone -b develop http://192.168.1.30/jie/web-page.git
Cloning into 'web-page'...
Username for 'http://192.168.1.30': jie
Password for 'http://[email protected]':
remote: Enumerating objects: 30, done.
remote: Counting objects: 100% (30/30), done.
remote: Compressing objects: 100% (13/13), done.
remote: Total 30 (delta 4), reused 27 (delta 4)
Unpacking objects: 100% (30/30), done.
添加一个php源码文件到克隆的目录下
root@ubuntu1804:/data/src/web-page# mv /data/Math.php ./
root@ubuntu1804:/data/src/web-page# ls
index.html  Math.php
代码添加至本地暂存区
root@ubuntu1804:/data/src/web-page# git add ./*代码提交至工作区并指定提交版本号以便多次提交的区分
root@ubuntu1804:/data/src/web-page# git commit -m 'v11'
[develop 9e106d4] v11
 1 file changed, 214 insertions(+)
 create mode 100644 Math.php
代码上传至gitlab代码库
root@ubuntu1804:/data/src/web-page# git push
Username for 'http://192.168.1.30': jie
Password for 'http://[email protected]':
Counting objects: 3, done.
Delta compression using up to 4 threads.
Compressing objects: 100% (3/3), done.
Writing objects: 100% (3/3), 1.75 KiB | 893.00 KiB/s, done.
Total 3 (delta 0), reused 0 (delta 0)
remote:
remote: To create a merge request for develop, visit:
remote:   http://192.168.1.30/jie/web-page/merge_requests/new?merge_request%5Bsource_branch%5D=develop
remote:
To http://192.168.1.30/jie/web-page.git
     3fb434f..9e106d4  develop -> develop
10)在gitlab服务端查看代码已提交成功

11)提交代码到gitlab后自动触发jenkins项目构建
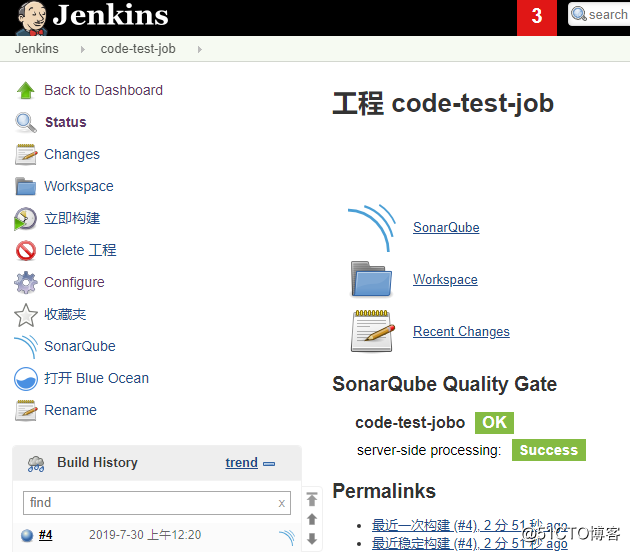
12)查看项目构建成功的控制台信息输出
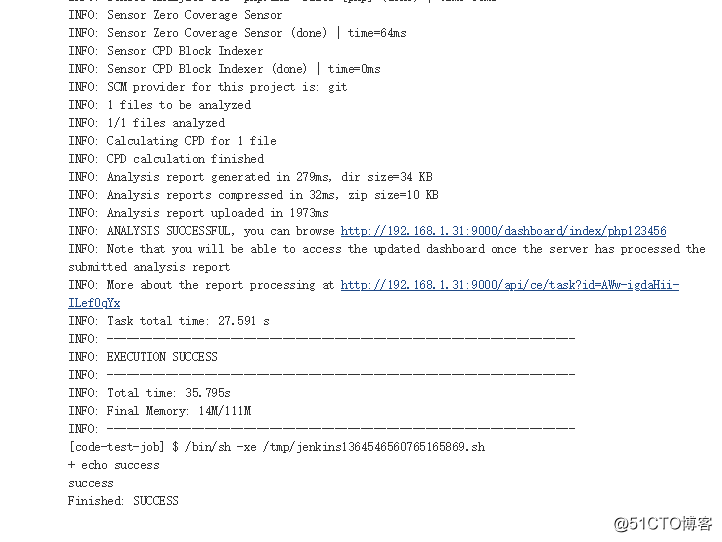
13)查看sonarqube-server服务器记录下来的php代码测试结果
Recommend
-
36
基于Kubernetes/Jenkins/Harbor/Sonarqube搭建微服务CICD系统
-
10
1 前提条件1、需要安装gitlab、jenkins、sonarqube;2、gitlab需要能访问jenkins地址,网络是通的,因为需要通过gitlab推送事件到jenkins机器;3、gitlab项目,需要有主程序员及以上权限。2 整体思路1、当有代码push到...
-
17
Analyze Java code using Gradle in SonarQube via JenkinsGradle is an open-source build automation tool that is designed to be flexible enough to build almost any type of software. Source:
-
19
代码质量管理:SonarQube + Jenkins Pipeline配置
-
3
4-8 Jenkins集成SonarQubeJenkins集成SonarQube Last updated on 17 Oct 2017 Published on 17 Oct 2017 Edit on GitHub
-
4
Share this:In this post we will setup SonarQube and Jenkins to perform code quality check and continuous integration....
-
4
一、SonarQube简介 SonarQube 是一个开源平台,用于管理源代码的质量。Sonar 不只是一个质量数据报告工具,更是代码质量管理平台。支持Java、Python、C、C++、Go等多种语言。 SonarQube是一种自动代码审...
-
8
【笔记】通过 Docker 部署 SonarQube 2023-07-26 2023-07-27...
-
3
通过 Maven 调用 SonarQube 进行代码检测 修改 Maven 配置 <sonar.login></sonar.login>:指定登陆 SonarQube 的用户名<sonar.password></sonar.password>
-
4
通过 Jenkins 调用 SonarQube 进行代码检测 Manage Jenkins->Plugins->Available plugins-> 搜索并安装 SonarQube Scanner 插件
About Joyk
Aggregate valuable and interesting links.
Joyk means Joy of geeK