

Old School Graphics Algorithms
source link: https://www.tuicool.com/articles/ieymeeZ
Go to the source link to view the article. You can view the picture content, updated content and better typesetting reading experience. If the link is broken, please click the button below to view the snapshot at that time.

Description
The C++ Bitmap Library consists of simple, robust, optimized and portable processing routines for the 24-bit per pixel bitmap image format.
Capabilities
The library has the following capabilities:
- Read/Write 24-bit Bitmap Images
- Pixel, row or column level batch editing
- colour conversions (RGB,YCbCr) in byte and floating values
- Highly optimized subsample and upsample (resizing)
- Various colour maps (1000 levels - autumn, copper, gray, hot, hsv, jet, prism, vga, yarg)
- Texture generation (checkered pattern, plasma)
- Graphics drawing interface (line, line-segment, rectangle, triangle, quadix, horizontal and vertical line-segments, ellipse, circle, plot pixel, pen width, pen colour)
- Cartesian canvas and associated drawing interface
- PSNR and Image comparisons
- Simple nearest colour match from set of colours
- Wavelength to RGB approximations
- Single header file solution requires no installation or building
C++ Bitmap Library License
Free use of the C++ Bitmap Library is permitted under the guidelines and in accordance with the MIT License.
Compatibility
The C++ Bitmap Library implementation is compatible with the following C++ compilers:
- GNU Compiler Collection (3.3+)
- Intel� C++ Compiler (8.x+)
- Clang/LLVM (1.1+)
- PGI C++ (10.x+)
- Microsoft Visual Studio C++ Compiler (7.1+)
- IBM XL C/C++ (10.x+)
Download
Simple Bitmap Library Usage Examples
- Example 01 - Count a particular colour in the given image
- Example 02 - Draw a rectangle then a circle
- Example 03 - Mandelbrot set fractal
- Example 04 - Julia set fractal
- Example 05 - Magnifying lens distortion
- Example 06 - Swirl effect
- Example 07 - Frosted glass effect
- Example 08 - Maze generation
- Example 09 - Fireballs along a Lissajous curve
- Example 10 - Sierpinski triangle via Monte-Carlo method
- Example 11 - Circles and equilateral triangles
- Example 12 - Archimedean spirals
- Example 13 - Image shuffle
- Example 14 - Phyllotaxis spiral
- Example 15 - Pointillism effect
Simple Example 1 - Count a particular colour in the given image
The following example will open a bitmap image called 'input.bmp' by instantiating an instance of the bitmap_image class and then proceed to count the number of pixels that have a red channel value greater than or equal to 111, then proceed to print the count to stdout. [Code: bitmap_simple_example01.cpp]
#include <cstdio>
#include "bitmap_image.hpp"

int main()
{
   bitmap_image image("input.bmp");

   if (!image)
   {
      printf("Error - Failed to open: input.bmp\n");
      return 1;
   }

   unsigned int total_number_of_pixels = 0;

   const unsigned int height = image.height();
   const unsigned int width  = image.width();

   for (std::size_t y = 0; y < height; ++y)
   {
      for (std::size_t x = 0; x < width; ++x)
      {
         rgb_t colour;

         image.get_pixel(x, y, colour);

         if (colour.red >= 111)
            total_number_of_pixels++;
      }
   }

   printf("Number of pixels with red >= 111: %d\n",total_number_of_pixels);

   return 0;
}
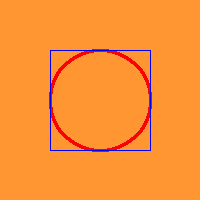
Simple Example 2 - Draw a Rectangle then a Circle
The following example will create a bitmap of dimensions 200x200 pixels, set the background colour to orange, then proceed to draw a circle centered in the middle of the bitmap of radius 50 pixels and of colour red then a rectangle centered in the middle of the bitmap with a width and height of 100 pixels and of colour blue. The newly constructed image will then be saved to disk with the name: 'output.bmp' . [Code: bitmap_simple_example02.cpp]
#include "bitmap_image.hpp"

int main()
{
   bitmap_image image(200,200);

   // set background to orange
   image.set_all_channels(255, 150, 50);

   image_drawer draw(image);

   draw.pen_width(3);
   draw.pen_color(255, 0, 0);
   draw.circle(image.width() / 2, image.height() / 2, 50);

   draw.pen_width(1);
   draw.pen_color(0, 0, 255);
   draw.rectangle(50, 50, 150, 150);

   image.save_image("output.bmp");

   return 0;
}
Simple Example 3 - Mandelbrot Set Fractal
The following example will render the Mandelbrot set fractal and save the generated bitmap as 'mandelbrot_set.bmp' .
[Code: bitmap_simple_example03.cpp]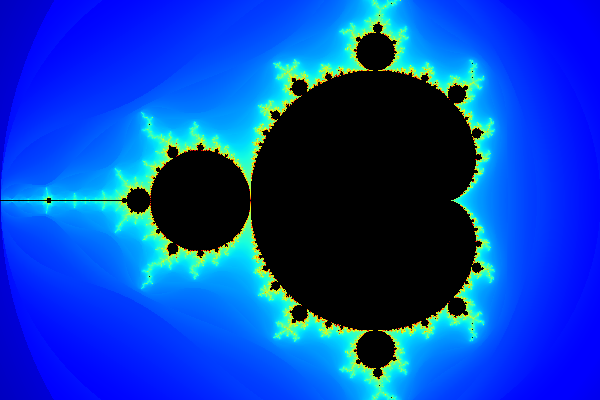
#include <cmath>
#include "bitmap_image.hpp"

int main()
{
   bitmap_image fractal(600,400);

   fractal.clear();

   double    cr,    ci;
   double nextr, nexti;
   double prevr, previ;

   const unsigned int max_iterations = 1000;

   for (unsigned int y = 0; y < fractal.height(); ++y)
   {
      for (unsigned int x = 0; x < fractal.width(); ++x)
      {
         cr = 1.5 * (2.0 * x / fractal.width () - 1.0) - 0.5;
         ci =       (2.0 * y / fractal.height() - 1.0);

         nextr = nexti = 0;
         prevr = previ = 0;

         for (unsigned int i = 0; i < max_iterations; ++i)
         {
            prevr = nextr;
            previ = nexti;

            nextr =     prevr * prevr - previ * previ + cr;
            nexti = 2 * prevr * previ + ci;

            if (((nextr * nextr) + (nexti * nexti)) > 4)
            {
               using namespace std;

               const double z = sqrt(nextr * nextr + nexti * nexti);

               //https://en.wikipedia.org/wiki/Mandelbrot_set#Continuous_.28smooth.29_coloring
               const unsigned int index = static_cast<unsigned int>
                  (1000.0 * log2(1.75 + i - log2(log2(z))) / log2(max_iterations));

               fractal.set_pixel(x, y, jet_colormap[index]);

               break;
            }
         }
      }
   }

   fractal.save_image("mandelbrot_set.bmp");

   return 0;
}

Simple Example 4 - Julia Set Fractal
The following example will render the Julia set fractal and save the generated bitmap as 'julia_set.bmp' .
[Code: bitmap_simple_example04.cpp]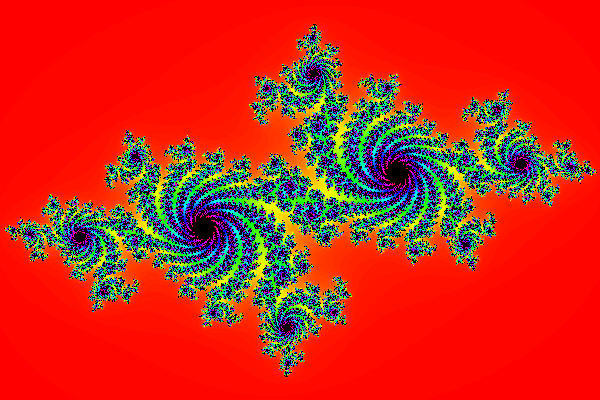
#include <cmath>
#include "bitmap_image.hpp"

int main()
{
   bitmap_image fractal(600,400);

   fractal.clear();

   const unsigned int max_iterations = 300;

   const double cr = -0.70000;
   const double ci =  0.27015;

   double prevr, previ;

   for (unsigned int y = 0; y < fractal.height(); ++y)
   {
      for (unsigned int x = 0; x < fractal.width(); ++x)
      {
         double nextr = 1.5 * (2.0 * x / fractal.width () - 1.0);
         double nexti =       (2.0 * y / fractal.height() - 1.0);

         for (unsigned int i = 0; i < max_iterations; ++i)
         {
            prevr = nextr;
            previ = nexti;

            nextr =     prevr * prevr - previ * previ + cr;
            nexti = 2 * prevr * previ + ci;

            if (((nextr * nextr) + (nexti * nexti)) > 4)
            {
               rgb_t c = hsv_colormap[static_cast<int>((1000.0 * i) / max_iterations)];

               fractal.set_pixel(x, y, c);

               break;
            }
         }
      }
   }

   fractal.save_image("julia_set.bmp");

   return 0;
}

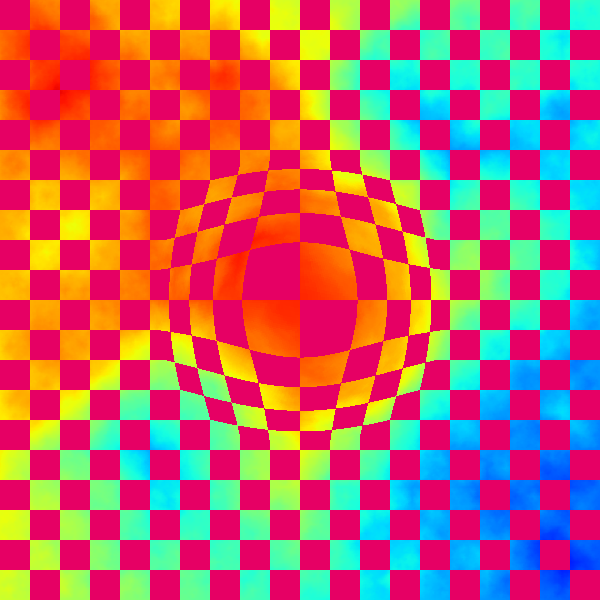
Simple Example 5 - Magnifying Lens Distortion
The following example will render a baseline image using a combination of plasma and checkered pattern effects. Then proceed to apply a lens distortion upon the base image. Finally both the base and the lens distorted versions of the images will be saved to file as 'base.bmp' and 'lens_effect.bmp' respectively. [Code: bitmap_simple_example05.cpp]
#include <algorithm>
#include <cmath>
#include "bitmap_image.hpp"

int main()
{
   bitmap_image base(600,600);

   base.clear();

   {
      const double c1 = 0.8;
      const double c2 = 0.4;
      const double c3 = 0.2;
      const double c4 = 0.6;

      ::srand(0xA5AA5AA5);

      plasma(base, 0, 0, base.width(), base.height(), c1, c2, c3, c4, 3.0, jet_colormap);

      checkered_pattern(30, 30, 230, bitmap_image::  red_plane, base);
      checkered_pattern(30, 30,   0, bitmap_image::green_plane, base);
      checkered_pattern(30, 30, 100, bitmap_image:: blue_plane, base);
   }

   bitmap_image lens_image(base.width(),base.height());

   lens_image = base;

   const double lens_center_x = base.width () / 2.0;
   const double lens_center_y = base.height() / 2.0;
   const double lens_radius   = std::min(base.width(), base.height()) / 4.0;
   const double lens_factor   = 0.7;

   for (unsigned int y = 0; y < base.height(); ++y)
   {
      for (unsigned int x = 0; x < base.width(); ++x)
      {
         const double dx = x - lens_center_x;
         const double dy = y - lens_center_y;

         const double distance = std::sqrt((dx * dx) + (dy * dy));

         if (distance <= lens_radius)
         {
            const double radius     = distance / lens_radius;
            const double angle      = std::atan2(dy, dx);
            const double distortion = std::pow(radius, lens_factor) * distance;

            int sx = static_cast<int>(distortion * std::cos(angle) + lens_center_x);
            int sy = static_cast<int>(distortion * std::sin(angle) + lens_center_y);

            if (
                 (sx >= 0)                 &&
                 (sy >= 0)                 &&
                 (sx < (int)base.width ()) &&
                 (sy < (int)base.height())
               )
            {
               unsigned char   red;
               unsigned char green;
               unsigned char  blue;

               base      .get_pixel(sx, sy, red, green, blue);
               lens_image.set_pixel( x,  y, red, green, blue);
            }
         }
      }
   }

   base      .save_image("base.bmp"       );
   lens_image.save_image("lens_effect.bmp");

   return 0;
}

Simple Example 6 - Swirl Effect
The following example will render a baseline image using a combination of plasma and checkered pattern effects. Then proceed to apply a swirl distortion upon the base image. Finally both the base and the swirl distorted versions of the images will be saved to file as 'base.bmp' and 'swirl_effect.bmp' respectively. [Code: bitmap_simple_example06.cpp]
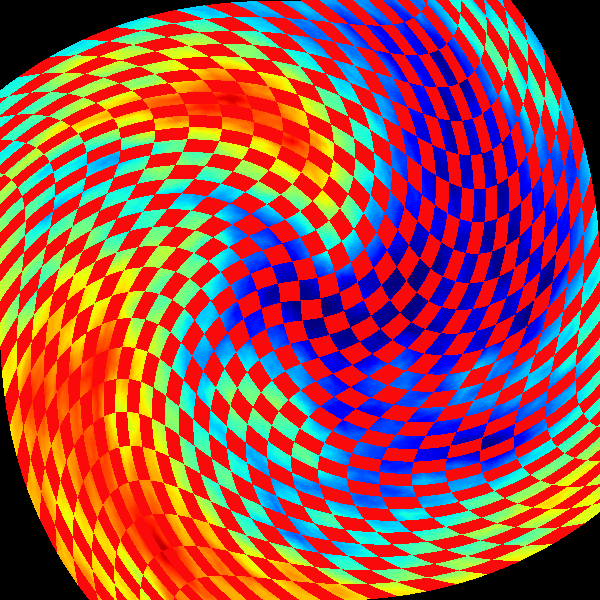
#include <cmath>
#include "bitmap_image.hpp"

int main()
{
   bitmap_image base(600,600);

   base.clear();

   {
      const double c1 = 0.8;
      const double c2 = 0.4;
      const double c3 = 0.2;
      const double c4 = 0.6;

      ::srand(0x5A5A5A5A);

      plasma(base, 0, 0, base.width(), base.height(), c1, c2, c3, c4, 7.0, jet_colormap);

      checkered_pattern(20, 20, 250, bitmap_image::  red_plane, base);
      checkered_pattern(20, 20,  10, bitmap_image::green_plane, base);
      checkered_pattern(20, 20,  10, bitmap_image:: blue_plane, base);
   }

   bitmap_image swirl_image(base.width(),base.height());

   swirl_image.clear();

   const double swirl_center_x = base.width () / 2.0;
   const double swirl_center_y = base.height() / 2.0;
   const double swirl_radius   = std::min(base.width(), base.height()) / 3.0;

   const double pi_ = 3.1415926535897932384626433832795028841971;
   const double swirl_angle = pi_ / 3.0;

   for (unsigned int y = 0; y < base.height(); ++y)
   {
      for (unsigned int x = 0; x < base.width(); ++x)
      {
         const double dx = x - swirl_center_x;
         const double dy = y - swirl_center_y;

         const double distance = std::sqrt((dx * dx) + (dy * dy));

         const double angle = swirl_angle * (distance / swirl_radius);

         const double cosa = std::cos(angle);
         const double sina = std::sin(angle);

         int sx = static_cast<int>(dx * cosa - dy * sina + swirl_center_x);
         int sy = static_cast<int>(dx * sina + dy * cosa + swirl_center_y);

         if (
              (sx >= 0)                 &&
              (sy >= 0)                 &&
              (sx < (int)base.width ()) &&
              (sy < (int)base.height())
            )
         {
            unsigned char   red;
            unsigned char green;
            unsigned char  blue;

            base       .get_pixel(sx, sy, red, green, blue);
            swirl_image.set_pixel( x,  y, red, green, blue);
         }
      }
   }

   base       .save_image("base.bmp"        );
   swirl_image.save_image("swirl_effect.bmp");

   return 0;
}

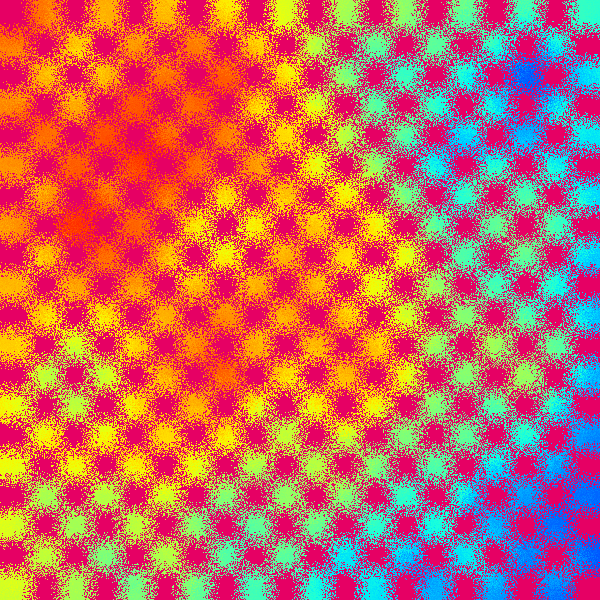
Simple Example 7 - Frosted Glass Effect
The following example will render a baseline image using a combination of plasma and checkered pattern effects. Then proceed to apply a frosted glass diffusion effect upon the base image. Finally the frosted glass version of the image will be saved to 'glass_effect.bmp' . [Code: bitmap_simple_example07.cpp]
#include <algorithm>
#include <cstdlib>
#include "bitmap_image.hpp"

int main()
{
   const int width       = 600;
   const int height      = 600;
   const int kernel_size =  10;

   bitmap_image base(width,height);

   base.clear();

   {
      const double c1 = 0.8;
      const double c2 = 0.4;
      const double c3 = 0.2;
      const double c4 = 0.6;

      ::srand(0xA5AA57A5);

      plasma(base, 0, 0, base.width(), base.height(), c1, c2, c3, c4, 3.0, jet_colormap);

      checkered_pattern(30, 30, 230, bitmap_image::  red_plane, base);
      checkered_pattern(30, 30,   0, bitmap_image::green_plane, base);
      checkered_pattern(30, 30, 100, bitmap_image:: blue_plane, base);
   }

   bitmap_image glass_image(base.width(),base.height());

   glass_image = base;

   for (int y = 0; y < height; ++y)
   {
      for (int x = 0; x < width; ++x)
      {
         const unsigned int min_x = std::max(0, x - kernel_size);
         const unsigned int min_y = std::max(0, y - kernel_size);
         const unsigned int max_x = std::min(x + kernel_size, width  - 1);
         const unsigned int max_y = std::min(y + kernel_size, height - 1);
         const unsigned int dx    = (max_x - min_x);
         const unsigned int dy    = (max_y - min_y);
         const unsigned int N     = rand() % (dx * dy);
         const unsigned int cx    = (N % dx) + min_x;
         const unsigned int cy    = (N / dx) + min_y;

         glass_image.set_pixel(x, y, base.get_pixel(cx, cy));
      }
   }

   glass_image.save_image("glass_effect.bmp");

   return 0;
}

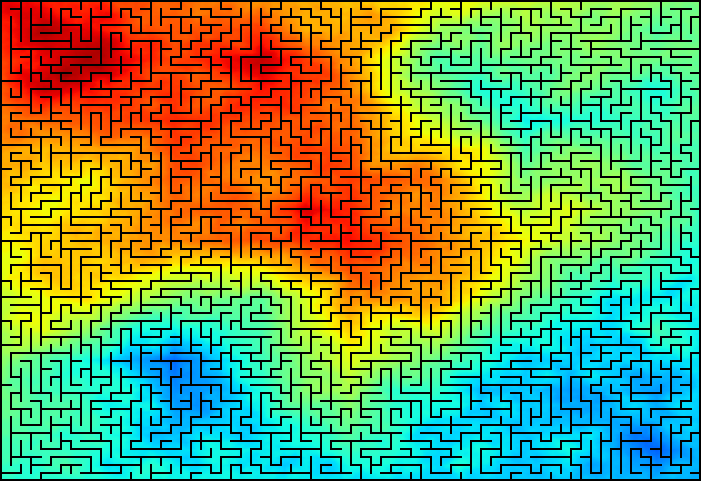
Simple Example 8 - Maze Generation
The following example will render a maze generated using a simple recursive backtracking algorithm. The example demonstrates the use of the drawing and colouring functionalities. Once the maze has been completed, it will be saved to file as 'maze.bmp' . [Large Maze] [Maze Generation Animation] [Code: bitmap_simple_example08.cpp]
![[Large Maze]](https://www.partow.net/programming/bitmap/images/maze_large.png)
![[Maze Generation Animation]](https://www.partow.net/programming/bitmap/images/maze.gif)
#include <cstdlib>
#include "bitmap_image.hpp"

enum compass { N = 1, E = 2, S = 4, W = 8 };

const int untouched = (N | E | S | W);

struct move_t { int x, y, inverse; };

const move_t move[5] =
      {
         { 0, 0, 0 },
         // North        East         South         West
         { 0, -1, S }, { 1, 0, W }, { 0, 1, N },  { -1, 0, E }
      };

const int movemap[] = {0, 1, 2, 0, 3, 0, 0, 0, 4};

const compass permutations[] =
      {
        N,S,E,W, S,N,E,W, E,N,S,W, N,E,S,W, S,E,N,W, E,S,N,W, E,S,W,N, S,E,W,N,
        W,E,S,N, E,W,S,N, S,W,E,N, W,S,E,N, W,N,E,S, N,W,E,S, E,W,N,S, W,E,N,S,
        N,E,W,S, E,N,W,S, S,N,W,E, N,S,W,E, W,S,N,E, S,W,N,E, N,W,S,E, W,N,S,E
      };

void generate_maze(int cx, int cy, response_image<int>& maze)
{
   const unsigned int perm_index = 4 * ((rand() % 24));

   std::vector<compass>
      directions(&permutations[perm_index], &permutations[perm_index + 4]);

   for (std::size_t i = 0; i < directions.size(); ++i)
   {
      const move_t m = move[movemap[directions[i]]];

      const int x = cx + m.x;
      const int y = cy + m.y;

      if (
           (x < 0) || (y < 0)        ||
           (x >= (int)maze.width ()) ||
           (y >= (int)maze.height()) ||
           (untouched != maze(x,y))
         )
         continue;

      // Eliminate the wall corresponding to the selected direction.
      maze(cx,cy) = maze(cx,cy) & ~directions[i];
      maze( x, y) = maze( x, y) & ~m.inverse;

      generate_maze(x,y, maze);
   }
}

int main()
{
   const std::size_t maze_width  = 80;
   const std::size_t maze_height = 70;

   response_image<int> maze(maze_width, maze_height);

   maze.set_all(untouched);

   generate_maze(rand() % maze_width, rand() % maze_height, maze);

   const std::size_t wall_size_x = 10; // 10 pixels
   const std::size_t wall_size_y =  8; //  8 pixels
   const std::size_t pen_size    =  2; //  2 pixels

   bitmap_image image(
                       (maze_width ) * wall_size_x + (pen_size - 1),
                       (maze_height) * wall_size_y + (pen_size - 1)
                     );

   image.clear();

   {
      // Render background using Plasma effect
      const double c1 = 0.9;
      const double c2 = 0.5;
      const double c3 = 0.3;
      const double c4 = 0.7;

      ::srand(0xA5AA5AA5);

      plasma(image, 0, 0, image.width(), image.height(), c1, c2, c3, c4, 3.0, jet_colormap);
   }

   image_drawer draw(image);

   draw.pen_width(2);
   draw.pen_color(0, 0, 0);

   draw.rectangle(0, 0, image.width() - pen_size, image.height() - pen_size);

   // Draw the maze
   for (std::size_t y = 0; y < maze.height(); ++y)
   {
      for (std::size_t x = 0; x < maze.width(); ++x)
      {
         // Cell(x,y) coordinates
         const int x0 = x * wall_size_x;
         const int y0 = y * wall_size_y;
         const int x1 = x * wall_size_x + wall_size_x;
         const int y1 = y * wall_size_y + wall_size_y;

         const int cell = maze(x,y);

         // Is north wall present?
         if ((cell & N))
            draw.line_segment(x0, y0, x1, y0);

         // Is south wall present?
         if ((cell & S))
            draw.line_segment(x0, y1, x1, y1);

         // Is east wall present?
         if ((cell & E))
            draw.line_segment(x1, y0, x1, y1);

         // Is west wall present?
         if ((cell & W))
            draw.line_segment(x0, y0, x0, y1);
      }
   }

   image.save_image("maze.bmp");

   return 0;
}

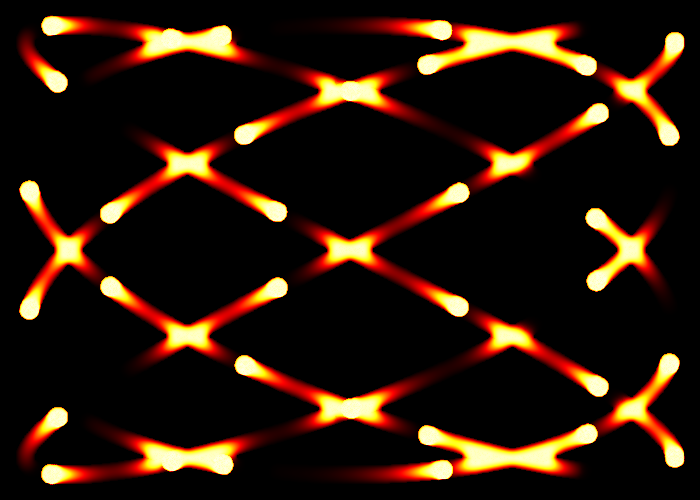
Simple Example 9 - Fireballs Along A Lissajous Curve
The following example is an old-school graphical effect of rendering fireballs that have been placed equidistant to their immediate neighbours following a Lissajous curve . The fireballs will then proceed to move within the plane using the curve as their path. The example demonstrates the construction of a piecewise colour palette and the response_image functionality. After having 'simulated' N-frames, the final frame will be converted to a bitmap and then saved to file as 'fireballs.bmp' . [Fireballs Animation] [Code: bitmap_simple_example09.cpp]
![[Fireballs Animation]](https://www.partow.net/programming/bitmap/images/fireballs.gif)
#include <cmath>
#include <iterator>
#include <vector>
#include "bitmap_image.hpp"

struct lissajous_curve
{
   lissajous_curve(const double xs, const double ys)
   : scale_x(xs),
     scale_y(ys)
   {}

   inline double x(const double t) const { return scale_x * std::sin(4 * t); }
   inline double y(const double t) const { return scale_y * std::cos(3 * t); }

   double scale_x;
   double scale_y;
};

int main()
{
   bitmap_image image(700,500);

   image.clear();

   lissajous_curve curve(image.width () / 2.0 - 25, image.height() / 2.0 - 25);

   const double pi_   = 3.1415926535897932384626433832795028841971;
   const double delta = (2.0 * pi_) / 100000.0;

   const std::size_t max_fire_balls   = 30;
   const std::size_t number_of_frames = 3000;

   const double cooling_factor = 0.940; // [0,1]

   // Arc-length of curve: x(t) = a0 * sin(4t), y(t) = a1 * cos(3t)
   const double curve_length = 6151.0;

   double segment_length  = curve_length / max_fire_balls;
   double curr_seg_length = 0;

   double prev_x = curve.x(0);
   double prev_y = curve.y(0);

   std::vector<double> fire_ball;

   // Set the initial location for each fireball
   for (double t = delta;  fire_ball.size() < max_fire_balls; t += delta)
   {
      const double center_x = curve.x(t);
      const double center_y = curve.y(t);

      const double dx = (prev_x - center_x);
      const double dy = (prev_y - center_y);

      curr_seg_length += std::sqrt((dx * dx) + (dy * dy));

      prev_x = center_x;
      prev_y = center_y;

      if (curr_seg_length >= segment_length)
      {
         curr_seg_length = 0.0;
         fire_ball.push_back(t);
      }
   }

   response_image<double> resp_image(image.width(),image.height(), -1.0);
   response_image<double> fb_misses (image.width(),image.height(), -1.0);

   resp_image.set_all(-999.0);
   fb_misses .set_all(   0.0);

   std::vector<rgb_t> fire_palette;

   // Baseline colours used in fire palette
   rgb_t black  = make_colour(  0,   0,   0);
   rgb_t red    = make_colour(255,   0,   0);
   rgb_t yellow = make_colour(255, 255,   0);
   rgb_t white  = make_colour(255, 255, 255);

   // Setup the fire palette:
   // Black (Coolest - 0) --> Red --> Yellow --> White (Hottest - 999)
   generate_colours(334,  black,    red, std::back_inserter(fire_palette));
   generate_colours(333,    red, yellow, std::back_inserter(fire_palette));
   generate_colours(333, yellow,  white, std::back_inserter(fire_palette));

   for (std::size_t k = 0; k < number_of_frames; ++k)
   {
      fb_misses.inc_all(1);

      // Render fireballs on response image
      for (std::size_t i = 0; i < fire_ball.size(); ++i)
      {
         const double fb_x = curve.x(fire_ball[i]) + image.width () / 2.0;
         const double fb_y = curve.y(fire_ball[i]) + image.height() / 2.0;

         // Draw circles with radii in the range [1,10]
         for (double t = 0;  t < (2 * pi_); t += (((2.0 * pi_) / 360)))
         {
            for (double r = 1; r <= 10; ++r)
            {
               std::size_t rx = static_cast<std::size_t>(r * std::sin(t) + fb_x);
               std::size_t ry = static_cast<std::size_t>(r * std::cos(t) + fb_y);

               // Per-frame in the range [0,100]
               double heat_distortion = 50.0 * std::cos(delta * i) + 50;

               resp_image(rx,ry) = fire_palette.size() * 0.8 +
                                   heat_distortion +
                                   (::rand() % 100);

               fb_misses (rx,ry) = 0;
            }
         }

         // Move fireball to its next location
         fire_ball[i] += delta;
      }

      // Apply cooling process to the entire plane
      for (std::size_t y = 1; y < resp_image.height() - 1; ++y)
      {
         for (std::size_t x = 1; x < resp_image.width() - 1; ++x)
         {
            double avg = (
                           resp_image(x - 1, y - 1) + resp_image(x    , y - 1) +
                           resp_image(x + 1, y - 1) + resp_image(x - 1, y    ) +
                           resp_image(x + 1, y    ) + resp_image(x    , y + 1) +
                           resp_image(x - 1, y + 1) + resp_image(x + 1, y + 1)
                         ) / (7.0 + cooling_factor);

            // Only allow cooler averages to be applied
            if (avg > resp_image(x, y))
               continue;

            // More rapidly cool points that haven't seen fireballs in the last N-frames
            if (fb_misses(x,y) > 2000)
               avg *= 0.90 + ((::rand() % 10) / 100.0);

            // Clamp average in the range [0,999]
            resp_image(x,y) = ((avg < 0.0) ? 0.0 : ((avg > 999.0) ? 999.0 : avg));
         }
      }
   }

   convert_rsp_to_image(resp_image, fire_palette, image);

   image.save_image("fireballs.bmp");

   return 0;
}

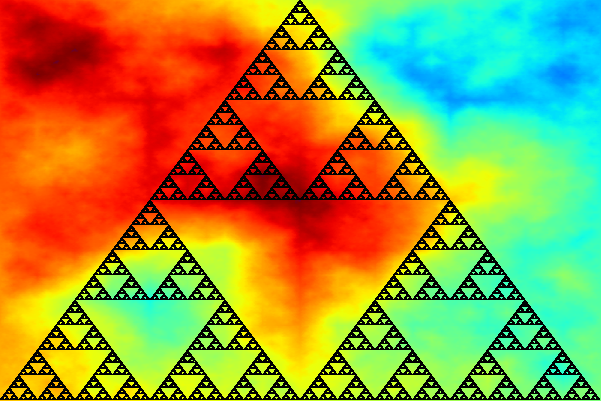
Simple Example 10 - Sierpinski Triangle Via Monte-Carlo Method
The following example will render the Sierpinski triangle fractal using a linear difference equation based monte-carlo process, and then proceed to save the generated bitmap as 'sierpinski_triangle.bmp' . [Sierpinski Generation Animation] [Code: bitmap_simple_example10.cpp]
![[Sierpinski Generation Animation]](https://www.partow.net/programming/bitmap/images/sierpinski_triangle.gif)
#include <cmath>
#include <cstdlib>
#include "bitmap_image.hpp"

struct point_t { double x,y; };

int main()
{
   const int canvas_width  = 600;
   const int canvas_height = 400;

   cartesian_canvas canvas(canvas_width,canvas_height);

   {
      // Render background using Plasma effect
      const double c1 = 0.9;
      const double c2 = 0.3;
      const double c3 = 0.5;
      const double c4 = 0.7;

      ::srand(0xA5AA5AA5);

      plasma(canvas.image(), c1, c2, c3, c4, 3.5, jet_colormap);
   }

   point_t triangle[3];

   triangle[0].x = 0;
   triangle[0].y = +canvas_height / 2.0;
   triangle[1].x = -canvas_width  / 2.0;
   triangle[1].y = -canvas_height / 2.0;
   triangle[2].x = +canvas_width  / 2.0;
   triangle[2].y = -canvas_height / 2.0;

   point_t pnt = triangle[0];

   const std::size_t max_iterations = 1000000;

   for (std::size_t i = 0; i < max_iterations; ++i)
   {
      const point_t target_point = triangle[rand() % 3];

      pnt.x += (target_point.x - pnt.x) / 2.0;
      pnt.y += (target_point.y - pnt.y) / 2.0;

      canvas.plot_pen_pixel(pnt.x,pnt.y);
   }

   canvas.image().save_image("sierpinski_triangle.bmp");

   return 0;
}

Simple Example 11 - Circles & Equilateral Triangles
The following example randomly generate circles and proceed to inscribe multiple levels of inner equilateral triangles. The example demonstrates the use of the cartesian canvas, pen functions, various shape fill routines and colour maps. Once complete the rendering will be saved to disk with the name: 'circles_and_triangles.bmp' . [Code: bitmap_simple_example11.cpp]
#include <cmath>
#include <cstdlib>
#include "bitmap_image.hpp"

struct point_t { double x,y; };

int main()
{
   const int canvas_width  = 700;
   const int canvas_height = 460;

   cartesian_canvas canvas(canvas_width,canvas_height);

   canvas.image().clear(255);

   canvas.pen_width(1);

   ::srand(0xA5A5A5A5);

   for (std::size_t i = 0; i < 100; ++i)
   {
      double cx = ((rand() % canvas_width ) - canvas_width  / 2.0);
      double cy = ((rand() % canvas_height) - canvas_height / 2.0);
      double r  = (rand() % 70) + 10;

      const double pi_   = 3.1415926535897932384626433832795028841971;
      const double _120d = (2.0 * pi_/ 3.0);

      double rndang = ((2.0 * pi_) / 360.0) * ((rand() % 360) + 1.0);

      point_t p0, p1, p2;
      point_t p3, p4, p5;

      p0.x = r * std::sin(1.0 * _120d + rndang) + cx;
      p0.y = r * std::cos(1.0 * _120d + rndang) + cy;
      p1.x = r * std::sin(2.0 * _120d + rndang) + cx;
      p1.y = r * std::cos(2.0 * _120d + rndang) + cy;
      p2.x = r * std::sin(3.0 * _120d + rndang) + cx;
      p2.y = r * std::cos(3.0 * _120d + rndang) + cy;

      #define rnd_colour (copper_colormap[rand() % 1000])

      // Draw and fill the circle
      canvas.pen_color(rnd_colour);
      canvas.fill_circle(cx, cy, r);
      canvas.pen_color(rnd_colour);
      canvas.circle(cx, cy, r);

      // Draw and fill the main equilateral triangles
      canvas.pen_color(rnd_colour);
      canvas.fill_triangle(p0.x, p0.y, p1.x, p1.y, p2.x, p2.y);
      canvas.pen_color(rnd_colour);
      canvas.triangle(p0.x, p0.y, p1.x, p1.y, p2.x, p2.y);

      // Draw the inner-equilateral triangles
      for (unsigned int j = 0; j < 4; ++j)
      {
         p3.x = (p0.x + p1.x) / 2.0;
         p3.y = (p0.y + p1.y) / 2.0;
         p4.x = (p1.x + p2.x) / 2.0;
         p4.y = (p1.y + p2.y) / 2.0;
         p5.x = (p2.x + p0.x) / 2.0;
         p5.y = (p2.y + p0.y) / 2.0;

         p0 = p3; p1 = p4; p2 = p5;

         canvas.pen_color(rnd_colour);
         canvas.fill_triangle(p3.x, p3.y, p4.x, p4.y, p5.x, p5.y);
         canvas.pen_color(rnd_colour);
         canvas.triangle(p3.x, p3.y, p4.x, p4.y, p5.x, p5.y);
      }
   }

   canvas.image().save_image("circles_and_triangles.bmp");

   return 0;
}

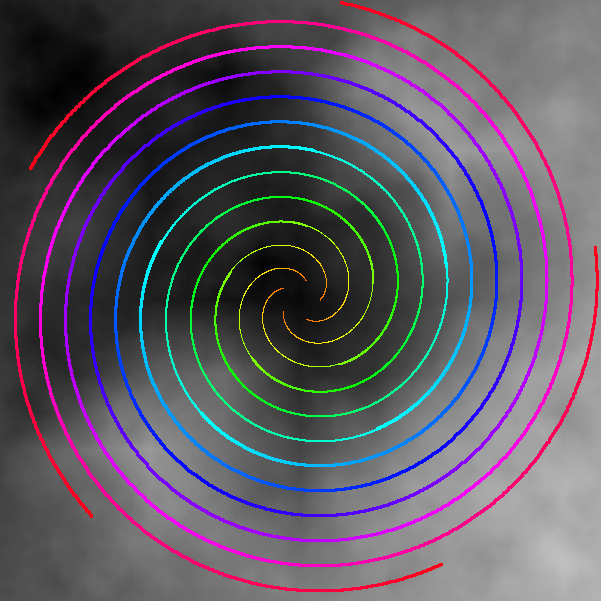
Simple Example 12 - Archimedean Spirals
The following example renders Archimedean spirals upon a gray-scale plasma background. The example demonstrates the use of the cartesian canvas, pen functions, and colour maps. Once complete the rendering will be saved to disk with the name: 'spirals.bmp' . [Code: bitmap_simple_example12.cpp]
#include <cmath>
#include <cstdlib>
#include "bitmap_image.hpp"

struct point_t
{
   point_t(double _x = 0.0, double _y = 0.0) : x(_x), y(_y) {}
   double x,y;
};

int main()
{
   const double pi_ = 3.1415926535897932384626433832795028841971;
   const double a   = 20.0;
   const double b   = 20.0;
   const double dr  = (2.0 * pi_) / 1000.0;

   const std::size_t N = 5;
   const double delta_angle = (2.0 * pi_) / N;

   std::vector<point_t> spiral;

   for (std::size_t i = 0; i < N; ++i)
   {
      spiral.push_back(
         point_t(a * std::cos((delta_angle * i)),
                 a * std::sin((delta_angle * i))));
   }

   const int canvas_width  = 600;
   const int canvas_height = 600;

   cartesian_canvas canvas(canvas_width,canvas_height);

   canvas.image().clear(0);

   {
      // Render background using Plasma effect
      const double c1 = 0.9;
      const double c2 = 0.5;
      const double c3 = 0.3;
      const double c4 = 0.7;

      bitmap_image& image = canvas.image();

      ::srand(0xA5AA5AA5);

      plasma(image, 0, 0, image.width(), image.height(), c1, c2, c3, c4, 3.0, gray_colormap);
   }

   for (double angle = dr; (a + b * angle) < canvas.image().width() / 2.0; angle += dr)
   {
      for (std::size_t i = 0; i < spiral.size(); ++i)
      {
         const double theta = angle + delta_angle * i;
         const double d     = (a + b * angle);
         const point_t curr(d * std::cos(theta), d * std::sin(theta));

         const double centre_ratio =
            (sqrt(curr.x * curr.x + curr.y * curr.y) / (canvas.image().width() / 2.0));

              if (centre_ratio <= 0.25) canvas.pen_width(1);
         else if (centre_ratio <= 0.50) canvas.pen_width(2);
         else if (centre_ratio <= 0.75) canvas.pen_width(3);
         else if (centre_ratio <= 1.00) canvas.pen_width(4);

         unsigned int index = (unsigned int)(1000.0 * centre_ratio);

         canvas.pen_color(hsv_colormap[index]);

         canvas.line_segment(spiral[i].x, spiral[i].y, curr.x, curr.y);

         spiral[i] = curr;
      }
   }

   canvas.image().save_image("spirals.bmp");

   return 0;
}

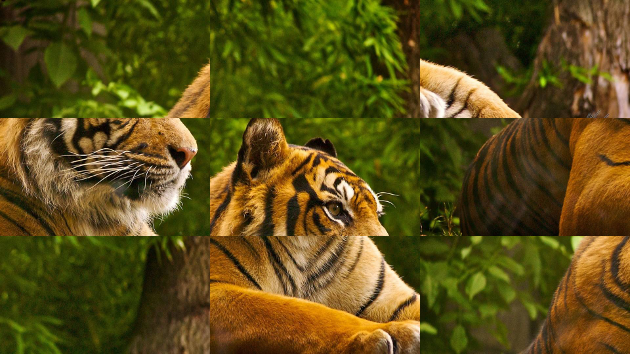
Simple Example 13 - Image Shuffle
The following example will take as input 'tiger.bmp' . Then proceed to dissect the image into 9 cells of 3x3, then proceed to randomly shuffle cells. The example demonstrates the copying to-and-from 'Regions Of Interest' ROI within and between images. Once the shuffling as been complete the shuffled image will be saved to disk with the name: 'shuffled.bmp' .
[Code: bitmap_simple_example13.cpp]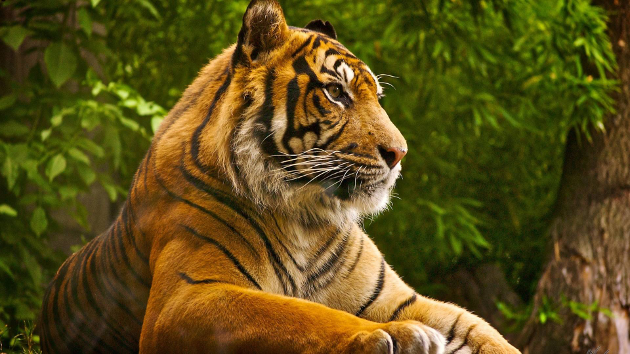
#include <cmath>
#include <cstdlib>
#include <vector>
#include "bitmap_image.hpp"

void shuffle(unsigned int n, std::vector<unsigned int>& v)
{
   ::srand(0x13A1515A);
   for (unsigned int i = 0; i < n; ++i) v.push_back(i);
   for (unsigned int i = v.size() - 1; i > 0; --i)
   { std::swap(v[i], v[rand() % (i + 1)]); }
}

int main()
{
   bitmap_image image("tiger.bmp");

   const unsigned int divisions    = 3;
   const unsigned int block_width  = image.width () / divisions;
   const unsigned int block_height = image.height() / divisions;

   std::vector<unsigned int> cell;

   shuffle(divisions * divisions, cell);

   bitmap_image shuffled(image.width(), image.height());
   bitmap_image region;

   shuffled.clear();

   for (std::size_t i = 0; i < cell.size(); ++i)
   {
      unsigned int x_offset = block_width  * (i % divisions);
      unsigned int y_offset = block_height * (i / divisions);

      // Copy region from original image
      image.region(x_offset, y_offset,
                   block_width, block_height, region);

      x_offset = block_width  * (cell[i] % divisions);
      y_offset = block_height * (cell[i] / divisions);

      // Paste region to new location in shuffled image
      shuffled.copy_from(region, x_offset, y_offset);
   }

   shuffled.save_image("shuffled.bmp");

   return 0;
}

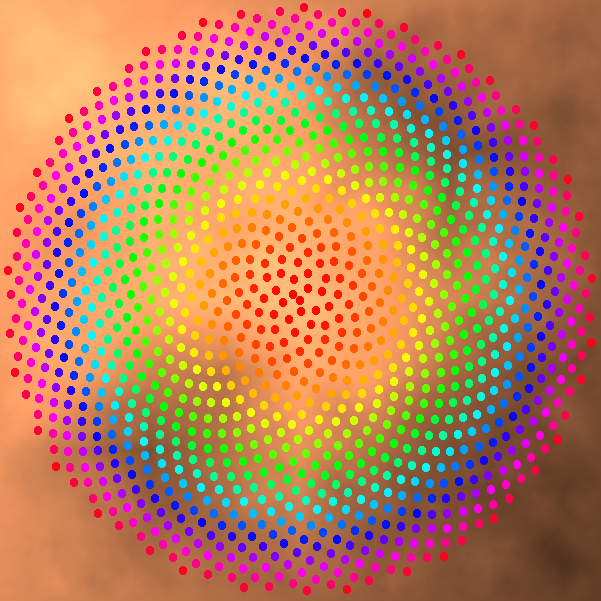
Simple Example 14 - Phyllotaxis Spiral
The following example renders a Phyllotaxis spiral upon a copper plasma background. The example demonstrates the use of the cartesian canvas, circle fill function, and colour maps. Once complete the rendering will be saved to disk with the name: 'phyllotaxis.bmp' . [Phyllotaxis Animation] [Code: bitmap_simple_example14.cpp]
![[Phyllotaxis Animation]](https://www.partow.net/programming/bitmap/images/phyllotaxis.gif)
#include <cmath>
#include <cstdlib>
#include "bitmap_image.hpp"

int main()
{
   const int canvas_width  = 600;
   const int canvas_height = 600;

   const double pi       = 3.1415926535897932384626433832795028841971;
   const double phi      = pi * (3.0 - std::sqrt(5.0));
   const double radius   = (std::min(canvas_width, canvas_height) / 2.0) - 5.0;
   const double N        = 1200.0;
   const double spread   = radius / std::sqrt(N);
   const double p_radius = std::floor(spread / 2.0);

   cartesian_canvas canvas(canvas_width,canvas_height);

   {
      // Render background using Plasma effect
      const double c1 = 0.9;
      const double c2 = 0.5;
      const double c3 = 0.3;
      const double c4 = 0.7;

      bitmap_image& image = canvas.image();

      ::srand(0xA5AA5AA5);

      plasma(image, 0, 0, image.width(), image.height(), c1, c2, c3, c4, 3.0, copper_colormap);
   }

   for (double i = 0.0; i < N; ++i)
   {
      const double theta = phi * i;
      const double d     = spread * std::sqrt(i);
      const double x     = d * std::cos(theta);
      const double y     = d * std::sin(theta);

      canvas.pen_color(hsv_colormap[static_cast<std::size_t>(1000.0 * (i  / N))]);
      canvas.fill_circle(x, y, p_radius);
   }

   canvas.image().save_image("phyllotaxis.bmp");

   return 0;
}

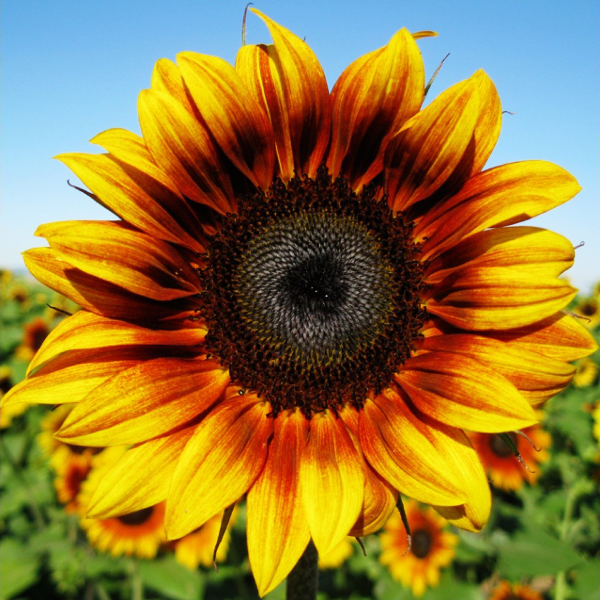
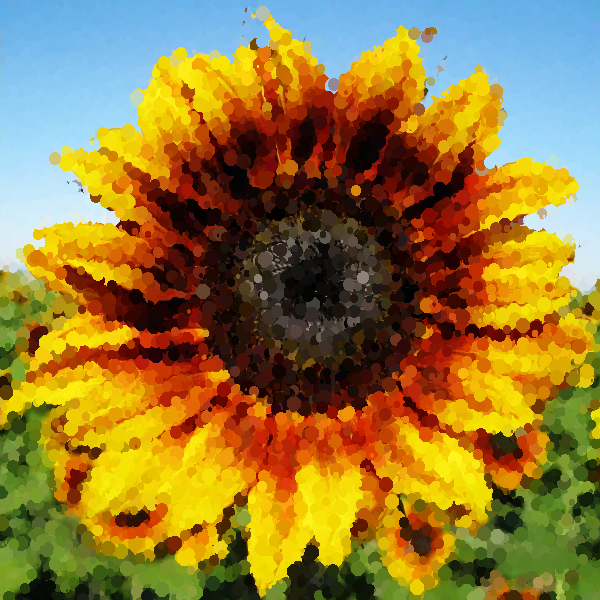
Simple Example 15 - Pointillism Effect
The following example will render an input image called 'sunflower.bmp' using an approximation of the Pointillism painting technique. Once the rendering is complete the image will be saved to disk with the name: 'pointillist.bmp' . [Pointillism Animation] [Code: bitmap_simple_example15.cpp]
![[Pointillism Animation]](https://www.partow.net/programming/bitmap/images/pointillist.gif)
#include <cstdlib>
#include "bitmap_image.hpp"

int main()
{
   bitmap_image base("sunflower.bmp");

   cartesian_canvas canvas(base.width(),base.height());
   canvas.image() = base;

   const int pixel_count  = base.width() * base.height();
   const int N            = static_cast<int>(pixel_count * 0.03); // 3% of pixels
   const double rnd_ratio = pixel_count / (1.0 + RAND_MAX);

   ::srand(0xA57A57A5);

   for (int i = 0; i < N; ++i)
   {
      const int    r  = static_cast<int>(rand() * rnd_ratio);
      const int    x  = (r % base.width());
      const int    y  = (r / base.width());
      const double cx = x - (base.width() / 2.0);
      const double cy = (base.height() / 2.0) - y;
      const double radius = 1.0 + (r % 7);

      canvas.pen_color(base.get_pixel(x, y));
      canvas.fill_circle(cx, cy, radius);
   }

   canvas.image().save_image("pointillist.bmp");

   return 0;
}

Final Note:
The above examples are for exposition purposes, primarily intended to demonstrate the functionality of the bitmap_image library using short, concise and simple to understand pieces of code. As such certain 'coding' simplifications were made which would not necessarily be acceptable in production implementations. As an example the use of the quick-n-dirty libc 'rand' function should be replaced with the C++ standard library's more modern and robust std::random facilities. Hence when evaluating the above examples such 'issues' should perhaps be taken into consideration.
Recommend
About Joyk
Aggregate valuable and interesting links.
Joyk means Joy of geeK