

Android Studio Tips and Tricks [FREE]
source link: https://www.tuicool.com/articles/qIRVveI
Go to the source link to view the article. You can view the picture content, updated content and better typesetting reading experience. If the link is broken, please click the button below to view the snapshot at that time.
Android app development has changed a lot since Android debuted. To be successful today, you need to know how to use an important tool of the trade: Android Studio .
Android Studio is the official Integrated Development Environment (IDE) for Google’s Android operating system. It was built on JetBrains’ IntelliJ IDEA software and created for Android development.
While you can write your code by hand, if you master the IDE, you’ll find you’ll use it on a daily basis to get the most out of Android Development and improve your efficiency and productivity.
Note : An Integrated Development Environment (IDE) is an app that provides comprehensive facilities to computer programmers for software development. An IDE consists of at least a source code editor, build automation tools and a debugger. Most modern IDEs also have intelligent code completion.

In this tutorial, you’ll master navigating the codebase, refactoring, debugging and using the right tool/plugin at the right time to become a beast of Android Studio!
So fire up your IDE and walk through this goldmine of productivity tips and tricks. :]
Getting Started
Since it’s based on IntelliJ IDE, Android Studio naturally inherits a lot of keyboard shortcuts. Additionally, many of its panels also have their own quick keyboard shortcuts.
Instead of juggling between a mouse or trackpad and a keyboard, these quick shortcuts let you keep your fingers on the keyboard and control everything smoothly.
In the next section, you’ll learn some of the most common keyboard shortcuts.
Note : Inside Android Studio, the set keyboard shortcuts correspond to the default MacOSX key mapping . For Windows and Linux, you’ll find the shortcuts to use either in the animated gifs or written out in the tutorial, where necessary.

To get started with this tutorial, click the Download Materials button at the top or bottom of the page to download the starter project.
If you already have Android Studio 3.4.1 or later open, click File ▸ Import Project and select the top-level project folder you downloaded.
If not, fire up Android Studio and select Open an existing Android Studio project from the Welcome screen, then choose the top-level project folder for the starter project you downloaded.
Code Refactoring
Your spontaneous reaction to refactoring might be that it’s too much work and leads to unintended bugs in the codebase. If your only option was to refactor your code by hand using a simple text editor, you’d be right. However, if you offload all the steps involved to the IDE and let it execute the refactoring task as an automated process, it becomes a piece of cake. :]
In this section, you’ll explore some of the Android Studio features which simplify the refactoring overhead to a few keystrokes, letting you refactor with confidence!
Using Shortcuts to Move Code Around

Moving code around is one of the most frequents tasks in a developer’s day-to-day activities. When you introduce new changes, you’ll often have to shift a line of code. Using Android Studio, you have a variety of shortcuts to help you do this without introducing errors.
Shifting Code Up and Down
You can easily push code up or pull it down by using:
-
For lines of code:
- On MacOSX: ⌥ + ⇧ + ↑ and ⌥ + ⇧ + ↓
- On Windows/Linux: Shift + Alt + ↑ and Shift + Alt + ↓

-
For methods:
- On MacOSX: ⇧ + ⌘ + ↑ and ⇧ + ⌘ + ↓
- On Windows/Linux: Shift + Ctrl + ↑ and Shift + Ctrl + ↓
Moving Sections of Code
If you’d like move a section of code to its own class or to another package, use the F6 key, as shown below:
Note : This works for all top-level declarations and for Java’s static methods and constants.
Duplicating Code
As you are coding, you might find that you want to duplicate a section or a line of code. To duplicate code quickly, use ⌘ + D on MacOSX and Ctrl + D on Windows/Linux:

Deleting Code
Oh, no, you’ve made a mistake! How can you quickly delete code? The shortcut ⌘ + Backspace on MacOSX and Ctrl + Y on Windows/Linux comes to the rescue:

Note : These shortcuts work regardless of the cursor’s position on the line.
Renaming Code Constructs
As you code, you might find that you need to rename your constructs. Manual renaming is out of the picture: It’s too much work and it’s prone to human error. Plus, switching to your mouse takes too much time.
To rename anything, use the key combination of ⇧ + F6 . Here’s how it’s done:
-
Renaming a variable/field:
-
Renaming a method:

-
Renaming a class:
Note : Android Studio takes care of all of the instances of the field, method or class when you execute rename .
Changing Method Signatures
What about when you’d like to change the method signature?
Android Studio can take care of changing the method signature for you by adding, removing, or reordering a method’s argument. To do so, use the key combination of ⌘ + F6 on MacOSX and Ctrl + F6 on Windows/Linux.
Take a look:

Extracting Variables
All of this is very cool, but do you know what would be even better? Being able to extract repeated or complex code into its own method or variable.
For example, say you have a string that’s used repeatedly in your class and you want to replace all of the string’s instances with a variable. Approaching this manually would be cumbersome to say the least.
But Android Studio simplifies the whole process into a single key combination of ⌥ + ⌘ + V on MacOSX and Ctrl + Alt + V on Windows/Linux:

Extracting Methods
How about extracting multiple lines of code as a method? Of course you can do this, too! Use the shortcut: ⌥ + ⌘ + M on MacOSX and Ctrl + Alt + M on Windows/Linux:

Extracting Method Parameters
But that’s not all! You can go even further by extracting part of the method body as a parameter to the method. You can do this with the key combination of ⌥ + ⌘ + P on MacOSX and Ctrl + Alt + P on Windows/Linux:
Note : You can choose to replace one or all of the occurrences of the method body.
Inlining With Shortcuts
Not only can you use Android Studio shortcuts to extract, you can also do the opposite: Inlining.
Use the key combination ⌥ + ⌘ + N on MacOSX and Ctrl + Alt + N on Windows/Linux to replace all occurrences of the variable with the actual value or methods in the method body:

Now, it’s time to move on to the next cool thing that Android Studio can help you do: Find and resolve errors!
The Magic of Quick Fix
Android Studio has a super cool feature called Quick Fix or Intention Actions . This feature offers you possible solutions to issues with your code based on the current cursor placement and context.
Quick Fix can fix many common issues such as removing unused imports, unused methods or unused variables; switching out var
with val
; switching out multiple if
– else
instances with switch
/ when
statements; and more.
To summon this magical feature, simply use the key combination of ⌥ + Enter on MacOSX and Alt + Enter on Windows/Linux:

So you’ve found quick ways to rearrange your code and to identify and fix problems. But how about moving around your codebase?
Using Android Studio to Navigate Your Codebase
While refactoring code is a powerful tool for developers, another benefit of using Android Studio is being able to navigate your codebase efficiently. Android Studio’s options and key bindings make it effortless to look through the codebase.

Searching the Codebase
When it comes to finding anything in your code, Android Studio has a super-helpful global search, which you access by pressing the Shift key two times .
That shortcut brings up a search box where you can look for files, classes, symbols, tests, methods etc. If there’s one thing that you need to memorize, it’s this keyboard combination:

Running More Specific Searches
But wouldn’t it be better to search for specific types of items, like files, classes or symbols, in the first place?
Don’t worry, Android Studio has you covered with various sub-search features that you can access with these key combinations:
-
To search only enumerations, classes, interfaces, and so on, use ⌘
+ O
on MacOSX and Ctrl
+ N
on Windows/Linux

-
To search files only, use ⌘
+ ⇧
+ O
on MacOSX and Shift
+ Ctrl
+ N
on Windows/Linux

-
To search only symbols, use ⌘
+ ⌥
+ O
on MacOSX and Shift
+ Ctrl
+ Alt
+ N
on Windows/Linux

Another kind of search which is very handy lets you look for actions. When you forget where a particular action is in the IDE, you can find it again easily by using ⇧ + ⌘ + A on MacOSX and Shift + Ctrl + A on Windows/Linux:

How about jumping to corresponding tests? To do that, you need to go to the class declaration and use ⇧ + ⌘ + T on MacOSX and Shift + Ctrl + T on Windows/Linux.
Note : If there are no existing tests, Android Studio will suggest that you create a new test.

Showing Methods and Properties
Now and then, it’s helpful to get an overview of the whole class, which gives you a better understanding of the code and a bird’s eye view of the class’s functionality.
Android Studio provides a quick overview, which you can access using the key combination ⌘ + F12 on MacOSX and Ctrl + F12 on Windows/Linux.

Go to an Implementation/Declaration
Let’s say that you’re scrolling through the codebase and find an unfamiliar method being called. To jump to its definition, all you need to do is select the method and hit ⌘ + B on MacOSX and Ctrl + B on Windows/Linux.
Once at the definition, if you press the same keyboard shortcut again, it’ll take you back to where the method is used.

Locating Errors
When the project encounters errors, you’re already sad. :[ Having to hunt for those errors in the file is even more frustrating. Trying to scroll through thousands of lines of code to find the error is like finding a needle in a haystack.
Android Studio simplifies this to a single key: F2 . Hitting F2 when there are errors in the file will allow jumping to the next line of error. That’s quite a productivity booster!
By pairing F2 with Shift , you can jump back to the previous line of error in the same file.
To test this, delete the method named printRecordingState()
inside MainActivity.kt
. This will introduce errors in the class.
Now, use the shortcut to jump to the lines of code where there’s an error.
Note : If there are no errors, those keys will do the same for all warnings.
Before you move on to the next section, undo your changes to remove the errors.
Debugging Like a Pro
As a developer, you can’t avoid debugging your codebase. Being a good debugger is a necessity.
Android Studio offers a few tricks to make debugging easier.
Color Code Logcat
This trick is somewhat superficial, but it helps you to separate logs inside Logcat using colors. Each type of log will have its own color.
To change Android Studio Logcat, you need to:
- Go to Preferences (Settings on Windows or Linux machines) ▸ Editor ▸ Color Scheme ▸ Android Logcat.
- Change the foreground color for every type of log.
- Uncheck the option: Inherit values from: Console ▸ Error output.
-
Set a color value for each type of log:
#BA68C8
#4CAF50
#F44336
#2196F3
#BBBBBB
#FF9800

Logging Using Non-Suspending Breakpoints
This next trick is a sure time saver. As a developer, you might want to put debug logs in your code so that you can track specific points while it’s executing.
Obviously, this is not very efficient; since debug logs are not required in the release codebase, you’ll have to remove them manually. Oh my!
Android Studio has a neat trick that can save you from the overhead of adding and removing log statements by using breakpoints.
To get this set up, place any breakpoint on a line and then right-click inside of it. This will open a menu pop-over. Uncheck the Suspend option to enable more options in the pop-over:

Once you’ve enabled the extra options and they’re visible, check the Evaluate and Log option. Next, enter a log statement with a variable appended to it, just as you would with a normal log statement.
Now, when you run the app in debug mode, your code will hit the breakpoint but won’t stop the execution. Instead, it will print the evaluated statement into the Console window.
Once done, remove all the breakpoints. Since these breakpoints are non-suspending, you can also choose to keep them.
Your code will only hit the breakpoints when you run the app in debug mode. For the release/production version, you don’t have to do any extra work. A win-win situation for all. :]
Now that you have some debugging tricks in your toolbelt, it’s time to take a look a how to set up the UI to be just the way you like it.
Mastering the Android Studio UI
Customizing the user interface of the tools you use helps you work more quickly and efficiently. The same applies to Android Studio. You can improve your experience by tweaking some features and by using others in a smart way.
Grouping Your Projects
You can organize projects from the launch window in Android Studio. You can group individual projects to help keep the never-ending list of projects, tidy! This makes finding a specific Android project a lot easier.
Right click anywhere in the list of projects, and choose New Group giving it some name. Then right click on any project, and select Move to group and then select the newly created group. You can see an example of this below:

Avoid Jumping to Design Tab
Working with Design view for layout files isn’t for everyone. Many developers still prefer using the XML layout editor.
However, by default, Android Studio will always open in Design view. To set it to always open in XML view, you need to set your preference in Android Studio as shown below:

Using Better Fonts
Being able to write code effortlessly should be one of the top goals of any developer. Being able to read your code easily will help you reach that goal. So it’s best to pick a font in Android Studio that’s easy to read and whose size doesn’t force you to strain your eyes.
One such font is FiraCode , which has ligature support and was made with programmers and developers in mind.
To get it up and running, download the font and install it in your operating system. Once installed, restart Android Studio and navigate to Preferences ▸ Editor ▸ Font , then choose FiraCode .
Your eyes will thank you. :]

Now that you’ve set Android Studio up to be easy to use, find out how you can customize its functionality to work just the way you want it!
Plugins: Power-Ups for Android Studio
The Android Studio IDE is a complete package that includes everything a developer needs for Android Development.
For anything that the IDE doesn’t support out of the box, Android Studio fills the gap by giving you the ability to extend its powers via plugins .
Using plugins is like adding superpowers to the IDE. They enable interesting functionalities inside the IDE beyond what you’ll find in Android Studio’s base install.

To install plugins in Android Studio, navigate to Preferences ▸ Plugins and then search for plugins in the Marketplace.
Helpful Plugins for Android Studio
Here are a few interesting plugins you might want to try:
-
CodeGlance
This plugin enables a small minimap view on the right side of your editor, which makes lets you scroll through your code very easily. This is especially useful if you have large class files and you want to be able to scroll to a section of code quickly.

-
ADB-Idea
This plugin is super handy when it comes to interacting with your emulator/devices over adb.
ADB-Idea simplifies tasks such as uninstall, kill, start, restart, clear an application and clear the application data and restart it. You just have to start it from the GUI.

-
ADB Wifi
This Android Studio plugin lets you debug Android apps over Wi-Fi.

-
Key Promoter X
This plugin will help you to train yourself to use keyboard shortcuts more often than your mouse.
It displays an annoying pop-up every time you perform an action with your mouse. It also lists how many times you’ve called that action.

-
Biu
This plugin makes PNG compression much more convenient.


Miscellaneous Tricks
Now that you’ve covered some of the major areas where Android Studio tips can help you, it’s time for a round-up of miscellaneous tricks that can increase your productivity even more!

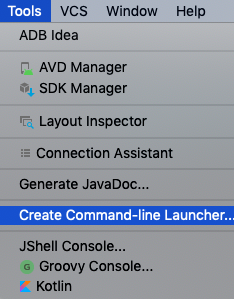
Create Command-Line Launcher
Tinkering with a terminal has more benefits than most people realize. Few people know this, but you can launch Android Studio from a terminal location.
All you need to do is create a command-line launcher. To do this, go to Tools ▸ Create Command-line Launcher… :
Hit OK in response to the dialog prompt:

Congratulations, studio
is now available as a command in your terminal!
Executing studio
with the path to the folder of the Android project will open the Android project. It also works when you are in your app’s root folder. You simply need to pass ./
in place of the path (i.e., studio ./
), which will open the Android project.
Including On-Demand Dependency
Once upon a time, there were only a handful of support library dependencies. But nowadays, these libraries have evolved, and it’s not easy to remember their signatures. Developers usually need to search the official docs to find them.
Well, with the release of Android Studio 3.4.0, you now can easily include the library dependency to the Gradle build. All you need to do is to type the class name you want to use and then press ⌥ + Enter on MacOS or Alt + Enter on Windows or Linux. This will give you a suggestion from your IDE of the required library dependency to include.
Choose which one you want to add the library dependency and sync Gradle. Pretty rad, right?

Using Android Studio’s Local History
Most developers love the Git versioning system, but not everyone chooses to use it. Sometimes, you’ll mess up your git history, and that’s a real bummer. :[
Luckily, Android Studio has a built-in Local History , which automatically saves a history of changes that you’ve made. When you’re stuck and want to revert to an earlier version, right-click inside the editor and select Local History ▸ Show History :

which opens a window with all the changes you’ve made in the past:

Once you select one of those changes, click on the Revert button at the top-left corner:

This can save you hours of fiddling with the codebase and manually attempting to restore earlier code. :]
Verifying Java-Kotlin Interop
Many apps in production still use Java and Kotlin side-by-side in their codebase. This is unavoidable since you can’t write the whole app in Kotlin overnight.
What do you do in such a situation? You write code in Java as well as Kotlin, making sure they can interop properly. There’s even a full guide on how to do this in the official documentation.
But checking the guide manually is error-prone and breaks the continuity in the development process. Here, Android Studio comes to the rescue once again.
This little-known feature isn’t enabled by default, but Android Studio has inspection rules that can validate Java-Kotlin interop compatibility as you write your code.
Find this feature under Preferences ▸ Inspection . Search for the keyword interop and enable the option Kotlin Interoperability .

Copying Tooltips
How many times have you been in a situation where Android Studio uses a tooltip to tell you that it’s detected an issue?
You’d like to copy the tooltip’s message and search for it online to find a solution. But to do that, you have to type out the whole message, word by word. Ugh.
Well, actually, Android Studio can copy the text for you. Just move the cursor over the tooltip, press ⌥ in MacOS or Alt in Windows or Linux and click the tooltip itself.

Keeping Your Code Tidy With Region Blocks
Here’s a neat trick: Oftentimes, you want to group code inside a file into small sections, because there is just too much to look at. Ideally, you should split your code into meaningful classes and functions, but even then you might have a lot to look at inside one file.
To solve this, Android Studio offers what’s known as Region comments, which you can collapse and expand.
To create a region, start a single-line comment and, without adding spaces, write region
. Add a space and the name of the region.
Next, at the point where you want to close the region, start another single line comment and, without adding spaces, write endregion
. The code looks something like this:
...
//region Print Functions
fun methodOne(){
  // Awesome code
}
fun methodSecond(){
  // Awesome code
}
//endregion
That’s it. You can collapse this using the – icon in the caret region on the left-hand side of Android Studio:

Executing Code Blocks
Sometimes, you only want to execute a small block of code instead of running the whole app. The use-case for this is usually when you’re building a utility function and you want to verify that it works properly.
Android Studio provides a very neat solution: Just add a top-level main
function. The IDE will let you execute that function locally as if it were a unit test.
Even better, use a live template to set it up by typing psvm
and hitting Enter
. Super neat!

Check the gif to see how it works:

Sharing Your Project as a ZIP File
Oftentimes, if you’re not using the Git versioning system, you want to share your project as a compressed zip file.
The trouble with doing so manually is that you’d bundle the generated build files along with your project. So you’ll either have to delete all of those files or run the gradlew clean
command before zipping your project folder.
Android Studio makes this super easy by generating a zip file without including the generated files. You end up with a clean and compressed zip archive, just by using a simple command in the File menu.

Phew, that was a lot of tips and tricks related to Android Studio, but you’ve only touched the tip of the iceberg. Android Studio is full of productivity tricks for developers.
Where to Go From Here?
You can find the final project in the tutorial .zip file, which you can download using the Download Materials button at the top and bottom of the tutorial.
If you’re new to Android Studio, be sure to check out our tutorial, Beginning Android Development with Kotlin, Part One: Installing Android Studio .
You can also learn more Android Studio tips and trucks by reading the official documentation .
I hope you enjoyed exploring Android Studio tips and tricks. If you have any questions or comments, please join the forum discussion below!
Recommend
About Joyk
Aggregate valuable and interesting links.
Joyk means Joy of geeK