

Introduction to Kotlin Lambdas: Getting Started [FREE]
source link: https://www.tuicool.com/articles/RrYvyqZ
Go to the source link to view the article. You can view the picture content, updated content and better typesetting reading experience. If the link is broken, please click the button below to view the snapshot at that time.
In this tutorial, you will learn how to use lambda expressions and other functional literals provided by Kotlin for the Android platform.
Lambda expression is a simplified representation of a function. It can be passed as a parameter, stored in a variable or even returned as a value.
Note : If you are new to Android app development or just getting started, you should get a head start from Kotlin for Android: An Introduction .
To practice using lambda expressions, you will build a simple app to save and manage your favorite songs. It will have the functionality to:
- Add songs to a Favorite list.
- Display favorite songs on a list with playlist range.

While doing so, you will explore the following Kotlin topics:
- Lambdas
- Anonymous functions
- Higher-order functions
- Closures
Time to start learning!
Getting Started
Use the Download Materials button at top or bottom of this tutorial to download the starter project.
Once the project is downloaded:
- Open the starter project in Android Studio 3.3 or above.
- Press Command + 1 on Mac (or Alt + 1 on Windows) to open the project structure.
- Open the java and res folders.

Take a moment to review the main project files to know more about their usage.
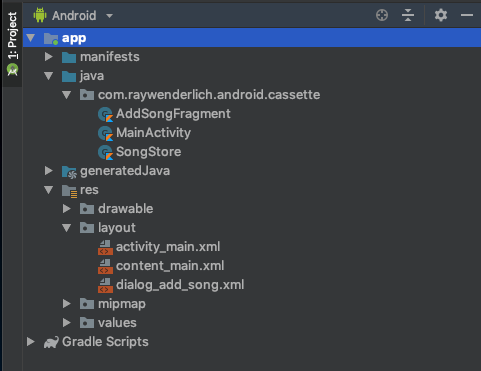
- MainActivity.kt : Shows all the songs added by you on the UI. Initially, it shows an empty screen as there is no data.
- AddSongFragment.kt : Shows the UI to enter and save song details.
- SongStore.kt : Helper class to manage and store songs in Preferences.
- activity_main.xml : Layout file for song list UI.
- dialog_add_song.xml : Layout file for new song addition UI.
Press Control + R (or Shift + F10 on Windows) to run the app on an emulator or device.
Recapping Functions
A function is a group of statements written to perform a specific task. It can have any number of parameters as input, and it can return one or more values.
Open the MainActivity.kt
file and add the following code below the onCreate()
function:
// 1
private fun showAddSongDialog() {
  // 2
  AddSongFragment.show(supportFragmentManager)
}
Here, you:
-
Define a function named
showAddSongDialogusingfunkeyword. The function takes no parameters and returns no value. -
Call the
show()function in theAddSongFragmentto show the Add Song screen.
Build the project and run on emulator or device.
Click Add Song button. Nothing happens. This is because you must still set the listeners on the buttons.
Next, you will add lambda expressions to the app. You will use them to set click listeners and also add a bit of text style to your song list.
Getting Into Lambda Expressions
A lambda expression is a shorter way of describing a function. It doesn’t need a name or a return statement. You can store lambda expressions in a variable and execute them as regular functions. They can also be passed as parameters to other functions or be the return value.
You define lambda expressions following this syntax:
val lambdaName : Type = { parameterList -> codeBody }
Function Types
Function types are notation similar to a function signature. A function type has a parameter list inside parentheses and a return type. For example, (A, B) -> C
represents a function that takes two parameters of type A
and B
and returns a value of type C
. You can also specify empty parameter lists and no return value with Unit
.
Example :
// 1
  val lambda1: () -> Unit = { println("Hello, world") }
  // 2
  val lambda2 = { println("Hello, world") }
  // 3
  lambda2()
In the example code above, you:
-
Assign the lambda expression to a variable
lambda1. It has a function type of() -> Unit. The type represents a function that takes no parameters and returns no value orUnit. -
Assign another lambda expression to another variable
lambda2. You can find that variable type can be ignored for simple lambda expressions thanks to Kotlin Type Inference . - Execute the lambda expression in a similar way as function calls.
Lambda With Parameters
A lambda expression can have one or more parameters. You specify the parameters before the →
symbol followed by codeBody
. The compiler interprets the return type of lambda by the last executable statement in its body:

You specify lambda expressions in following formats:
// 1
  val lambda1: (String) -> Unit = { name: String -> println("Hello, $name") }
  // 2
  val lambda2: (String) -> Unit = { name -> println("Hello, $name") }
  // 3
  val lambda3: (String) -> Unit = { println("Hello, $it") }
  // 4
  val lambda4: (String) -> Unit = { println("Hello, World!") }
  // 5
  val lambda5: (Int, Int) -> Int = {  x, y ->
    print(x)
    print(y)
    x + y
  }
  // 6
  val lambda6 = {x: Int, y: Int -> x + y }
In the examples above, you learn:
-
lambda1stores a lambda that takes single parameter with typeStringand returns no value. -
lambda2proves that you can ignore the lambda parameter type as it is already specified through the variable function type. -
In
lambda3the parameter name and→is skipped and insteaditkeyword is used.itcan be used to refer to the parameter in lambdas with only one argument. -
In
lambda4, you use the same structure aslambda3but, in this case, you don’t make use of theStringparameter. -
lambda5type declaration of variable represents a function with two parameters of typeIntwith return type also asInt. In this example, you have a block code with several instructions. The last statement of lambdax + yhelps the compiler in inferring the return type of the lambda. -
lambda6represents the simplified form oflambda5.
Next, you will explore the lambda expression use cases in the app.
Making Buttons Clickable
Open MainActivity.kt
. It shows an empty UI with a Add Song
button. Add the following function below the showAddSongDialog()
:
// 1
private fun setClickListeners() {
  // 2
  button_add_song_empty.setOnClickListener {
    showAddSongDialog()
  }
  // 3
  button_add_song.setOnClickListener {
    showAddSongDialog()
  }
}
After adding the above code, press Opt
+ Enter
(or Alt
+ Enter
on Windows) to import the button_add_song_empty
and button_add_song
references if Android Studio doesn’t do it automatically.
In this code, you:
-
Define a function
setClickListeners()to add click listeners to buttons. -
Using Kotlin extensions, you set click listener to
button_add_song_empty. As per the documentation ofView.OnClickListenerinterface, it provides a single function to implement. You can replace such interface implementations with lambdas. Also, as the lambda is only and last parameter tosetOnClickListenerfunction, it can be moved outside the parentheses. -
Set click listener to
button_add_songbutton, which is displayed when the empty UI is hidden.
Understanding Lambda Concepts
Lambdas have two special characteristics.
First, the onClickListener()
that you just defined could’ve been written this other way:
button_add_song_empty.setOnClickListener(View.OnClickListener {
  showAddSongDialog()
})
As you can see, in this case, the lambda is defined inside the parentheses as a parameter. If a lambda has a function as its last or only parameter, you can omit the parentheses as you did in the previous code.
The second characteristic is that you can replace interfaces with a single method
with a lambda expression. You can check the Android Documentation on View.OnClickListener
to see that View.OnClickListener
is an interface with just one method: onClick(View v)
.
Finally, call setClickListeners()
from the onCreate()
function in the MainActivity
:
setClickListeners()
Build and run , and click the Add Song button again. You will see the dialog to add a new song.

Next, you will add logic to show songs and hide empty UI.
Hiding the Empty UI
The MainActivity
class initially shows an empty screen. You need to hide the empty UI once you start adding songs.
In the MainActivity.kt
file, add the following lambda expression as a new property below private lateinit var songStore: SongStore
to toggle the empty UI visibility:
// 1
val toggleEmptyView = { show: Boolean ->
  // 2
  group_empty.visibility = if (show) View.VISIBLE else View.GONE
  button_add_song.visibility = if (show) View.GONE else View.VISIBLE
}
In the snippet above, you:
-
Define a lambda that has a parameter
showofBooleantype. -
Show the empty UI if the
showvalue istrue, else hide it.
Next, you will add the code to show songs from SongStore
on the UI.
Displaying Songs
As specified earlier, the SongStore.kt
stores the song to preferences. It stores each song as a comma-separated String
item in StringSet
preference in the format title, artist, year
.
The SongStore
class provides you with a property allSongs
to access all the currently stored songs. You will now add the code to show song list on the screen. You will also add a bit of styling to the song list by underlining the song title.
In the MainActivity.kt
file, and add the following function below the setClickListeners()
method to show the available songs. Don’t forget to import the necessary classes using Opt
+ Enter
(or Alt
+ Enter
on Windows):
// 1
private fun showAllSongs(songs: List<String>) {
  // 2
  val spans = mutableListOf<Spanned>()
  // 3
  val underlineTitle: (String) -> SpannableString = {
    val songTitle = it.split(",")[0]
    SpannableString(it).apply {
      setSpan(UnderlineSpan(), 0, songTitle.length,
      Spannable.SPAN_EXCLUSIVE_INCLUSIVE)
    }
  }
  // 4
  for (song in songs) {
    spans.add(underlineTitle(song))
    spans.add(SpannedString("\n\n"))
  }
  // 5
  text_view_all_songs.text = TextUtils.concat(*spans.toTypedArray())
  // 6
  toggleEmptyView(spans.isEmpty())
}
In this code, you:
-
Define function
showAllSongs(), which takes a list of songs as parameter. -
Initialize list of
Spannedto hold each styled song item. -
Define lambda expression which takes a parameter of
Stringtype and has a return type ofSpannableString. The lambda finds the song title by splitting the song at,and reading the first value. It then applies the underline span to each song title. -
Apply the underline style to each song title by passing each song to the
underlineTitlelambda variable asunderlineTitle(song). You also add new line span to add spacing between song items in UI. -
Show the song list on the UI by joining all the spans and setting it to
text_view_all_songsview. -
Toggle the empty UI by calling the
toggleEmptyViewbased on if the styled song item list is not empty.
Reloading Songs
In the MainActivity.kt
file, add the following line below the setClickListeners()
call in the onCreate()
function:
showAllSongs(songStore.allSongs.toList())
In this code block, you call the showAllSongs
and pass the current stored songs by reading the store.allSongs.toList()
value from SongStore
class.
Also, add following code to the onSongAdded
function:
showAllSongs(songStore.allSongs.toList())
  toggleEmptyView(false)
The onSongAdded
function is called by the AddSongFragment
every time a new song is added.
In the above code, you call the showAllSongs
and pass the current stored songs from SongStore
class. You also toggle the empty UI.
Save your changes and run the app. No songs are visible yet as the SongStore
is still empty. Next, you will go ahead and add the code to handle the addition of songs.
Anonymous Functions
As you learnt in the previous section, lambda expressions can’t have a return statement. The return type is either inferred from the variable which stores the lambda or from the last statement of the lambda body. Another missing thing is multiple return points you might often need.
You can use anonymous functions to solve these shortcomings. You define an anonymous function as a regular function omitting its name.
After you type in the song title, artist and year in the input fields on the screen, click the Save button.
Nothing happens yet as you must still add the code to read and store the input song. Next, you will add the code to save the song once you click the Save button.
Saving Songs
Open the AddSongFragment.kt
file and add the following code below the handleSongSaveClick()
function to read input data:
// 1
private fun saveSong(): Boolean {
  // 2
  val title = edit_text_title.text?.toString()
  val artist = edit_text_artist.text?.toString()
  val year = edit_text_year.text?.toString()

  return true
}
In this code, you:
-
Define a function to
saveSong()with aBooleanreturn type. -
Read and store the input values in the respective variables. You store the title, artist and year in the
title,artist,yearvariables.
Next, you will add the following code inside the onClickListener { }
block code defined in handleSongSaveClick()
to call the saveSong
function each time you click the Save button:
if (saveSong()) {
  dismiss()
}
Here, you dismiss the input screen dialog if the saveSong()
returns true
.
You might wonder why the saveSong()
function returns a Boolean
value. Next, you will find out why validation is important and the use case for anonymous functions.
Validating Song Data
Whenever you take user input, it is necessary for you to validate the input data and make sure input data is correct and consistent. Inconsistent data leads to app crashes and bad user experiences.
Add the following code below the saveSong()
function in the AddSongFragment.kt
file. You will need to validate the input data using the following functions before storing it:
// 1
private fun isValidArtist(artist: String?): Boolean {
  // 2
  val artistValidator = fun(value: String?): Boolean {
  // 3
  if (value.isNullOrEmpty()) {
    showError(R.string.error_artist_empty)
    return false
  }

  if (value.length < 2) {
    showError(R.string.error_artist_invalid)
    return false
  }
  return true }

  // 4
  return artistValidator(artist)
}

// 5
private fun isValidYear(year: String?): Boolean {
  val yearValidator: (String?) -> Boolean = { !it.isNullOrEmpty() && it.toInt() in 1877..2019 }
  return yearValidator(year)
}
In the code block above, you:
-
Define a function
isValidArtist()withBooleanreturn type. -
Initialize
artistValidatorvariable with an anonymous function. -
Return
falseif the input value of artist name isnullor empty or if its length is less than two characters. Otherwise, you returntruefrom the anonymous function. -
Execute the anonymous function by calling
artistValidator()and passingartistas parameter. -
Define a function
isValidYear(), which returns atrueorfalsevalue. It calls the lambdayearValidatoron the year value to validate the input data and returns its result.
You will need to call these validation functions whenever a song is being saved.
Saving Data With Validation
Once again, in AddSongFragment.kt
file, add the following lines in the saveSong()
method before the return
statement:
if (title.isNullOrEmpty()) {
  showError(R.string.error_title_empty)
  return false
}

if (!isValidArtist(artist)) {
  return false
}

if (!isValidYear(year)) {
  showError(R.string.error_year_invalid)
  return false
}
The code above returns false
whenever any of the input fields has an invalid value. You dismiss the Add Song dialog when the saveSong()
function returns true
— i.e., there is no error in the input values.
Run the app . Click the Add Song button to add a new song. You will notice an error message if you provide an incorrect year or when you keep the artist name field empty.

Next, you will add a function to save the input song data to preferences.
Higher-Order Functions
A higher-order function is a function that takes functions as parameters and can also return a function. When you invoke a higher-order function you can pass lambdas or anonymous functions as parameters.
Open the SongStore.kt
file and add the following function below getStoredSongs()
function to save the song details:
// 1
fun saveSong(song: String, onSuccess: (() -> Unit)?, onError: (Int) -> Unit) {
  // 2
  val songs = getStoredSongs()
  if (songs.contains(song)) {
    // 3
    onError(R.string.error_song_exists)
  } else {
    // 4
    songs.add(song)
    preferences.edit(true) {
    putStringSet(STORE_KEY, songs)
  }
  onSuccess?.invoke()
  }
}
Remember to import the required dependencies with Opt + Enter (or Alt + Enter on Windows).
In the code above code, you:
-
Define a high-order function name
saveSong(). It takes the first parametersongof typeString, the second parameter is namedonSuccesswith a function type, and the third parameteronErroris also a function type. - Check for duplication by getting all songs and checking if the new song already exists.
-
In case of duplication, show an error by calling
onError()function. -
Successfully save the song to store and call the
onSuccess()function.
You still need call the above function from the saveSong()
in AddSongFragment
class after you have validated the input data.
Go back to AddSongFragment.kt
file and add the following code to the saveSong()
method before the last return statement:
songStore.saveSong("$title, $artist, $year", onSongAdded::onSongAdded, this::showError)
In the above code, you call the saveSong
function from the SongStore
class and pass the input data after validation. Its fourth parameter is a function reference to OnSongAdded
interface function. Its fifth parameter is a function reference to the showError
function defined in AddSongFragment
.
Build and run . Finally, now when you save a song, it is stored in the Preferences. The Add Song dialog will be dismissed, and the newly added song will be shown on the home screen.

Next, you will add a function to find the year range of your song playlist by using Closures .
Understanding Closures
A closure is a lambda that is able to read and modify the variables defined outside its scope. It is also known as variable capture inside lambda . It minimizes code redundancy and improves the overall readability.
Go back to MainActivity.kt
and add the following code below the showAllSongs()
function:
// 1
private fun findPlaylistYearRange(songs: List<String>) {
  // 2
  if (songs.isEmpty()) {
    return
  }
  // 3
  var startYear = songs[0].split(",")[2].trim().toInt()
  var endYear = startYear
  // 4
  val findStartEndYear = {
    songs.forEach { song ->
      val songYear = song.split(",")[2].trim().toInt()
      if (songYear > endYear) {
        endYear = songYear
      } else if (songYear < startYear) {
        startYear = songYear
      }
    }
  }
  // 5
  findStartEndYear()

  // 6
  text_view_total.text = "($startYear - $endYear) - Total: ${songs.count()}"
}
In the code above, you:
-
Define a function
findPlaylistYearRange(). It takes a list ofStringas a single parameter. - If there is no any song, do not show anything.
-
Set the value of
startYearto the year of the first song in the song list. You also define theendYearequal to thestartYear. -
Define a lambda expression to calculate the year range and store it in
findStartEndYearvariable. This lambda expression can access and modify the values ofstartYearandendYeardefined outside its scope. This is referred as a Lambda closure . - Call the lambda expression to find the year range.
-
Set the year range text to
text_view_year_rangeview.
You need to call this function to see the year range on the screen.
In the MainActivity.kt
file, add the following code below to the end of showAllSongs
function:
findPlaylistYearRange(songs)
Build and deploy the app to check out the year range of your playlist.


Where to Go From Here?
Congratulation! You learned many concepts about lambda and applied those to your app. While developing Android apps, you might have used lambda expressions even without knowing what they are because Android Studio help you convert interface to lambda expression whenever possible. Now you understand how Android Studio simplifies your code.
You can use the Download Materials button at the top or bottom of this tutorial to download the final project.
Be sure to keep yourself updated with ourlatest tutorials on Android and Kotlin. You may take the Android and Kotlin learning path for a more comprehensive understanding of building apps for Android.
We hope it was fun learning about lambdas. If you have questions and comments, please join the discussions in theforums.
Good luck! :]
Recommend
About Joyk
Aggregate valuable and interesting links.
Joyk means Joy of geeK