

Tesseract OCR Tutorial for iOS [FREE]
source link: https://www.tuicool.com/articles/IFbueaE
Go to the source link to view the article. You can view the picture content, updated content and better typesetting reading experience. If the link is broken, please click the button below to view the snapshot at that time.
Update note : Updated for Xcode 10.2, Swift 5, iOS 12.1 and TesseractOCRiOS (5.0.1).
We at raywenderlich.com have figured out a sure-fire way to fulfill your true heart’s desire — and you’re about to build the app to make it happen with the help of Optical Character Recognition (OCR) .
OCR is the process of electronically extracting text from images. You’ve undoubtedly seen it before — it’s widely used to process everything from scanned documents, to the handwritten scribbles on your tablet PC, to the Word Lens technology in the GoogleTranslate app .
In this tutorial, you’ll learn how to use Tesseract , an open-source OCR engine maintained by Google, to grab text from a love poem and make it your own. Get ready to impress!

U + OCR = LUV
Getting Started
Download the materials for this tutorial by clicking the Download Materials button at the top or bottom of this page, then extract the folder to a convenient location.
The Love In A Snap directory contains three others:
- Love In A Snap Starter : The starter project for this tutorial.
- Love In A Snap Final : The final project.
- Resources : The image you’ll process with OCR and a directory containing the Tesseract language data.
Open Love In A Snap Starter/Love In A Snap.xcodeproj in Xcode, then build and run the starter app. Click around a bit to get a feel for the UI.

Back in Xcode, take a look at ViewController.swift
. It already contains a few @IBOutlet
s and empty @IBAction
methods that link the view controller to its pre-made Main.storyboard
interface. It also contains performImageRecognition(_:)
where Tesseract will eventually do its work.
Scroll farther down the page and you’ll see:
// 1
// MARK: - UINavigationControllerDelegate
extension ViewController: UINavigationControllerDelegate {
}
// 2
// MARK: - UIImagePickerControllerDelegate
extension ViewController: UIImagePickerControllerDelegate {
  // 3
  func imagePickerController(_ picker: UIImagePickerController,
    didFinishPickingMediaWithInfo info: [UIImagePickerController.InfoKey : Any]) {
    // TODO: Add more code here...
  }
}
-
The
UIImagePickerViewControllerthat you’ll eventually add to facilitate image loading requires theUINavigationControllerDelegateto access the image picker controller’s delegate functions. -
The image picker also requires
UIImagePickerControllerDelegateto access the image picker controller’s delegate functions. -
The
imagePickerController(_:didFinishPickingMediaWithInfo:)delegate function will return the selected image.
Now, it’s your turn to take the reins and bring this app to life!
Tesseract’s Limitations
Tesseract OCR is quite powerful, but does have the following limitations:
- Unlike some OCR engines — like those used by the U.S. Postal Service to sort mail — Tesseract isn’t trained to recognize handwriting, and it’s limited to about 100 fonts in total.
- Tesseract requires a bit of preprocessing to improve the OCR results: Images need to be scaled appropriately, have as much image contrast as possible, and the text must be horizontally aligned.
- Finally, Tesseract OCR only works on Linux, Windows and Mac OS X.

Wait. WHAT?
Uh oh! How are you going to use this in iOS? Nexor Technology has created a compatible Swift wrapper for Tesseract OCR.
Adding the Tesseract Framework
First, you’ll have to install Tesseract OCR iOS via CocoaPods , a widely used dependency manager for iOS projects.
If you haven’t already installed CocoaPods on your computer, open Terminal, then execute the following command:
sudo gem install cocoapods
Enter your computer’s password when requested to complete the CocoaPods installation.
Next, cd
into the Love In A Snap
starter project folder. For example, if you’ve added Love In A Snap
to your desktop, you can enter:
cd ~/Desktop/"Love In A Snap/Love In A Snap Starter"
Next, enter:
pod init
This creates a Podfile for your project.
Replace the contents of Podfile with:
platform :ios, '12.1'

target 'Love In A Snap' do
  use_frameworks!

  pod 'TesseractOCRiOS'

end
This tells CocoaPods that you want to include TesseractOCRiOS as a dependency for your project.
Back in Terminal, enter:
pod install
This installs the pod into your project.

As the terminal output instructs, “Please close any current Xcode sessions and use `Love In A Snap.xcworkspace` for this project from now on.” Open Love In A Snap.xcworkspace in Xcode .
How Tesseract OCR Works
Generally speaking, OCR uses artificial intelligence to find and recognize text in images.
Some OCR engines rely on a type of artificial intelligence called machine learning . Machine learning allows a system to learn from and adapt to data by identifying and predicting patterns.
The Tesseract OCR iOS engine uses a specific type of machine-learning model called a neural network .
Neural networks are loosely modeled after those in the human brain. Our brains contain about 86 billion connected neurons grouped into various networks that are capable of learning specific functions through repetition. Similarly, on a much simpler scale, an artificial neural network takes in a diverse set of sample inputs and produces increasingly accurate outputs by learning from both its successes and failures over time. These sample inputs are called “training data.”
While educating a system, this training data:
- Enters through a neural network’s input nodes.
- Travels through inter-nodal connections called “edges,” each weighted with the perceived probability that the input should travel down that path.
- Passes through one or more layers of “hidden” (i.e., internal) nodes, which process the data using a pre-determined heuristic.
- Returns through the output node with a predicted result.
Then that output is compared to the desired output and the edge weights are adjusted accordingly so that subsequent training data passed into the neural network returns increasingly accurate results.
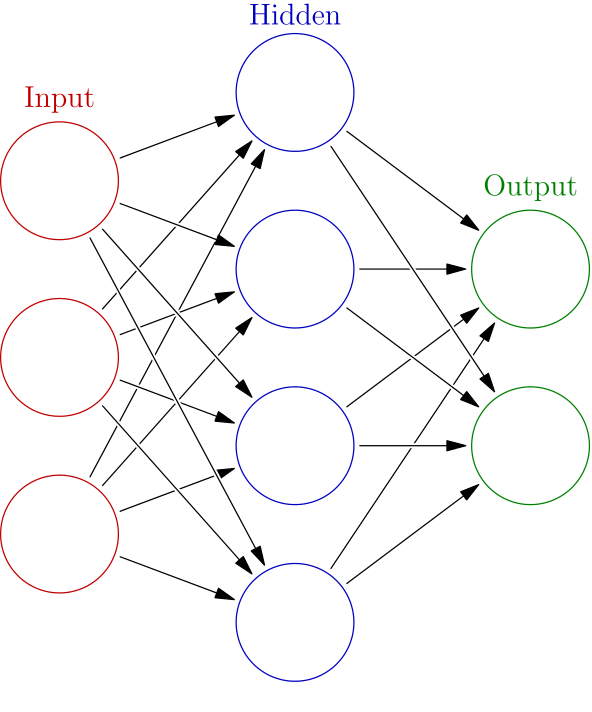
Schema of a neural network. Source: Wikipedia .
Tesseract looks for patterns in pixels, letters, words and sentences. Tesseract uses a two-pass approach called adaptive recognition . It takes one pass over the data to recognize characters, then takes a second pass to fill in any letters it was unsure about with letters that most likely fit the given word or sentence context.
Adding Trained Data
In order to better hone its predictions within the limits of a given language, Tesseract requires language-specific training data to perform its OCR.
Navigate to Love In A Snap/Resources in Finder. The tessdata folder contains a bunch of English and French training files. The love poem you’ll process during this tutorial is mainly in English, but also contains a bit of French. Très romantique !

Your poem vil impress vith French! Ze language ov love! *Haugh* *Haugh* *Haugh*
Now, you’ll add tessdata to your project. Tesseract OCR iOS requires you to add tessdata as a referenced folder .
- Drag the tessdata folder from Finder to the Love In A Snap folder in Xcode’s left-hand Project navigator.
- Select Copy items if needed.
- Set the Added Folders option to Create folder references.
- Confirm that the target is selected before clicking Finish .
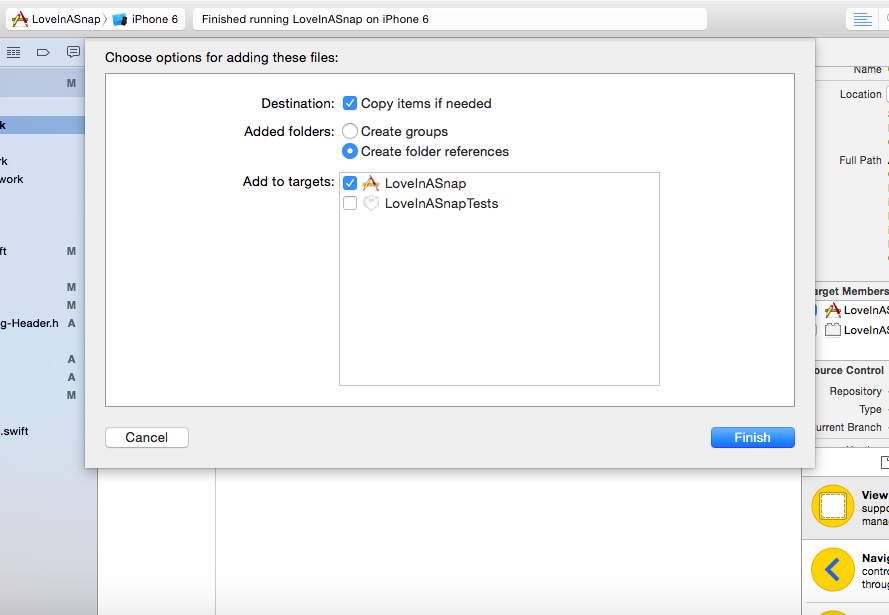
Add tessdata as a referenced folder
You should now see a blue tessdata folder in the navigator. The blue color indicates that the folder is referenced rather than an Xcode group.
Now that you’ve added the Tesseract framework and language data, it’s time to get started with the fun coding stuff!
Loading the Image
First, you’ll create a way to access images from the device’s camera or photo library.
Open ViewController.swift
and insert the following into takePhoto(_:)
:
// 1
let imagePickerActionSheet =
  UIAlertController(title: "Snap/Upload Image",
                    message: nil,
                    preferredStyle: .actionSheet)

// 2
if UIImagePickerController.isSourceTypeAvailable(.camera) {
  let cameraButton = UIAlertAction(
    title: "Take Photo",
    style: .default) { (alert) -> Void in
      // TODO: Add more code here...
  }
  imagePickerActionSheet.addAction(cameraButton)
}

// 3
let libraryButton = UIAlertAction(
  title: "Choose Existing",
  style: .default) { (alert) -> Void in
    // TODO: Add more code here...
}
imagePickerActionSheet.addAction(libraryButton)

// 4
let cancelButton = UIAlertAction(title: "Cancel", style: .cancel)
imagePickerActionSheet.addAction(cancelButton)

// 5
present(imagePickerActionSheet, animated: true)
Here, you:
- Create an action sheet alert that will appear at the bottom of the screen.
- If the device has a camera, add a Take Photo button to the action sheet.
- Add a Choose Existing button to the action sheet.
-
Add a Cancel
button to action sheet. Selecting this button removes the alert without performing an action since it’s of type
.cancel. - Finally, present the alert.
Immediately below import UIKit
add:
import MobileCoreServices
This gives ViewController
access to the kUTTypeImage
abstract image identifier, which you’ll use to limit the image picker’s media type.
Now within the cameraButton
UIAlertAction
’s closure, replace the // TODO
comment with:
// 1
self.activityIndicator.startAnimating()
// 2
let imagePicker = UIImagePickerController()
// 3
imagePicker.delegate = self
// 4
imagePicker.sourceType = .camera
// 5
imagePicker.mediaTypes = [kUTTypeImage as String]
// 6
self.present(imagePicker, animated: true, completion: {
  // 7
  self.activityIndicator.stopAnimating()
})
So when the user taps cameraButton
, this code:
- Reveals the view controller’s activity indicator.
- Creates an image picker.
- Assigns the current view controller as that image picker’s delegate.
- Tells the image picker to present as a camera interface to the user.
- Limits the image picker’s media type so the user can only capture still images.
- Displays the image picker.
- Hides the activity indicator once the image picker finishes animating into view.
Similarly, within libraryButton
’s closure, add:
self.activityIndicator.startAnimating()
let imagePicker = UIImagePickerController()
imagePicker.delegate = self
imagePicker.sourceType = .photoLibrary
imagePicker.mediaTypes = [kUTTypeImage as String]
self.present(imagePicker, animated: true, completion: {
  self.activityIndicator.stopAnimating()
})
This is identical to the code you just added to cameraButton
’s closure aside from imagePicker.sourceType = .photoLibrary
. Here, you set the image picker to present the device’s photo library as opposed to the camera.
Next, to process the captured or selected image, insert the following into imagePickerController(_:didFinishPickingMediaWithInfo:)
:
// 1
guard let selectedPhoto =
  info[.originalImage] as? UIImage else {
    dismiss(animated: true)
    return
}
// 2
activityIndicator.startAnimating()
// 3
dismiss(animated: true) {
  self.performImageRecognition(selectedPhoto)
}
Here, you:
-
Check to see whether
info’s.originalImagekey contains an image value. If it doesn’t, the image picker removes itself from view and the rest of the method doesn’t execute. -
If
info’s.originalImagedoes in fact contain an image, display an activity indicator while Tesseract does its work. -
After the image picker animates out of view, pass the image into
performImageRecognition.
You’ll code performImageRecognition
in the next section of the tutorial, but, for now, just open Info.plist
. Hover your cursor over the top cell, Information Property List
, then click the +
button twice when it appears.
In the Key fields of those two new entries, add Privacy – Camera Usage Description to one and Privacy – Photo Library Usage Description to the other. Select type String for each. Then in the Value column, enter whatever text you’d like to display to the user when requesting permission to access their camera and photo library, respectively.

Build and run your project. Tap the Snap/Upload Image
button and you should see the UIAlertController
you just created.

Test out the action sheet options and grant the app access to your camera and/or library when prompted. Confirm the photo library and camera display as expected.
Note : If you’re running on a simulator, there’s no physical camera available, so you won’t see the “Take Photo” option.
All good? If so, it’s finally time to use Tesseract!
Implementing Tesseract OCR
First, add the following below import MobileCoreServices
to make the Tesseract framework available to ViewController
:
import TesseractOCR
Now, in performImageRecognition(_:)
, replace the // TODO
comment with the following:
// 1
if let tesseract = G8Tesseract(language: "eng+fra") {
  // 2
  tesseract.engineMode = .tesseractCubeCombined
  // 3
  tesseract.pageSegmentationMode = .auto
  // 4
  tesseract.image = image
  // 5
  tesseract.recognize()
  // 6
  textView.text = tesseract.recognizedText
}
// 7
activityIndicator.stopAnimating()
Since this is the meat of this tutorial, here’s a detailed break down, line by line:
-
Initialize
tesseractwith a new G8Tesseract object that will use both English (“eng”)- and French (“fra”)-trained language data. Note that the poem’s French accented characters aren’t in the English character set, so it’s necessary to include the French-trained data in order for those accents to appear. -
Tesseract offers three different OCR engine modes:
.tesseractOnly, which is the fastest, but least accurate method;.cubeOnly, which is slower but more accurate since it employs more artificial intelligence; and.tesseractCubeCombined, which runs both.tesseractOnlyand.cubeOnly..tesseractCubeCombinedis the slowest, but since it’s most accurate, you’ll use it in this tutorial. -
Tesseract assumes, by default, that it’s processing a uniform block of text, but your sample image has multiple paragraphs. Tesseract’s
pageSegmentationModelets the Tesseract engine know how the text is divided. In this case, setpageSegmentationModeto.autoto allow for fully automatic page segmentation and thus the ability to recognize paragraph breaks. -
Assign the selected image to the
tesseractinstance. - Tell Tesseract to get to work recognizing your text.
-
Put Tesseract
’s recognized text output into your
textView. - Hide the activity indicator since the OCR is complete.
Now, it’s time to test out this first batch of new code!
Processing Your First Image
In Finder, navigate to Love In A Snap/Resources/Lenore.png to find the sample image.

Lenore.png is an image of a love poem addressed to a “Lenore,” but with a few edits you can turn it into a poem that is sure to get the attention of the one you desire! :]
Although you could print a copy of the image, then snap a picture with the app to perform the OCR, you’ll make it easy on yourself and add the image directly to your device’s camera roll. This eliminates the potential for human error, further lighting inconsistencies, skewed text and flawed printing among other things. After all, the image is already dark and blurry as is.
Note : If you’re using a simulator, simply drag-and-drop the image file onto the simulator to add it to its photo library.
Build and run your app. Tap Snap/Upload Image , tap Choose Existing , then choose the sample image from the photo library to run it through OCR.
Note : You can safely ignore the hundreds of compilation warnings the TesseractOCR library produces.
Uh oh! Nothing appears! That’s because the current image size is too big for Tesseract to handle. Time to change that!
Scaling Images While Preserving Aspect Ratio
The aspect ratio of an image is the proportional relationship between its width and height. Mathematically speaking, to reduce the size of the original image without affecting the aspect ratio, you must keep the width-to-height ratio constant.

When you know both the height and the width of the original image, and you know either the desired height or width of the final image, you can rearrange the aspect ratio equation as follows:

This results in the two formulas.
Formula 1: When the image’s width is greater than its height.
Height1/Width1 * width2 = height2
Formula 2: When the image’s height is greater than its width.
Width1/Height1 * height2 = width2
Now, add the following extension and method to the bottom of ViewController.swift :
// MARK: - UIImage extension

//1
extension UIImage {
  // 2
  func scaledImage(_ maxDimension: CGFloat) -> UIImage? {
    // 3
    var scaledSize = CGSize(width: maxDimension, height: maxDimension)
    // 4
    if size.width > size.height {
      scaledSize.height = size.height / size.width * scaledSize.width
    } else {
      scaledSize.width = size.width / size.height * scaledSize.height
    }
    // 5
    UIGraphicsBeginImageContext(scaledSize)
    draw(in: CGRect(origin: .zero, size: scaledSize))
    let scaledImage = UIGraphicsGetImageFromCurrentImageContext()
    UIGraphicsEndImageContext()
    // 6
    return scaledImage
  }
}
This code does the following:
-
The
UIImageextension allows you to access any method(s) it contains directly through aUIImageobject. -
scaledImage(_:)takes in the maximum dimension (height or width) you desire for the returned image. -
The
scaledSizevariable initially holds aCGSizewith height and width equal tomaxDimension. -
You calculate the smaller dimension of the
UIImagesuch thatscaledSizeretains the image’s aspect ratio. If the image’s width is greater than its height, use Formula 1. Otherwise, use Formula 2. -
Create an image context, draw the original image into a rectangle of size
scaledSize, then get the image from that context before ending the context. - Return the resulting image.
Whew! </math>
Now, within the top of performImageRecognition(_:)
, include:
let scaledImage = image.scaledImage(1000) ?? image
This will attempt to scale the image so that it’s no bigger than 1,000 points wide or long. If scaledImage()
fails to return a scaled image, the constant will default to the original image.
Then, replace tesseract.image = image
with:
tesseract.image = scaledImage
This assigns the scaled image to the Tesseract object instead.
Build, run and select the poem again from the photo library.

Much better. :]
But chances are that your results aren’t perfect. There’s still room for improvement…
Improving OCR Accuracy
“Garbage In, Garbage Out.” The easiest way to improve the quality of the output is to improve the quality of the input. As Google lists on their Tesseract OCR site , dark or uneven lighting, image noise, skewed text orientation and thick dark image borders can all contribute to less-than-perfect results.
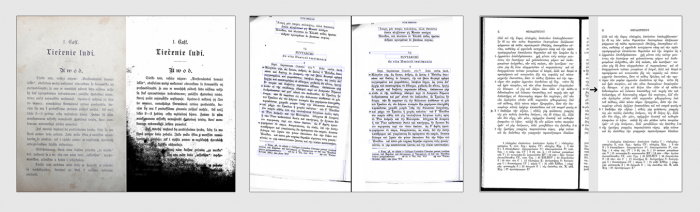
Examples of potentially problematic image inputs that can be corrected for improved results. Source: Google’s Tesseract OCR site.
Next, you’ll improve the image’s quality.
Improving Image Quality
The Tesseract iOS framework used to have built-in methods to improve image quality, but these methods have since been deprecated and the framework’s documentation now recommends using Brad Larson’s GPUImage framework instead.
GPUImage
is available via CocoaPods, so immediately below pod 'TesseractOCRiOS'
in Podfile
, add:
pod 'GPUImage'
Then, in Terminal, re-run:
pod install
This should now make GPUImage available in your project.
Note : It will also add several hundred more compilation warnings. You can safely ignore these also.
Back in ViewController.swift
, add the following below import TesseractOCR
to make GPUImage
available in the class:
import GPUImage
Directly below scaledImage(_:)
, also within the UIImage
extension, add:
func preprocessedImage() -> UIImage? {
  // 1
  let stillImageFilter = GPUImageAdaptiveThresholdFilter()
  // 2
  stillImageFilter.blurRadiusInPixels = 15.0
  // 3
  let filteredImage = stillImageFilter.image(byFilteringImage: self)
  // 4
  return filteredImage
}
Here, you:
- Initialize a GPUImageAdaptiveThresholdFilter . The GPUImageAdaptiveThresholdFilter “determines the local luminance around a pixel, then turns the pixel black if it is below that local luminance, and white if above. This can be useful for picking out text under varying lighting conditions.”
- The blurRadius represents the average blur of each character in pixels. It defaults to 4.0, but you can play around with this value to potentially improve OCR results. In the code above, you set it to 15.0 since the average character blur appears to be around 15.0 pixels wide when the image is 1,000 points wide.
- Run the image through the filter to optionally return a new image object.
- If the filter returns an image, return that image.
Back in performImageRecognition(_:)
, immediately underneath the scaledImage
constant instantiation, add:
let preprocessedImage = scaledImage.preprocessedImage() ?? scaledImage
This code attempts to run the scaledImage
through the GPUImage
filter, but defaults to using the non-filtered scaledImage
if preprocessedImage()
’s filter fails.
Then, replace tesseract.image = scaledImage
with:
tesseract.image = preprocessedImage
This asks Tesseract to process the scaled and filtered image instead.
Now that you’ve gotten all of that out of the way, build, run and select the image again.

Voilà! Hopefully, your results are now either perfect or closer-to-perfect than before.
But if the apple of your eye isn’t named “Lenore,” he or she probably won’t appreciate this poem coming from you as it stands… and they’ll likely want to know who this “Lenore” character is! ;]
Replace “Lenore” with the name of your beloved and… presto chango! You’ve created a love poem tailored to your sweetheart and your sweetheart alone.
That’s it! Your Love In A Snap app is complete — and sure to win over the heart of the one you adore.
Or if you’re anything like me, you’ll replace Lenore’s name with your own, send that poem to your inbox through a burner account, stay in for the evening, order in some Bibimbap, have a glass of wine, get a bit bleary-eyed, then pretend that email you received is from the Queen of England for an especially classy and sophisticated evening full of romance, mystery and intrigue. But maybe that’s just me…
Where to Go From Here?
Use the Download Materials button at the top or bottom of this tutorial to download the project if you haven’t already, then check out the project in Love In A Snap Final .
Try out the app with other text to see how the OCR results vary between sources and download more language data as needed.
You can also train Tesseract to further improve its output. After all, if you’re capable of deciphering characters using your eyes or ears or even fingertips, you’re a certifiable expert at character recognition already and are fully capable of teaching your computer so much more than it already knows.
As always, if you have comments or questions on this tutorial, Tesseract or OCR strategies, feel free to join the discussion below!
Recommend
About Joyk
Aggregate valuable and interesting links.
Joyk means Joy of geeK