

The Back End: Using Gatsby.js and Node.js for Static Site Updates
source link: https://www.tuicool.com/articles/hit/VB7vymN
Go to the source link to view the article. You can view the picture content, updated content and better typesetting reading experience. If the link is broken, please click the button below to view the snapshot at that time.
In this article series, we will develop a static content website prototype. It will generate daily-updated, simple static HTML pages for popular GitHub repositories to track their latest releases. Static web page generation frameworks have great features to achieve that—we’ll use Gatsby.js, one of the most popular.
In Gatsby, there are many ways to collect data for a front end without having a back end (serverless), Headless CMS platforms and Gatsby source plugins among them. But we will implement a back end to store basic information about GitHub repositories and their latest releases. Thus, we will have full control over both our back end and front end.
Also, I’ll cover a set of tools to trigger a daily update of your application. You can also trigger it manually or whenever some specific event happens.
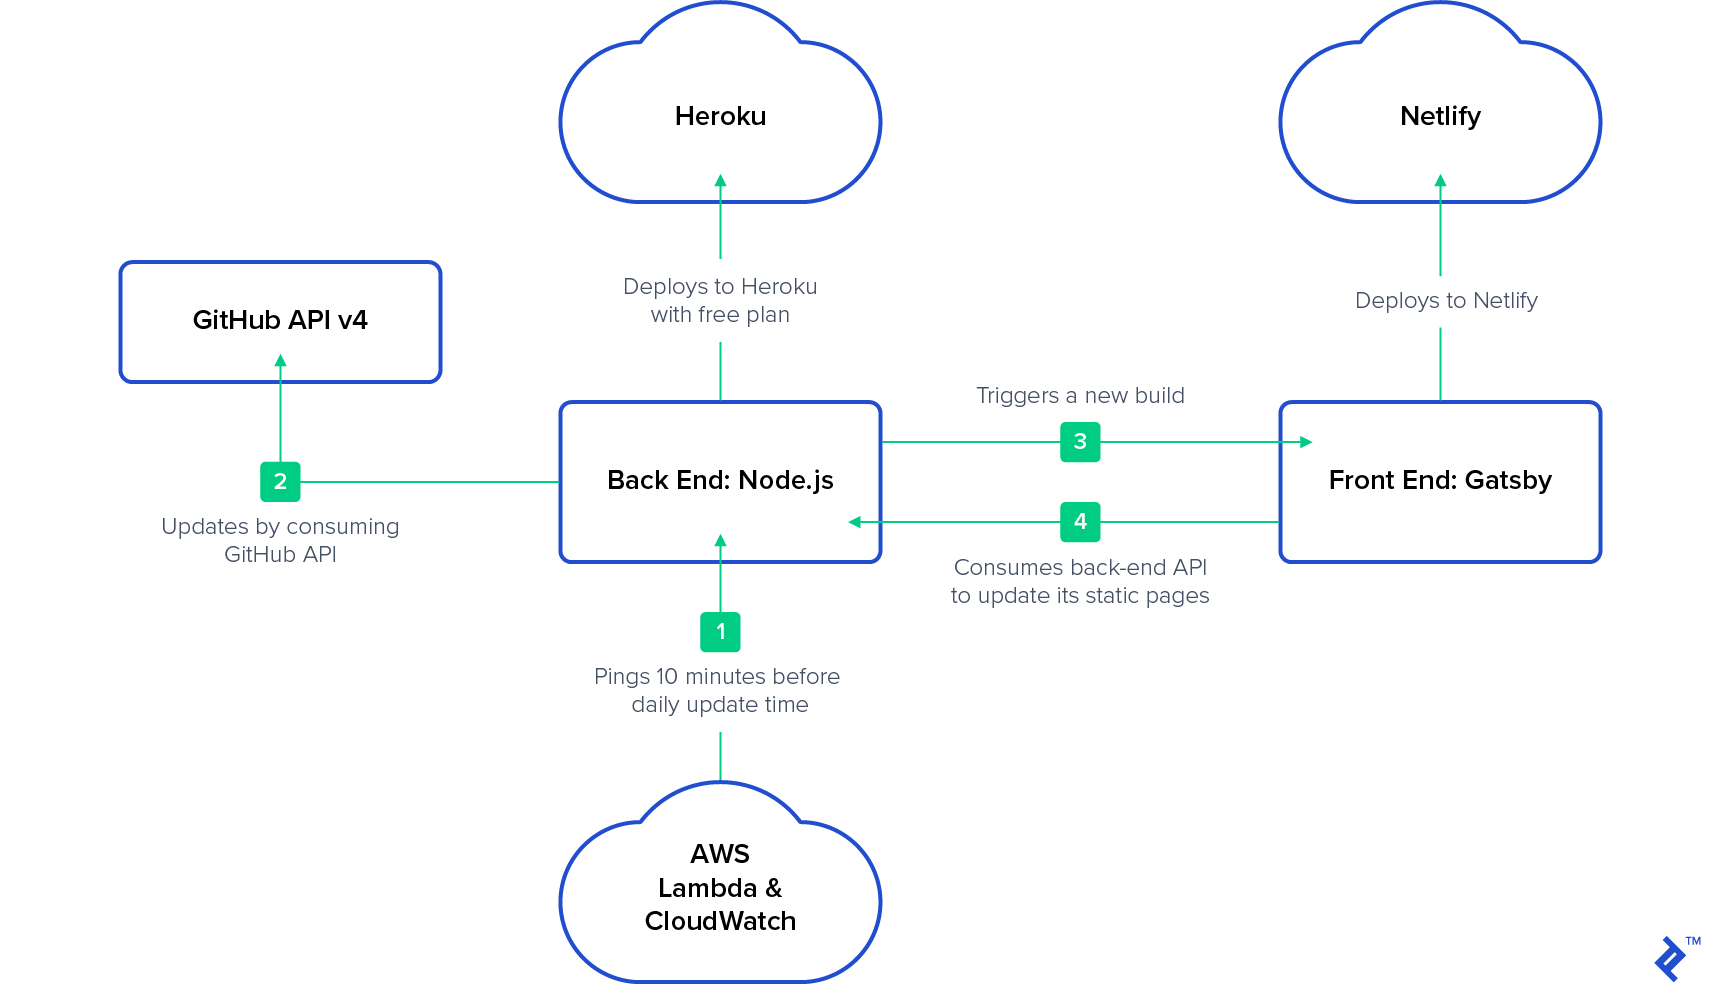
Our front-end application will be run on Netlify, and the back-end application will be working on Heroku using a free plan. It will sleep periodically : “When someone accesses the app, the dyno manager will automatically wake up the web dyno to run the web process type.” So, we can wake up it via AWS Lambda and AWS CloudWatch. As of this writing, this is the most cost-effective way to have a prototype online 24/7.
Our Node Static Website Example: What to Expect
To keep these articles focused on one topic, I won’t be covering authentication, validation, scalability, or other general topics. The coding part of this article will be as simple as possible. The structure of the project and usage of the correct set of tools are more important.
In this first part of the series, we will develop and deploy our back-end application. In the second part, we will develop and deploy our front-end application, and trigger daily builds.
The Node.js Back End
The back-end application will be written in Node.js (not mandatory, but for simplicity) and all communications will be over REST APIs. We will not collect data from the front end in this project. (If you are interested in doing that, have a look at Gatsby Forms .)
First, we will start by implementing a simple REST API back end that exposes the CRUD operations of the repository collection in our MongoDB. Then we will schedule a cron job that consumes GitHub API v4 (GraphQL) in order to update documents in this collection. Then we will deploy all this to the Heroku cloud. Finally, we’ll trigger a rebuild of the front end at the end of our cron job.
The Gatsby.js Front End
In the second article, we will focus on the implementation of the
createPages
API
. We will gather all repositories from the back end and will generate a single home page that contains a list of all repositories, plus a page for each repository document returned. Then we’ll deploy our front end to Netlify
.
From AWS Lambda and AWS CloudWatch
This part is not mandatory if your application won’t sleep. Otherwise, you need to be sure that your back end is up and running at the time of updating repositories. As a solution, you can create a cron schedule on AWS CloudWatch 10 minutes before your daily update and bind it as a trigger to your GET
method in AWS Lambda. Accessing the back-end application will wake up the Heroku instance. More details will be at the end of the second article.
Here is the architecture that we will implement:
Assumptions
I assume that readers of this article have knowledge in the following areas:
- HTML
- CSS
- JavaScript
- REST APIs
- MongoDB
- Git
- Node.js
It’s also good if you know:
- Express.js
- Mongoose
- GitHub API v4 (GraphQL)
- Heroku, AWS, or any other cloud platform
- React
Let’s dive into the implementation of the back end. We’ll split it into two tasks. The first one is preparing REST API endpoints and bind them to our repository collection. The second is implementing a cron job that consumes GitHub API and updates the collection.
Developing the Node.js Static Site Generator Back End, Step 1: A Simple REST API
We will use Express for our web application framework and Mongoose for our MongoDB connection. If you are familiar with Express and Mongoose, you might be able to skip to Step 2.
(On the other hand, if you need more familiarity with Express you can check out the official Express starter guide ; if you’re not up on Mongoose, the official Mongoose starter guide should be helpful.)
Project Structure
Our project’s file/folder hierarchy will be simple:

In more detail:
env.config.js
routes.config.js
repository.controller.js
repository.model.js
index.js
package.json
Implementation
Run npm install
(or yarn
, if you have Yarn installed) after adding these dependencies to package.json
:
{
  // ...
  "dependencies": {
    "body-parser": "1.7.0",
    "express": "^4.8.7",
    "moment": "^2.17.1",
    "moment-timezone": "^0.5.13",
    "mongoose": "^5.1.1",
    "node-uuid": "^1.4.8",
    "sync-request": "^4.0.2"
  }
  // ...
}
Our env.config.js
file has only port
, environment
( dev
or prod
), and mongoDbUri
properties for now:
module.exports = {
  "port": process.env.PORT || 3000,
  "environment": "dev",
  "mongoDbUri": process.env.MONGODB_URI || "mongodb://localhost/github-consumer"
};
routes.config.js
contains request mappings and will call the corresponding method of our controller:
const RepositoryController = require('../controller/repository.controller');

exports.routesConfig = function(app) {

  app.post('/repositories', [
    RepositoryController.insert
  ]);

  app.get('/repositories', [
    RepositoryController.list
  ]);

  app.get('/repositories/:id', [
    RepositoryController.findById
  ]);

  app.patch('/repositories/:id', [
    RepositoryController.patchById
  ]);

  app.delete('/repositories/:id', [
    RepositoryController.deleteById
  ]);
};
The repository.controller.js
file is our service layer. Its responsibility is to call the corresponding method of our repository model:
const RepositoryModel = require('../model/repository.model');

exports.insert = (req, res) => {
  RepositoryModel.create(req.body)
    .then((result) => {
      res.status(201).send({
        id: result._id
      });
    });
};

exports.findById = (req, res) => {
  RepositoryModel.findById(req.params.id)
    .then((result) => {
      res.status(200).send(result);
    });
};

exports.list = (req, res) => {
  RepositoryModel.list()
    .then((result) => {
      res.status(200).send(result);
    })
};

exports.patchById = (req, res) => {
  RepositoryModel.patchById(req.params.id, req.body)
    .then(() => {
      res.status(204).send({});
    });
};

exports.deleteById = (req, res) => {
  RepositoryModel.deleteById(req.params.id, req.body)
    .then(() => {
      res.status(204).send({});
    });
};
repository.model.js
handles the MongoDb connection and the CRUD operations for the repository model. The fields of the model are:
owner
name
createdAt
resourcePath
tagName
releaseDescription
homepageUrl
repositoryDescription
avatarUrl
const Mongoose = require('mongoose');
const Config = require('../config/env.config');

const MONGODB_URI = Config.mongoDbUri;

Mongoose.connect(MONGODB_URI, {
  useNewUrlParser: true
});

const Schema = Mongoose.Schema;

const repositorySchema = new Schema({
  owner: String,
  name: String,
  createdAt: String,
  resourcePath: String,
  tagName: String,
  releaseDescription: String,
  homepageUrl: String,
  repositoryDescription: String,
  avatarUrl: String
});

repositorySchema.virtual('id').get(function() {
  return this._id.toHexString();
});

// Ensure virtual fields are serialised.
repositorySchema.set('toJSON', {
  virtuals: true
});

repositorySchema.findById = function(cb) {
  return this.model('Repository').find({
    id: this.id
  }, cb);
};

const Repository = Mongoose.model('repository', repositorySchema);

exports.findById = (id) => {
  return Repository.findById(id)
    .then((result) => {
      if (result) {
        result = result.toJSON();
        delete result._id;
        delete result.__v;
        return result;
      }
    });
};

exports.create = (repositoryData) => {
  const repository = new Repository(repositoryData);
  return repository.save();
};

exports.list = () => {
  return new Promise((resolve, reject) => {
    Repository.find()
      .exec(function(err, users) {
        if (err) {
          reject(err);
        } else {
          resolve(users);
        }
      })
  });
};

exports.patchById = (id, repositoryData) => {
  return new Promise((resolve, reject) => {
    Repository.findById(id, function(err, repository) {
      if (err) reject(err);
      for (let i in repositoryData) {
        repository[i] = repositoryData[i];
      }
      repository.save(function(err, updatedRepository) {
        if (err) return reject(err);
        resolve(updatedRepository);
      });
    });
  })
};

exports.deleteById = (id) => {
  return new Promise((resolve, reject) => {
    Repository.deleteOne({
      _id: id
    }, (err) => {
      if (err) {
        reject(err);
      } else {
        resolve(err);
      }
    });
  });
};

exports.findByOwnerAndName = (owner, name) => {
  return Repository.find({
    owner: owner,
    name: name
  });
};
This is what we have after our first commit: A MongoDB connection and our REST operations .
We can run our application with the following command:
node index.js
Testing
For testing, send requests to localhost:3000
(using e.g. Postman or cURL):
Insert a Repository (Only Required Fields)
Post: http://localhost:3000/repositories
Body:
{
  "owner" : "facebook",
  "name" :  "react"
}
Get Repositories
Get: http://localhost:3000/repositories
Get by ID
Get: http://localhost:3000/repositories /:id
Patch by ID
Patch: http://localhost:3000/repositories /:id
Body:
{
  "owner" : "facebook",
  "name" :  "facebook-android-sdk"
}
With that working, it’s time to automate updates.
Developing the Node.js Static Site Generator Back End, Step 2: A Cron Job to Update Repository Releases
In this part, we will configure a simple cron job (which will start at midnight UTC) to update the GitHub repositories that we inserted to our database. We added only the owner
and name
parameters only in our example above, but these two fields are enough for us to access general information about a given repository.
In order to update our data, we have to consume the GitHub API. For this part, it’s best to be familiar with GraphQL and v4 of the GitHub API .
We also need to create a GitHub access token . The minimum required scopes for that are:

That will generate a token, and we can send requests to GitHub with it.
Now let’s go back to our code.
We have two new dependencies in package.json
:
"axios": "^0.18.0"
"cron": "^1.7.0"
As usual, run npm install
or yarn
after adding dependencies.
We’ll need two new properties in config.js
, too:
-
"githubEndpoint": "https://api.github.com/graphql" -
"githubAccessToken": process.env.GITHUB_ACCESS_TOKEN(you’ll need to set theGITHUB_ACCESS_TOKENenvironment variable with your own personal access token)
Create a new file under the controller
folder with the name cron.controller.js
. It will simply call the updateResositories
method of repository.controller.js
at scheduled times:
const RepositoryController = require('../controller/repository.controller');
const CronJob = require('cron').CronJob;

function updateDaily() {
  RepositoryController.updateRepositories();
}

exports.startCronJobs = function () {
  new CronJob('0 0 * * *', function () {updateDaily()}, null, true, 'UTC');
};
The final changes for this part will be in repository.controller.js
. For brevity, we’ll design it to update all repositories at once. But if you have a large number of repositories, you may exceed the resource limitations of GitHub’s API
. If that’s the case, you’ll need to modify this to run in limited batches, spread out over time.
The all-at-once implementation of the update functionality will look like this:
async function asyncUpdate() {

  await RepositoryModel.list().then((array) => {
    const promises = array.map(getLatestRelease);

    return Promise.all(promises);
  });
}

exports.updateRepositories = async function update() {
  console.log('GitHub Repositories Update Started');

  await asyncUpdate().then(() => {
    console.log('GitHub Repositories Update Finished');
  });
};
Finally, we will call the endpoint and update the repository model.
The getLatestRelease
function will generate a GraphQL query and will call the GitHub API. The response from that request will then be processed in the updateDatabase
function.
async function updateDatabase(responseData, owner, name) {

  let createdAt = '';
  let resourcePath = '';
  let tagName = '';
  let releaseDescription = '';
  let homepageUrl = '';
  let repositoryDescription = '';
  let avatarUrl = '';

  if (responseData.repository.releases) {

    createdAt = responseData.repository.releases.nodes[0].createdAt;
    resourcePath = responseData.repository.releases.nodes[0].resourcePath;
    tagName = responseData.repository.releases.nodes[0].tagName;
    releaseDescription = responseData.repository.releases.nodes[0].description;
    homepageUrl = responseData.repository.homepageUrl;
    repositoryDescription = responseData.repository.description;

    if (responseData.organization && responseData.organization.avatarUrl) {
      avatarUrl = responseData.organization.avatarUrl;
    } else if (responseData.user && responseData.user.avatarUrl) {
      avatarUrl = responseData.user.avatarUrl;
    }

    const repositoryData = {
      owner: owner,
      name: name,
      createdAt: createdAt,
      resourcePath: resourcePath,
      tagName: tagName,
      releaseDescription: releaseDescription,
      homepageUrl: homepageUrl,
      repositoryDescription: repositoryDescription,
      avatarUrl: avatarUrl
    };

    await RepositoryModel.findByOwnerAndName(owner, name)
      .then((oldGitHubRelease) => {
        if (!oldGitHubRelease[0]) {
          RepositoryModel.create(repositoryData);
        } else {
          RepositoryModel.patchById(oldGitHubRelease[0].id, repositoryData);
        }
        console.log(`Updated latest release: http://github.com${repositoryData.resourcePath}`);
      });
  }
}

async function getLatestRelease(repository) {

  const owner = repository.owner;
  const name = repository.name;

  console.log(`Getting latest release for: http://github.com/${owner}/${name}`);

  const query = `
         query {
           organization(login: "${owner}") {
               avatarUrl
           }
           user(login: "${owner}") {
               avatarUrl
           }
           repository(owner: "${owner}", name: "${name}") {
               homepageUrl
               description
               releases(first: 1, orderBy: {field: CREATED_AT, direction: DESC}) {
                   nodes {
                       createdAt
                       resourcePath
                       tagName
                       description
                   }
               }
           }
         }`;

  const jsonQuery = JSON.stringify({
    query
  });

  const headers = {
    'User-Agent': 'Release Tracker',
    'Authorization': `Bearer ${GITHUB_ACCESS_TOKEN}`
  };

  await Axios.post(GITHUB_API_URL, jsonQuery, {
    headers: headers
  }).then((response) => {
    return updateDatabase(response.data.data, owner, name);
  });
}
After our second commit, we will have implemented a cron scheduler to get daily updates from our GitHub repositories .
We are nearly done with the back end. But the last step there should be done after implementing the front end, so we’ll cover it in the next article.
Deploying the Node Static Site Generator Back End to Heroku
In this part, we will deploy our application to Heroku, so you’ll need to set up an account with them if you don’t have one already. If we bind our Heroku account to GitHub, it will be much easier for us to have continuous deployment. To that end, I’m hosting my project on GitHub .
After logging into your Heroku account, add a new app from the dashboard:

Give it some unique name:

You will be redirected to a deployment section. Select GitHub as the deployment method, search for your repository, then click the “Connect” button:
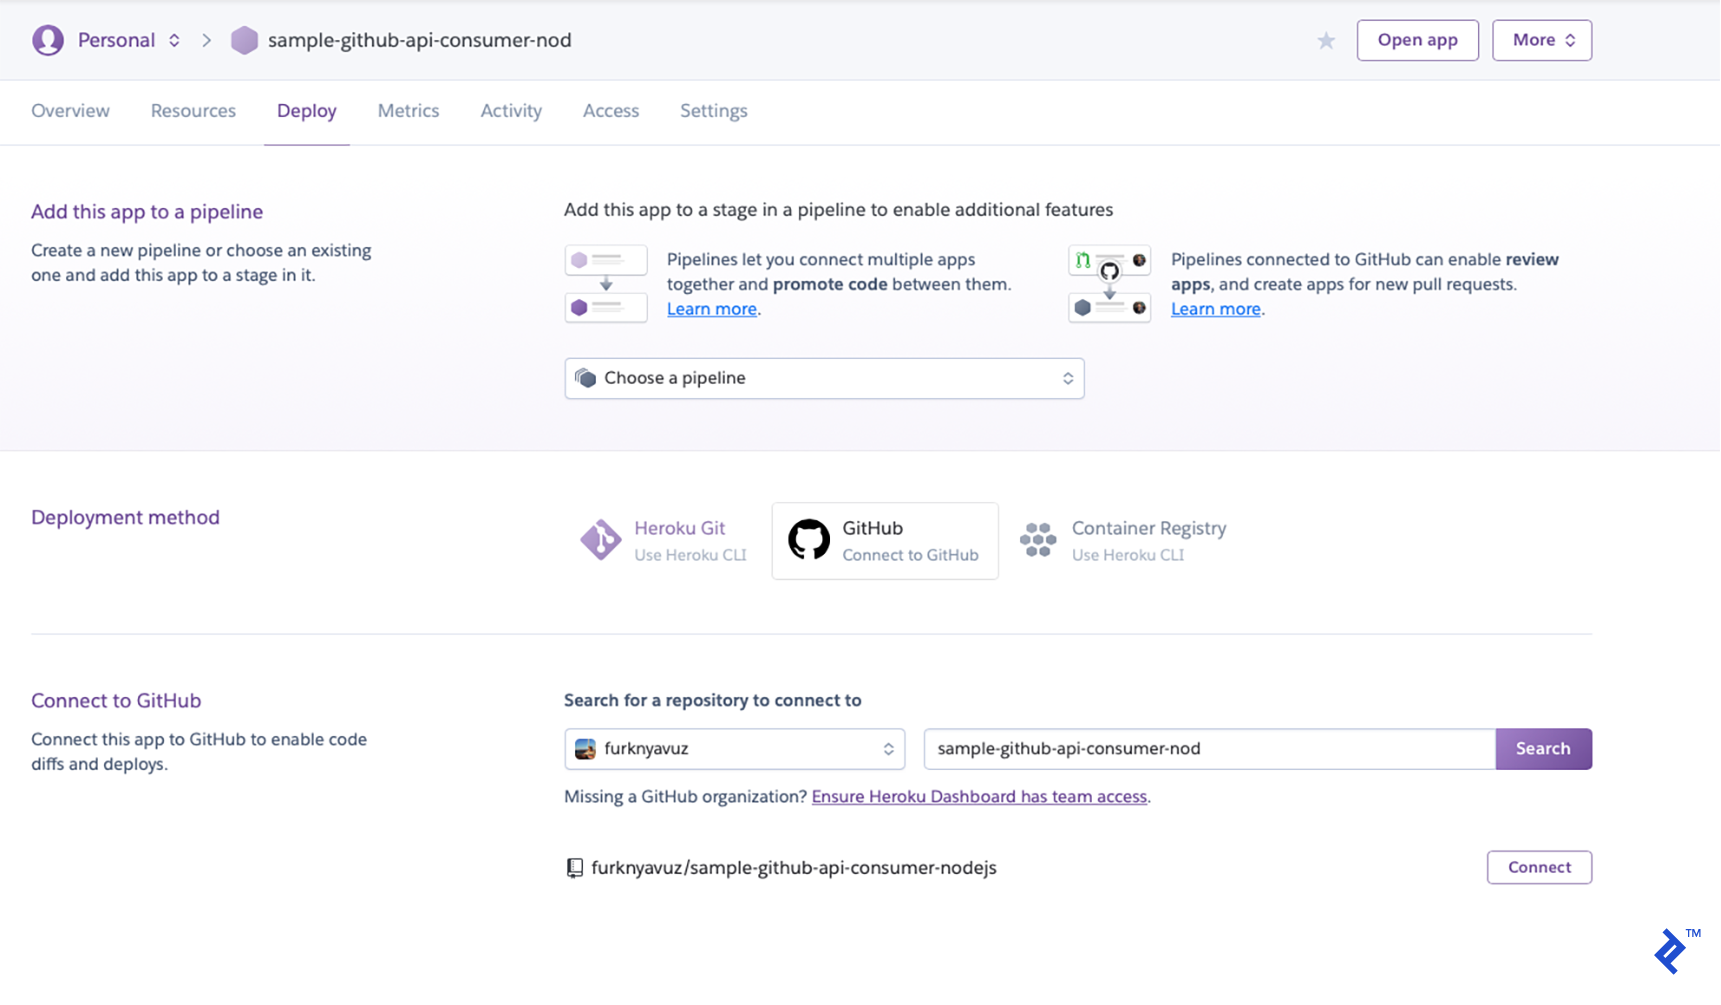
For simplicity, you can enable automatic deploys. It will deploy whenever you push a commit to your GitHub repo:

Now we have to add MongoDB as a resource. Go to the Resources tab and click “Find more add-ons.” (I personally use mLab mongoDB.)
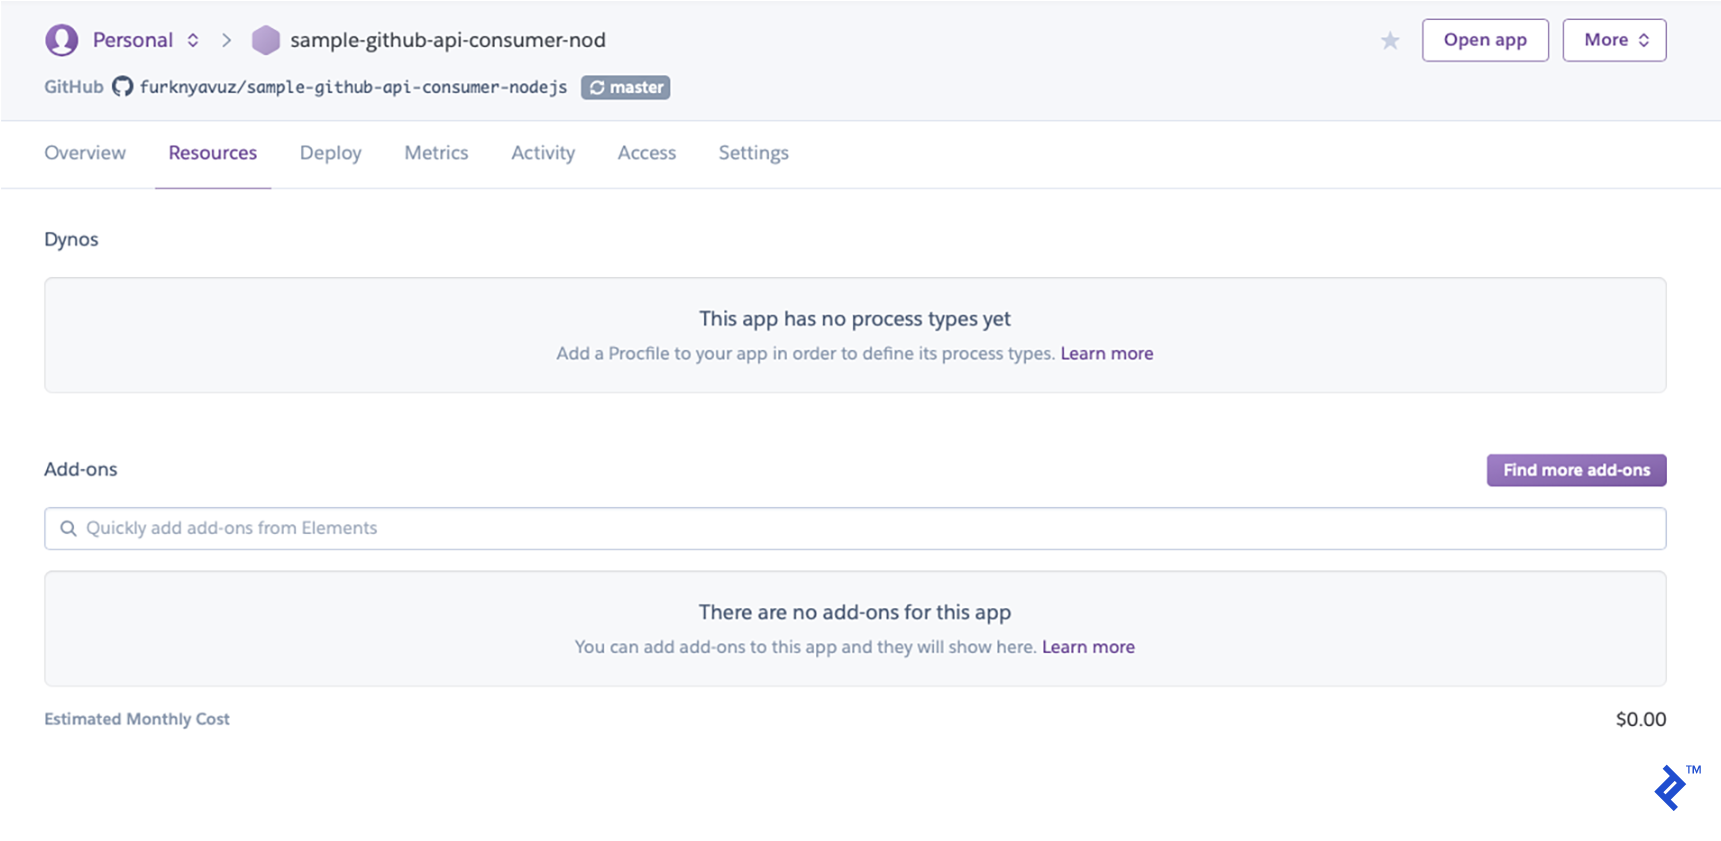
Install it and enter the name of your app in the “App to provision to” input box:

Finally, we have to create a file named Procfile
at the root level of our project, which specifies the commands that are executed by the app when Heroku starts it up.
Our Procfile
is as simple as this:
web: node index.js
Create the file and commit it. Once you push the commit, Heroku will automatically deploy your application, which will be accessible as https://[YOUR_UNIQUE_APP_NAME].herokuapp.com/
.
To check if it’s working, we can send the same requests that we sent to localhost
.
Node.js, Express, MongoDB, Cron, and Heroku: We’re Half-way There!
After our third commit, this is what our repo will look like .
So far, we’ve implemented theNode.js/Express-based REST API on our back end, the updater that consumes GitHub’s API, and a cron job to activate it. Then we’ve deployed ourstatic web content using Heroku with a hook for continuous integration. Stay tuned for the second half next week, where we’ll implement the front end and complete the app!
Related: The Top 10 Most Common Mistakes That Node.js Developers Make
Understanding the Basics
What are static and dynamic web pages?
After publishing, static web pages contain the same data for all sessions. In dynamic web pages, data can be updated on the fly.
What is Gatsby?
Gatsby.js (or simply "Gatsby") is an open-source, React-based static site generation framework.
Why is Node popular?
Node.js is lightweight, fast, scalable, open-source, and well-supported by its community.
What is the purpose of Node.js?
Node.js serves as a back-end runtime environment for building scalable, lightweight, asynchronous, event-driven web applications with JavaScript.
What are the advantages of Node.js?
Node.js uses the same language (JavaScript) for the server side that is normally used in the browser. It's lightweight and designed to use non-blocking I/O operations while requests are processing.
How important is Node.js?
As a member of the popular MEAN stack—MongoDB, Express.js, Angular, and Node.js—Node.js is important for developing high-performance, scalable web applications with JavaScript.
What are the benefits of GraphQL?
Some of the benefits of GraphQL include gathering only what you need from the server, obtaining multiple resources in one request, and the fact that its APIs are self-documented.
Why is GraphQL used?
GraphQL enables fast prototyping and production deployment. Plus it uses a single endpoint for all resources, which makes make client-server communication easier.
What is Netlify?
Netlify is a static site host, similar to GitHub Pages, but with some additional features.
What is the purpose of Heroku?
Heroku is a cloud platform focused on streamlining the launching and scaling of apps.
About the author

member since November 12, 2015
Java JavaScript Spring Spring MVC Spring Boot Spring Security Spring REST GitHub API LinkedIn API Git GitLab GitHub
Furkan is an experienced Java developer who has worked on a variety of projects including online payment solutions and fraud detection areas in a well-known airline company. His expertise is shaped around Spring Framework, PostgreSQL, Redis, MongoDB, and RabbitMQ. In his own projects, he uses Heroku Cloud. He co-founded a startup to discover talents from the open source community. After one year, he successfully exited from his startup. [click to continue...]
Hiring? Meet the Top 10 Freelance Node.js Developers for Hire in May 2019
Recommend
About Joyk
Aggregate valuable and interesting links.
Joyk means Joy of geeK