

Continuous Integration With GitHub, Fastlane & Jenkins [FREE]
source link: https://www.tuicool.com/articles/hit/6nEray2
Go to the source link to view the article. You can view the picture content, updated content and better typesetting reading experience. If the link is broken, please click the button below to view the snapshot at that time.
You write unit tests for your code, but do you run all your tests whenever you add new code and tests? Or at least, just before you push a commit to your repository? As your app grows, the number of unit tests grows too — running all of them can take a long time and break your concentration. So are you ready to take the next step? Continuous integration!
Using continuous integration (CI) in your development process is game-changing. Every commit is checked by testing, and you immediately know when something has gone wrong. The tests run on another server, so you can continue working on developing new features, without distractions.
There are many ways to set up CI. This tutorial starts you off using Travis CI to run tests on each GitHub commit and email the results to you. Then, you’ll add fastlane to add a little more automation.
Note : You might know fastlane as a super-tool for continuous delivery/deployment/distribution — it has tons of features that you can add to your process. Check out our updatedfastlane Tutorial.
Travis CI might satisfy all your CI needs. If not, continue working through this tutorial to get started with Jenkins — a battle tested system that is free, reasonably easy to install and set up, and totally configurable. It works great with GitHub and fastlane.
Note : This tutorial assumes you’re comfortable with basic version control using GitHub, writing unit tests, and using the command line.
Getting Started
Get started by downloading the materials for this tutorial — you can find the link at the top or bottom of this tutorial. Build and run the app in the Numero-Starter folder. This is based on the sample app from Test Driven Development Tutorial for iOS: Getting Started , and you’ll be adding some of the tests and code described in that tutorial.
In a browser, login to your GitHub account, or create a GitHub account, if you don’t already have one.
The Numero project already has a git repository and a .gitignore file tailored for Swift and macOS. Use your favorite method to push it to your GitHub account.
Doing CI With Travis CI
If you have repositories hosted at GitHub, Travis CI is the easiest way to get started with continuous integration. The service is free for public repositories.
Setting Up Travis
Setting up your Travis account is amazingly simple. Just go to Travis-ci.com , and Sign in with GitHub .

Because you’re already logged in at GitHub, you don’t even need to enter your GitHub username — Travis just knows !
Click Authorize travis-ci .

Travis creates your profile, complete with your GitHub profile image and your public GitHub repositories. Click the big green Activate button to install Travis-CI in your GitHub account. You may have to refresh your browser when it completes to see your repositories.

Click Numero to display its repository page:

No builds for this repository — you’ll take care of that right away!
Note : If you want to activate another repository, click the + button next to My Repositories . If you don’t see all your repos, click Sync account , then reload the page.
Your First Travis Build
To set Travis CI in motion, you need to add two things to Numero — a unit test, so Travis has something to do, and a .travis.yml file, so Travis knows how to do it. Then you’ll push your local repo to GitHub, and Travis CI will auto-magically pull it, build it, and run the test!
Test-Driven Development
This tutorial uses the sample app and instructions from our Test Driven Development Tutorial for iOS: Getting Started . It’s a convenient resource for quick unit tests and code fixes, which you need for trying out CI tools. And it’s a sneaky way to introduce you to this popular software development methodology, in case you haven’t yet gotten around to trying it.
Our TDD tutorial lists the benefits, which include excellent code coverage and highly robust code, then takes you through the red-green-refactor cycle . For each use case, you perform these steps:
- Red : Write a failing test.
- Green : Write just enough code to make the test pass.
- Refactor : Clean up and optimize your code.
In Xcode, open ConverterTests.swift and add the following code:
import XCTest
@testable import Numero

class ConverterTests: XCTestCase {
  var converter: Converter!

  override func setUp() {
    super.setUp()
    converter = Converter()
  }

  override func tearDown() {
    converter = nil
    super.tearDown()
  }

  func testConversionForOne() {
    let result = converter.convert(1)
    XCTAssertEqual(result, "I", "Conversion for 1 is incorrect")
  }
}
You create the system-under-test — converter — in setup() and remove it in tearDown() . Then, you write the first unit test to see if converter.convert(1) returns “I”.
Spoiler : It won’t — that’s all part of the TDD cycle: First, write a test that fails.
Now check the Numero scheme’s Test settings to ensure ConverterTests is selected:

This ensures that Travis CI will run the tests when it runs Numero.
OK, that’s the first task done. Now on to the second task.
Creating .travis.yml
Create your .travis.yml file — in Terminal , cd to the Numero project’s root directory, then enter the following commands to create and open an empty file in TextEdit :
touch .travis.yml
open -a TextEdit .travis.yml
This is a hidden file, so it’s easier to use Unix commands to create and open it. Check that you’re working with a text file, not Rich Text .
Add these lines to the file:
osx_image: xcode10.1
language: swift
os: osx
xcode_project: Numero.xcodeproj
xcode_scheme: Numero
xcode_destination: platform=iOS Simulator,OS=12.2,name=iPhone 8
The first three lines tell Travis CI to use Xcode 10.2, Swift and macOS to build and run your project. The default macOS version for this Xcode is 10.14. Check the Travis CI macOS Build Environment: macOS Version page for updates.
The last three lines specify the .xcodeproj file to run, the name of the scheme, and where you want Travis CI to run the project — in this case, you’re asking for the iOS simulator, running iOS 12.2 on an iPhone 8. You’ll find other Xcode and iOS versions and simulator devices at Travis CI macOS Build Environment: Xcode version .
OK, you’re all set! Save .travis.yml , then commit and push your changes to GitHub. On your Travis CI Numero repository page, click Build History . Soon you’ll see your first build start:

Now click #1 started and scroll down to view the Job log . It’s very long, so I’ll just show parts of it.
Travis CI is written in Ruby, so the Ruby Version Manager ( rvm ) uses the default Ruby version.
$ rvm use default
Using /Users/travis/.rvm/gems/ruby-2.4.5
$ ruby --version
ruby 2.4.5p335 (2018-10-18 revision 65137) [x86_64-darwin17]
Then Travis CI runs xcodebuild , and you see it compiling, linking and processing the files in Numero, including ConverterTests.swift . Then it links NumeroTests and copies iPhoneSimulator.platform :
$ set -o pipefail && xcodebuild -project Numero.xcodeproj -scheme Numero -destination platform\=iOS\ Simulator,OS\=12.1,name\=iPhone\ 8 build test | xcpretty
▸ Compiling GameDoneViewController.swift
▸ Compiling Shuffle.swift
▸ Compiling ViewController.swift
▸ Compiling Game.swift
▸ Compiling Converter.swift
▸ Compiling AppDelegate.swift
▸ Linking Numero
...
▸ Processing Info.plist
▸ Compiling ConverterTests.swift
▸ Linking NumeroTests
▸ Copying /Applications/Xcode-10.1.app/Contents/Developer/Platforms/iPhoneSimulator.platform/Developer/usr/lib/libXCTestBundleInject.dylib
You’ll see Travis CI writing the log to DerivedData :
Writing diagnostic log for test session to:
/Users/travis/Library/Developer/Xcode/DerivedData/Numero-...
Then Travis CI begins “test session NumeroTests”:
Beginning test session NumeroTests-B7DA7C58-1134-45E5-AD03-87B9C1FFA667 at 2019-02-16 22:14:12.074 with Xcode 10B61 on target <DVTiPhoneSimulator: 0x7fd75cbf3cc0> {
  SimDevice: iPhone 8 (ADFB69A9-BD7C-45E7-BEBA-6E438C39952C, iOS 12.2, Shutdown)
} (12.1 (16B91))
All tests
Test Suite NumeroTests.xctest started
ConverterTests
    ✗ testConversionForOne, XCTAssertEqual failed: ("") is not equal to ("I") - Conversion for 1 is incorrect
NumeroTests.ConverterTests
  testConversionForOne, XCTAssertEqual failed: ("") is not equal to ("I") - Conversion for 1 is incorrect
  /Users/travis/build/mataharimau/Numero/NumeroTests/ConverterTests.swift:27
  ```
    let result = converter.convert(1)
    XCTAssertEqual(result, "I", "Conversion for 1 is incorrect")
  }
  ```
Executed 1 test, with 1 failure (0 unexpected) in 0.017 (0.019) seconds
</code>
As I promised, the test fails, and the log reports this:
Failing tests:
   ConverterTests.testConversionForOne()
** TEST FAILED **
Now check your email account for the notification:

And there you have the essence of continuous integration, and it couldn’t be easier! Or could it?
Using fastlane With Travis
In fact, you can make your CI life just that bit easier by using fastlane . You may know it as a super-assistant for streamlining deployment to the App Store, but it can also help with CI, by automating unit testing with fastlane scan .
And because Travis CI is so accommodating, you don’t even have to install fastlane on your Mac.
Open .travis.yml to edit it, and replace the last four lines with this:
script:
- fastlane scan
That’s right — you just have to specify the Xcode version and the Swift language, then fastlane takes care of the rest!
Now edit the code in Converter.swift , to make your unit test pass. The starter project has a convert(_:) method that returns an empty String . Change it so it returns "I" :
return "I"
Commit and push to GitHub. On your Travis CI Numero repository page, click Build History , then #2 — its status might be received , booting or started .

This time, Travis CI boots a virtual machine (VM):

And the Job log shows the configuration of the VM with Swift, macOS 10.14.4, and various utilities. Travis CI then runs fastlane, which runs an xcodebuild command:
$ fastlane scan
...
$ xcodebuild -showBuildSettings -scheme Numero -project ./Numero.xcodeproj
Cool — fastlane figures out for itself the scheme and project values that you wrote in your first .travis.yml file! Then fastlane finds a simulator — it’s just the first in the simulator list, the 5s. And fastlane defaults to the latest iOS:
Found simulator "iPhone 5s (12.2)"
Note : Use the --device option to tell fastlane to use a specific simulator device, for example, --device "iPhone 8" . This is useful for UI tests. The similarly named --devices (plural) option lets you specify an array of physical devices that are connected your server. This option isn’t useful for Travis CI because it doesn’t support running tests against actual iOS devices.
Then fastlane displays a long Summary for scan table, and eventually displays Test Results :
+--------------------+---+
|      Test Results      |
+--------------------+---+
| Number of tests    | 1 |
| Number of failures | 0 |
+--------------------+---+
...
The command "fastlane scan" exited with 0.
Done. Your build exited with 0.
This time, the build succeeds! But you knew that would happen ;]. And here’s the good news in your mailbox:

Time for a celebration!

Note : You can customize the Travis CI build , including build timeouts, auto cancellation to build only the latest commit, safelisting or blocklisting branches, and — my favorite — skipping a build by including [skip travis] in the commit message. I couldn’t find a way to send an email only if something goes wrong: This is something you can configure in Jenkins — in fact, it’s the default behavior.
Doing CI With Jenkins
Travis CI is such an instant feel-good experience, why would you look anywhere else? Well, maybe because you need CI for a private repository — check out Travis CI Plans & Pricing . Or, if your team or company already maintains or rents servers, it might be more cost-effective to install Jenkins.
Installing Jenkins
Jenkins Docker images exist, but Jenkins running in a Docker container won’t be able to run xcodebuild , so you’ll install Jenkins directly on your Mac. Download the installer by visiting the Jenkins download page and clicking Mac OS X .
While the installer downloads, check to see if you have the appropriate Java installed. You need Java 1.8 to install Jenkins. Mojave doesn’t have Java pre-installed, but if you’re not sure, enter this command to see if you already have it:
java -version
If the output doesn’t include java version “1.8 …” , you’ll need to install it. While you can download it from the Oracle web site, it’s simpler to install it using Homebrew , a popular package manager for macOS. If you don’t have Homebrew installed already, enter this command in Terminal:
/usr/bin/ruby -e \
  "$(curl -fsSL https://raw.githubusercontent.com/Homebrew/install/master/install)"
Enter your password if prompted. You should see Installation Successful once it completes.
To install Java, enter this command in Terminal:
brew cask install homebrew/cask-versions/java8
Again, enter your password if prompted.
Once Java 1.8 is installed, run the Jenkins installer, which should have finished downloading by now. When the installer finishes, it should open localhost:8080 in your browser — it wants a password:

The easiest way to find the initial admin password is to look in the log — enter this command:
cat /var/log/jenkins/jenkins.log
There’s a lot in this log, but you only need to scroll up a little from the bottom to see your password between the two triple-rows of asterisks:
*************************************************************
*************************************************************
*************************************************************

Jenkins initial setup is required. An admin user has been created and a password generated.
Please use the following password to proceed to installation:

<your initial admin password>

This may also be found at: /Users/Shared/Jenkins/Home/secrets/initialAdminPassword

*************************************************************
*************************************************************
*************************************************************
Copy the password and paste it into the Administrator password field. Click Continue to load the Customize Jenkins page:

sudo nano /Users/Shared/Jenkins/Home/hudson.model.UpdateCenter.xml
This opens the offending configuration file in a simple text editor. Find https and change it to http . To exit the editor and save the file, press Control-C , then press Y , then finally press Enter . Now, refresh the page in your browser and you should see the correct page.
Select Install suggested plugins , then go for a walk — this takes several minutes.

Ah, you’re back! Now create your admin account — entering admin for both Username and Password works OK:

On the Instance Configuration page, just click Not now :

And on the next page, click Start using Jenkins :

Your First Jenkins Build
Next, you’ll see a welcome page, prompting you to create new jobs :

Click that link, and you’ll need to sign in:

Just use your admin/admin account and check the box Keep me signed in .
On the next page, enter Numero for item name and select Freestyle project :

And here’s your new project page! Select Configure from the side menu to really get started! That is, of course, if Jenkins didn’t automatically take you to the configuration page!

The project configuration page has several tabs. Start with the first — General — all you need to do here is check GitHub project , then paste your repository URL in the Project url field that appears. For simplicity, make sure you use HTTPS and not SSH access to GitHub.

Next, scroll down or click across to Source Code Management : Select Git and paste your Repository URL again.

Note : You don’t need to enter Credentials for this tutorial, but you’d provide these to give Jenkins access to a private repository. Also, notice the Branches to build section — you won’t use it in this tutorial, but it will be handy for your own projects.
Scroll down past Build Triggers — you’ll come back to this tab later.
The next section is Build Environment : Sometimes a build keeps going, even after the console log says it’s finished, so check Abort the build if it’s stuck and select No Activity as the Time-out strategy . If you like to know when things happened, also check Add timestamps to the Console Output .

Finally, the Build section is where it all happens! In the Add build step menu, select Execute shell :

In the Command field that appears, paste this shell command:
xcodebuild -scheme Numero -configuration Debug build test \
  -destination 'platform=iOS Simulator,name=iPhone 8'

Click the Save button to return to the project page, then select Build Now from the side menu:

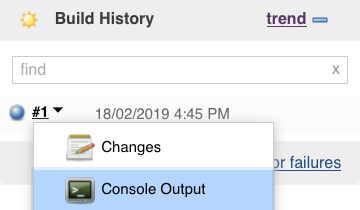
Something starts happening in the Build History section — your first build appears! Hover your cursor over #1 to make the menu button appear, then select Console Output from the menu:
Here are some highlights from my console log:
16:46:07 Test Suite 'ConverterTests' started at 2019-02-18 16:46:07.264
16:46:07 Test Case '-[NumeroTests.ConverterTests testConversionForOne]' started.
16:46:07 Test Case '-[NumeroTests.ConverterTests testConversionForOne]' passed (0.004 seconds).
...
16:46:07 Test session results and logs:
16:46:07    /Users/Shared/Jenkins/Library/Developer/Xcode/DerivedData/Numero-bhnpnysdndqcwobwddhndhxectdi/Logs/Test/Run-Numero-2019.02.18_16-45-19-+1100.xcresult
...
16:46:07 ** TEST SUCCEEDED **
16:46:07
16:46:14 Testing started on 'iPhone 8'
16:46:16 Finished: SUCCESS
SUCCESS indeed!

Notifying Jenkins With GitHub Webhook
Great, Jenkins pulled your project, built it and ran the test. But you had to tell it to Build Now — that’s not very automated. You want Jenkins to pull your project as soon as you push a commit to GitHub, the way Travis CI did. It turns out, Travis CI did something with GitHub automatically that you now have to do manually.
You need to create a GitHub webhook to notify your Jenkins server whenever you push a new commit. A webhook is a GitHub mechanism for POSTing a notification to the webhook’s URL whenever certain events happen in your GitHub repository — for example, whenever you push a commit.
First, set up your Jenkins project to expect notifications from GitHub: Use the Numero menu to get back to Configure :

Select the Build Triggers tab and check GitHub hook trigger for GITScm polling :

Scroll to the bottom and press Save .
Now go to your GitHub page to set up the webhook.
If you’d like to disable Travis-CI on your repository to avoid builds running in both places, you’ll need to uninstall Travis from your repository. This is optional; click Reveal to show the instructions. Or, just leave it running and skip ahead to creating a webhook for Jenkins.
[spoiler]
On your Numero repository page, click Settings , select Integrations & Services , then click Configure in the row for Travis CI.
Scroll to the bottom and click Uninstall . Click OK and GitHub will schedule a job to remove Travis.
[/spoiler]
To add a webhook for your Jenkins server, go to your Numero repository page and click Settings . Select Webhooks from the side menu, then click Add webhook :

The first thing you need is the Payload URL — the URL of your Jenkins server. But, unless you set up your Jenkins with a proper external URL, back at the Instance Configuration step, you’re using localhost while you work through this tutorial. But GitHub needs a real URL to send notifications to — what to do?
ngrok to the rescue! It’s a free app that uses a secure tunnel to expose localhost to the internet. GitHub’s webhooks tutorial uses it, so it must be OK ;]. Go ahead and download ngrok for Mac OS X :

In Terminal , cd to where ngrok is, then run this command:
./ngrok http 8080
Your output will look similar to this:
ngrok by @inconshreveable                                       (Ctrl+C to quit)

Session Status                online
Session Expires               7 hours, 59 minutes
Version                       2.2.8
Region                        United States (us)
Web Interface                 http://127.0.0.1:4040
Forwarding                    http://4c94cdf1.ngrok.io -> localhost:8080
Forwarding                    https://4c94cdf1.ngrok.io -> localhost:8080

Connections                   ttl     opn     rt1     rt5     p50     p90
                              0       0       0.00    0.00    0.00    0.00
Copy your Forwarding URL — mine is http://4c94cdf1.ngrok.io , for the next almost-8 hours.
Back on your GitHub Add webhook page, paste this URL in the Payload URL field, and add /github-webhook/ to the end of the URL. This is the endpoint on your Jenkins server that responds to pushes from GitHub:

Note : The default events setting is Just the push event . You can change the list of subscribed events anytime. The complete list of available events is in the Webhooks documentation .
Click Add Webhook . GitHub sends a test POST request to the URL, which responds with 302 Found , meaning the URL has been redirected. Don’t worry that GitHub flags this as a failure.
Now, in ConverterTests.swift add this new unit test to Numero, so you have something to push to GitHub, which will notify your Jenkins server:
func testConversionForTwo() {
  let result = converter.convert(2)
  XCTAssertEqual(result, "II", "Conversion for 2 is incorrect")
}
Note : We’re back at the red step of TDD, so this test will fail — convert(_:) returns “I”, not “II”.
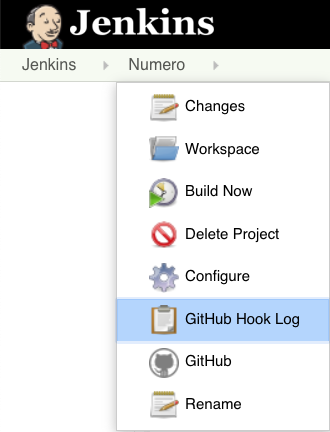
Commit and push to GitHub, then check your Jenkins page — Numero’s menu now has an item for GitHub Hook Log !
Select GitHub Hook Log : An event from your ngrok URL caused Jenkins to poll your GitHub repository for changes, which it found:

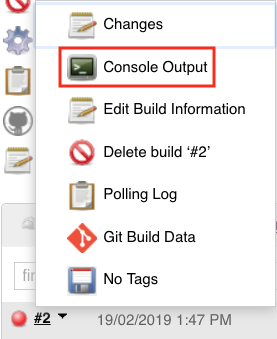
Your push to GitHub triggered build #2 — its light is red, because the unit test failed. Use the pop-up menu to view build #2’s Console Output :
Scroll all the way down to see the test results:
13:48:12 Test Suite 'All tests' started at 2019-02-19 13:48:12.227
13:48:12 Test Suite 'NumeroTests.xctest' started at 2019-02-19 13:48:12.228
13:48:12 Test Suite 'ConverterTests' started at 2019-02-19 13:48:12.228
13:48:12 Test Case '-[NumeroTests.ConverterTests testConversionForOne]' started.
13:48:12 Test Case '-[NumeroTests.ConverterTests testConversionForOne]' passed (0.002 seconds).
13:48:12 Test Case '-[NumeroTests.ConverterTests testConversionForTwo]' started.
13:48:12 /Users/Shared/Jenkins/Home/workspace/Numero/NumeroTests/ConverterTests.swift:32: error: -[NumeroTests.ConverterTests testConversionForTwo] : XCTAssertEqual failed: ("I") is not equal to ("II") - Conversion for 2 is incorrect
...
13:48:15 Failing tests:
13:48:15    ConverterTests.testConversionForTwo()
13:48:15 ** TEST FAILED **
13:48:15
13:48:21 Testing started on 'iPhone 8'
13:48:21 Build step 'Execute shell' marked build as failure
13:48:21 Finished: FAILURE
Congratulate yourself — you’ve set up communication from GitHub to Jenkins! Something that Travis CI did for you auto-magically. Well, Travis CI has a fixed URL, so that made it easier — no need to ngrok.
Travis CI has another useful default behavior: It sends emails to notify you of build results. You can set up Jenkins to do this, but you have to do some work.
Emailing From Jenkins
First, you need an SMTP (Simple Mail Transfer Protocol) server . You could configure one with Postfix, but this tutorial uses smtp.gmail.com — you need a Google account to follow along.
This time, you must configure both your project and your Jenkins system.
Configuring Your Project
Start with your project: Use the Numero menu to get back to Configure , then select the Post-build Actions tab.
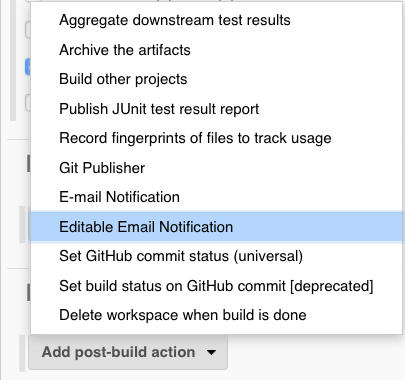
From the Add post-build action menu, select Editable Email Notification :
In the form that appears, you don’t have to edit anything, but note the value of Project Recipient List is $DEFAULT_RECIPIENTS — you’ll need to make sure to edit this field, when you find it.

Below this form, click Advanced Settings… to see more options: The default trigger is Failure – Any , so you don’t have to do anything to prevent success emails.
To duplicate the default behavior of Travis CI, select Always from the Add Trigger menu:

Click Advanced… in the Always section and add your email address to Recipient List :

Note : This is just insurance, to make sure the recipient list isn’t empty.
Click Save to return to your project page.
Configuring Your Jenkins System
Now to configure your Jenkins system: Use the Jenkins menu to select Manage Jenkins ▸ Configure System :

Scroll down to Extended E-mail Notification and settle in for lots of form-filling!
- For SMTP server, type smtp.gmail.com , then click Advanced… .
- Check Use SMTP Authentication , then type your Google User Name and Password .
- Check Use SSL .
- For SMTP port , type 465 .
- For Default Recipients (aha!), type your email address.
- Click Apply to save your entries but stay on this page.

Scroll all the way down, to (plain old) E-mail Notification and click Advanced… : All your email settings should be already here; if not, enter them again.
Right down at the bottom, check Test configuration by sending test e-mail , then fill in your email address.

Before you click Test configuration , there’s one more thing you need to do. Because Google has tightened up security, go to Less secure app access and flick the switch to ON :

Now return to Jenkins and click Test configuration . Wait a bit, and you should see “Email was successfully sent”. Check your email to find:

Note : If you get error messages about “Username and Password not accepted”, check your SMTP Authentication User Name and Password in both places. Also switch secure apps access OFF then ON , maybe more than once.
Pushing to GitHub
Now edit the code in Converter.swift to make your second unit test pass. Edit the convert(_:) method so it returns a String with the correct number of “I” characters:
func convert(_ number: Int) -> String {
  return String(repeating: "I", count: number)
}
Commit and push to GitHub, then watch your build’s console log — it should end with “2 tests, with 0 failures” and an email sent to your email address:
20:54:28 Test Suite 'ConverterTests' passed at 2019-02-19 20:54:28.700.
20:54:28     Executed 2 tests, with 0 failures (0 unexpected) in 0.002 (0.003) seconds
20:54:28 Test Suite 'NumeroTests.xctest' passed at 2019-02-19 20:54:28.701.
20:54:28     Executed 2 tests, with 0 failures (0 unexpected) in 0.002 (0.003) seconds
20:54:28 Test Suite 'All tests' passed at 2019-02-19 20:54:28.701.
20:54:28     Executed 2 tests, with 0 failures (0 unexpected) in 0.002 (0.004) seconds
20:54:29
20:54:29
20:54:29 Test session results and logs:
20:54:29    /Users/Shared/Jenkins/Library/Developer/Xcode/DerivedData/Numero-bhnpnysdndqcwobwddhndhxectdi/Logs/Test/Run-Numero-2019.02.19_20-54-23-+1100.xcresult
20:54:29
20:54:29 2019-02-19 20:54:29.034 xcodebuild[49013:36278327] [MT] IDETestOperationsObserverDebug: 1.783 elapsed -- Testing started completed.
20:54:29 2019-02-19 20:54:29.034 xcodebuild[49013:36278327] [MT] IDETestOperationsObserverDebug: 0.000 sec, +0.000 sec -- start
20:54:29 2019-02-19 20:54:29.034 xcodebuild[49013:36278327] [MT] IDETestOperationsObserverDebug: 1.783 sec, +1.783 sec -- end
20:54:29 ** TEST SUCCEEDED **
20:54:29
20:54:29 Testing started on 'iPhone 8'
20:54:29 Email was triggered for: Always
20:54:29 Sending email for trigger: Always
20:54:29 Sending email to: audrey.tam@xxxxxxx
20:54:33 Finished: SUCCESS
And there’s the email:

Whew! That took a while longer than Travis CI, but you’ve got the basic CI workflow happening with pushes to GitHub triggering Jenkins builds, which trigger email notifications. Take a well-earned break!

Note : Remember to turn off Less secure app access on your Gmail account.
Using fastlane With Jenkins
To use fastlane with Jenkins, you need to install it on your Mac — follow the instructions in our fastlane Tutorial: Getting Started : Enter ruby -v to check you have Ruby 2.0 and xcode-select --install to ensure you have Xcode Command Line Tools (CLT) , then enter this command to install fastlane in /usr/local/bin :
sudo gem install -n /usr/local/bin fastlane --verbose
While fastlane is installing, in your Jenkins project’s Build ▸ Command field, replace the xcodebuild command with this:
fastlane scan
With fastlane installed, cd to the root directory of Numero , and enter this command:
fastlane init
When fastlane asks “What would you like to use fastlane for?”, select 4. Manual setup . This just adds Gemfile and a fastlane folder to your project. Commit and push to GitHub, to start the next build.
Note : If Jenkins says it doesn’t know where fastlane is, specify the full path in the Command field. You can find the full path in Terminal , with which fastlane .
Cleaning Up
Jenkins runs as a launch daemon so it can restart after you exit or even kill the process. To stop Jenkins, run this command in Terminal :
sudo launchctl unload /Library/LaunchDaemons/org.jenkins-ci.plist
The launch daemon restarts when you restart your Mac, which you only discover when you try to expose another service on localhost:8080 and find it’s already in use! To completely uninstall Jenkins, run this command:
/Library/Application Support/Jenkins/Uninstall.command
Check that this has deleted Applications/Jenkins and /Users/Shared/Jenkins , and also the unnamed standard user in System Preferences ▸ Users & Groups — when you restart your Mac, you shouldn’t see the option to login as Jenkins.
Where to Go From Here?
You can download the final project using the link at the top or bottom of this tutorial.
In this tutorial, you got started using both Travis CI and Jenkins. Travis CI is a super-easy pathway to getting started with CI, so no more excuses! Jenkins takes more effort to set up, but there’s no additional cost for private repositories, and it’s more flexible than Travis CI.
Here are some useful references for Travis CI, Jenkins and fastlane:
- Travis CI documentation
- Travis CI Core Concepts for Beginners
- Jenkins User Documentation
- fastlane documentation
- fastlane Tutorial: Getting Started
There are many other CI services or products. The fastlane documentation includes a short list of those that integrate with fastlane.
Beyond CI are the CDs: Continuous Delivery , where you automate your release process so you’re always ready to deploy changes to your users, and Continuous Deployment , where you actually deploy every change automatically. You can move on to CD with a combination of Jenkins pipelines and fastlane. Or you might find Travis CI’s deploy command is sufficient — for example, to automatically deploy to Heroku .
Feel free to add comments or questions in the forum below!
Recommend
About Joyk
Aggregate valuable and interesting links.
Joyk means Joy of geeK