

Create a Beautiful and Responsive HTML Email Template with Postcards
source link: https://www.tuicool.com/articles/hit/rAZNjuR
Go to the source link to view the article. You can view the picture content, updated content and better typesetting reading experience. If the link is broken, please click the button below to view the snapshot at that time.
Postcards is the perfect tool for quickly creating beautiful, fully responsive HTML emails . It has a great drag and drop interface that makes building and customizing emails a breeze.
Today, I’ll walk you through creating a custom newsletter design using Postcards . It’s one of the fastest and simplest tools for professional quality emails with no coding or design background required.
If you’ve thought about using Postcards, read through this tutorial to see how easily we can create custom HTML emails with Postcards. Go ahead and give the free trial a try to follow along with this walkthrough. And, if you already have it, let me show you how you can get super creative and detailed in formulating your emails.

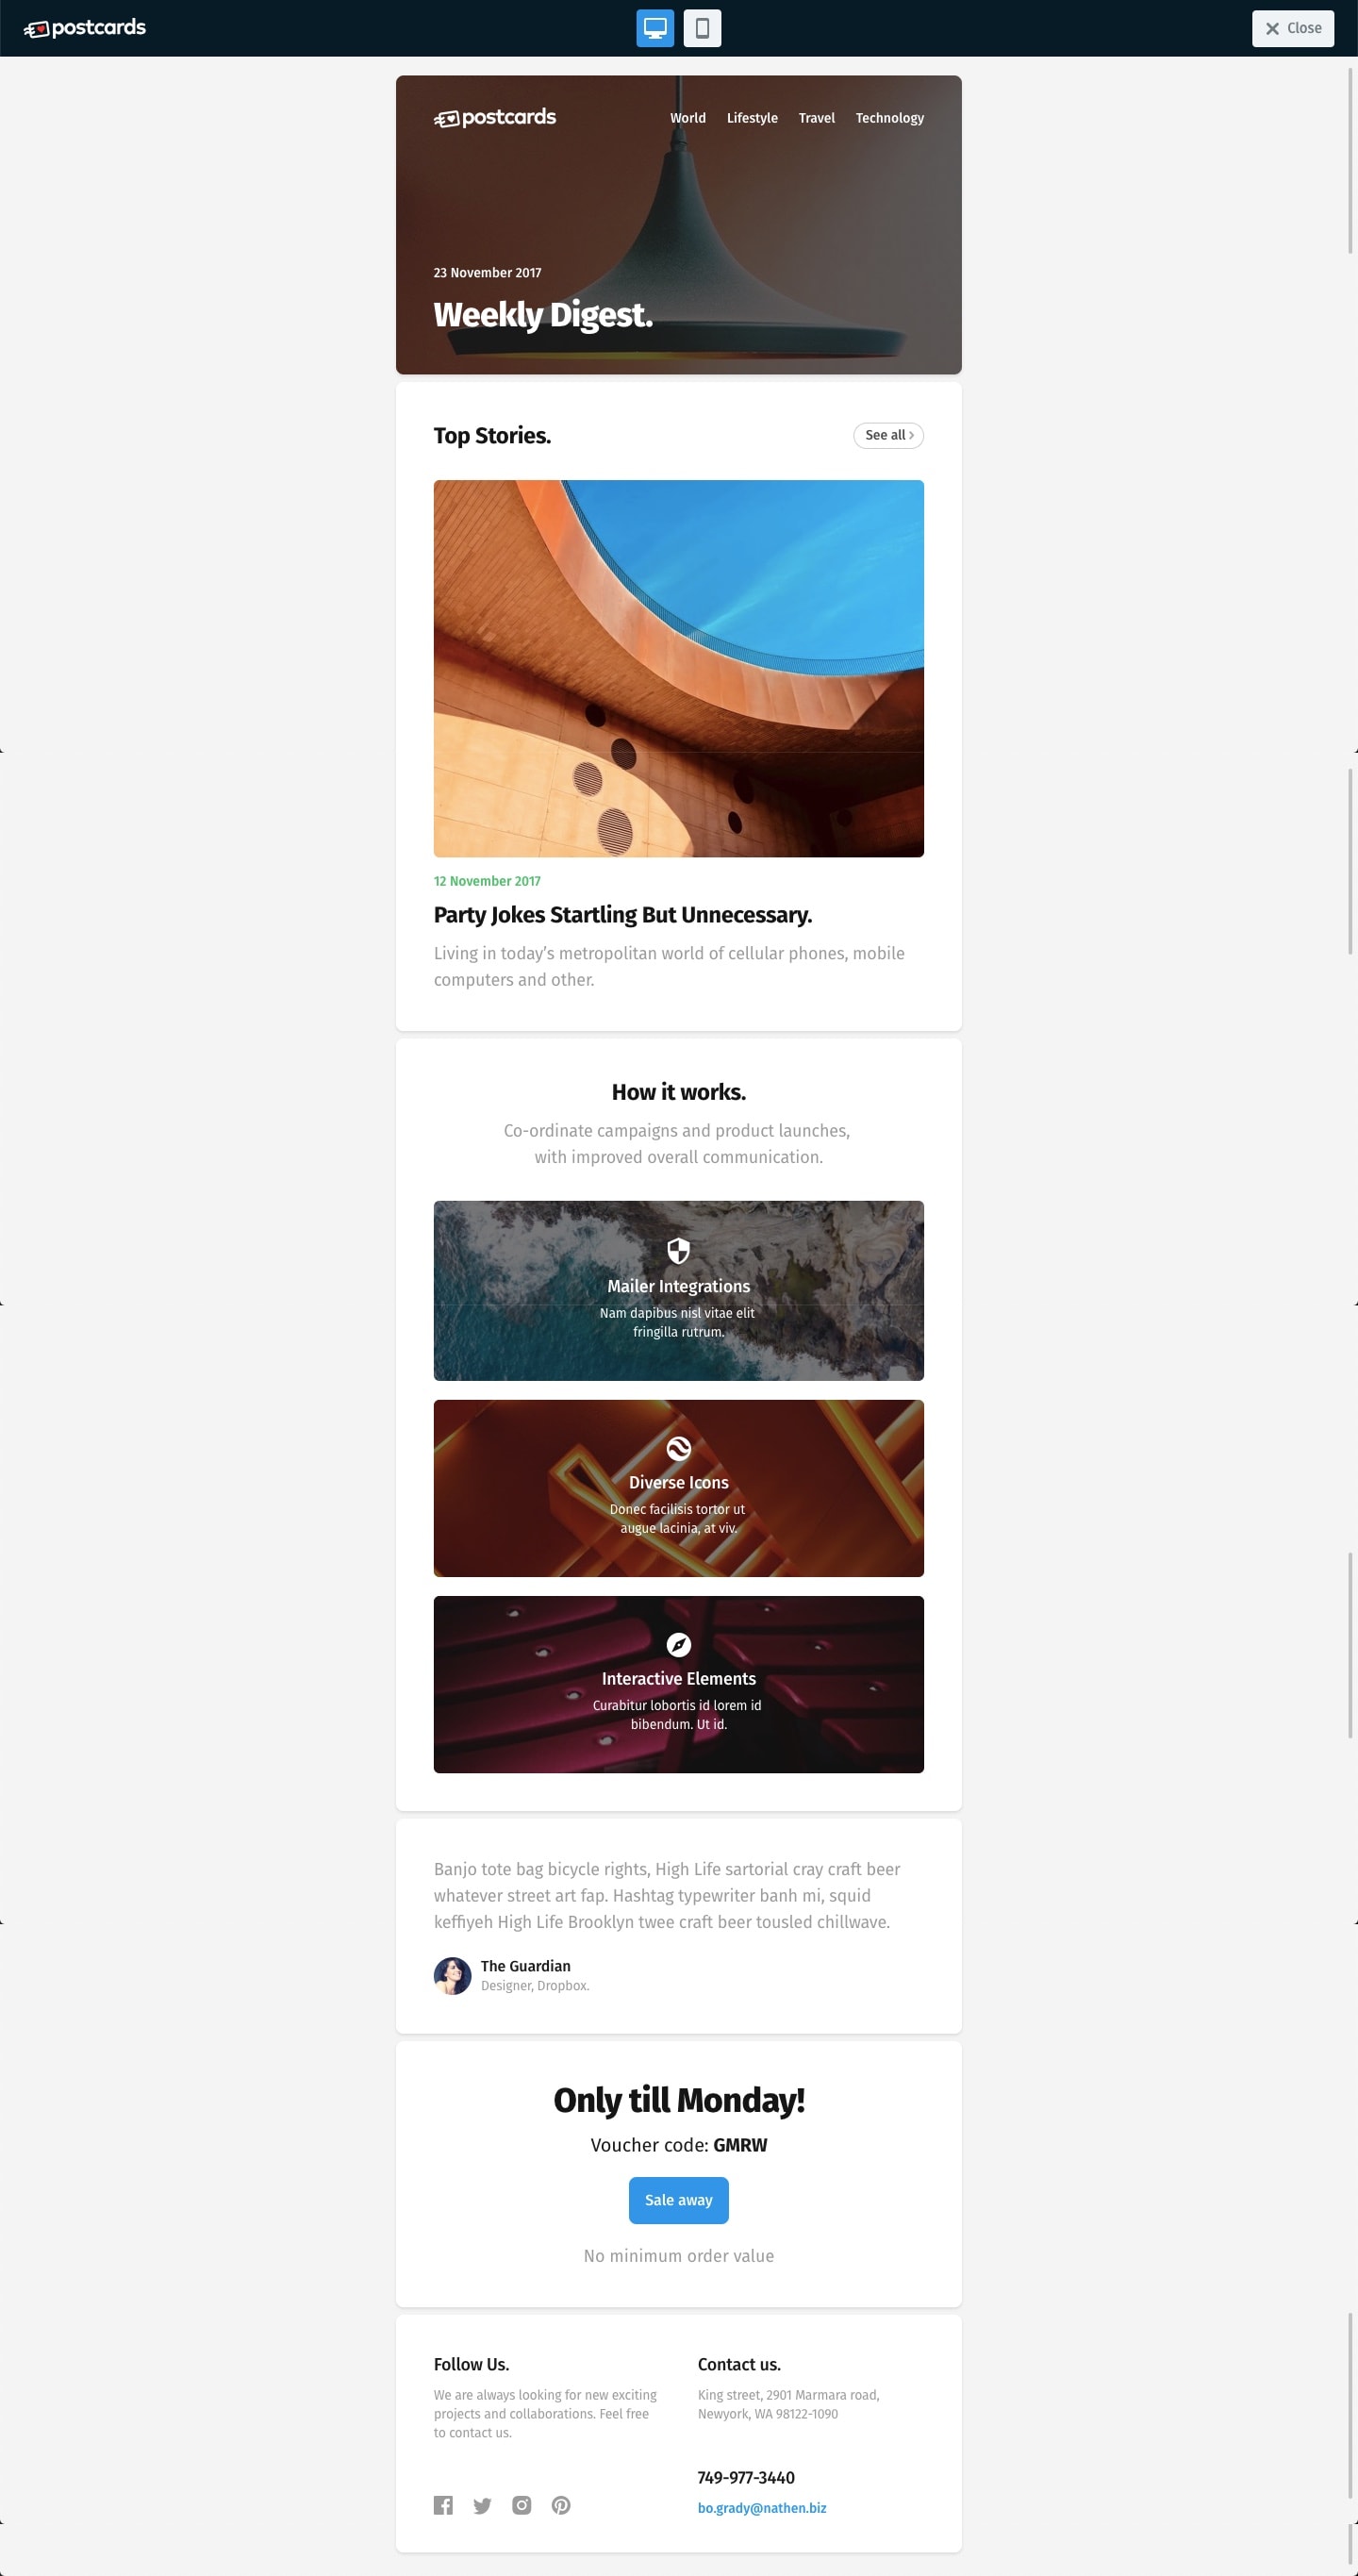
Click here for full email template preview .
What Kind of Emails Can Postcards Create?
Today, we’ll cover how to create a dummy newsletter. However, Postcards can be used for so many more applications such as confirmations, updates and releases, sales, file delivery, and heavy editorial, transactional or promotional emails. Postcards is incredibly flexible and versatile.
Set up a new template
To create a new template, simply click the green + button in the top right of the dashboard. Enter a name – I picked Template Tutorial – and click Save.

Select your new template from the list to the right and you’ll be taken to the template view where you can create and edit it.

Take a minute to browse through all the different sections available for you on the right-hand side menu. There is a lot to choose from between the menu, headers, content or feature sections. Postcards keeps things simple and straightforward. All the sections are well crafted and designed!
Online HTML Email Template Builder
WithPostcards you can create and edit email templates online without any coding skills! Includes more than 100 components to help you create custom emails templates faster than ever before.Try now for free!
Learn More Other ProductsSelect your sections
In this design, I decided to forgo a separate menu and selected Header 1 which encompasses the menu as part of the header. This was purely a design decision to have them both together instead of separately.

I’ve used the following section in the exact order: Header1, Content 9, Feature 7, Content 15, Call to Action 2, and Footer 8. (The names of the sections are right above their displayed image.) Go ahead and add them all. Don’t worry if you don’t drag them in the exact order. You can drag the sections around to reorder them.

If you accidentally dragged in a section you don’t want, hover on its top, right corner and click the trash icon to delete it.
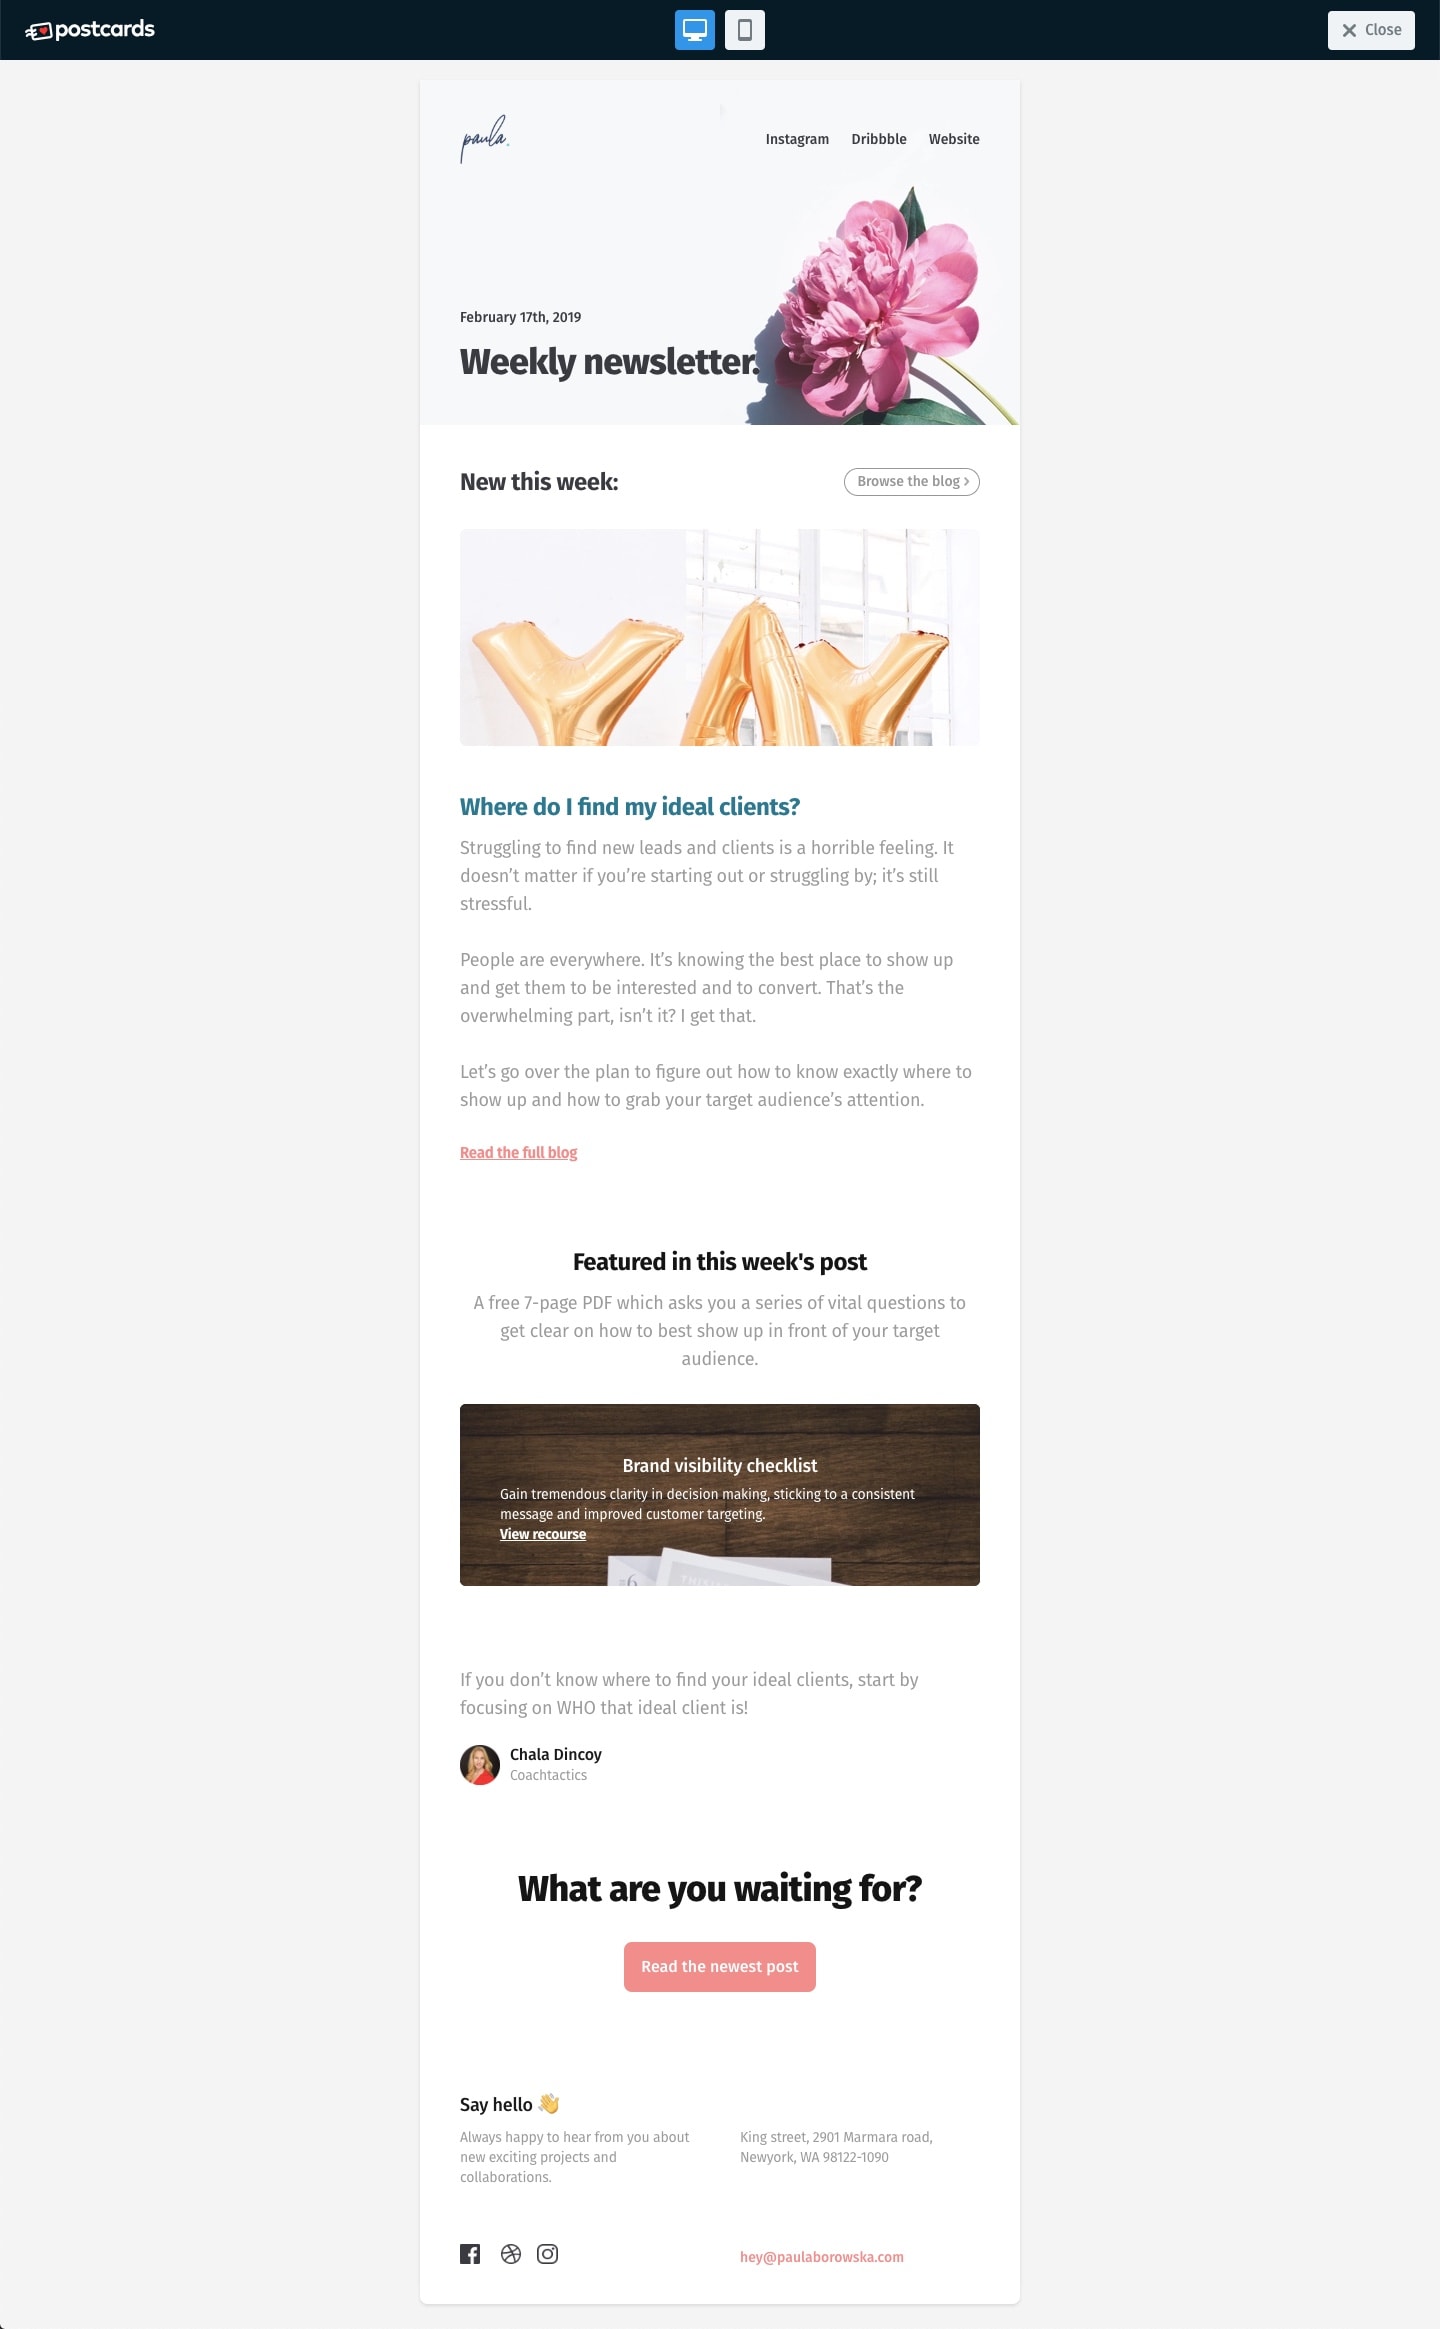
Take a look at the screenshot below, it will show you exactly what the starting point of this template should look like.

Click here for a full preview .
Customize the header
To edit the different sections, hover over the top right corner and click the pencil icon.

Doing so will open up a right-hand side menu with all the details pertaining to the selected section. For Header 1, we can change the background image to another image or colored background. Add a logo, menu items, title and subtitle text.
Under the General tab, go ahead and change the background. The cool thing about Postcards is that under many of the images, the default dimensions are displayed below the upload button. For Header 1 the default background size is 600x320px. If you upload a larger image, Postcards will fill it into the default size of the header.

Don’t be alarmed, the text is white on an off-white background. Let’s change that! Head over to the Title tab. At the bottom, you will see Text Color. I’m changing mine to #393b40. I’m also going to change the text from “Weekly Digest” to “Weekly Newsletter.”

From there, edit the subtitle the same way. I’m simply updating the date to when this hypothetical newsletter would be going out next. And, again, change the color to #393b40.

Under the Header tab, upload your logo. You can resize the logo right there too. If you remove the width or height measurements and leave them blank, Postcards will set the measurement automatically to keep the proportions the same. I set the height of my logo to 50px.
Scroll down a bit and you will see the logo’s link (the default is “www.example.com”) and the menu items in the header as well. Edit the URL for the logo to your own site. To edit the menu items, click into them. Let’s start by changing their color, I’m going to stick to #393b40. I’m also changing the links to Instagram, Dribbble, and Website while removing the fourth link.


And the Header section is done!
Customize blog content
Moving down, let’s edit the Content 9 sections.

As you can see, each section has different editing tabs. Under the General tab, you can always change the section’s background color. I’m keeping mine white. Under the Heading tab, you can change “Top Stories.” as well as customize the “See all” button. I’ve changed both of them to “New this week:” and “Browse the blog,” respectively. And, I changed the text color to #393b40. I’ve also changed the color of the button text and border to #979797. You can also switch the arrow icon to something else or remove it altogether like I have.

Next, I’ve uploaded a new post image. Postcards will automatically round the corners for you here. The size of the default image is 520x400px if you wanna keep it the same. You can also resize the image to any size you’d like and Postcards will crop it for you to fit the max width of 520px.
I’ve also gone ahead and removed the subtitle. I don’t need it. The date of this newsletter has already been established and we’re only sharing a single post here. If you’d like to add a little space between the text and the image, change the subtitle to a period and turn it the same color as the background.

Then, I’ve added the title of the blog post and updated the color to #2d778e. Lastly, I’ve added a description of the blog post to the Post Text which also includes an inline link to the blog post again. However, I edited the link manually through the source code editor under the Tools drop down menu.

If you’re comfortable with inline CSS, you can edit this text area. With it, I set the font size to be smaller, the font weight to be bold and the link color to #f18e8c.

Customize the featured section
To make this tutorial a little bit more interesting, I decided to add a couple more sections. I’m using the Feature 7 section to add a call out for a featured PDF. I changed the title to “Featured in this week’s post” and added a short description.

Under the Icon Boxes tab, I deleted two of them since I only need one. I started by changing the background. Here, the height of the image will be determined by the content inside of it – including the icon, title and description text. I changed the text title to “Brand visibility checklist” – the name of the PDF and added a short description. In the description, I added a link to the PDF again. I customized the link color to be white and the link font weight to bold in the source code with inline CSS. I’ve also gone ahead and changed the text-alignment of the description to left aligned.

Add a quote
I used the Content 15 section to feature a quote. I’ve added it under the Blockquote Text tab and proceeded to add the information about the author under the Blockquote Author Details tab.

Keep in mind that Postcards does not round the uploaded author image here. If you want to use a circular image, you have to make sure you upload one yourself. But, a square one is fine too. You can edit the colors of every text element you see in this section. Use whatever colors you’d like.
Customize the call to action
Since this email is a bit long, I thought it would be best to add one more CTA button toward the bottom: Call to Action 2. As you can see, Postcards comes with a variety of Call to Action sections. I wanted to use the simplest one because I was mostly interested in the button itself and not any additional information.

I’ve changed the Title to “What are you waiting for?” and the button text to “Read the newest post.” You can customize the button’s background and text colors. I changed the background color to this lovely shade of pink – #f18e8c – and set the text white. I also removed the copy from under both Text #1 and Text #2 tabs.

Customize the footer
Using the Footer 8 section, I changed the Title and the Text in the Column 1 tab. Just a simple little message to encourage the subscribers to keep in touch.

If you scroll all the way down, you will also see you can edit icons that are present in the first column. I had a few icons prepared already for Facebook, Dribbble and Instagram. I changed the top three accordingly and adding the links too while removing the fourth icon since it wasn’t needed.
Make sure you edit the default height and width to match the dimensions of your icons as well.

Under the Column 2 tab, I decided I didn’t want the first title. I changed it to a period and made it white because I like the spacing better this way.

I also went ahead and removed the phone number. Finally, I changed the color of the email to match my design (#f18e8c – same as the button above).
Finish Things Off
At this point, we’re more or less done! Good job! I hope your design came out fantastic. As you saw, Postcards is incredibly simple to edit and for making amazing templates. But there are a coupe more things to do before you send this email.
General settings
By default, each template has a few settings on the right-hand side of the dashboard. You change the overall style of the template from individual cards to a continuous, list-style look. I went with the continuous style.

This is also where you can edit the gray background that the email is featured on as well as the default font and pretext.
Preview
Previewing the template is easy. You can do so at any time by clicking the blue eye icon in the top right corner of the window.

Click here for full email template preview .
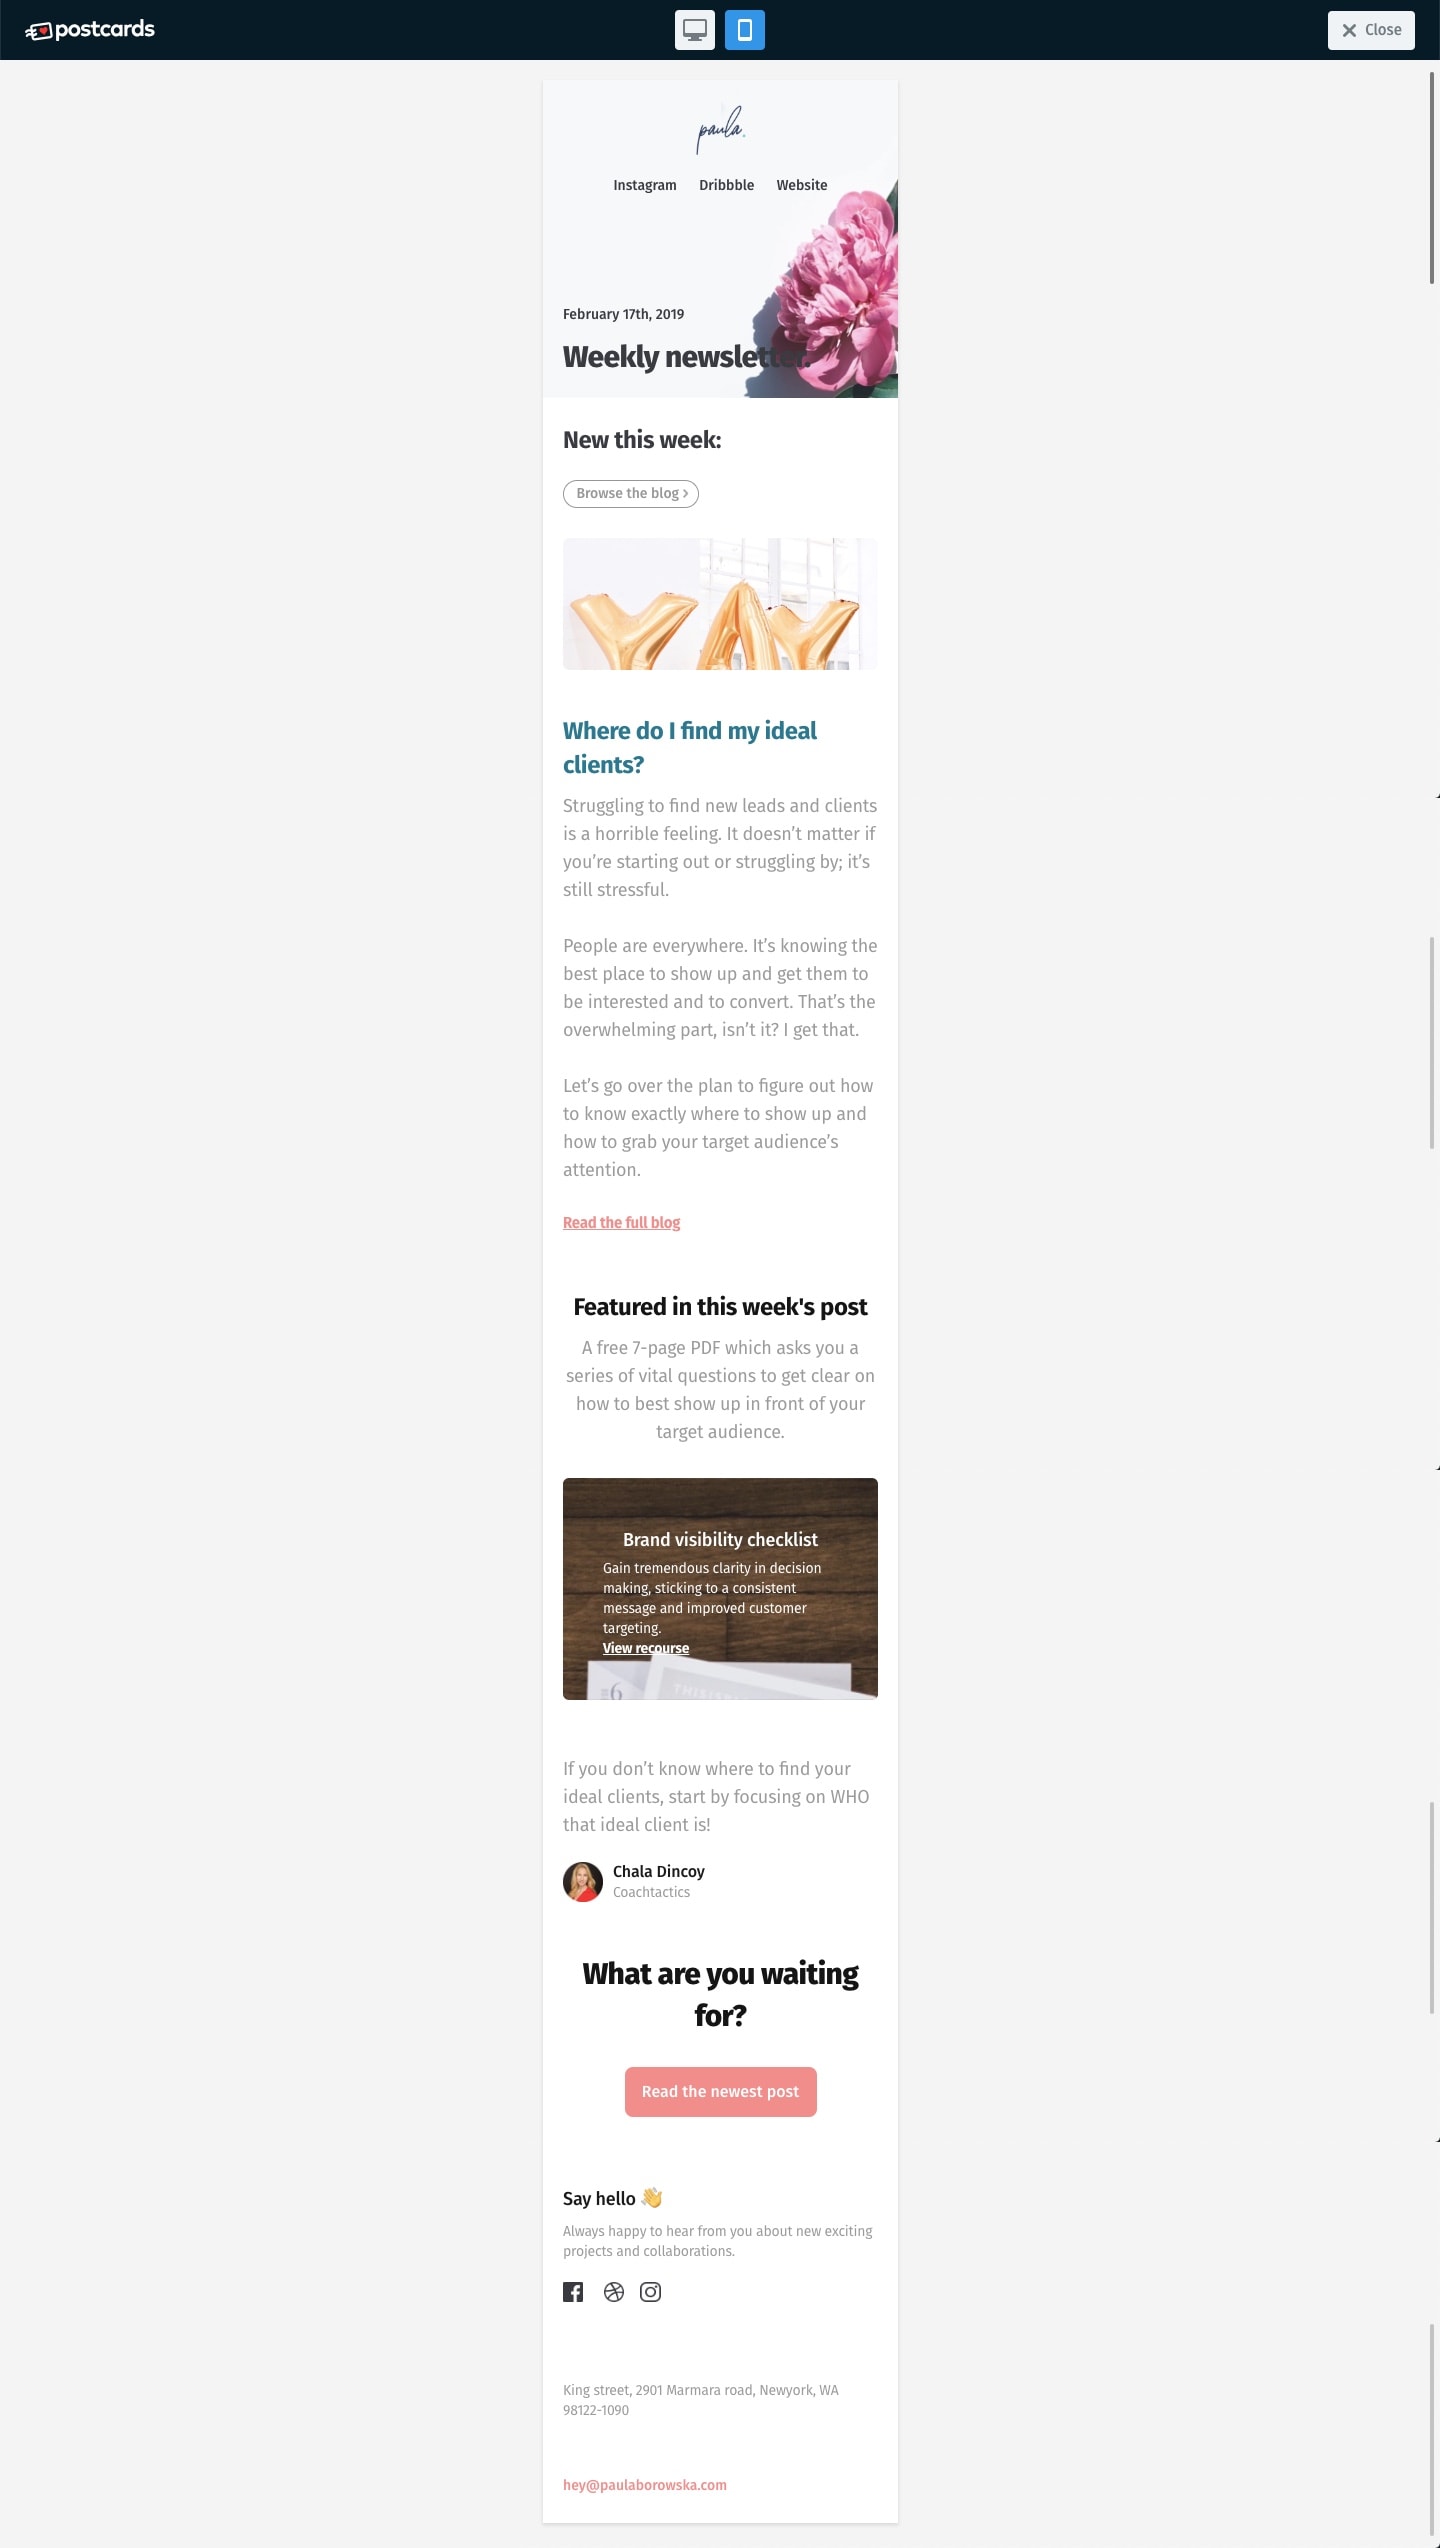
While previewing you have the option to switch back and forth between desktop and mobile views.

Click here for full responsive email template preview .
Export the template
Of course, Postcards makes exporting the template easy. Click the green button in the top right corner that says Export. This will prompt Postcards to generate the code of your template and lets you download everything in a zip file. You will get an HTML file with all the images you used in the template.

Copy and paste the HTML email code to whichever email marketing provider you use, like ConvertKit, MailChimp or otheremail design tools. In those apps replace the necessary text with their shortcodes. Don’t forget to also upload the logos and icons and, you’re set to go!
You can download this free HTML email template here .
Conclusion
As you saw in this walkthrough, using Postcards is extremely simple. The designs are spectacular and will help you create a beautiful email template.
Feel free to play around with the free demo . Right now,Postcards is available for as little as $15 a month! Don’t miss out on an email builder with simplicity, creative flexibility and sleek design at its core!
Recommend
About Joyk
Aggregate valuable and interesting links.
Joyk means Joy of geeK