

Using CLion as an IDE for Server Side Swift Apps on Linux [FREE]
source link: https://www.tuicool.com/articles/hit/YbU77nq
Go to the source link to view the article. You can view the picture content, updated content and better typesetting reading experience. If the link is broken, please click the button below to view the snapshot at that time.
When Swift became open source, one of the great additions to the community was that it was ported to Linux. Since then, the community has made many tools and platforms to allow for easy, solid Swift development on Linux.
One question that may come up in your quest to use Swift on Linux: “Which IDE is right?”
While there are several great options on macOS, aside from Xcode, there aren’t many for Linux. The great team over at JetBrains made CLion , a cross-platform IDE that works on macOS and Linux.
In this tutorial, you’ll learn how to get set up with Swift on Linux, setup CLion to work with Swift, and use Vapor to build a Swift server app.
Note : This CLion tutorial assumes you already have a version of Linux installed on a machine, whether natively or in a virtual machine. You should also be familiar with using the command-line.
Getting Started
If you want to follow along with this tutorial, you should use Ubuntu 16.04. If you are using another version of Linux, your mileage may vary, and you may encounter an issue not covered here.
To install Swift on other versions of Linux, follow the instructions on the official Swift website .
Installing Swift
First, for the install and other components of this tutorial to work, open Terminal and run the following command:
sudo apt-get install clang libicu-dev libcurl4-openssl-dev libssl-dev git docker.io
Note : Each time this tutorial refers to Terminal, it means a command prompt on Linux and not the macOS Terminal.
To download Swift 4.2.1, start by navigating to your Downloads directory in Terminal:
cd ~/Downloads
Next, download Swift 4.2.1 with the following command:
wget https://swift.org/builds/swift-4.2.1-release/ubuntu1604/swift-4.2.1-RELEASE/swift-4.2.1-RELEASE-ubuntu16.04.tar.gz
Finally, download the Signature file for Swift:
wget https://swift.org/builds/swift-4.2.1-release/ubuntu1604/swift-4.2.1-RELEASE/swift-4.2.1-RELEASE-ubuntu16.04.tar.gz.sig
If Swift isn’t already installed on your Linux OS, follow the installation instructions found on the page for Linux.
It is important to follow the steps laid out, as they ensure you are using a signed download of the language. Feel free to download and unzip Swift to your desired location. Ensure that you remember where, as you’ll need the path for future steps.
Finally, to make sure you can use Swift even after you restart Terminal or your computer, you need to export your Swift path in your .bashrc file. In Terminal, open the file in gedit :
gedit ~/.bashrc
Scroll to the bottom of the file and paste the following line:
export PATH=~/Downloads/swift-4.2.1-RELEASE-ubuntu16.04/usr/bin:"${PATH}"
Note : If you’re using Ubuntu 18.04, replace the path with the correct folder for the Swift toolchain you downloaded.
Save the file, and quit gedit. Restart Terminal. Ensure Swift is set up by running the Swift REPL in Terminal.
swift
If prompted, enter your password and try running REPL again.
To quit the REPL, type:
:quit
Installing CLion
Open the Ubuntu Software Center , search for CLion and install. This will install a trial version of the software, which should give you plenty of time to complete this tutorial. Once installed, open CLion . You’ll need to click through a few dialogs when opening CLion the first time. If you didn’t purchase CLion, you can choose Evaluate for free when prompted. This will give you 30 days to try out the app.
Setting Up Swift Support
To use Swift in CLion, you’re going to need to install the Swift plug-in. At the bottom of the Welcome screen , go to Configure ▸ Settings . Here, you can configure your settings globally.

Since Swift support is not installed in CLion by default, you’ll need to install a plug-in. In the left-hand column, search for Plugins . Then, search for Swift and select Install . Once this finishes, restart CLion.

Now that the plug-in is installed, you’ll need to configure CLion to know where your Swift toolchain is. From the Welcome screen, select Configure ▸ Settings . In the left-hand column, expand Build, Execution, Deployment . Now, select Swift in the expanded list.
Next, enter the path where you unzipped your Swift toolchain download. Select the Folder icon in the Swift toolchain path field and navigate to the installed directory of Swift. You’ll know when you’ve selected the proper directory when the OK button becomes active. If you installed according to the instructions above, this folder should be in ~/Downloads .

Select OK , and follow the prompts to restart CLion.
Creating Your First Swift App
Now that CLion setup is complete, you’re ready to create your first app!
From the Welcome screen, select New Project . Under Swift choose Swift Package . On the right-hand side, change the path of the project from ending with untitled to Roar . Then, click Create .

Once the project window is open, there are a few things you’ll need to familiarize yourself with. You can expand Roar ▸ Sources ▸ Roar to see where your project files are located. As of now, there is only main.swift .
In the Project window, you’ll also find Package.swift , the manifest file for Swift Package Manager , which manages dependencies for the project. If you need to add any dependencies to your project, you do it here.
In main.swift , you’ll find the actual code for this project. Replace the contents of the file with the following:
class Lion {
  func speak() {
    print("Roar")
  }
}

let application = Lion()
application.speak()
Now, select Run , shaped like a Play button, in the upper-right corner of the screen.

In Messages at the bottom, you’ll see Roar printed to the console.

Adding Files
Since any project you write won’t be contained in one file, you’ll need to know how to add and debug files. If you’re used to Xcode, things will be slightly different, but still easy.
First, expand your project’s files in the left-hand side of CLion, then expand Sources . Right-click on Roar and choose New ▸ Swift Type

In Name , enter Lion and select OK .
Replace the contents of Lion.swift with the following:
import Foundation

class Lion {
  func speak(_ text: String) {
    print(text)
  }
}
Now, replace the contents of main.swift with the following:
let application = Lion()
application.speak("Roar")
Then, select Run and you should see the same result as before.
Debugging
Finally, one of the most important things is knowing how to debug your code. CLion provides great debugging tools.
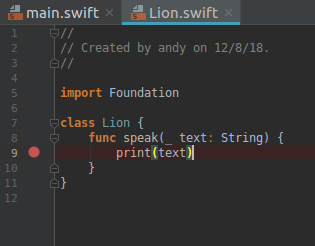
Open Lion.swift
and add a breakpoint by clicking in the gutter next to print(text)
. You should now see a red dot:
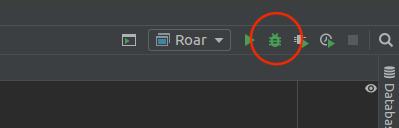
Now, select Debug in the upper-right of the project. The icon looks like a bug.
As your app runs, it will break , or pause, on the line of code from the previous step. This allows you to inspect your app as needed.
At the bottom of the screen, the debugger tool window will appear allowing you to see the state of your code and interact with LLDB.
On the left side of the debugger, you’ll see Frames , which allows you to see the progression of your code and any applicable threads.
On the right side of the debugger, you’ll find a tabbed window. First, you will see the Variables tab. You can press the arrows next to each variable to expand the information about them.

Next, select the tab that says Swift LLDB . Here, you can actually interact with the LLDB using commands you may be familiar with from Xcode. In the console, type:
po text
You should see it print the value of text in the console:

Yay — you’ve made your first Swift project using CLion!
Importing a Vapor Project
To conclude this tutorial, you’re going to take a project made using Vapor and import it into CLion. This gives you the flexibility to write server-side apps and deploy them, all from a Linux environment. The sample project, TIL , is a web app that creates and shows a list of acronyms and their meanings.
To start, download the project materials using the Download Materials button at the top or bottom of this tutorial.
Next, in CLion, select File ▸ Import Project… and select vapor-til-master . Select OK to continue and choose Open Existing Project

When CLion asks how you want to open the project, choose New Window .
CLion will recognize this as a Swift project, setting up everything you need. After the project opens, it will need to sync the dependencies found in Package.swift . This may take some time, so let it finish before continuing.

Note : This process may take several minutes depending on your network connection. However, the process may become stuck. If this happens, quit CLion and navigate to the project folder. If there is a hidden directory called .build , delete it. Restart CLion and it should work. It might take a few times of doing this dance before it works.
Next, edit the configuration for the target. Select Run ▸ Edit Configurations… . Change Working directory to the root directory of the project: That being the vapor-til-master folder you imported earlier. This needs to be set in order for Vapor to know where your resources (images, leaf templates) will be served from.
This project requires a few, easy-to-set-up environment variables. To start, in the Edit Configuration window, select the folder on the text field for Environment variables . Select + and add the following variables:
-
GOOGLE_CALLBACK_URL:localhost:8080 -
GOOGLE_CLIENT_ID:identifier -
GOOGLE_CLIENT_SECRET:secret

Note : This project comes from the book Server Side Swift with Vapor , which goes over more steps that would be required to get this project fully running with Google OAuth. In this tutorial, you’ll go through enough steps to make the project work, but not everything found in the book. This is just to show you the function of setting environment variables. To understand more about how these variables affect this project, check out the book!
When finished, select OK .
Configuring the Database
This project requires you to have a PostgreSQL server running to save and retrieve data. To make it easy, Docker can deploy what you need in a short amount of time. Open Terminal and type the following command:
sudo docker run --name postgres -e POSTGRES_DB=vapor \
  -e POSTGRES_USER=vapor -e POSTGRES_PASSWORD=password \
  -p 5432:5432 -d postgres
If prompted, enter your computer’s password.
This command will:
- Download the docker container for PostgreSQL, if not already installed.
- Start a PostgreSQL database named vapor .
- Give the database a username/password of vapor/password .
- Run it on port 5432 , and in the background.
If you are coming back to this project at a future time, you will not be able to run this command again. You can start the container again in Terminal using the following command:
sudo docker start postgres
If you’d like to stop it manually, run:
sudo docker stop postgres
Now that you have a valid database running, go back to CLion and press Run . As this is the first time running, it will take a while to compile all of the dependencies needed to make a Vapor project work.
This time, you should see in Messages that your app is running on http://localhost:8080 .

Open a web browser and go to localhost:8080 . You’ll see your app is up and running!

Navigate to Create An Acronym in the navigation bar. Log in with the following credentials:
- Username : admin
- Password : password
Once you’re logged in, navigate back to Create An Acronym and create anything you’d like.

You’ve successfully set up Swift, Vapor and CLion to run in a Linux environment! Feel free to add more features to the Vapor project and investigate how the code works with CLion’s debugging tools.
Where to Go From Here?
You can download the finished project using the Download Materials button at the top or bottom of this tutorial.
To learn more, check out these resources:
- Server Side Swift with Vapor course
- JetBrains CLion Information
- Linux Details From Swift.org
- Vapor Documentation
We hope you enjoyed this tutorial! If you have any questions or comments, please join the forum discussion below!
Recommend
About Joyk
Aggregate valuable and interesting links.
Joyk means Joy of geeK