

Unity 2017 2D Techniques: Build a 2D Pinball game [FREE]
source link: https://www.tuicool.com/articles/hit/iE3Un22
Go to the source link to view the article. You can view the picture content, updated content and better typesetting reading experience. If the link is broken, please click the button below to view the snapshot at that time.
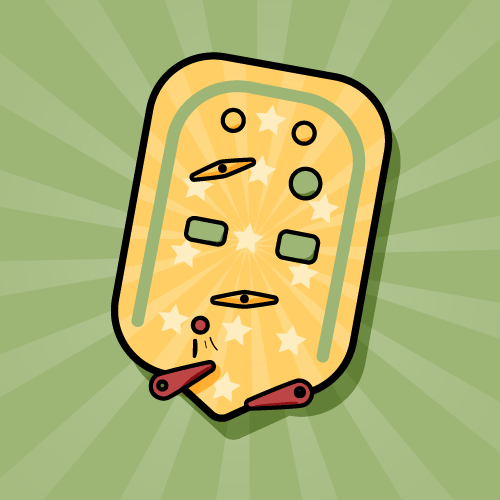
Unity’s 2D techniques are cool. But are they as fun as playing an old-school pinball game?
In this tutorial, you’re going to find out by applying those techniques to build a 2D Pinball game!
This game requires a bit of Physics, so having advanced knowledge of Unity’s 2D Techniques & 2D Physics Engine will save you some time. If you need some extra help, you can find in-depth explanations of 2D Effectors and Joints in Brian Moakley’sUnity 2D Deep Dive and Physics Joints in Unity 2D by Pedro Pereira.
There will be minimal scripting in this tutorial, but it will be easier to follow if you have some basic knowledge of C# programming. To brush up your skills here, read through Georgi Ivanov’s Introduction to Unity Scripting .
Note: This tutorial assumes that you’re comfortable working with Unity and you know your way around Unity’s UI. If you’re not, take the time to read thorugh Brian Moakley’s Introduction to Unity first. If you’re entirely new to Unity2D, then definitely check out Sean Duffy’s Introduction to Unity 2D .
Here’s what you’ll learn in this tutorial about Unity 2D Techniques:
- Introduction to Sorting Group
- Sprite Mask
- 9-Slice Sprite
- 2D Colliders and Joints
- Mesh Editor
- Types of Effectors and 2D Physics Material
Getting Started with 2D Techniques
Before you get started, make sure you’re using Unity 2017.3.0 and be sure to have your favorite code editing tools ready.
To get started, download the Pinball project materials (you can find a link at the top or bottom of this tutorial). Unzip the materials and open the starter project in Unity. When the project launches, switch to Scene view and make sure you’re using 2D mode.
Exploring the Starter Project
Before you begin, take a look at the starter project.
Double-click on Starter Scene in Assets\Scenes . In the Hierarchy, you can see that the game objects are organized into three categories:
- Static Colliders : These are objects with colliders that form the basic structure of the pinball table.
- Static Panel : Contents in this group are hidden. To show this group, select Static Panel in Hierarchy. Then, click Add Component and select Rendering\Sorting Group . In the newly-added Sorting Group component, find the Sorting Layer dropdown and select Panel .
 Note: A Sorting Group is a group of components that you can use to create consolidated Sorting Layers ; multiple instances of a prefab with multiple objects on different sorting layers,
The Sorting Layers in this project are arranged in the following order:
- Panel (lowest layer)
- Efx
- Logo
- Obstacles
- Top
- Cover (highest layer)
- Animations : Select Animations in Hierarchy, and click Add Component . Then, select Rendering\Sorting Group . In the Sorting Layer dropdown, select Efx and hit Play .

You’ll find that most of the nuts and bolts for the pinball game are already in place. Now it’s time for the fun stuff: adding the action — yay!
Time to Get the Ball Rolling
First, create an empty object to hold your project. Right-click Starter Scene in Hierarchy, and select GameObject\Create Empty . Now, name the new object Interactive Parts .
In the Inspector, reset its Transform values by clicking the Settings icon and selecting Reset .
Next, create seven more empty child objects and name them:
- ScrollingTrees
- BillBoard
- Plunger
- Flippers
- Float Piece Area
- Road Tunnel Zone
- Bumpy Parts
Be sure to reset all of their Transform values as well.

Note: You can duplicate these seven new Game Objects using CTRL-D (Windows) or Command-D (Mac). Highlight the first one you created, use the comment to duplicate it, and then press F2 to rename the object. Repeat the process until all seven are duplicated.
Scrolling Trees
You’ll use a Sprite Mask to display only a portion of an animation; it’ll look like this:
Here’s how you do it:
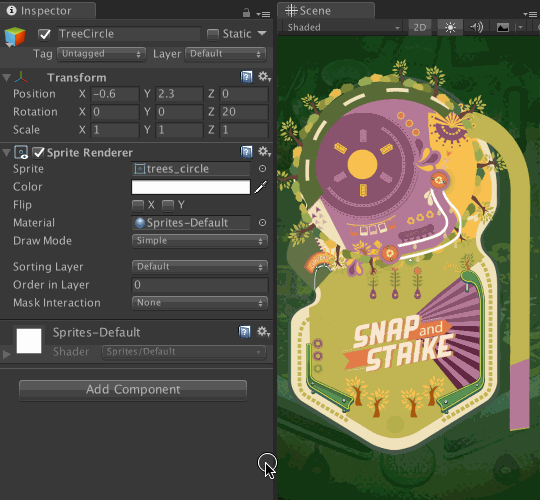
- Go to Assets\Sprites , drag trees_circle onto ScrollingTrees in the Hierarchy and name the sprite instance TreeCircle .
- Set the Inspector Transform Position to (X:-0.7 Y:2.2 Z:0) and set its Rotation to (X:0 Y:0 Z:17) .
- Right-click on ScrollingTrees in Hierarchy, select 2D Objects\Sprite Mask and name it TreeMask .
- Set the Transform Position to (X:-1.91 Y:2.58 Z:0) and set Scale to (X:1.48 Y:1.58 Z:1) .
- In the Inspector, go to the Sprite field of the Sprite Mask component, click on the circle icon to launch the list of sprite assets, and select trees_mask .
- Select TreeCircle in Hierarchy. Using the Inspector, find the Sprite Renderer and select Efx from the Sorting Layer dropdown. From the Mask Interaction dropdown, select Visible Inside Mask .
Scripting the Animation
With the animation is in place, it’s time to add the script that controls animation and sound.
Double-click Assets\Scripts\AnimateController . This opens the script in the code editor.
After //#1 , add the following variables:
public GameObject treeObject;
private float turnspeed = 30f;
After //#2 , add the following FixedUpdate function:
void FixedUpdate()
{
    // checks if current instance has treeObject
    if (treeObject != null)
    {
        treeObject.transform.Rotate (new Vector3 (0, 0, turnspeed * Time.deltaTime));
    }
}
Click Save and return to Unity.
Select ScrollingTrees in Hierarchy, click Add Component and select Scripts\Animate Controller .
In the Inspector, go to the Tree Object field of Animate Controller and click on the circle icon to launch a list of game objects.
Select TreeCircle and hit Play to preview your new working animation.
The script structure for the animation looks like this:
AnimateController.cs
ReactionController.cs
This is an easy way to reuse code on multiple game objects with different properties.
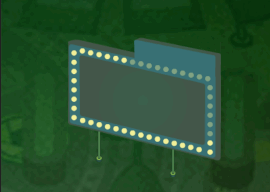
Adding The Billboard
There’s no sense playing Pinball if you aren’t racing the clock to beat your last score! An animated billboard with flashing lights will do nicely.
Go to Assets\Sprites\ani_billboard , drag aniBillbord001 into Billboard in Hierarchy, and name the child instance AniBillboard .
In the Sorting Layer dropdown, select Top . Click Add Component and select Miscellaneous\Animator .
In the Inspector, go to the Controller field of Animator and click on the circle icon beside it to launch the list of animator controllers. Select ani_Billboard .
Open the Animation window from Menu\Window and click Play to preview what the billboard will look like.
The 9-Slice Sprite is another useful 2D Technique. This feature preserves the corners and borders of graphical elements when resizing.
Go to Assets\Sprites\ani_billboard and select one of the sprites. In the Inspector, click on the Sprite Editor icon to edit the stretchable parts of the sprite.
The sprites used for this animation were already prepped with a 9-slice sprite, so resizing them won’t be a problem now. Phew!

Now you need to place the billboard onto your pinball machine.
Go to AniBillboard in Hierarchy, set its Transform values for Position to (X:1.5 Y:4.3 Z:0) and change its Scale to (X:-3.5 Y:2 Z:1) .
In the Inspector, set Sprite Renderer\Draw Mode to Tiled , and Size to Width:1 Height:1 . In the Tile Mode dropdown, select Adaptive .
Add the score to your billboard by going to Assets\PreFab , dragging scoreText into Billboard in the Hierarchy and changing its Scale to (X:0.41 Y:0.4 Z:1) .
Hit Play to preview your pinball game with the new animated billboard!
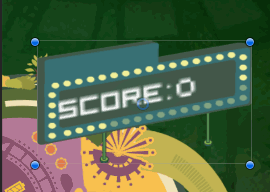
You should see a swanky rectangle billboard now.
Adding the Ping!
With the “bling” in place, it’s time to add the “ping!” into the playfield!
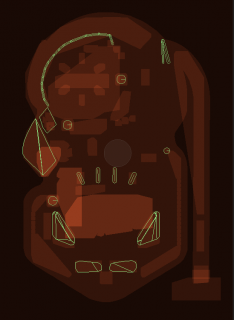
Adding more colliders!
In the Hierarchy, move BumperRamps and CurveRamp from Static Colliders into Interactive Parts .
Adding the Plunger
The first thing you need to play pinball is a Plunger so you can shoot a ball out of the barrel and kickstart the game!
In the real world, the player pulls back the plunger, which engages the spring coils. Upon release, the spring coils propel the ball into the playfield.
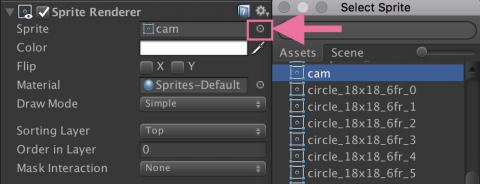
To implement those mechanics, select Plunger in the Hierarchy. In the Inspector, add a Rendering\Sprite Renderer component.
Select the Sprite Renderer Component, click on the circle icon beside the Sprite field and assign the cam asset to it. Set Sorting Layer to Top and the Transform Position to (X:2.66 Y:-4.6 Z:0) .
Take a look at the Plunger Physics . There are 2 Rigidbodies at work here:
- Rigidbody 1: Anchors the moving part of the joint. Exerts force.
- Rigidbody 2: The moving part of the joint. Receives force.
All 2D Joint components comes with a compulsory Rigidbody 2D.

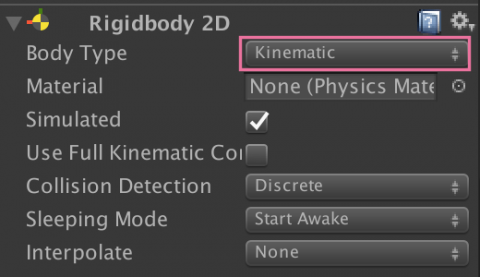
Go to Assets\PreFab , and drag plungerAnchor into Plunger in the Hierarchy to create a child instance. In the Inspector, add Physics 2D\Rigidbody 2D and set its Body Type to Kinematic to fix its position.
The Spring Joint
Now that you’ve created the plunger, it’s time to create the spring joint. This will act like a spring in real life and pull back and launch the plunger.
To do this, go to the Hierarchy and click the arrow sign beside plungerAnchor to show nested contents. Select the Plunger-springjoint . Go to Inspector and add Spring Joint 2D to it.
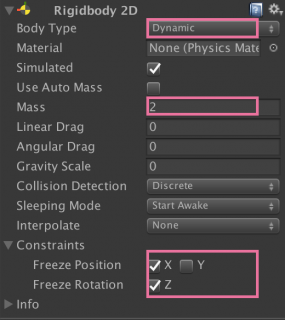
In Rigidbody 2D , set Body Type to Dynamic and Mass to 2.
Expand the Constraints section and enable Freeze Position for X and Freeze Rotation for Z.
On Spring Joint 2D , check Enable Collision on. Disable Auto Configure Distance . Set Distance to 1, and Frequency to 10.
Set Connected Anchor to (X:0 Y:-1) and assign plungerAnchor as the component’s Connected Rigid Body .

In the Hierarchy, drag the plungerEffects prefab into the Plunger object. This creates a child object instance.
Plunger Script
Finally, it’s time to add physics to the plunger and spring joint.
In the Inspector, with Plunger-springjoint still selected, click Add Component and select Scripts\Launcher . Double-click to launch it in the code editor.
After //#1 , declare the following variables:
private SpringJoint2D springJoint;
private float force = 0f;          // current force generated
public float maxforce = 90f;
After //#2 in Start , add the following code:
springJoint = GetComponent<SpringJoint2D>();
springJoint.distance = 1f;
After //#3 in Update , add the following line:
// calculates current force of exertion
force = powerIndex * maxforce;
After //#4 , add the following FixedUpdate function:
void FixedUpdate()
{
    // When force is not 0
    if (force != 0)
    {
        // release springJoint and power up
        springJoint.distance = 1f;
        GetComponent<Rigidbody2D>().AddForce(Vector3.up * force);
        force = 0;
    }
    // When plunger is engaged
    if (pressTime != 0)
    {
        // retract springJoint distance and reduce power
        springJoint.distance = .8f;
        GetComponent<Rigidbody2D>().AddForce(Vector3.down * 400);
    }
}
Save the file and return to Unity.
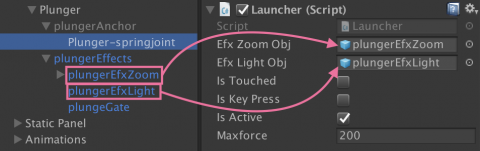
Assign plungerEfxZoom and plungerEfxLight from the plungerEffects instance to the script’s game objects. Set Maxforce to 200 .
Test Your Work
You’re now ready to test your new working pinball plunger.
Drag the ball prefab into the Hierarchy to create an instance. Set its Transform Position to (X:2.84 Y:-1.08) . Hit Play and test your plunger by pressing and releasing the space bar.

Now you’re rolling!
Adding the Flippers
Right now, the ball shoots out from the barrel, into the playfield and off into space.
Time to add those Flppers – the main weapons for Pinball victory!
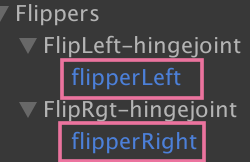
In the Hierarchy, right-click Flippers and select Create Empty . Rename the game object FlipLeft-hingejoint . In the Inspector, set Transform Position to (X:-1.26 Y:-3.8 Z:0) and Scale to (X:1.05 Y:1.05 Z:1) .
For the right flipper, create another new game object as you did above, but this time name it FlipRgt-hingejoint . In the Inspector, set Transform Position to (X:0.46 Y:-3.8 Z:0) and Scale to (X:1.05 Y:1.05 Z:1) .
Take a look at the Flipper Set Up. There are 2 Rigidbodies at work here:
- Rigidbody 1: Anchors a movable part at its point of rotation.
- Rigidbody 2: The movable part.
Next, go to Assets\Prefab and drag the flipperLeft prefab into FlipLeft-hingejoint and the flipperRight prefab into FlipRgt-hingejoint .
The Hinge Joints
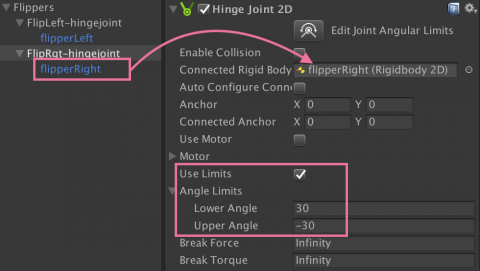
Select FlipLeft-hingejoint in the Hierarchy. Go to Inspector and add Hinge Joint 2D . Set its Body Type to Kinematic .
Note: Setting Body Type to Kinematic makes this “joint” the fixed point of rotation for the flipper.
In Inspector\Hinge Joint 2D , assign the flipperLeft instance as its Connected Rigid Body .

Enable Use Limits . Then, set Angle Limits to -30 for Lower, and 30 for Upper.

Pop Quiz! Since the rotation limit for the Left HingeJoint is between -30 to 30 degrees, what do you think the rotation limit for the Right HingeJoint should be?
[spoiler title=”Steps for Right Flipper”]
Create a new Hinge Joint 2D component for FlipRgt-hingejoint . Set its default Rigidbody 2D component Body Type to Kinematic .
The Angle Limits for the Right HingeJoint are Lower:30 and Upper:-30 .
Remember to assign the flipperRight instance as its Connected Rigid Body .
[/spoiler]
Script to Flip
Now add the script to make the flippers work.
In Assets\Scripts , double-click on FlipControlLeft.cs to launch the file in the code editor.
After //#1 , declare the following variables:
public float speed = 0f;
private HingeJoint2D myHingeJoint;
private JointMotor2D motor2D;
After //#2 in Start , add:
myHingeJoint = GetComponent<HingeJoint2D>();
motor2D = myHingeJoint.motor;
After //#3 in FixedUpdate , add the code to engage the joint’s motor:
// set motor speed to max
motor2D.motorSpeed = speed;
myHingeJoint.motor = motor2D;
After //#4 in FixedUpdate , add the following else statement block to disengage the joint’s motor:
else
{
    // reduce motor speed
    motor2D.motorSpeed = -speed;
    myHingeJoint.motor = motor2D;
}
Try repeating the above code for the Right Flipper:
- Declare the required variables to gain access to the object’s HingeJoint2D and JointMotor2D components.
- Create a variable that stores the speed value for the motor.
- Listen for user interaction in
FixedUpdateand trigger its motor speed accordingly.
[spoiler title=”Code Update for FlipControlRight “]
In FlipControlRight.cs , after //#1 , declare the following variables:
public float speed = 0f;
private HingeJoint2D myHingeJoint;
private JointMotor2D motor2D;
After //#2 in Start , add:
myHingeJoint = GetComponent<HingeJoint2D>();
motor2D = myHingeJoint.motor;
After //#3 in FixedUpdate , add:
// set motor speed to max
motor2D.motorSpeed = -speed;
myHingeJoint.motor = motor2D;
After //#4 in FixedUpdate , add the following else statement block:
else
{
    // reduce motor speed
    motor2D.motorSpeed = speed;
    myHingeJoint.motor = motor2D;
}
[/spoiler]
Save the files and return to Unity.
Attach the script component FlipControlLeft to FlipLeft-hingejoint and FlipControlRight to FlipRgt-hingejoint . Set their Speed values to 1700 .

Hit Play and try out your flippers using the left and right arrow keys.

Road Tunnel Zone
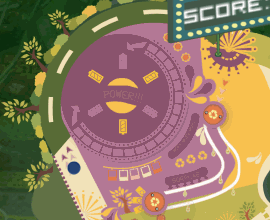
The curved orbit at the top of the playfield increases the chance for the ball to enter the CurveRamp for more points — if you’re able to get the ball in!
In this step, you’ll create a vortex at the entrance to suck the ball into the tunnel and spit it out at the other end. Weeeee!
Force Field with Area Effector 2D
Set the ball instance’s Transform Position to (X:-2.2 Y:0.8 Z:0) . In the Hierarchy, right-click on Road Tunnel Zone and select Create Empty . Name this object ForceField .
Click on Add Component and select Physics2D/ Polygon Collider 2D .
In the Inspector, click on the Edit Collider icon and move the vectors to the area outside the entrance of the tunnel. Enable Is Trigger and Used By Effector .

Click Add Component and select Physics 2D\Area Effector 2D . Enable Use Global Angle . Then, set Force Angle to 90 and Force Magnitude to 20 . In the Force Target dropdown, select Rigidbody .
Hit Play and test out your new vortex.
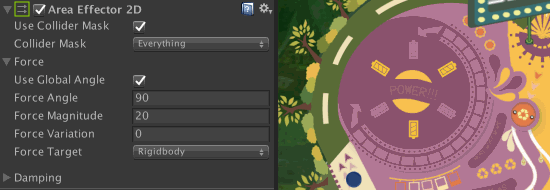
Note: Increasing Force Magnitude to 200 is enough to send the ball through the tunnel. But you won’t get to use Surface Effectors 2D , so let’s make this a weak vortex.
A Guided Path with Surface Effector 2D
The “weak” vortex has only enough power to push your ball to the entrance of the tunnel. Let’s create a path to guide the ball through the rest of it.
- Right-click on Road Tunnel Zone in Hierarchy and select Create Empty . Name this new object Road Surface .
- In the Inspector, click Add Component , and select Physics 2D/Edge Collider 2D .
- Click the Edit Collider icon and move the vectors accordingly.
- Enable Used By Effector and increase Edge Radius to 0.03 .

Next, click Add Component and select Physics 2D\Surface Effector 2D . Set Force Speed to 15 and Force Scale to 1 . Hit Play .
What are you doing !?
Mesh Editing in Unity
At this point, when you preview your work you’ll see that the ball is acting weird.
Go to Hierarchy, select Static Colliders\WallBoard , and enable Sprite Renderer in Inspector. Here, you’ll find the culprit.
Go to Inspector\Polygon Collider 2D , click on the Edit Collider icon and move the offending vectors out of the way. Don’t make the gap too wide.
Note: For faster mesh editing:
- Press alt and left-click to change the cursor into the Hand icon to move the canvas around.
- Press Command (Mac) or CTRL (Windows) to highlight vertices and then left-click to delete.
Hit Play again. There you go… all better!

Blocking with Platform Effector 2D
Now, the ForceField pushes the ball onto the Road Surface, which then guides the ball along tunnel and right back to the shooter and then… Wha…?

That’s not quite right.
You need a collider to prevent the ball from falling back into the Plunger , but at the same time you need to allow the ball to exit from the shooter after launch.
Back in the old days, you might have “if-else’d” your way out of it! But now, Platform Effector 2D is where it’s at!
Right-click on Road Tunnel Zone in Hierarchy, select Create Empty and name the new object BlockPlatform .
In the Inspector, click Add Component and select Physics 2D\Edge Collider 2D . Then Edit Collider to move the vectors that will block the exit. Enable Used By Effector and set Edge Radius to 0.03 .

Next, click Add Component and select Physics 2D\Platform Effector 2D . Disable Use Collider Mask . Then, set the value of Rotational Offset to 90 and the value of Surface Arc to 130 . Enable Use One Way .
Hit Play and the problem is solved.
Float Piece Area
Another sweet spot where you can let the player score more points in the game is in the floating area.
To implement this:
- Set the Transform Position of the ball instance to (X:-2.2 Y:-0.5 Z:0) .
- Go to Assets\Sprites and drag floatpiece into Float Piece Area object in Hierarchy.
- Name the child instance Float Area .
- In the Inspector, set Transform Position to (X:-2.63 Y:0.18 Z:0) and select Logo as its Sorting Layer .
- Click Add Component and select Physics2D\Polygon Collider 2D . Enable Is Trigger and Used By Effector .
- Add another component from Physics 2D\Buoyancy Effector 2D . Set Density to 50 . Under Damping for Linear Drag use 10 and for Angular Drag use 10.
- Set Flow Variation to -5 to give the floating effect a bit of movement.

Hit Play to check out the floating effect.

Code the Float
Now you will set float duration. In Assets\Scripts , double-click Floatpiece.cs to launch the file in the code editor.
Right after //#1 , declare the following variables:
private BuoyancyEffector2D floatEffector;
public float floatingTime = 0f; // floating duration
private float runningTime = 0f; // the current duration since startTime
private float startTime = 0f;
After //#2 in Start , add:
floatEffector = GetComponent<BuoyancyEffector2D>(); // assign component to this instance
After //#3 in OnTriggerEnter2D , replace the code with the following:
// on enter zone, start float
floatEffector.density = 50;
// start timer
if (startTime == 0f)
{
    startTime = Time.time;
    sound.bonus.Play();
    scoreBoard.gamescore = scoreBoard.gamescore + 10;
    golightRenderer.sprite = golightAniController.spriteSet[0];
    StartCoroutine(BeginFloat());
}
After //#4 , replace BeginFloat with the following:
IEnumerator BeginFloat()
{
    while (true)
    {
        // calculate current duration
        runningTime = Time.time - startTime;

        // play animation loop
        int index = (int)Mathf.PingPong(handcamAniController.fps *
                    Time.time, handcamAniController.spriteSet.Length);
        handcamRenderer.sprite = handcamAniController.spriteSet[index];
        yield return new WaitForSeconds(0.1f);

        // when time is up
        if (runningTime >= floatingTime)
        {
            // stop float and reset timer
            floatEffector.density = 0;
            runningTime = 0f;
            startTime = 0f;

            // stop sound & animation
            sound.bonus.Stop();
            golightRenderer.sprite = golightAniController.spriteSet[1];
            handcamRenderer.sprite = handcamAniController.spriteSet
                          [handcamAniController.spriteSet.Length - 1];
            break;
        }
    }
}
Click Save and return to Unity.
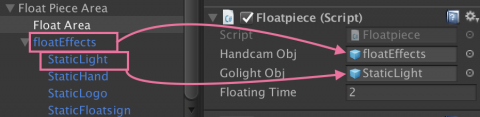
Go to Assets\PreFab and drag floatEffects into the Float Piece Area object in Hierarchy to create a child instance. Click the arrow sign beside floatEffects to expand the contents.
Select Float Area in Hierarchy. Click Add Component and select Scripts\Floatpiece . In the Inspector, assign floatEffects to Handcam Obj and StaticLight to Golight Obj . Set the Floating Time value to 2 .
Now press Play again to test.

Hit Play and test
Triangle Bumpy Parts
You’re almost done with your Pinball game! All that’s left is to enhance gameplay with Point Effectors and a Physics Material .
If the ball hits any of these bumpy parts, they’ll fire the ball in opposite direction.
To create these, go to Assets\PreFab , drag bumperTriangleLeft into Bumpy Parts in Hierarchy. Place the ball instance in front of the bumper.
Hit Play to see how the ball rolls off the slope all like… bleahhh.

Physics Material 2D vs Point Effector 2D
In Unity, to add momentum to animated objects on collision, you have 2 options.
- Physics Material 2D: Velocity is consistent throughout the entire object surface, regardless of the point of impact.

-
Point Effector 2D: Velocity is dependant on the object’s center of mass and its point of impact.
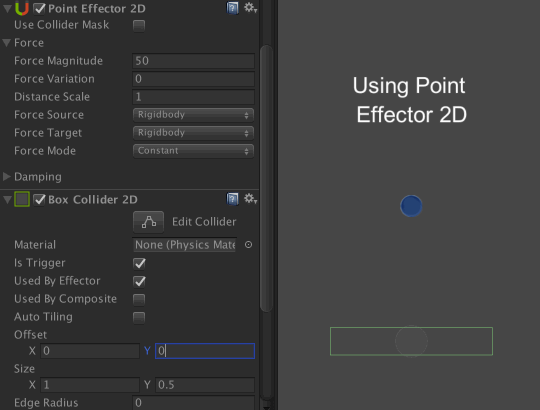
Feel free to play with both options. Experiment with different settings to find the optimal impact for the different colliding elements in the game.
Select bumperTriangleLeft in Hierarchy, go to Inspector\Polygon Collider 2D and enable Is Trigger and Used By Effector .
Next, click on Add Component and select Physics 2D\Point Effector 2D . Set Force Magnitude to 500 , and adjust the Damping settings to Drag: 5000 Angular Drag: 1000 .
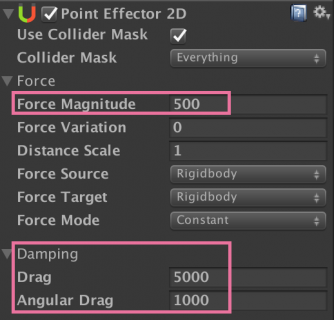
For the Right Bumper, drag bumperTriangleRgt from Assets\PreFab into Bumpy Parts . In the Inspector\Polygon Collider 2D properties, enable Is Trigger and Used By Effector .
Add Point Effector 2D and set Force Magnitude to 500 . Adjust the Damping settings to Drag:5000 Angular Drag:1000 .
Now set the ball instance Transform Position to (X:-1.7 Y:-1.6 Z:0) . Hit Play to test out your new bumpers.
Look! It’s so fast, you can’t see it.
More Bumpy?
There are 2 more prefabs you can try out to explore more of the 2D Physics engine; bumperCircles and bumperDividers . To add them to your Pinball game, drag them into Bumpy Parts in Hierachy .
Tweak the impact of the collision using either Point Effectors 2D or changing it up with Physics Material 2D.
Now set the Transform Position of the ball instance to (X:2.8 Y:-1 Z:0) .
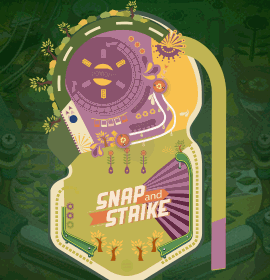
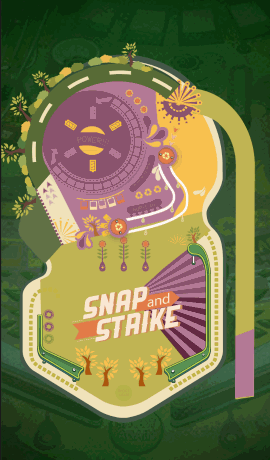
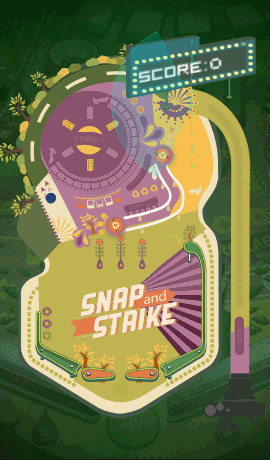
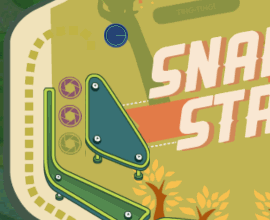
Hit Play and enjoy playing “Snap and Strike”!

Where to Go From Here?
Check out the final version of this tutorial project by downloading the project materials using the link at the top or bottom of this tutorial.
To add on to this game, you can hook it up with Facebook and try setting up a High Score Table to challenge your friends. Check out Backend Integration in Unity with Firebase for help with this.
I hope you found this tutorial useful. If you’ve put together some other cool effects using Unity’s 2D Techniques, tell us about it in the comments section below!
Recommend
About Joyk
Aggregate valuable and interesting links.
Joyk means Joy of geeK