

ARCore Sceneform SDK: Getting Started
source link: https://www.tuicool.com/articles/hit/RBNveaf
Go to the source link to view the article. You can view the picture content, updated content and better typesetting reading experience. If the link is broken, please click the button below to view the snapshot at that time.
In 2017, Google unveiled ARCore , a platform for building augmented reality (AR) experiences on Android devices.
At that time, ARCore required developers to know either Unity or 3D graphics with OpenGL to create AR applications. You can see an example of this in our Getting Started With ARCore With Kotlin tutorial. Also at that time, the number of devices supported for ARcore was much smaller. Since then, the support for devices has grown, but developers still needed to grasp knowledge about OpenGL or Unity for developing AR applications.
At Google I/O 2018, Google announced Sceneform , a sort of “layer” on ARCore, which enables developers to create AR applications using knowledge of only the Android SDK and the Kotlin/Java language.
In this tutorial, you’re going to create an AR-based game, WhacARDroid , and, along the way, you’ll learn to develop AR apps using Sceneform.
Prerequisite: There’s a restricted number of devices capable of running ARCore. The complete list is available here .
Setting Up the Environment
Using a Real Device
To run an app that uses ARCore on a real device, you need to check if ARCore is supported. If it is, install the ARCore app from the Google Play Store . This app has no UI; it only contains support for what ARCore-based apps need to run.
Using an Emulator
Not every development machine can run an AR-enabled emulator supporting Sceneform. If you plan to run your app on an emulator, you must ensure that your machine supports OpenGL ES 3.1 or later. Moreover, the emulator must follow some rules:
– When creating it, you must choose a Pixel or Pixel 2 hardware profile.
– You must use Oreo: API Level 27: x86: Android 8.1 (Google APIs) system image.
– you must set the back camera to VirtualScene ( Verify Configuration ▸ Show Advanced Settings ▸ Camera Back ).
Once you’ve such an emulator set up, start the emulator and open its settings. Go to the Advanced tab and set OpenGL ES API level to Renderer maximum (up to OpenGL ES 3.1) , then restart the emulator.

Now, you can check if your machine supports OpenGL ES 3.1 by filtering your Logcat for eglMakeCurrent . You should get something like this:
`com.google.android.gms.unstable D/EGL_emulation: eglMakeCurrent: 0xdffbd660: ver 3 1 `
As you can see, the above emulator is using the version 3.1 of OpenGL, so it’ll be able to use Sceneform.
Getting the Sceneform Plugin
The Sceneform plugin is an Android Studio plugin used to import 3D models, convert them into Sceneform format, and preview them in Android Studio. Sceneform can handle OBJ, FBX, and glTF formats for 3D assets.
To get the plugin, open Android Studio, go to the Plugins settings (Windows/Linux: File ▸ Settings ▸ Plugins ▸ Browse Repositories , macOS: Android Studio ▸ Preferences ▸ Plugins ), browse the plugin “Google Sceneform Tools” (as of now it’s beta) and install it. Then restart Android Studio.
To use the plugin, you will only need to add these lines to your app level build.gradle (these have already been added to the starter project that you will open below):
apply plugin: 'com.google.ar.sceneform.plugin'

sceneform.asset('sampledata/models/andy.obj', // Source Asset Path
        'default',                            // Material Path
        'sampledata/models/andy.sfa',         // .sfa Output Path
        'src/main/res/raw/andy')              // .sfb Output Path
For the sample project, you’re going to use a model provided by Google in its Sceneform samples .
Getting Started
Use the Download materials button at the top or bottom of this tutorial to download the starter project. Open the starter project in Android Studio 3.1.3 or later.
You can click the Run button and the starter project should run on your device or emulator.
You’ll first be prompted to provide camera permissions and, upon approving, you’ll see an image prompting you to move your phone around. This is needed to track the surface. Aiming the device at a flat surface and moving it a little bit, you should see a few points highlighted. When you see them, it means ARCore has detected the plane. ARCore does all these operations by itself, so you don’t need to worry about doing anything more.
Note : Light-colored planes may have trouble being detected.

If you see some white dots on your plane, congratulations — your app is working!
Now, you’ll create a simple yet funny AR version of the popular Whac-A-Mole game. For this game, you’ll hit as many 3D droids as you can and get a high score. Time to create WhacARDroid ! :]
Creating 3D Objects
Sceneform provides three simple and similar ways to create a 3D object: from scratch, from a model or from an Android XML file. Building the model is asynchronous — the method returns a CompletableFuture
— because instantiating a renderable is a heavy operation.
Making a 3D Object From Scratch
To create a 3D object from the ground up, you need to provide a Material
. A material defines some physical aspect of the object you’re going to instantiate – its color, for example. With the code that follows, as an example, you’d create an opaque material with a red tint:
// The color object is from `com.google.ar.sceneform.rendering` package
var cubeRenderable: ModelRenderable? = null
MaterialFactory.makeOpaqueWithColor(this, Color(android.graphics.Color.BLUE))
        .thenAccept { material ->
          // This is async and will be called when the material has been created

          val size = Vector3(1F, 1F, 1F)
          val center = Vector3(0.5F, 0.5F, 0.5F)

          cubeRenderable = ShapeFactory.makeCube(size, center, material)
        }
Instantiating an Existing 3D Model
For your game, you need a droid to hit, so you’ll create one now.
Open MainActivity.kt
and add a property representing your object, droidRenderable
, then create the method initResources()
that will instantiate all your resources and call it at the end of onCreate()
:
private var droidRenderable: ModelRenderable? = null

override fun onCreate(savedInstanceState: Bundle?) {
    ...
    initResources()
}

private fun initResources() {
  // Create a droid renderable (asynchronous operation,
  // result is delivered to `thenAccept` method)
  ModelRenderable.builder()
      .setSource(this, R.raw.andy)
      .build()
      .thenAccept { droidRenderable = it }
      .exceptionally { it.toast(this) }
}
Here, you’ve created a new ModelRenderable
using R.raw.andy
— an .sfb 3D model – as source; with the thenAccept
method, you can get this model and assign its value to your property droidRenderable
. Since you’re not 100% sure that everything will work as expected, you can add an exceptionally
block that will be called when something goes wrong.
Displaying XML in Real Life
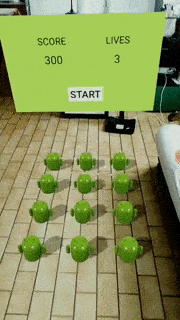
What would a game be without a scoreboard? You’re going to create one using an XML-based model, just like any regular Android view.
In the starter project, there’s already a class called ScoreboardView
, which inflates scoreboard_view.xml
, so you’re simply going to create the 3D model from it. Add a new property scoreboardRenderable
to MainActivity
and update initResources()
to set a value for the existing scoreboard
property and then build scoreboardRenderable
using scoreboard
:
private var scoreboardRenderable: ViewRenderable? = null

private fun initResources() {
  ...
  scoreboard = ScoreboardView(this)

  scoreboard.onStartTapped = {
    // Reset counters
    scoreboard.life = START_LIVES
    scoreboard.score = 0
  }

  // create a scoreboard renderable (asynchronous operation,
  // result is delivered to `thenAccept` method)
  ViewRenderable.builder()
      .setView(this, scoreboard)
      .build()
      .thenAccept {
        it.isShadowReceiver = true
        scoreboardRenderable = it
      }
      .exceptionally { it.toast(this) }
}
Similarly to what you’ve done for the previous renderable, you have provided a source for the renderable but are using setView
this time instead of setSource
.
You’re also telling the renderable that it has the capability of receiving shadows casted by other objects with isShadowReceiver = true
.
If you check what onStartTapped
does in ScoreboardView
, you see it’s just using an onClickListener
to intercept a click event, since this 3D object works exactly like a regular view.
Adding Another Light
Afraid of the dark? Sceneform can help you! Instantiating a light is so light — no pun intended — that this operation is done synchronously by default. Add a new property failLight
to MainActivity
and set it up at the bottom of initResources()
:
private var failLight: Light? = null

private fun initResources() {
  ...
  // Creating a light is NOT asynchronous
  failLight = Light.builder(Light.Type.POINT)
      .setColor(Color(android.graphics.Color.RED))
      .setShadowCastingEnabled(true)
      .setIntensity(0F)
      .build()
}
As you can easily see, it’s possible to build different types of light with different colors, intensity and other parameters. You can read more about this here .
In the above code snippet, you just created a Light
object from its builder and set the following characteristics for it:
true
This light will blink when the player fails to hit a droid, so the intensity is equal to zero for now.
Interacting With the AR World
Every object that is displayed on the plane is attached to a Node
. When an OnTapArPlaneListener
is applied on the plane and a user taps on it, a HitResult
object is created. Through this object, you can create an AnchorNode
. On an anchor node, you can then attach your own node hosting your renderable. In this way, you can use a custom node that can be moved, rotated or scaled.
For WhacARDroid, you’ll need a node capable of moving up and down, so you’re going to create the class TranslatableNode . You’ll add the animation code later; for now, a helper method for adding some offset for translation is enough.
Right-click on the main app package and choose New ▸ Kotlin File/Class and then create the new class:
class TranslatableNode : Node() {

  fun addOffset(x: Float = 0F, y: Float = 0F, z: Float = 0F) {
    val posX = localPosition.x + x
    val posY = localPosition.y + y
    val posZ = localPosition.z + z

    localPosition = Vector3(posX, posY, posZ)
  }
}
Make sure that any imports you pull in for the new class are from com.google.ar.sceneform
sub-packages.
Touch Listener on a 3D Object
Like with other listeners on Android, an event is propagated until a listener consumes it. Sceneform propagates a touch event through every object capable of handling it, until it reaches the scene. In the order that follows, the event is sent to:
Knowing the theory, it’s now time to plan the game logic:
-
When the player taps the plane for the first time, Sceneform will instantiate the whole game, so you’ll set an
onTouchListeneron the plane. -
When the player taps on the Start button, the game will begin; the click listener is handled by the
onClickListenerofScoreBoardView. -
If the player hits a droid, he or she will gain 100 points, so you’ll intercept the
onTouchEventon the droid. - If the player misses the droid, he or she will lose a life and 50 points; you’ll need to detect a tap on the plane so you can reuse the existing listener.
Go ahead and add two new properties to MainActivity
, one to represent the grid of droids and the other to indicate whether the game board is initialized, and then add the rest of the following code to the end of onCreate()
, after the call to initResources
:
private var grid = Array(ROW_NUM) { arrayOfNulls<TranslatableNode>(COL_NUM) }
private var initialized = false

override fun onCreate(savedInstanceState: Bundle?) {
  ...
  arFragment.setOnTapArPlaneListener { hitResult: HitResult, plane: Plane, _: MotionEvent ->
    if (initialized) {
      // 1
      // Already initialized!
      // When the game is initialized and user touches without
      // hitting a droid, remove 50 points
      failHit()
      return@setOnTapArPlaneListener
    }

    if (plane.type != Plane.Type.HORIZONTAL_UPWARD_FACING) {
      // 2
      // Only HORIZONTAL_UPWARD_FACING planes are good to play the game
      // Notify the user and return
      "Find an HORIZONTAL and UPWARD FACING plane!".toast(this)
      return@setOnTapArPlaneListener
    }

    if(droidRenderable == null || scoreboardRenderable == null || failLight == null){
      // 3
      // Every renderable object must be initialized
      // On a real world/complex application
      // it can be useful to add a visual loading
      return@setOnTapArPlaneListener
    }

    val spacing = 0.3F

    val anchorNode = AnchorNode(hitResult.createAnchor())

    anchorNode.setParent(arFragment.arSceneView.scene)

    // 4
    // Add N droid to the plane (N = COL x ROW)
    grid.matrixIndices { col, row ->
      val renderableModel = droidRenderable?.makeCopy() ?: return@matrixIndices
      TranslatableNode().apply {
        setParent(anchorNode)
        renderable = renderableModel
        addOffset(x = row * spacing, z = col * spacing)
        grid[col][row] = this
        this.setOnTapListener { _, _ ->
          // TODO: You hit a droid!
        }
      }
    }

    // 5
    // Add the scoreboard view to the plane
    val renderableView = scoreboardRenderable ?: return@setOnTapArPlaneListener
    TranslatableNode()
            .also {
              it.setParent(anchorNode)
              it.renderable = renderableView
              it.addOffset(x = spacing, y = .6F)
            }

    // 6
    // Add a light
    Node().apply {
      setParent(anchorNode)
      light = failLight
      localPosition = Vector3(.3F, .3F, .3F)
    }

    // 7
    initialized = true
  }
}
In the above listener, you:
- Handle a failed hit on a droid, and return.
- Alert the user if they’ve picked a bad plane for the game, and return.
- Return if not all renderable objects have been initialized.
- Set up droids on the plane.
- Add the scoreboard view to the plane.
- Add a light to the game.
-
Set
initializedtotrue.
With that long snippet added, you can now try to run the app. If everything is OK, you should be able to spawn the game by touching a plane.

Nothing will happen right now, however; you’ll need to add some logic.
Animating
There are two ways to create an animation: animate an existing node or create a custom node capable of complex animations.
Animating a Node
Animating an existing node can be achieved using an ObjectAnimator
and is as easy as setting a start and an end value for a property.
ObjectAnimator
is an Android class, and it’s not specific to ARCore or Sceneform. If you don’t know how to use it, we have you covered! You can read more about it in the Android Animation Tutorial with Kotlin
.
For your game, you’re going to use the animator to blink a light, so you’ll have to pass four parameters:
- A target (the light object).
- A property (the intensity of the light).
- The start value of the property.
- The end value of the same property.
There is an extension method in Extensions.kt
that uses an ObjectAnimator
to blink a light:
private fun failHit() {
  scoreboard.score -= 50
  scoreboard.life -= 1
  failLight?.blink()
  ...
}
Next, you need to animate the droid. Add the following code to the TranslatableNode
class to create the up animation for the droid renderable:
class TranslatableNode : Node() {
  ...

  // 1
  var position: DroidPosition = DroidPosition.DOWN

  // 2
  fun pullUp() {
    // If not moving up or already moved up, start animation
    if (position != DroidPosition.MOVING_UP && position != DroidPosition.UP) {
      animatePullUp()
    }
  }

  // 3
  private fun localPositionAnimator(vararg values: Any?): ObjectAnimator {
    return ObjectAnimator().apply {
      target = this@TranslatableNode
      propertyName = "localPosition"
      duration = 250
      interpolator = LinearInterpolator()

      setAutoCancel(true)
      // * = Spread operator, this will pass N `Any?` values instead of a single list `List<Any?>`
      setObjectValues(*values)
      // Always apply evaluator AFTER object values or it will be overwritten by a default one
      setEvaluator(VectorEvaluator())
    }
  }

  // 4
  private fun animatePullUp() {
    // No matter where you start (i.e. start from .3 instead of 0F),
    // you will always arrive at .4F
    val low = Vector3(localPosition)
    val high = Vector3(localPosition).apply { y = +.4F }

    val animation = localPositionAnimator(low, high)

    animation.addListener(object : Animator.AnimatorListener {
      override fun onAnimationRepeat(animation: Animator?) {}
      override fun onAnimationCancel(animation: Animator?) {}

      override fun onAnimationEnd(animation: Animator?) {
        position = DroidPosition.UP
      }

      override fun onAnimationStart(animation: Animator?) {
        position = DroidPosition.MOVING_UP
      }

    })
    animation.start()
  }
}
Here, you have added:
ObjectAnimator
Calling the start()
method on the animator is enough to fire it, and the cancel()
method will stop the animation. Setting auto cancel to true will stop an ongoing animation when a new one — with the same target and property — is started.
Try to write the pullDown
method and associated code yourself. If you’re having trouble, open the spoiler below for the complete code.
[spoiler title=”Pull down animation code”]
fun pullDown() {
  // If not moving down or already moved down, start animation
  if (position != DroidPosition.MOVING_DOWN && position != DroidPosition.DOWN) {
    animatePullDown()
  }
}

private fun animatePullDown() {
  // No matter where you start,
  // you will always arrive at 0F
  val high = Vector3(localPosition)
  val low = Vector3(localPosition).apply { y = 0F }

  val animation = localPositionAnimator(high, low)

  animation.addListener(object : Animator.AnimatorListener {
      override fun onAnimationRepeat(animation: Animator?) {}
      override fun onAnimationCancel(animation: Animator?) {}

      override fun onAnimationEnd(animation: Animator?) {
        position = DroidPosition.DOWN
      }

      override fun onAnimationStart(animation: Animator?) {
        position = DroidPosition.MOVING_DOWN
      }

    })

  animation.start()
}
[/spoiler]
Creating an Animated Node
Custom animated nodes are a little bit harder to use than using ObjectAnimator
as you have done above, but they are more powerful.
To use custom animation with a node, you need to extend the Node
class and then override the onUpdate
method.
WhacARDroid doesn’t need anything that customizable, so if you want to check out an example you can see Google’s Sceneform sample.
Completing the Project
You’re nearly done! The last part covers starting the real game.
Inside scoreboard.onStartTapped
in the MainActivity
initResources()
method, add this code to start a Runnable
:
scoreboard.onStartTapped = {
  ...
  // Start the game!
  gameHandler.post {
    repeat(MOVES_PER_TIME) {
      gameHandler.post(pullUpRunnable)
    }
  }
}
Next, create the pullUpRunnable
Runnable
property for MainActivity
.
private val pullUpRunnable: Runnable by lazy {
  Runnable {
    // 1
    if (scoreboard.life > 0) {
      grid.flatMap { it.toList() }
          .filter { it?.position == DOWN }
          .run { takeIf { size > 0 }?.getOrNull((0..size).random()) }
          ?.apply {
            // 2
            pullUp()
            // 3
            val pullDownDelay = (MIN_PULL_DOWN_DELAY_MS..MAX_PULL_DOWN_DELAY_MS).random()
            gameHandler.postDelayed({ pullDown() }, pullDownDelay)
          }

      // 4
      // Delay between this move and the next one
      val nextMoveDelay = (MIN_MOVE_DELAY_MS..MAX_MOVE_DELAY_MS).random()
      gameHandler.postDelayed(pullUpRunnable, nextMoveDelay)
    }
  }
}
Its purposes are to:
- Check if the game is completed.
- Pull up a random droid renderable from the grid.
- Pull the same droid down after a random delay.
- If player has at least one life, start itself over again after a random delay.
Next, you need to handle what happens if the player hits the droid.
If the droid is down, it counts as a missed hit, so you remove 50 points and a life from the player. If it’s up, add 100 points to the player.
In MainActivity
, in the code within arFragment.setOnTapArPlaneListener
, there is a setOnTapListener
that is currently just passed a TODO
comment in it’s lambda. Replace the comment with this logic:
this.setOnTapListener { _, _ ->
  if (this.position != DOWN) {
    // Droid hit! assign 100 points
    scoreboard.score += 100
    this.pullDown()
  } else {
    // When player hits a droid that is not up
    // it's like a "miss", so remove 50 points
    failHit()
  }
}
As a final step, whenever the player fails a hit, if its life counter is equal to zero or less, reset every droid on the grid by calling the pullDown
method. Update the failHit()
method to be as follows:
private fun failHit() {
  scoreboard.score -= 50
  scoreboard.life -= 1
  failLight?.blink()
  if (scoreboard.life <= 0) {
    // Game over
    gameHandler.removeCallbacksAndMessages(null)
    grid.flatMap { it.toList() }
            .filterNotNull()
            .filter { it.position != DOWN && it.position != MOVING_DOWN }
            .forEach { it.pullDown() }
  }
}
Everything is ready! Run your brand new WhacARDroid game and challenge your friends to beat your score. :]
Where to Go From Here?
You can download the final project using the Download materials button at the top or bottom of the tutorial.
Sceneform — together with ARCore — has so many uses that it's impossible to cover them all with a single tutorial. You may want to check its API Reference if you need more specific information.
For a couple of examples, there's also an official repository on GitHub: Official sample repository .
If something is not completely clear, you can also follow the official quickstart provided by Google itself.
Happy augmented reality coding! Please us know if you have any questions or comments in the discussion forum below.
Recommend
About Joyk
Aggregate valuable and interesting links.
Joyk means Joy of geeK