
60

CentOS+OpenVZ+Vtonf实现Linux虚拟化
source link: https://www.linuxprobe.com/linux-vps.html
Go to the source link to view the article. You can view the picture content, updated content and better typesetting reading experience. If the link is broken, please click the button below to view the snapshot at that time.

导读
OpenVZ 是基于Linux内核和作业系统的操作系统级虚拟化技术。OpenVZ允许物理服务器运行多个操作系统,被称虚拟专用服务器(VPS,Virtual Private Server)或虚拟环境(VE, Virtual Environment)。
与VMware这种虚拟机和Xen这种半虚拟化技术相比,OpenVZ的host OS和guest OS都必需是Linux(虽然在不同的虚拟环境里可以用不同的Linux发行版)。但是,OpenVZ声称这样做有性能上的优势。根据OpenVZ网站的说法,使用OpenVZ与使用独立的服务器相比,性能只会有1-3%的损失。
OpenVZ是SWsoft, Inc.公司开发的专有软件Virtuozzo的基础。OpenVZ的授权为GPLv2。OpenVZ由两部分组成,一个经修改过的操作系统核心与及用户工具。
OpenVZ 其实是很不错的,也是唯一可用于Unibilling生产用的服务器虚拟技术。目前全球有多套unibilling运行于OpenVZ container。经过3年多的VOIP连续运营生产,证实绝对可靠稳定。
CentOS安装OpenVZ创建VPS的完整步骤:CentOS-5.4-i386系统(Vtonf不支持x86-64的系统,安装过程会出错,在其INSTALL中也有说明)
关闭SELinux
打开setup界面–firewall configureation,将SELinux置为Disabled,或修改:
vi /etc/sysconfig/selinux
为:
SELINUX=disabled
SELINUXTYPE=targeted
Firewall
如果不想关闭Firewall,需要打开8001端口:
# /sbin/iptables -I INPUT -p tcp –dport 8001 -j accept
# /etc/rc.d/init.d/iptables save
# /etc/init.d/iptables restart
安装 OpenVZ
# cd /etc/yum.repos.d
# wget http://download.openvz.org/openvz.repo
# rpm –import http://download.openvz.org/RPM-GPG-Key-OpenVZ
# yum search ovzkernel
# yum -y install ovzkernel
# yum -y install vzctl vzquota

# vi /etc/sysctl.conf

修改或添加以下内容

net.ipv4.ip_forward = 1
net.ipv4.conf.default.proxy_arp = 0
net.ipv4.conf.all.rp_filter = 1
kernel.sysrq = 1
net.ipv4.conf.default.send_redirects = 1
net.ipv4.conf.all.send_redirects = 0
net.ipv4.icmp_echo_ignore_broadcasts=1
net.ipv4.conf.default.forwarding=1

使之生效:

# sysctl -p

重启系统

# reboot
# uname -r

如果安装正常应该显示为:2.6.18-164.15.1.el5.028stab068.9
安装Vtonf
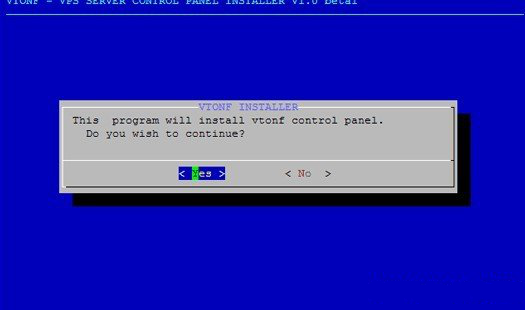
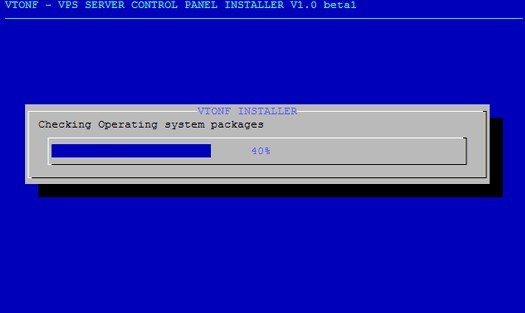
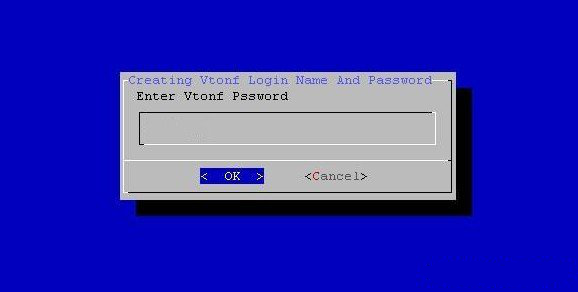
# yum -y install vzpkg expect

# wget http://mesh.dl.sourceforge.net/sourceforge/vtonf/vtonfinstaller.1.0-beta1.tar.gz
# tar xvfz vtonfinstaller.1.0-beta1.tar.gz
# cd vtonfinstaller.1.0-beta1
# ./install

会问你是否开始安装程序,输入yes

Do you wish to start the installation procedure (y/n)? : y
Starting installation
Please wait……………….
OK.安装完成。
打开vtonf控制面板http://yourhostip:8001/
输入安装过程中你设置的用户名和密码
login Name : admin
Password :
Recommend
About Joyk
Aggregate valuable and interesting links.
Joyk means Joy of geeK