

Basic UIView Animation Tutorial: Getting Started
source link: https://www.tuicool.com/articles/hit/iEzInuy
Go to the source link to view the article. You can view the picture content, updated content and better typesetting reading experience. If the link is broken, please click the button below to view the snapshot at that time.

Update note : Ehab Amer updated this tutorial for Xcode 10 and iOS 12. Bjørn Ruud wrote the original.

One of the coolest things about iOS apps is how animated they are. Views can nimbly fly across the screen, gracefully fade in and out, cleverly rotate around and rescale, and much, much more! UIView animation is everywhere in iOS, and it’s a big part of what makes iOS apps so much fun.
Thoughtfully chosen animations look great, and they can really bring your own iOS app to life. Better still, they’re also a great way to draw a user’s attention any time new or additional information becomes available in your app.
But maybe the best part about UIView animation is that it’s incredibly easy to implement. All it takes is a few lines of code, and you’re up and running!
In this tutorial, you’ll get a chance to go hands-on with UIView animation! You’ll create a simple app with a picnic theme: You’ll use animation to open the picnic basket, animate an interloping bug that’s snuck into the basket, then take decisive action, so your tasty picnic goodies stay bug-free!
As you’re doing this, you’ll learn to use the basic UIView animation APIs and to chain animations together for even more satisfying effects.
So grab your picnic basket; it’s time to get started!

Swift loves an animated picnic!
What UIView Animation Does For You
To help you appreciate how nice and easy native UIView animation is, first review some of the steps you’d need to take if iOS didn’t provide built-in animation tools and you wanted to animate a view moving across the screen on your own:
- Schedule a method to be called in your app, once for every frame drawn.
- Determine the number of frames your animation should run based on its duration and then, for each frame:
- Calculate the new position of the view based on the view’s beginning and desired final destination, the time your animation will run, and how long it’s run so far.
- Update the view’s position, either by directly setting it or by updating the AutoLayout constraints that determine its position.
- When your animation has completed, or if it’s interrupted, clean up and make sure the final state of the view is correct.
That’s all possible to do, but you’d likely think hard before implementing even a simple animation this way. And homegrown animations like this would get more complex as you added animations of different types, durations, and delays. Your code would become more complicated still as animations interacted. You’d end up micro-managing animation implementation details rather than working on meaningful code.

Let iOS sweat the animation details for you!
The great news is that UIView animations are extremely easy to use. Many view properties, such as a view’s frame (its size and position), its alpha (transparency), and its transform (scale, rotation, etc.), have built-in animation support. And best of all, instead of having to sweat all the frame-by-frame steps listed, using UIView animation, all you do is:
- Call one of the UIView animation methods and tell it how long your animation should run, along with some other simple parameters.
- Set up an animation block where you let UIKit know the final values of any properties you’d like to animate.
- There is no Step 3! :]
Once you’ve completed these 2 simple steps, UIView animation will manage all the fine details and complexities to deliver silky smooth animations on your behalf. Time to dive right in and see how to make this magic happen in code!
Getting Started
Use the Download Materials button at the top or bottom of this tutorial to download the starter project. Unzip the downloaded project, open the starter project, and take a look around: You’ll see that the starter project contains a view controller and a main storyboard pre-populated with the elements you’ll need. The outlets for each elements are already connected, so you can get right to work on the good stuff. You might also notice a sound file, which you’ll use for some extra fun at the end of this tutorial!
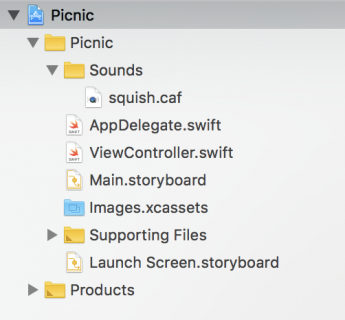
Picnic Starter Project
Open Main.storyboard , and check that the Document Outline is visible and expanded as shown below. If you don’t see this, either click the Show Document outline button, or choose Editor ▸ Show Document Outline to display it.

In the Document Outline , you’ll see the views you’ll be animating: The doors of your fancy picnic basket, a spiffy set of fabric napkins, a plate of tasty cheese, and a sneaky, picnic-crashing bug.
Build and run your app. After a moment, you’ll see the starter project showing your picnic basket with its lid closed:

Opening the Picnic Basket
Note : You’ll learn to animate objects both with and without Auto Layout constraints . The basket views have constraints anchoring them to their parent view, while the fabric views are directly positioned. If you’d like to learn more about how to use Auto Layout and constraints on your own, check out Auto Layout Tutorial: Getting Started .
You’re going to teach your picnic basket to open up in a nifty animated way. You’ll do this in two steps:
- Open up the picnic basket’s doors.
- Move aside the fabric napkins inside the picnic box. :]
Open ViewController.swift . After viewDidAppear(_:) , add stubs for the methods you’ll use to perform these two steps:
func openBasket() {

}

func openNapkins() {

}
And then call both methods inside viewDidAppear(_:) :
openBasket()
openNapkins()
Next, you’ll flesh out these methods, starting with the napkins. You’ll start here because it’s a bit simpler to animate views without constraints.
Open Main.storyboard and select the Basket Top and Basket Bottom views. Open the Attribute inspector and, in the Drawing section, tick the Hidden attribute checkbox. This will temporarily hide basket’s doors so they won’t block your view of the animating napkins.

Build and run your app once again. This time, you’ll see the fabric napkins inside the basket.

Now, open ViewController.swift again and add this code to openNapkins() :
UIView.animate(withDuration: 1.0, delay: 1.2, options: .curveEaseOut, animations: {
  var fabricTopFrame = self.fabricTop.frame
  fabricTopFrame.origin.y -= fabricTopFrame.size.height

  var fabricBottomFrame = self.fabricBottom.frame
  fabricBottomFrame.origin.y += fabricBottomFrame.size.height

  self.fabricTop.frame = fabricTopFrame
  self.fabricBottom.frame = fabricBottomFrame
}, completion: { finished in
  print("Napkins opened!")
})
Here’s what this does:
-
animate(withDuration:delay:options:animations:completion:)defines an animation with a duration of 1 second, beginning after a delay of 1.2 seconds. You selected an “ease out” option, which produces an animation that progresses linearly through each frame until it approaches completion, at which point it slows down to give a more natural, less jarring effect. In other words, the napkins don’t “slam” open. - You use the
animationblock to specify which views and properties to animate. Notice that instead of having to deal with any details of how this animation will be rendered frame-by-frame, you simply declare the final value each animatable property will have when your animation is complete. Armed with these high-level instructions, UIView animation takes charge of all the low-level implementation details on your behalf: It handles all the frame-by-frame calculations, applies any easing, and even handles any interruptions that might occur. Hooray! - Finally, the
completionblock runs after the animation either completes naturally or is interrupted, giving you a chance to do any final clean up that might be needed. The completion block receives a boolean parameter, finished , that tells you whether the animation completed or not.
Before moving on, take a quick look at the different easing options UIView animation provides out of the box:
-
curveEaseInOut: Property changes are slow at the beginning and at the end of the animation. -
curveEaseIn: Property changes are slow at the beginning of the animation only. -
curveEaseOut: Property changes are slow at the end of the animation only. -
curveLinear: Property changes are equal during the whole animation.
Build and run again:

Sweet! Now when your app launches, the napkins animate to reveal the yummy picnic goodies in your basket (well, that plus an unwanted buggy… for now).

Well-chosen easing takes your animations to Ninja level.
Open the Flood Gates! (Er, I mean, the Picnic Gates)
Next, you’ll animate opening the picnic basket doors. Because the picnic basket’s doors have Auto Layout constraints anchoring them to their superview, you’ll use a different technique to animate them. Rather than setting the doors’ positions, you’ll change the constraints that hold the doors in place, then let UIKit animate this change for you. Here’s how this type of animation works:
Whenever UIKit needs to calculate the position of constrained views, it uses the view’s Auto Layout constraints to calculate 4 core values of the frame: origin.x , origin.y , size.width and size.height . When you add a leading constraint to a view in relation to its superview, its origin.x is set to equal the x position of its superview, plus the constraint constant (which defaults to 0) times the constraint multiplier (this defaults to 1).
Note : To learn more about Auto Layout and constraints, check out Auto Layout Tutorial: Getting Started .
There’s an important catch when animating constraints: If you only set new constraint values, UIView animation doesn’t update the view’s frame. After you update a constraint, you also must instruct either the view itself, or its superview, to reset its layout. This lets UIKit know that it should visually update the frame property of this view. Since you want to animate your constraint change, you need to place the instruction to reset the layout inside the animation block. It doesn’t actually matter whether you set the new constraint values inside or outside the animation block, so long as you put your layout reset instruction within this block.
Open Main.storyboard , select the Basket Top and Basket Bottom views, and uncheck the Hidden property you enabled earlier.
Now open ViewController.swift and replace openBasket() with the following:
func openBasket() {
  basketTopConstraint.constant -= basketTop.frame.size.height
  basketBottomConstraint.constant -= basketBottom.frame.size.height

  UIView.animate(withDuration: 0.7, delay: 1.0, options: .curveEaseOut, animations: {
    self.view.layoutIfNeeded()
  }, completion: { finished in
    print("Basket doors opened!")
  })
}
This is very similar to openNapkins() in how it works. The only difference is that it adjusts the Auto Layout contraints instead of the directly modifying the frames.
Build and run to see your animation.

Cool! Now the basket doors and the napkins both animate out, each with different phasing and offsets. Technically, you’ve just combined two different animation techniques, and UIView animation has made it all look smooth and effortless. By the way: If you’d animated the constrained basket doors by directly setting their position, they would indeed animate. But as soon as these views or their superview recalculated their layouts, their constraints would suddenly slam them back to their original positions. Animating the constraints instead ensures that once your doors open, they’ll stay that way.
How To Chain Animations
Your basket now opens nicely, but there’s a bug in your project — a literal one, instead of the code variety! You’ll soon e-squish this buggy (this is a humane tutorial, so no actual bugs get harmed). First, though, you’ll teach your bug to move back and forth, so it has a sporting chance. :]
Open ViewController.swift , and add these four methods to ViewController , right after openNapkins() :
func moveBugLeft() {
  UIView.animate(withDuration: 1.0,
                 delay: 2.0,
                 options: [.curveEaseInOut , .allowUserInteraction],
                 animations: {
                  self.bug.center = CGPoint(x: 75, y: 200)
  },
                 completion: { finished in
                  print("Bug moved left!")
  })
}

func faceBugRight() {
  UIView.animate(withDuration: 1.0,
                 delay: 0.0,
                 options: [.curveEaseInOut , .allowUserInteraction],
                 animations: {
                  self.bug.transform = CGAffineTransform(rotationAngle: .pi)
  },
                 completion: { finished in
                  print("Bug faced right!")
  })
}

func moveBugRight() {
  UIView.animate(withDuration: 1.0,
                 delay: 2.0,
                 options: [.curveEaseInOut , .allowUserInteraction],
                 animations: {
                  self.bug.center = CGPoint(x: self.view.frame.width - 75, y: 250)
  },
                 completion: { finished in
                  print("Bug moved right!")
  })
}

func faceBugLeft() {
  UIView.animate(withDuration: 1.0,
                 delay: 0.0,
                 options: [.curveEaseInOut , .allowUserInteraction],
                 animations: {
                  self.bug.transform = CGAffineTransform(rotationAngle: 0.0)
  },
                 completion: { finished in
                  print("Bug faced left!")
  })
}
Each of these new methods is an animation step. When chained together, they make up the complete motion of the bug. Your bug starts out facing left, and the first step is to move it in that direction. Next, you’ll turn it around to face right, then move it back in that direction. Last, you’ll bring the buggy full circle, turning it back around to face left, as it did initially.
To chain these individual steps in a sequence, you’ll just call the next step you’d like to execute in the completion block of each step. It’s as simple as that.
In the completion block of moveBugLeft() , right after the print() statement, add:
self.faceBugRight()
Then, in the completion block of faceBugRight() , add:
self.moveBugRight()
Next, in the completion block of moveBugRight() , add:
self.faceBugLeft()
And last, to make the sequence a repeated one, in the completion block of faceBugLeft() , add:
self.moveBugLeft()
Great! Now you just need to set all this in motion. At the end of viewDidAppear(_:) , add a call to trigger the first step in your “buggy” animation sequence. :]
moveBugLeft()
Build and run. You should see the bug moving from right to left in a repeating loop — exactly what you wanted (well, for the moment). Huzzah!

Bug Off, Bug!
The moment you’ve been waiting for has arrived: It’s time to squish that bug!
In ViewController.swift , add two new properties to ViewController , right after the @IBOutlet declarations:
var isBugDead = false
var tap: UITapGestureRecognizer!
Now, add this line of code at the top of each of the four bug animation methods you added in the previous section. Make sure to place this above each method’s call to animate(withDuration:delay:options:animations:completion:) :
if isBugDead { return }
This makes sure that when you squish that bug, it will stop crawling around. Now it’s time to set up a UITapGestureRecognizer so you can do some serious power squashing. :]
Add the following method at the bottom of ViewController.swift
@objc func handleTap(_ gesture: UITapGestureRecognizer) {
  let tapLocation = gesture.location(in: bug.superview)
  if (bug.layer.presentation()?.frame.contains(tapLocation))! {
    print("Bug tapped!")
  } else {
    print("Bug not tapped!")
  }
}
Here’s what this code does:
When responding to a tap, you need to check whether the user actually tapped on your bug. Typically, you’d simply compare the tapLocation to the bug view’s frame . But here, you’re using the view’s presentation layer frame, bug.layer.presentation().frame , instead. What gives?
This is an important distinction and a very common source of confusion. UIView animation updates a view’s “presentation layer”, which represents what will be displayed on screen at any given moment. This contrasts with the view’s underlying frame itself, which does not change during animations. As your bug scoots back and forth, its underlying frame has already moved to its final position for that animation. All the in-between animation orientation and positioning details are handled in the presentation layer. This means that when you’re checking if a user has tapped on your bug, what you really want to know is whether that tap was within the presentation layer’s frame.

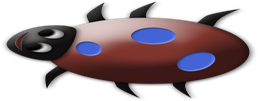
Now where is that picnic bug hiding?
OK! It’s time to get squishy! In ViewController.swift , find init(coder:) , and immediately below the line super.init(coder: aDecoder) add:
tap = UITapGestureRecognizer(target: self, action: #selector(ViewController.handleTap(_:)))
This creates a gesture recognizer to detect your taps on the screen. Next, add this to the end of viewDidAppear(_:) to add the gesture recognizer to the view:
view.addGestureRecognizer(tap)
Build and run. Wait for the bug to start moving around and then tap on the screen. Depending on whether you tapped on the bug or not, you’ll either see “Bug tapped!” or “Bug not tapped!” in the Xcode console.
That’s good, but how about adding some squishy satisfaction. Locate handleTap() and add the following code inside its if block:
if isBugDead { return }
view.removeGestureRecognizer(tap)
isBugDead = true
UIView.animate(withDuration: 0.7, delay: 0.0,
               options: [.curveEaseOut , .beginFromCurrentState], animations: {
  self.bug.transform = CGAffineTransform(scaleX: 1.25, y: 0.75)
}, completion: { finished in
  UIView.animate(withDuration: 2.0, delay: 2.0, options: [], animations: {
    self.bug.alpha = 0.0
  }, completion: { finished in
    self.bug.removeFromSuperview()
  })
})
Here’s what this does:
- Once the bug is tapped, you first set
isBugDeadtotrueso the animation chain will stop. - Next, you remove the tap gesture recognizer from the view so that no more interaction can happen.
- Then, you start a new chain of animations:
- The bug gets flattened by applying a scale transform.
- It fades to nothingness by setting its alpha to 0 after a delay.
- Finally, you remove the bug from the superview.
Build and run: This time when you squish your bug, it gets well and truly squished!
Buggy be squished!
Gratuitous Sound Effect
To round things out, you’ll add a satisfying bug-squashing sound effect. It’s completely unnecessary but totally fun! You’ll use the sound file already in the project to do this.
Back in ViewController.swift , add the following at the top of the file:
import AVFoundation
Next, add a property to the class declaration to hold an audio player instance with your sound file:
let squishPlayer: AVAudioPlayer
Now, add the following in init(coder:) , before super.init(coder: aDecoder) , so that your AVAudioPlayer instance is set up before you initialize the view controller. Swift requires this in order to satisfy its initialization rules.
let squishURL = Bundle.main.url(forResource: "squish", withExtension: "caf")!
squishPlayer = try! AVAudioPlayer(contentsOf: squishURL)
squishPlayer.prepareToPlay()
Finally, add the following line to handleTap() after you set isBugDead to true :
squishPlayer.play()
This plays the sound at just the right moment. And that’s it! Build and run your code. Crank up the volume, tap on that bug, and bask in satisfaction as your bug squishes in glorious, gratuitously stereophonic sound!
Where to Go From Here?
You can download the completed version of the project using the Download Materials button at the top or bottom of this tutorial.
You can probably think of more animations to apply to this projec, based on what you’ve just learned. You might like to close the picnic basket after you’ve squashed the bug. Or you might prefer that the picnic basket doors and napkins don’t open once the app launches and open them instead with a tap. Give it a try!
Throughout this tutorial, you’ve used animate(withDuration:delay:options:animations:completion:) . UIView animation also offers several more highly useful methods:
animate(withDuration:animations:)
animate(withDuration:animations:completion:)
animateKeyframes(withDuration:delay:options:animations:completion:)
performSystemAnimation(animation:onViews:options:animations:completion:)
animate(withDuration:delay:usingSpringWithDamping:initialSpringVelocity:options:animations:completion)
The first two methods in this list are siblings of the animation method you used in this tutorial, minus the delay and options parameters. The third method provides keyframe-based animation, giving you the ability to orchestrate highly complex animation sequences with fine-grained control. The fourth method runs system-provided animations. The last method creates an animation using a spring-based motion curve. In other words, the animated view bounces back and forth around its destination as if it’s on a spring.
If you’d like to take a deeper dive into the full power of iOS animations, you might enjoy iOS Animations by Tutorials .
How do you use UIView animation or Core Animation in your projects? I’d love to hear from you in the forum discussion below!
Recommend
-
58
-
50
README.md Fireworks Effect you can add to a UIView. More in
-
40
这是一种实现 UIView 镂空效果的方案,可以快速实现任意形状的镂空、文字的镂空、带镂空的毛玻璃效果等。本质上是 UIView 的 maskView 效果的「取反」。 前言 首先来复习一下遮罩效果的实现。如果我们有一张图片,又恰好有一个圆,当我们把圆设置为图
-
19
作者:Tomasz Szulc, 原文链接 ,原文日期:2018-09 译者: Joeytat ;...
-
33
Update note : Felipe Laso-Marsetti updated this tutorial for Swift 5.1, Xcode 11 and iOS 13. Marin Todorov wrote the original. Animation is a critical part of your iOS user interfaces, giving apps the...
-
13
uiview 实现阴影效果 – ruquan.z – github技术博客,成长在于积累。 ruquan.z github技术博客,成长在于积累。
-
5
Learning to code in the 1980s meant learning BASIC. No installations, no dependencies, no downloads. Just you, some type-in listings, and an 8-bit computer... Retrocoding fun wi...
-
2
Getting Started with Apache Spark Basic Reading Time: 4 minutes Apache Spark is a fast and general-purpose cluster computi...
-
7
Official website: www.rabbitmq.com/ Introduction RabbitMQ is the most widely deployed open source message broker. RabbitMQ has thousands of...
-
4
Getting Started With Basic Bindings in .NET MAUI
About Joyk
Aggregate valuable and interesting links.
Joyk means Joy of geeK