

Creating a Framework for iOS
source link: https://www.tuicool.com/articles/hit/qaIzUzn
Go to the source link to view the article. You can view the picture content, updated content and better typesetting reading experience. If the link is broken, please click the button below to view the snapshot at that time.

Update note : This tutorial was updated to iOS 12, Xcode 10, and Swift 4.2 by Lorenzo Boaro. The original tutorial was written by Sam Davies.

Have you ever wanted to share a chunk of code between two or more of your apps, or wanted to share a part of your program with other developers?
Maybe you wanted to modularize your code in a manner similar to how the iOS SDK separates its API by functionality. Or perhaps you want to distribute your code in the same way as popular 3rd party libraries.
In this tutorial you’ll learn how to do all of the above with Frameworks!
Frameworks have three major purposes:
- Code encapsulation.
- Code modularity.
- Code reuse.
You can share your framework with your other apps, team members, or the iOS community. When combined with Swift’s access control , frameworks help define strong, testable interfaces between code modules.
In Swift parlance, a module is a compiled group of code that is distributed together. A framework is one type of module, and an app is another example.
In this tutorial, you’ll extract the knob control developed in How To Make a Custom Control Tutorial: A Reusable Knob and learn the ins and outs of frameworks by:
- Creating a new framework for the knob control.
- Migrating the existing code.
- Importing the whole thing back into the app.
- Rendering your custom component on the fly in Interface Builder.
- Packing it up as an uber-portable CocoaPod.
- Bonus: Setting up a repository for your framework.
By the time you’re done, the app will behave exactly as it did before, but will use the portable framework you developed! :]
Getting Started
Use the Download Materials button at the top or bottom of this tutorial to download the projects and open the starter project in Xcode.
KnobShowcase is a simple application that demonstrates how to interact with a control like a circular slider, such as those found on a mixer.
Build and run to get an idea of how it works.
The code for this control lives in two files:
- Knob.swift has all the view logic.
- ViewController.swift is responsible for creating the knob and interacting with it.
The knob control is pretty sweet. Wouldn’t it be nice to use it in a number of applications beyond this fun, but completely silly, app? Frameworks to the rescue!
Creating a Framework
Frameworks are self-contained, reusable chunks of code and resources that you can import into any number of apps and even share across iOS, tvOS, watchOS, and macOS apps.
If you’ve programmed in other languages, you may have heard of node modules, packages, gems or jars. Frameworks are the Xcode version of these. Some examples of common frameworks in the iOS SDK are Foundation , UIKit , AVFoundation and CloudKit .
Note : If you want to learn more about Frameworks, read What are Frameworks? .
Framework Set Up
In Xcode 6, Apple introduced the Cocoa Touch Framework template along with access control , so creating frameworks has never been easier. The first thing to do is to create the project for the framework.
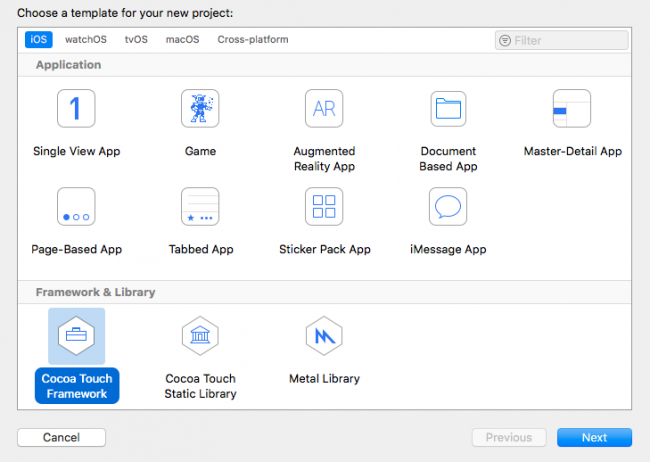
- In Xcode, select File ▸ New ▸ Project… .
- Choose iOS ▸ Framework & Library ▸ Cocoa Touch Framework .

Now you have a project (albeit a boring one) that creates a framework!
Add Code
Your current state is a framework without code, and that is about as appealing as straight chocolate without sugar. In this section, you’ll introduce code by adding the existing files to the framework.
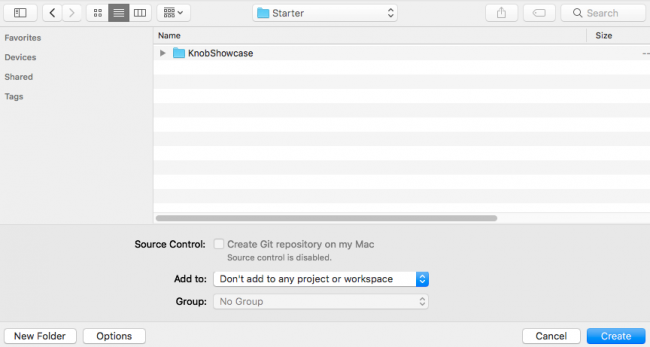
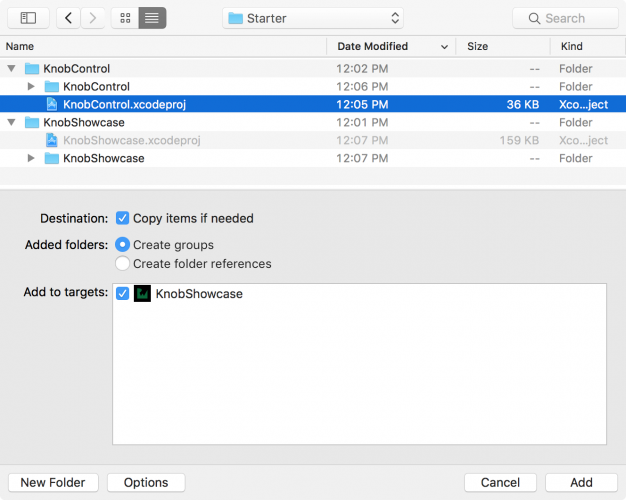
From the KnobShowcase source directory, drag the Knob.swift file into the KnobControl project in Xcode. Make sure to check Copy items if needed so that the files actually copy into the new project instead of just adding a reference. Frameworks need their own code, not references, to be independent.

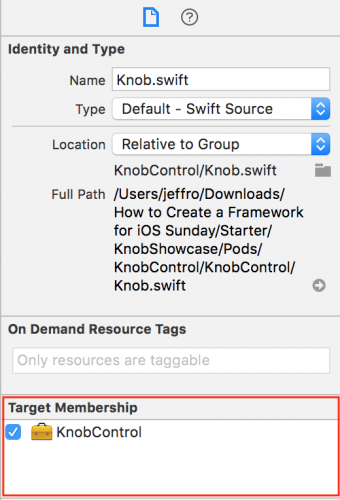
Double-check that Knob.swift has Target Membership in KnobControl to make sure it appears in the final framework. You can verify this in the File inspector .
Build the framework project to make sure that you get Build Succeeded with no build warnings or errors.
If you read the How to Make a Custom Control tutorial, you may recall Knob.swift contains three different classes:
Knob
KnobRenderer
RotationGestureRecognizer
Your next task is to separate those components into different files. Start by moving KnobRenderer
:
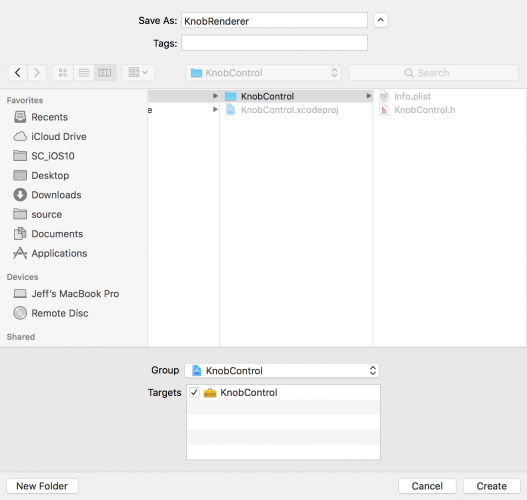
- Go to File ▸ New ▸ File… and select iOS ▸ Source ▸ Swift File .
- Click Next .
- On the next screen, specify the class name as KnobRenderer and choose the KnobControl ▸ KnobControl directory.
KnobRenderer
class and paste it ( Command-V
) into KnobRenderer.swift
just below the import Foundation
statement.
Remove the private
modifier for KnobRenderer
. When the code was all contained in Knob.swift
this was fine, but now it must be accessible throughout the module with the default internal
modifier.
Repeat steps 1 to 6 for the RotationGestureRecognizer
class. In this case, when you perform the fifth step, make sure you also grab the import UIKit.UIGestureRecognizerSubclass
statement, otherwise the compiler will complain during the build phase.
With your two new files created, Knob.swift
now only contains the Knob
class.
Note : Separating classes into their own files is not strictly necessary, but it’s a good practice in order to make your code organized. You don’t want to have a huge file that is hard to comprehend and maintain.
Add the Framework to the Project
Close the KnobControl project, and go back to the KnobShowcase project. Delete Knob.swift file. Select Move to Trash in the confirmation dialog.

Build the project, and you’ll see several predictable errors where Xcode complains about not knowing what the heck a Knob
is. Well, you’ll actually see Use of undeclared type ‘Knob’
error message.
Adding the KnobControl framework project is the solution to these problems.
Embed Your Binary
Right-click on the root KnobShowcase node in the project navigator. Click Add Files to “KnobShowcase” . In the file chooser, navigate to and select KnobControl.xcodeproj . Click Add to add KnobControl.xcodeproj as a sub-project.
output.
However, combining the projects makes it easier to develop both the framework and app simultaneously. Any changes you make to the framework project are automatically propagated up to the app. It also makes it easier for Xcode to resolve the paths and know when to rebuild the project.
Build and run, and you’ll see that same compile error!

Even though the two projects are now together, KnobShowcase still doesn’t get KnobControl . It’s like they’re sitting in the same room, but KnobShowcase can’t see the new framework.
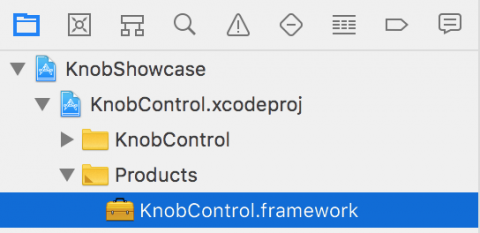
You’ll link the framework to the app’s target to fix this problem. First, expand the KnobControl project to see the Products folder, and then look for KnobControl.framework beneath it. This file is the output of the framework project that packages up the binary code, headers, resources and metadata.
Select the top level KnobShowcase node to open the project editor. Click the KnobShowcase target, and then go to the General tab.
Scroll down to the Embedded Binaries section. Drag KnobControl.framework from the Products folder of KnobControl.xcodeproj onto this section.
You just added an entry for the framework in both Embedded Binaries and Linked Frameworks and Binaries .

Now the app knows about the framework and where to find it, so that should be enough, right?
Build KnobShowcase project. More of the same errors.

Access Control
Your problem is that although the framework is part of the project, the project’s code doesn’t know about it — out of sight, out of mind.
Go to ViewController.swift , and add the following line to the list of imports at the top of the file.
import KnobControl
It’s critical, but this inclusion still won’t fix the build errors. This is because Swift uses access control to let you determine whether constructs are visible to other files or modules.
By default, Swift makes everything internal
or visible only within its own module.
To restore functionality to the app, you have to update the access control on Knob
class.
Although it’s a bit tedious, the process of updating access control improves modularity by hiding code not meant to appear outside the framework. You do this by leaving certain functions with no access modifier, or by explicitly declaring them internal
.
Swift has five levels of access control. Use the following rules of thumb when creating your own frameworks:
- Open and public : for code called by the app or other frameworks, e.g. a custom view.
- Internal : for code used between functions and classes within the framework, e.g. custom layers in that view.
- Fileprivate : for code used within a single file, e.g. a helper function that computes layout heights.
-
Private
: for code used within an enclosing declaration, such as a single
classblock, and extensions of that declaration in the same file.
When Knob
was part of the Showcase app, internal access wasn’t a problem. Now that it’s in a separate module, it must be made public for the app to use it. You’ll do that in the next section.
Note
: If you want to learn more about the internals of access control and to understand the difference between open
and public
, take a look at Access Control Documentation
.
Update the Code
Open Knob.swift
inside of KnobShowcase
. Make the class public by adding the public
keyword to the class definition, like so:
public class Knob : UIControl {
Knob
will now be visible to any app file that imports the KnobControl
framework.
Now add the public
keyword to:
-
The properties
minimumValue,maximumValue,value,isContinuous,lineWidth,startAngle,endAngle,pointerLengthandcolor. Note forvalue, the property will bepublicwhile the setter continues to beprivate. -
Both
initfunctions. -
The methods
setValue(_:animated:)andtintColorDidChange().
Note
: You might wonder why you have to declare init
method as public. Apple explains this and other finer points of access control in their Access Control Documentation
.
Now build and run. The good news is that the errors are gone, and the bad news is that you’ve got a runtime crash like the following:

Oh no! What’s going on? Go straight to the next section to fix the crash :].
Update the Storyboard
When using storyboards, references to custom classes need to have both the class name and module set in the Identity inspector
. At the time this storyboard was created, Knob
was in the app’s module, but now it’s in the framework.
Update the storyboard by telling it where to find the custom view:
- Open Main.Storyboard in the KnobShowcase project.
- Select the Knob in the Document outline .
- In the Identity inspector , under Custom Class , change the Module to KnobControl as shown below.

Build and run. Now you should get your knob.
Congratulations! You now have a working stand-alone framework and an app that uses it!
Live Rendering in Interface Builder
One limitation of your framework is that you cannot customize the appearance of your custom control through Interface Builder (IB).
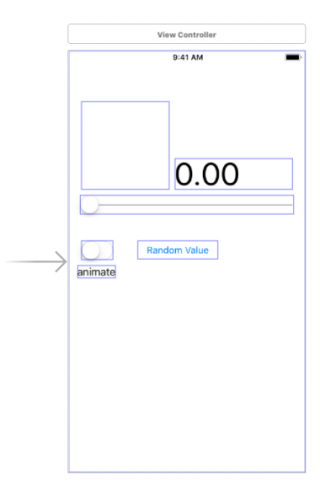
Open Main.storyboard . You’ll notice a blank rectangle instead of the knob. If you are not seeing these blue boxes, turn on Editor ▸ Canvas ▸ Show Bounds Rectangles .
In order to let users who import your framework change properties of the knob both programatically and visually, you need to rely on Live Views . Those are views which appear in IB as they will in the running app.
Open Knob.swift
and insert the @IBDesignable
annotation just in front of your Knob
definition:
@IBDesignable public class Knob: UIControl {
This annotation instructs your project to enable live-rendering in IB.
Open Main.storyboard and you’ll see nothing has changed. You still have a blank rectangle.
Don’t worry! Apple provides a method, called prepareForInterfaceBuilder()
, that is invoked only when rendering inside IB.
Scroll to the end of Knob.swift and add this code:
extension Knob {
  public override func prepareForInterfaceBuilder() {
    super.prepareForInterfaceBuilder()

    renderer.updateBounds(bounds)
  }
}
Here you are setting the bounds of the knob in order to make it visible.
Open Main.storyboard and make sure Editor ▸ Automatically Refresh Views is checked. Now the blank rectangle has been replaced by the knob you see every time you run the app :].

It’s good being able to see the knob, but what if you want to configure the appearance for its properties, like the color, the line width or the pointer length?
@IBInspectable
comes to the rescue. If you annotate these properties, then IB will let you configure them in the attributes inspector.
Open Knob.swift
and put @IBInspectable
in front of the following properties: lineWidth
, pointerLength
and color
.
Back in Main.storyboard
select the knob control and view Attributes inspector
. IB has created a new panel, titled Knob
, showing the properties annotated with @IBInspectable
.
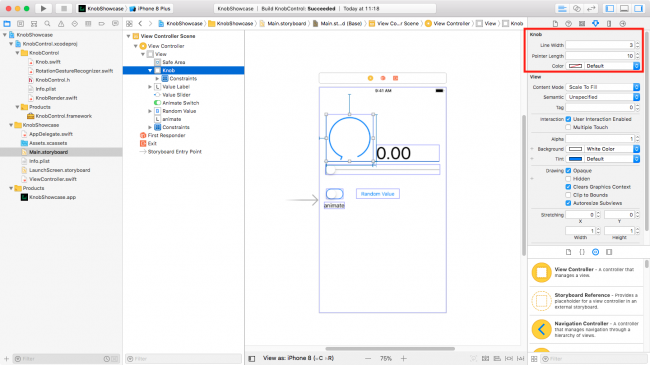
Play with those fields and you’ll see the shape or the color of the control changing live. Cool!
Creating a CocoaPod
CocoaPods is a popular dependency manager for iOS projects. It’s a tool for managing and versioning dependencies. Similar to a framework, a CocoaPod, or pod for short, contains code and resources as well as metadata, dependencies, and setup for libraries. CocoaPods are built as frameworks that are included in the main app.
Anyone can contribute libraries and frameworks to the public repository, which is open to other iOS app developers. Almost all of the popular third-party frameworks, such as Alamofire , Charts or RxSwift , distribute their code as a pod.
Here’s why you should care: by making a framework into a pod, you give yourself a mechanism for distributing the code, resolving the dependencies, including and building the framework source, and easily sharing it with your organization or the wider development community.
If you’ve been following along, you’re good to proceed to the next section and create a CocoaPod. If you’re just jumping in, or having trouble, the downloaded material for this tutorial contains an Intermediate version of the project up to this stage.
Clean out the Project
Perform the following steps to remove the current link to KnobControl project from KnobShowcase .
- Select KnobControl.xcodeproj in the project navigator and delete it.
- Choose Remove Reference in the confirmation dialog, since you’ll need to keep the files on disk to create the pod.
Install CocoaPods
If you’ve never used CocoaPods before, you’ll need to follow a brief installation process before going any further. Go to the CocoaPods Installation Guide and come back here when you’re finished. Don’t worry, we’ll wait!
Create the Pod
Open Terminal and use cd
to switch to the KnobControl
root directory.
Run the following command:
pod spec create KnobControl
This creates the file KnobControl.podspec in the current directory. It’s a template that describes the pod and how to build it. Open it in your preferred text editor.
The template contains plenty of comment descriptions and suggestions for the commonly used settings.
-
Replace the entire
Spec Metadatasection with:
s.name         = "KnobControl"
s.version      = "1.0.0"
s.summary      = "A knob control like the UISlider, but in a circular form."
s.description  = "The knob control is a completely customizable widget that can be used in any iOS app. It also plays a little victory fanfare."
s.homepage     = "http://raywenderlich.com"
Normally, the description would be a little more descriptive, and the homepage would point to a project page for the framework.
-
Replace the
Spec Licensesection with the below code, as this iOS frameworks tutorial code uses an MIT License :s.license = "MIT"
-
You can keep the
Author Metadatasection as is, or set it with how you’d like to be credited and contacted. -
Replace the
Platform Specificssection with the below code, because this is an iOS-only framework.:s.platform = :ios, "12.0"
-
Replace the
Source Locationwith the below code. When you’re ready to share the pod, this will be a link to the GitHub repository and the commit tag for this version.s.source = { :path => '.' } -
Replace the
Source Codesection with:s.source_files = "KnobControl"
-
Add the following line above the one with
end. This line helps the application project understand that this pod’s code was written for Swift 4.2.s.swift_version = "4.2"
-
Remove all the comments — the lines that start with
#.
You now have a workable development Podspec.
Note
: If you run pod spec lint
to verify the Podspec
in Terminal, it’ll show an error because the source
was not set to a valid URL. If you push the project to GitHub and fix that link, it will pass. However, having the linter pass is not necessary for local pod development. The Publish the Pod
section below covers this.
Use the Pod
At this point, you’ve got a pod ready to rock and roll. Test it out by implementing it in the KnobShowcase app.
Back in Terminal, navigate to the KnobShowcase directory, and then run the following command:
pod init
This steathily creates a new file named Podfile that lists all pods that the app uses, along with their versions and optional configuration information.
Open Podfile in a text editor. Replace its entire content as follows:
platform :ios, '12.0'

target 'KnobShowcase' do
  use_frameworks!

  pod 'KnobControl', :path => '../KnobControl'

end

# Workaround for Cocoapods issue #7606
post_install do |installer|
    installer.pods_project.build_configurations.each do |config|
        config.build_settings.delete('CODE_SIGNING_ALLOWED')
        config.build_settings.delete('CODE_SIGNING_REQUIRED')
    end
end
Save the file and run this in Terminal:
pod install
With this command, you’re searching the CocoaPods repository and downloading any new or updated pods that match the Podfile criteria. It also resolves any dependencies, updates the Xcode project files so it knows how to build and link the pods, and performs any other required configuration.
Finally, it creates a KnobShowcase.xcworkspace file. Use this file to open the project from now on as it has references to both the app and any Pods.
Close the KnobShowcase and KnobControl projects if they are open, and then open KnobShowcase.xcworkspace .
pod install
you could receive few warnings as follows:
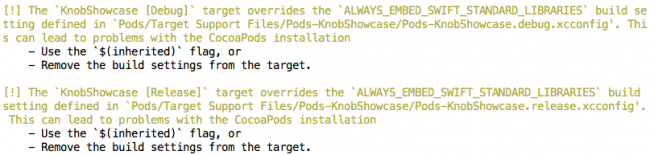
To fix them, select the KnobShowcase
root node and then the KnobShowcase
target. Switch to the Build Settings
tab and in the search field look for ALWAYS_EMBED_SWIFT_STANDARD_LIBRARIES
. Click on the pop-up for that build setting and select Other…
. In the dialog replace the content with $(inherited)
.
Run pod install
again. Now the warnings should disappear!
Check it Out
Build and run. Like magic, the app should work exactly as it did before. Pulling in the control was quick for two reasons:
KnobControl
Pod Organization
Take a look at the Pods
project, and you’ll notice two targets:

- Pods-KnobShowcase : a pod project builds all the individual pods as their own framework, and then combines them into one single framework: Pods-KnobShowcase .
- KnobControl : this replicates the same framework logic used for building it on its own.
Inside the project organizer, you’ll see several groups. KnobControl
is under Development Pods
. This is a development pod
because you defined the pod with a :path
link in the app’s Podfile
. You can edit and develop this code side-by-side with the main app code.

Pods that come from a repository appear in a Pods directory and are listed in a Pods group. Any modifications you make are not pushed to the repository and are overwritten whenever you update the pods.
Hooray! You’ve now created and deployed a CocoaPod — and you’re probably thinking about what to pack into a pod first.
You’re welcome to stop here, congratulate yourself and move on to Where to Go From Here . But if you do, you’ll miss out on learning how to publish a pod where others can use it!
Publish the Pod
This section walks you through publishing your pod to GitHub and using it like a third party framework.
Create a Repository
If you don’t already have a GitHub account, create one .
Now create a new repository to host the pod. KnobControl is the obvious best fit for the name, but you can name it whatever you want. Select Swift as the .gitignore language and MIT as the license.
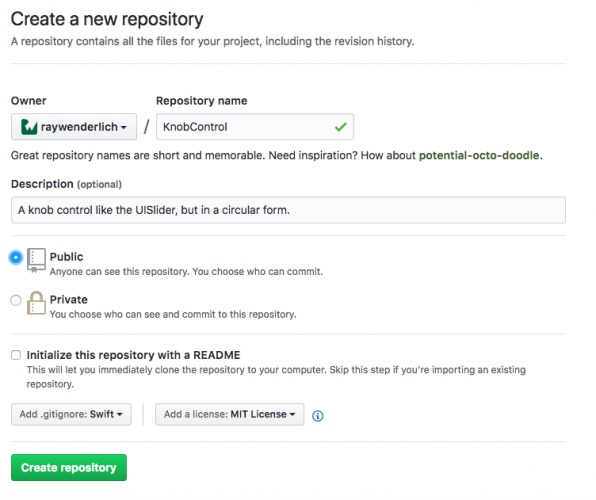
Click Create repository
. On the dashboard page that follows, click Clone or download
and copy the HTTPS
link. This will be the URL
value that you are going to use in the following sections.
Clone the Repository
Go back to Terminal and create a new directory at the root of KnobShowcase
. The following commands will create a repo
directory and navigate to it:
mkdir repo
cd repo
From there, clone
the GitHub repository. Replace URL
below with the HTTPS
link from the GitHub page.
git clone URL
This will set up a Git folder and copy the pre-created files. The cloning operation should look like this:
Cloning into 'KnobControl'...
remote: Counting objects: 4, done.
remote: Compressing objects: 100% (4/4), done.
remote: Total 4 (delta 0), reused 0 (delta 0), pack-reused 0
Unpacking objects: 100% (4/4), done.
Add the Code to the Repository
Next, copy the contents of the root KnobControl directory to the repo/KnobControl directory.
Open the copied version of KnobControl.podspec
, and update the s.source
line to:
s.source = { :git => "URL", :tag => "1.0.0" }
Replacing URL
with the link to your repository.
Make the Commitment
Now it gets real. In this step, you’ll commit and push the code to GitHub. Your little pod is about to enter the big kid’s pool.
Run the following commands in Terminal to commit those files to the repository and push them back to the server.
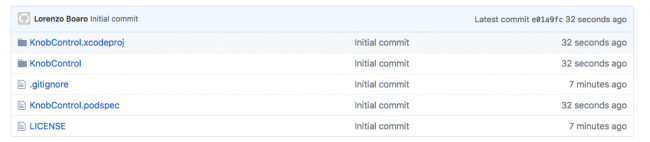
cd KnobControl/
git add .
git commit -m "Initial commit"
git push -u origin master
Visit the GitHub page and refresh it to see all the files.
Tag It
In KnobControl.podspec
, you set the version
as follows:
s.version = "1.0.0"
You need to tag the repository so it matches. Run this command to set the tags:
git tag 1.0.0
git push --tags
Check your work by running:
pod spec lint
The response you’re looking for is KnobControl.podspec passed validation.
Note
: If you get an error complaining that the iOS 12 simulator is not available, you need to make Xcode 10 your default Xcode using sudo xcode-select -p path-to-your-Xcode-10
.
Update the Podfile
Look at Podfile in the KnobShowcase directory and you’ll recall the path points to a local pod:
pod 'KnobControl', :path => '../KnobControl'
Replace this line with:
pod 'KnobControl', :git => 'URL', :tag => '1.0.0'
Replace URL
with your GitHub link and save when done. This tells KnobShowcase to use your published pod.
From Terminal, run this in the KnobShowcase directory:
pod update
Now the code will pull the framework from the GitHub repository, and it is no longer be a development pod!
Where to Go From Here?
In this iOS frameworks tutorial, you made a framework from scratch, imported it into your app, and even turned it into a CocoaPod. Nice work!
You can download the final project using the button at the top or bottom of the tutorial. It doesn’t include the published CocoaPod, as the steps to set up a GitHub repository depend on your personal account information.
Hats off to Sam Davies for developing the knob control. You might remember him from such videos as Introducing Custom Controls , where you can learn more about custom controls and custom frameworks.
The team here has put together a lot of tutorials about CocoaPods, and now that you’ve gone through a crash course, you’re ready to learn more. Here are a couple that you might like:
Spend some time at CocoaPods.org and be sure to check out how to submit to the public pod repository and the dozens of configuration flags.
What did you learn from this? Any lingering questions? Want to share something that happened along the way? Let’s talk about it in the forums. See you there!
Recommend
About Joyk
Aggregate valuable and interesting links.
Joyk means Joy of geeK