

Video Streaming Tutorial for iOS: Getting Started
source link: https://www.tuicool.com/articles/hit/IVFVjmN
Go to the source link to view the article. You can view the picture content, updated content and better typesetting reading experience. If the link is broken, please click the button below to view the snapshot at that time.

You’ve been working on iOS apps for a while now and you think you’re pretty slick. Think you’ve done it all, eh?
Yeah I get it, you can probably do some basic networking? Maybe pull in some JSON and put together a decent table view with cells that have text and images.
That’s an impressive list of accomplishments to be sure, but tell me…
Can you do this??

That’s right, it’s time to take your app to the next level, and learn how to add video streaming!
This time around, you’ll be building a new app for all those travel vloggers out there. Some people want to make artsy films about their travels and some people want to enjoy these experiences from the comfort of their own bed.
You’re here to make both of these dreams come true.
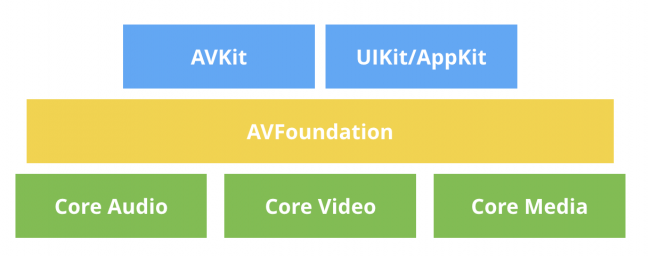
In the process, you’ll learn the basics of the AVKit and AVFoundation frameworks.
Getting Started
Note : If you’re following along and building for a simulator, get ready to either turn breakpoints off or hit the skip button a lot. If you see errors or warnings starting with AudioHAL_Client or CUICatalog , feel free to ignore them and move on.
To get started, make sure you’ve downloaded the resources available at the top of the tutorial. Then, open TravelVlogs.xcodeproj and head to VideoFeedViewController.swift .
Introduction to AVKit
A useful bit of development wisdom: Always favor the highest level of abstraction available to you. Then, you can drop down to lower levels when what you’ve been using no longer suits your needs. In line with this advice, you’ll start your journey at the highest level video framework.
AVKit sits on top of AVFoundation and provides all necessary UI for interacting with a video.
If you build and run, you’ll see an app that has already been set up with a table full of potential videos to watch.
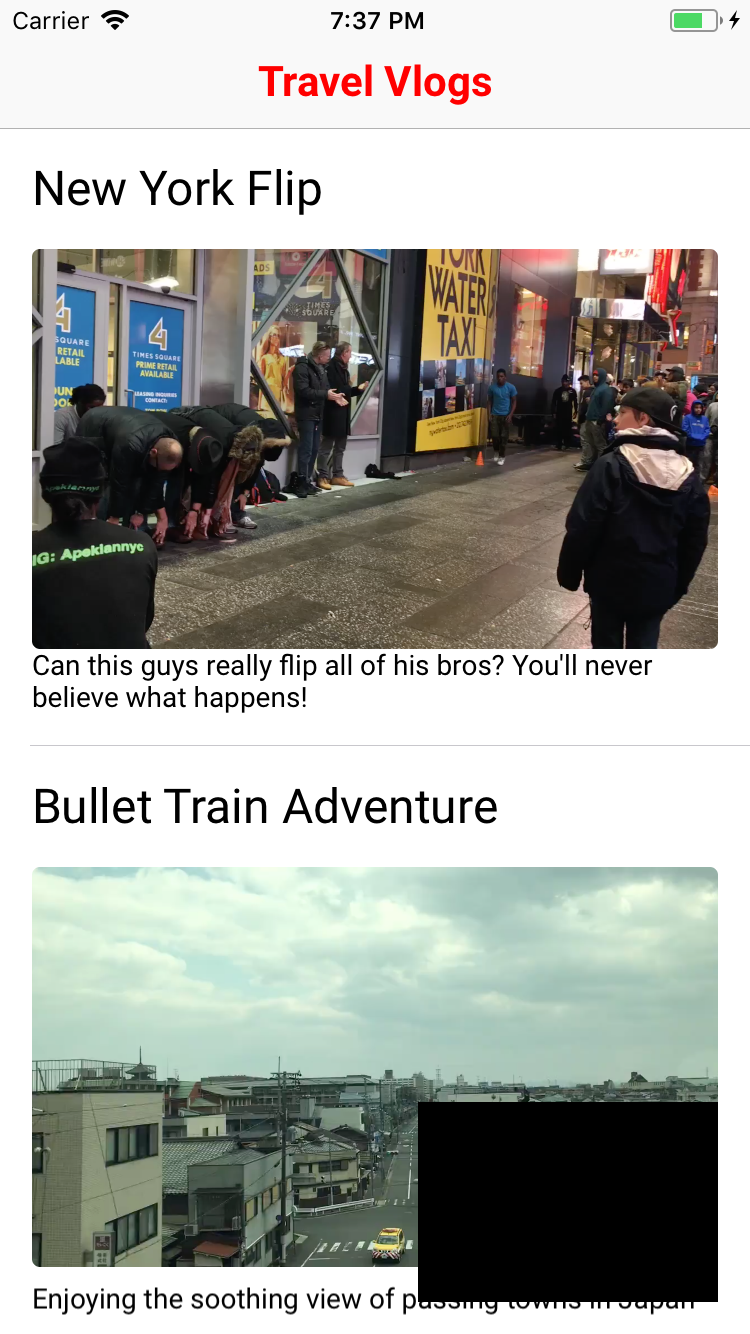
Your goal is to show a video player whenever a user taps on one of the cells.
Adding Local Playback
There are actually two types of videos you can play. The first one you’ll look at is the type that’s currently sitting on the phone’s hard drive. Later, you’ll learn how to play videos streaming from a server.
To get started, navigate to VideoFeedViewController.swift . Add the following import right below the UIKit import.
import AVKit
Look below this, and you’ll see that you already have a tableView and an array of Video s defined. This is how the existing tableView is being filled with data. The videos themselves are coming from a video manager class. You can look in AppDelegate.swift to see how they’re fetched.
Next, scroll down until you find tableView(_ tableView:didSelectRowAt:) . Add the following code to the existing method:
//1
let video = videos[indexPath.row]

//2
let videoURL = video.url
let player = AVPlayer(url: videoURL)
- First, you grab the video model object.
- All
Videoobjects have aurlproperty representing the path to the video file. Here, you take theurland create anAVPlayerobject.
AVPlayer is the heart of playing videos on iOS.
A player object can start and stop your videos, change their playback rate and even turn the volume up and down. You can think of a player as a controller object that’s able to manage playback of one media asset at a time.
At the end of the method, add the following lines to get the view controller set up.
let playerViewController = AVPlayerViewController()
playerViewController.player = player

present(playerViewController, animated: true) {
  player.play()
}
AVPlayerViewController is a handy view controller that needs a player object to be useful. Once it has one, present it as a fullscreen video player.
Once the presentation animation has finished, you call play() to get the video started.
And that’s all there is to it! Build and run to see how it looks.

The view controller shows a set of basic controls. This includes a player button, a mute button and 15 second skip buttons to go forward and backward.
Adding Remote Playback
That was pretty easy. How about adding video playback from a remote URL? That must be a lot harder, for sure.
Go to AppDelegate.swift . Find the line where the feed.videos is set. Instead of loading local videos, load all the videos by replacing that line with the following.
feed.videos = Video.allVideos()
And…that’s it! Go to Video.swift . Here you can see that allVideos() is simply loading one extra video. The only difference is that its url property represents an address on the web instead of a filepath.
Build and run and then scroll to the bottom of the feed to find the キツネ村(kitsune-mura) or Fox Village video.
This is the beauty of AVPlayerViewController ; all you need is a URL and you’re good to go!
In fact, go to allVideos() and swap out this line:
let videoURLString =
  "https://wolverine.raywenderlich.com/content/ios/tutorials/video_streaming/foxVillage.mp4"
…with this one:
let videoURLString =
  "https://wolverine.raywenderlich.com/content/ios/tutorials/video_streaming/foxVillage.m3u8"
Build and run and you’ll see that the fox village video still works.

The only difference is that the second URL represents an HLS Livestream. HLS live streaming works by splitting a video up into 10-second chunks. These are then served to the client a chunk at a time. As you can see in the example GIF, the video started playing a lot more quickly than when you used the MP4 version.
Adding a Looping Video Preview
You may have noticed that black box in the bottom right hand corner. You are going to turn that black box into a floating custom video player. Its purpose is to play a revolving set of clips to get users excited about all these videos.

Then you need to add a few custom gestures like tapping to turn on sound and double tapping to change it to 2x speed. When you want to have very specific control over how things work, it’s better to write your own video view.
Go back to VideoFeedViewController.swift and check out the property definitions. You’ll see that the shell of this class already exists and is being created with a set of video clips.
It’s your job to get things going.
Introduction to AVFoundation
While AVFoundation can feel a bit intimidating, most of the objects you deal with are still pretty high-level, all things considered.
The main classes you’ll need to get familiar with are:
-
AVPlayerLayer: This specialCALayersubclass can display the playback of a givenAVPlayerobject. -
AVAsset: These are static representations of a media asset. An asset object contains information such as duration and creation date. -
AVPlayerItem: The dynamic counterpart to anAVAsset. This object represents the current state of a playable video. This is what you need to provide to anAVPlayerto get things going.
AVFoundation is a huge framework that goes well beyond these few classes. Luckily, this is all you’ll need to create your looping video player.
You’ll come back to each of these in turn, so don’t worry about memorizing them or anything.
Writing a Custom Video View with AVPlayerLayer
The first class you need to think about is AVPlayerLayer . This CALayer subclass is like any other layer: It displays whatever is in its contents property onscreen.
This layer just happens to fill its contents with frames from a video you’ve given it via its player property.
Head over to VideoPlayerView.swift where you’ll find an empty view you’ll use to show videos.
The first thing you need to do is add the proper import statement, this time for AVFoundation.
import AVFoundation
Good start; now you can get AVPlayerLayer into the mix.
A UIView is really just a wrapper around a CALayer . It provides touch handling and accessibility features, but isn’t a subclass. Instead, it owns and manages an underlying layer property. One nifty trick is that you can actually specify what type of layer you would like your view subclass to own.
Add the following property override to inform this class that it should use an AVPlayerLayer instead of a plain CALayer .
override class var layerClass: AnyClass {
  return AVPlayerLayer.self
}
Since you’re wrapping the player layer in a view, you’ll need to expose a player property.
To do so, first add the following computed property so you don’t need to cast your layer subclass all the time.
var playerLayer: AVPlayerLayer {
  return layer as! AVPlayerLayer
}
Next, add the actual player definition with both a getter and a setter.
var player: AVPlayer? {
  get {
    return playerLayer.player
  }

  set {
    playerLayer.player = newValue
  }
}
Here, you’re just setting and getting your playerLayer ‘s player object. The UIView is really just the middle man.
Once again, the real magic comes when you start interacting with the player itself.
Build and run to see…
You’re halfway there, even though you can’t see anything new yet!
Writing the Looping Video View
Next, go over to VideoLooperView.swift and get ready to put your VideoPlayerView to good use. This class already has a set of VideoClip s and is initializing a VideoPlayerView property.
All you need to do is take these clips and figure out how to play them in a continuous loop.
To get started, add the following player property.
private let player = AVQueuePlayer()
The discerning eye will see that this is no plain AVPlayer instance. That’s right, this is a special subclass called AVQueuePlayer . As you can probably guess by the name, this class allows you to provide a queue of items to play.
Add the following method to get started setting up your player.
private func initializePlayer() {
  videoPlayerView.player = player
}
Here, you pass the player to the videoPlayerView to connect it to the underlying AVPlayerLayer .
Now it’s time to add your list of video clips to the player so it can start playing them.
Add the following method to do so.
private func addAllVideosToPlayer() {
  for video in clips {
    //1
    let asset = AVURLAsset(url: video.url)
    let item = AVPlayerItem(asset: asset)

    //2
    player.insert(item, after: player.items().last)
  }
}
Here, you’re looping through all the clips. For each one, you:
- Create an
AVURLAssetfrom theURLof each video clip object. - Then, you create an
AVPlayerItemwith theassetthat the player can use to control playback. - Finally, you use the
insert(_after:)method to add each item to the queue.
Now, go back to initializePlayer() and call the method.
addAllVideosToPlayer()
Now that you have your player set, it’s time to do some configuration.
To do this, add the following two lines:
player.volume = 0.0
player.play()
This sets your looping clip show to autoplay and audio off by default.
Finally, you need to call the method you’ve been working on. Go to the init(clips:) method and add this line at the bottom.
initializePlayer()
Build and run to see your fully working clip show!

Unfortunately, when the last clip has finished playing, the video player fades to black.
Doing the Actual Looping
Apple wrote a nifty new class called AVPlayerLooper . This class will take a single player item and take care of all the logic it takes to play that item on a loop. Unfortunately, that doesn’t help you here!

What you want is to be able to play all of these videos on a loop. Looks like you’ll have to do things the manual way. All you need to do is keep track of your player and the currently playing item. When it gets to the last video, you’ll add all the clips to the queue again.
When it comes to “keeping track” of a player’s information, the only route you have is to use Key-Value Observing .

Yeah, it’s one of the wonkier APIs Apple has come up with. Even so, if you’re careful, it’s a powerful way to observe and respond to state changes in real time. If you’re completely unfamiliar with KVO, here’s the quick answer. The basic idea is that you register for notification any time the value of a particular property changes. In this case, you you want to know whenever the player ‘s currentItem changes. Each time you’re notified, you’ll know the player has advanced to the next video.
The first thing you need to do is change the player property you defined earlier. Go to the top of the file and replace the old definition with:
@objc private let player = AVQueuePlayer()
The only difference is that you’ve added the @objc directive. This tells Swift that you would like to expose property to Objective-C things like KVO . To use KVO in Swift — much nicer than in Objective-C — you need to retain a reference to the observer. Add the following property just after player :
private var token: NSKeyValueObservation?
To start observing the property, go back to initializePlayer() and add the following at the end:
token = player.observe(\.currentItem) { [weak self] player, _ in
  if player.items().count == 1 {
    self?.addAllVideosToPlayer()
  }
}
Here, you’re registering a block to run each time the player’s currentItem property changes. When the current video changes, you want to check to see if the player has moved to the final video. If it has, then it’s time to add all the video clips back to the queue.
That’s all there is to it! Build and run to see your clips looping indefinitely.
Playing Video Efficiently
One thing to note before moving on is that playing video is a resource intensive task. As things are, your app will continue to play these clips, even when you start watching a fullscreen video.
To fix it, first add the following two methods to the bottom of the VideoLooperView.swift .
func pause() {
  player.pause()
}

func play() {
  player.play()
}
As you can see, you’re exposing play() and pause() methods and passing the message along to this view’s player .
Now, go to VideoFeedViewController.swift and find viewWillDisappear(_:) . There, add the following call to pause the video looper.
videoPreviewLooper.pause()
Then, go to viewWillAppear(_:) and add the matching call to resume playback when the user returns.
videoPreviewLooper.play()
Build and run, and go to a fullscreen video. The preview will resume where it left off when you return to the feed.

Playing with Player Controls
Next, it’s time to add some controls. Your tasks are to:
- Unmute the video when a single tap occurs.
- Toggle between 1x and 2x speed when a double tap occurs.
You’ll start with the actual methods you need to accomplish these things. First, go back to VideoLooperView.swift and find where you added your play and pause methods.
Add the following single tap handler that will toggle the volume between 0.0 and 1.0.
@objc func wasTapped() {
  player.volume = player.volume == 1.0 ? 0.0 : 1.0
}
Next, add a double tap handler.
@objc func wasDoubleTapped() {
  player.rate = player.rate == 1.0 ? 2.0 : 1.0
}
This one is similar in that it toggles the play rate between 1.0 and 2.0.
Next, add the following method definition that creates both gesture recognizers.
func addGestureRecognizers() {
  // 1
  let tap = UITapGestureRecognizer(target: self, action: #selector(VideoLooperView.wasTapped))
  let doubleTap = UITapGestureRecognizer(target: self,
                                         action: #selector(VideoLooperView.wasDoubleTapped))
  doubleTap.numberOfTapsRequired = 2

  // 2
  tap.require(toFail: doubleTap)

  // 3
  addGestureRecognizer(tap)
  addGestureRecognizer(doubleTap)
}
Taking it comment-by-comment:
- First, you create both gesture recognizers and tell them which methods to call. You also tell the double tap that it needs two taps.
- Next, you make the single tap wait to make sure a double tap isn’t going to happen. If you didn’t do this, the single tap method would always be called immediately.
- Then, you add the gesture recognizers to the video view.
To finish things off, go up to init(clips:) and add the following method call at the bottom.
addGestureRecognizers()
Build and run again and you’ll be able to tap and double tap to play around with the speed and volume of the clips. This shows how easy it is to add custom controls for interfacing with a custom video view.

Now, you can pump up the volume and throw things into overdrive at the tap of a finger. Pretty neat!
Trying Not to Steal the Show
As a final note, if you’re going to make an app that has videos, it’s important to think about how your app will affect your users.
Yeah I know, that sounds blindingly obvious. But how many times have you been using an app that starts a silent video but turns off your music?
If you’ve never experienced this first world travesty, then go ahead and plug in your headphones… Oh, sorry. 2018 version: Bluetooth-connect your headphones. Turn on some music and then run the app. When you do, you’ll notice that your music is off even though the video looper isn’t making any noise !
It’s my contention that you should allow your user to turn off their own music instead of making such a bold assumption. Lucky for you, this isn’t very hard to fix by tweaking AVAudioSession ‘s settings.
Head over to AppDelegate.swift and add the following import to the top of the file.
import AVFoundation
Next, at the top of application(_:didFinishLaunchingWithOptions:) , add the following line.
try? AVAudioSession.sharedInstance().setCategory(AVAudioSessionCategoryAmbient,
                                                 mode: AVAudioSessionModeMoviePlayback,
                                                 options: [.mixWithOthers])
Here, you’re telling the shared AVAudioSession that you would like your audio to be in the AVAudioSessionCategoryAmbient category. The default is AVAudioSessionCategorySoloAmbient , which explains shutting off the audio from other apps.
You’re also specifying that your app is using audio for “movie playback” and that you’re fine with the sound mixing with sound from other sources.
For your final build and run, start your music back up and launch the app one more time.

You now have a baller video app that gives you the freedom to be the captain of your own ship.
Where to Go From Here?
You can download the final project using the link at the top or bottom of this tutorial.
You’ve successfully put together an application that can play both local and remote videos. It also efficiently spams your users with a highlights reel of all the coolest videos on the platform.
If you’re looking to learn more about video playback, this is the tip of the iceberg. AVFoundation is a vast framework that can handle things such as:
- Capturing video with the built-in camera.
- Transcoding between video formats.
- Applying filters to a video stream in real-time.
As always, I recommend looking at the WWDC video archive when trying to learn more about a particular subject.
One thing in particular not covered in this tutorial is reacting to AVPlayerItem ‘s status property. Observing the status of remote videos will tell you about network conditions and playback quality of streaming video.
To learn more about how to react to changes in this status, I recommend Advances in AVFoundation Playback .
Also, we mentioned HLS Live Streaming but there’s a lot more to learn about this topic. If it’s something that interests you, I recommend Apple’s documentation . This page contains a nice list of links to other resources you can use to learn more.
As always, thanks for reading, and let me know if you have any questions in the comments!
Recommend
-
101
This is an excerpt taken from Chapter 1, “Getting Started”, of our book
-
81
Create ML is proof that Apple is committed to making it easier for you to use machine learning models in your apps. In this Create ML...
-
89
Note : This tutorial requires at least Xcode 10, Swift 4.2, and iOS 12.
-
49
Update note : Ehab Amer updated this tutorial for Xcode 10 and iOS 12. Bjørn Ruud wrote the original.
-
44
Quantum computers might sound a bit exotic and far into the future, but in reality, they are now accessible in the cloud or through emulators for everyone to write quantum code. In this tutorial, we’ll go through how you...
-
100
Note : This tutorial uses Xcode 10 and Swift 4.2. The libraries it depends upon are not yet updated for Swift 4.2 but can be used without issue. You’ll need to ignore the single warning telling you that Swift 4....
-
72
Update note : Pietro Rea updated this tutorial for Xcode 10, Swift 4.2 and iOS 11/12. Ray Wenderlich wrote the original.
-
52
Note : This tutorial is up to date for Swift 4.2, Xcode 10 and iOS 12. HomeKit is a library that allows users to u...
-
11
Getting Started with Realtime Events and Streaming Data (in JS)
-
6
About Joyk
Aggregate valuable and interesting links.
Joyk means Joy of geeK