

Best-Practices for API Authorization
source link: https://blog.bitsrc.io/best-practices-for-api-security-6d8242587caf
Go to the source link to view the article. You can view the picture content, updated content and better typesetting reading experience. If the link is broken, please click the button below to view the snapshot at that time.
Best-Practices for API Authorization
4 Best Practices for API Authorization
APIs (Application Programming Interfaces) are like secret doors allowing different software programs to talk. But not everyone should have the keys to every door, just as not every software should have unrestricted access to every API.
These APIs connect everything from your bank’s mobile app to your favorite social media platform, handling sensitive data and performing critical functions.
Without strict authorization protocols, APIs could be misused, leading to data breaches, service disruptions, and a loss of user trust.
So, this is where API authroization comes into play.
API authorization acts as a gatekeeper, ensuring that only the right software with the right key can open the door and use the resources inside. Effective API authorization is more than just security; it creates a seamless and safe user experience. It ensures that authorized applications only access personal information and that these applications can only perform actions within their permitted scope.
Pst, if you’d like to checkout a cool demo on API Security, check out my Bit Scope.
Understanding API Authorization
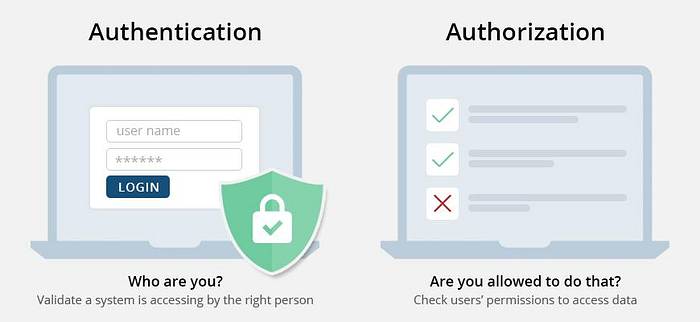
Before discussing API authorization best practices, we must understand the difference between two often-confused concepts: authorization and authentication.
- Authentication is about verifying identity. It’s like confirming a user’s identity through a username, password, or biometrics.
- Authorization is about granting access to resources or functionalities once the identity is confirmed. For example, if authentication is about getting through the front door, authorization determines which rooms and services the person can access inside the building.
Best Practices in API Authorization
Since you now understand the importance of API authorization, let’s delve into some best practices for getting the most out of it.
1. Use Token-Based Authorization (JWT, OAuth Tokens)

Token-based authorization, particularly with JWT (JSON Web Tokens) and OAuth tokens, offers a secure and efficient way to manage API interactions. For example:
- Tokens enable stateless authentication, meaning the server doesn’t need to maintain a session state for each user, leading to better scalability.
- Tokens can be securely transmitted through various means and are less susceptible to CSRF attacks than traditional session-based authentication.
- Tokens can be used across domains, making them ideal for microservices architecture and single sign-on (SSO) applications.
- Tokens, especially OAuth tokens, can include scopes and permissions, providing precise control over an authenticated user’s actions.
How to Implement Token-Based Authorization with JWT
JWTs are typically generated after a user successfully authenticates. They contain a payload with user information and possibly their permissions. You can use libraries like jsonwebtoken in Node.js or PyJWT in Python to implement JWT authorization.
First, you need to generate the JWT token. Here is how you can do it using PyJWT:
import jwt
from datetime import datetime, timedelta

secret_key = 'YOUR_SECRET_KEY'
payload = {
    'sub': user_id,
    'iat': datetime.utcnow(),
    'exp': datetime.utcnow() + timedelta(days=1)
}

token = jwt.encode(payload, secret_key, algorithm='HS256')
Then, you need to validate each request to decide if the user is allowed the preform the request. The token is typically sent in the Authorization header of the each request. The server can decode the JWT using the secret key and validates it. If valid, the server processes the request; if not, it returns an error.
from flask import Flask, request, jsonify
import jwt
import datetime

app = Flask(name)
SECRET_KEY = "your_secret_key"  # Replace with your secret key

Sample route that requires token-based authorization
@app.route('/protected', methods=['GET'])
def protected():
    token = request.headers.get('Authorization')
    if not token:
        return jsonify({'message': 'Token is missing!'}), 403

try:
        # Decoding the token
        data = jwt.decode(token, SECRET_KEY, algorithms=["HS256"])
        # You can use the data in the token as needed, for example:
        # user_id = data['user_id']

except jwt.ExpiredSignatureError:
        return jsonify({'message': 'Token has expired!'}), 403
    except jwt.InvalidTokenError:
        return jsonify({'message': 'Invalid token!'}), 403

# Token is valid, process the request
    return jsonify({'message': 'Token is valid! You have access to protected routes.'})
2. Implement Fine-Grained Access Control
Fine-grained access Control is a security management approach that offers detailed control over an application’s permissions and access rights. It ensures that users or services have only the access they need, adhering to the principle of least privilege.
How to Implement Fine-Grained Access Control:
Implementing fine-grained access control involves several steps:
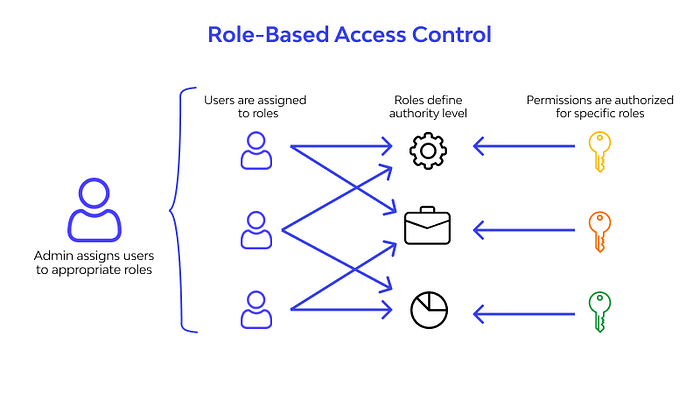
- Define Roles and Permissions: Identify different user roles within your system and define each role’s specific actions.
- Use Role-Based Access Control (RBAC): Implement RBAC where resource access is granted based on roles. Each role is assigned specific permissions.
- Consider Attribute-Based Access Control (ABAC): For more complex scenarios, ABAC can be used, where access decisions are based on a combination of attributes (user, resource, environment).
For example, if you have an API where access differs between an admin and a user. You can implement your access control mechanisms using independent components that can be re-used across your application.
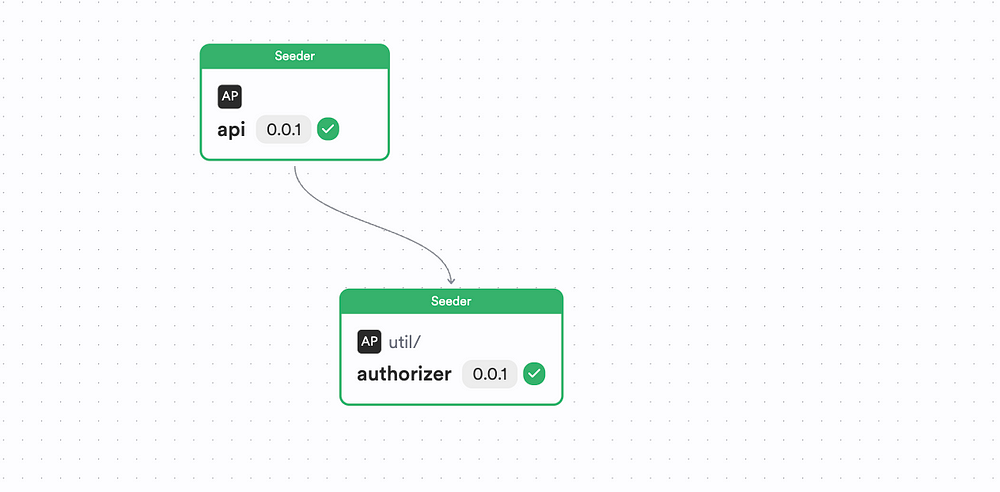
For instance, you can leverage tools like Bit to build an independent authorizer component that will be responsible for authorizing API requests.
All you’d have to do is:
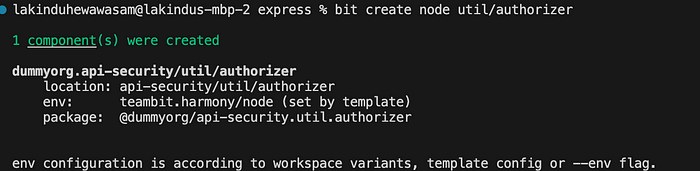
1. Create a Node.js component called “authorizer” that lets you implement your auth logic using the command:
bit create node util/authorizer
If you do this correctly, you’ll see the output:
Next, implement your authorizer logic:
export function authorizer(userId: string) {
// Implement logic to retrieve the user's role
if (userId === 'U001') {
return "admin";
}
return "customer"
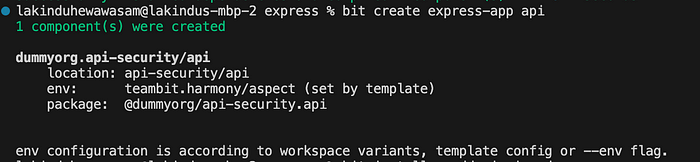
}Next, create an Express App using the command:
bit create express-app api
You’ll see the output:
Next, let’s hook up the authorizer to the app by updating the mock-route.ts. Initially, you'll see this:
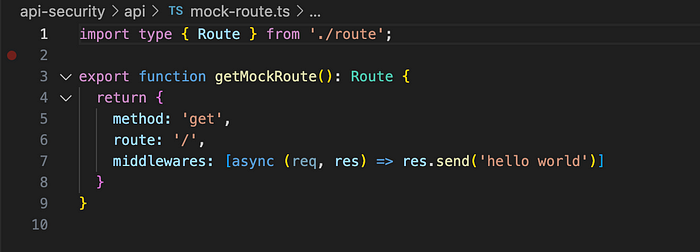
Let’s add a new middleware:
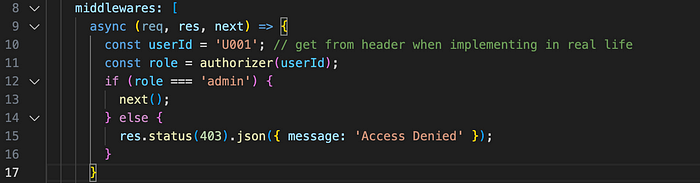
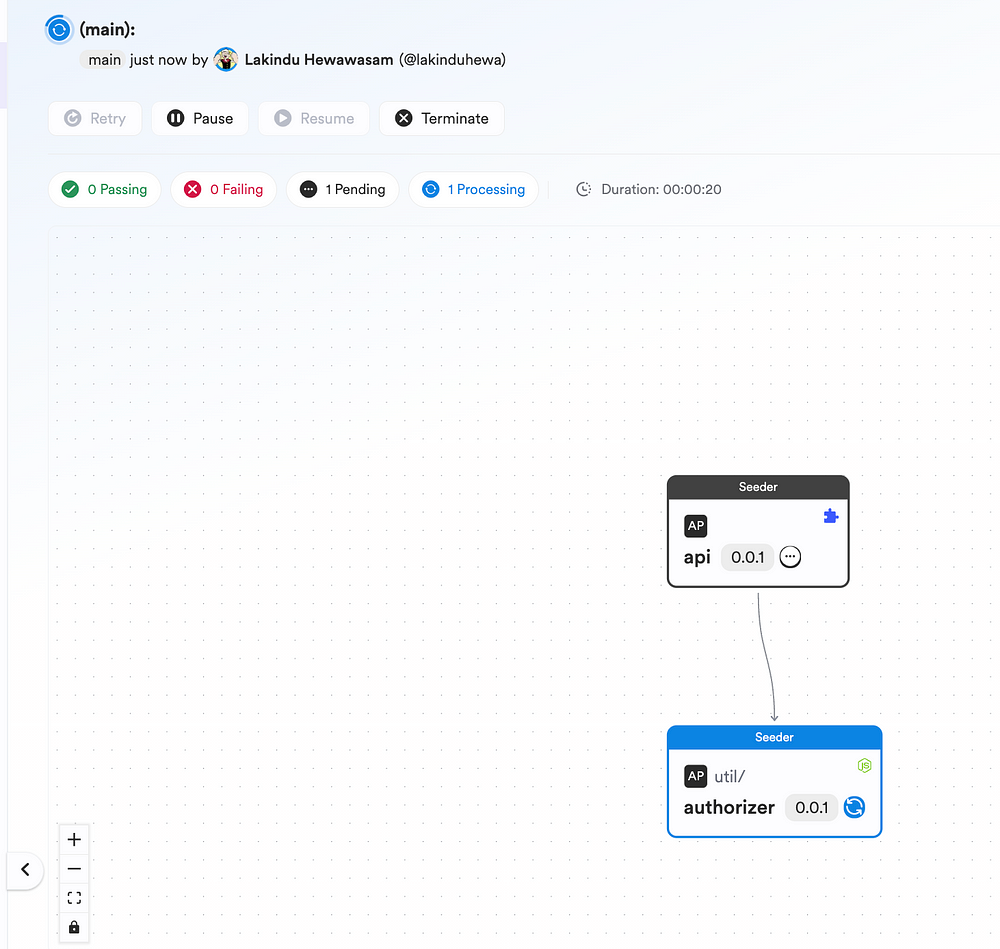
This will make sure your authorizer component runs before it invokes the actual business logic. After you run your API, you should see the following output:

By chaining functions, we’ve enforced role-based access control. The decorator checks if the user’s role matches the required roles for the endpoint. If not, it returns an access denied message.
And, as you keep updating the authorizer logic and updating the app, Bit’s CI Server — Ripple CI automatically updates the changes across the tree.
If you’d like to check out this full implementation, checkout my Bit Scope.
3. Secure API Gateway Configuration
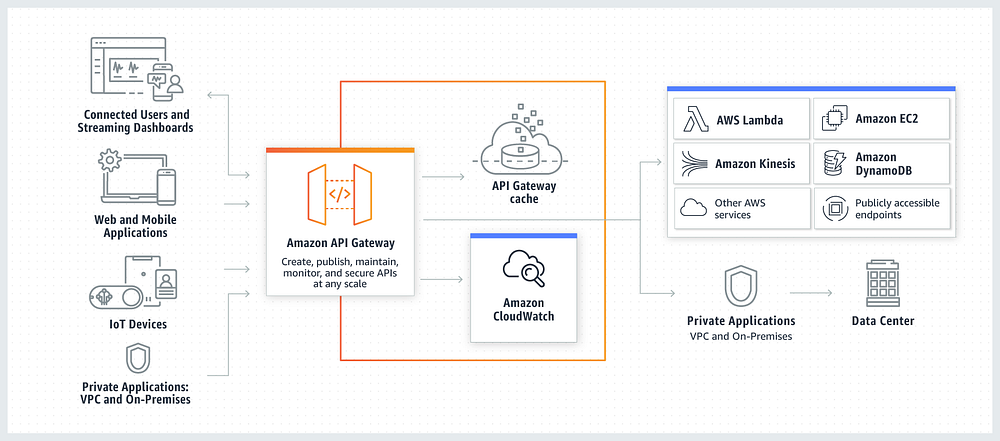
An API Gateway acts as a front-door for all API requests, providing a centralized place to enforce security and operational policies. For example, APi Gateways help you with:
- Enhanced Security: Provides an additional layer of security, protecting against threats like DDoS attacks, unauthorized access, and API abuse.
- Rate Limiting and Throttling: Prevents API overuse and ensures fair usage among users.
- Data Transformation and Validation: Ensures incoming data adheres to expected formats and standards.
How to Implement Secure API Gateway Configuration:
There are multiple API Gateway providers you can choose for your application. For example, Amazon API Gateway, Kong, and Apigee by Google are some of the most popular API Gateway platforms.
If you are planning to use AWS, you can follow the steps in their documentation to easily create an API Gateway. However, there are a few additional things you need to enable to ensure the API Gateway is secure and efficient.
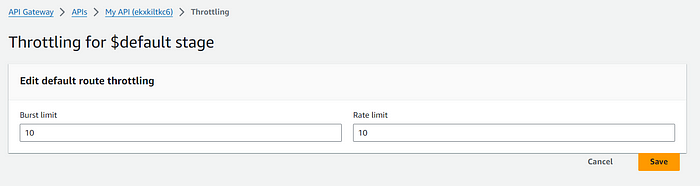
- Setup Rate Limiting — In the AWS Management Console, navigate to Amazon API Gateway, select your API, and go to the Throttling section under the Protect tab. There, you can set the rate and burst limits.
- Enable SSL/TLS — Ensure that your custom domain name for the API Gateway is associated with an SSL/TLS certificate in AWS Certificate Manager.
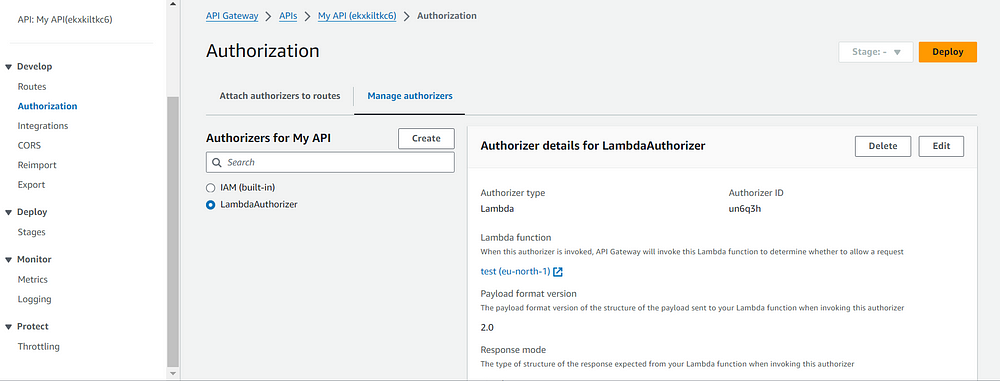
- Implement IP Restrictions — Use AWS Lambda authorizers to validate the IP addresses of incoming requests. Once the function is deployed, you can select it by creating a new authorizer for the API Gateway in the Authorization tab. Here is a sample Lambda function in Python for restricting IPs:
import json

def lambda_handler(event, context):
    ip_address = event['requestContext']['identity']['sourceIp']
    allowed_ips = ['192.168.1.1']  # List of allowed IPs
    # Add logic here to check if the ip_address is in allowed_ips or not

if ip_address not in allowed_ips:
        raise Exception('Unauthorized')

return {
        'principalId': 'user',
        'policyDocument': {
            'Version': '2012-10-17',
            'Statement': [{
                'Action': 'execute-api:Invoke',
                'Effect': 'Allow',
                'Resource': event['methodArn']
            }]
        }
    }
- Enable CloudWatch Logs — In the AWS Management Console, go to the settings of your API Gateway. In the CloudWatch Settings section, check the Enable CloudWatch Logs option. Set the log level to INFO to log all requests and responses or ERROR to log only error responses.
4. Encrypt Sensitive Data in Transit and at Rest
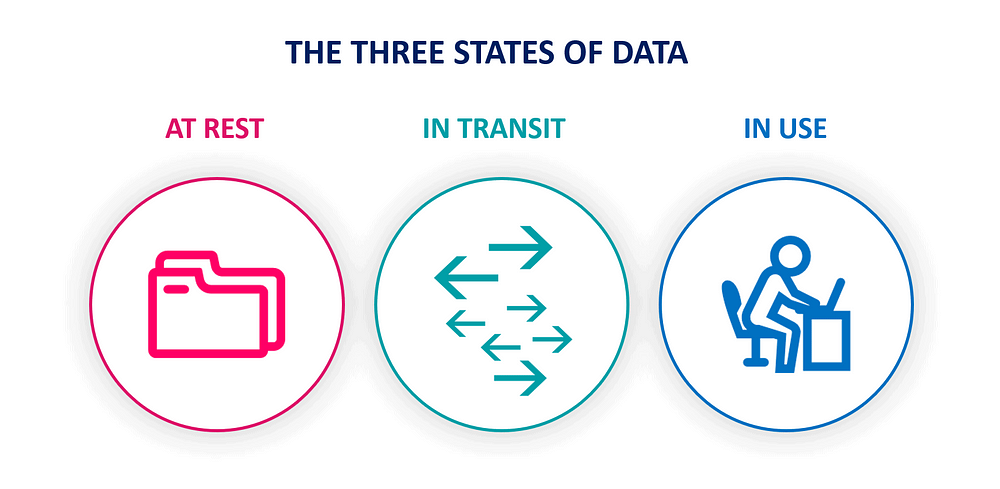
Encrypting sensitive data in transit and at rest is a fundamental security practice to protect data from unauthorized access and breaches. Encryption in transit safeguards data as it moves between clients and servers, while encryption at rest secures data when stored on a disk or database.
How to Implement Encryption in Transit
If you are using your own webserver, you must manually set up and manage SSL/TLS certificates. First, you need to obtain certificates from a trusted Certificate Authority (CA) like Let’s Encrypt, DigiCert, GoDaddy, etc. Then, configure your server to use the CA. For example, here is how to configure SSL with Nginx:
- Modify the Nginx configuration file (typically found at
/etc/nginx/nginx.confor/etc/nginx/sites-available/your_site). - Add SSL settings in the server block:
server {
    listen 443 ssl;
    server_name yourdomain.com;

ssl_certificate /path/to/your/fullchain.pem; # Path to your fullchain.pem from CA
    ssl_certificate_key /path/to/your/privkey.pem; # Path to your private key from CA

# Strong encryption settings (consider using recommendations from Mozilla's SSL Configuration Generator)
    ssl_protocols TLSv1.2 TLSv1.3;
    ssl_ciphers 'ECDHE-ECDSA-AES128-GCM-SHA256:ECDHE-RSA-AES128-GCM-SHA256...';

# Other server configurations...
}
If you use a cloud service, they offer fully managed services for handling SSL/TLS. For example, you can use AWS Certificate Manager for services hosted in AWS.
How to Implement Encryption at Rest
You can implement encryption at rest at the database level, application level, or using cloud-based tools.
- Database-Level Encryption: Many modern databases offer built-in encryption features. For example:
- SQL Server: Transparent Data Encryption.
- MySQL: InnoDB tablespace encryption.
- MongoDB: Encrypted Storage Engine.
- Application-Level Encryption: Application level encryption should be used with high sensitive data to encrypt them even before storing in the database. You can use libraries like cryptography for this:
from cryptography.fernet import Fernet

# Generate a key
key = Fernet.generate_key()
cipher_suite = Fernet(key)

# Encrypt data
encrypted_data = cipher_suite.encrypt(b"Sensitive Data")
# Decrypt data
decrypted_data = cipher_suite.decrypt(encrypted_data)
Final Thoughts
Robust API authorization is crucial for securing digital assets and maintaining user trust.
By implementing the best practices discussed here, developers can significantly enhance applications’ API security while ensuring compliance and protection against various cyber threats.
Learn More
Recommend
About Joyk
Aggregate valuable and interesting links.
Joyk means Joy of geeK