

RenderScript:Android平台上高性能图形计算框架
source link: https://www.51cto.com/article/785522.html
Go to the source link to view the article. You can view the picture content, updated content and better typesetting reading experience. If the link is broken, please click the button below to view the snapshot at that time.
RenderScript介绍
RenderScript是一种高性能的计算框架,用于在设备上执行复杂的数学计算,尤其是在图像处理方面。最初是为了解决Android平台上图形和计算密集型任务而设计的,可以在CPU或GPU上并行执行,以利用多核处理器和图形硬件的加速能力。

RenderScript的主要特点:
- 并行计算:RenderScript利用设备的多核处理器进行并行计算,从而显著提高计算密集型任务的性能。
- 硬件加速:RenderScript能够利用GPU进行硬件加速计算,适用于图形和图像处理任务。
- 易于使用:RenderScript使用C99样式的语法,Android SDK提供了方便的Java/Kotlin绑定,使得可以在Android应用中轻松集成RenderScript代码。
- 性能优化:RenderScript编译器会自动优化代码,以充分利用目标设备的硬件特性。
RenderScript使用场景:
- 图像处理:如模糊、锐化、颜色转换等。
- 计算机视觉:如特征检测、边缘识别等。
- 物理模拟:如碰撞检测、粒子系统等。
随着Android平台的不断发展,一些新的API和框架(如Android的NDK,Vulkan和RenderEffect(Android12))也提供了类似的性能优化能力。
Google在Android开发者博客中提到,其实早已不建议将RenderScript用于对性能需求至关重要的任务,Android开发者应该转向可在GPU硬件层级上高效运作、且具有出色的跨平台体验的Vulkan API 。
RenderScript脚本
RenderScript .rs 脚本使用一种类似于C99的语法,允许开发者定义内核函数,这些函数可以在Android设备上高效地并行执行。.rs 脚本的基本语法说明:
1.脚本头
在脚本的开头,通常会看到一些预处理指令,用于定义脚本的版本和Java包名:
#pragma version(1)
#pragma rs java_package_name(com.reathin.renderscript)- #pragma version(1):指定RenderScript的版本。
- #pragma rs java_package_name(...):指定生成的Java类的包名。
2.数据类型
RenderScript使用了一些特殊的数据类型,如rs_allocation,是用于访问内存分配的引用类型。还有uchar4、float4等类型,用于表示包含四个无符号字符或浮点数的向量。
3.内核函数
内核函数是RenderScript脚本中的主要部分,定义了要在GPU或CPU上执行的并行计算。
void blur(const uchar4 *v_in, uchar4 *v_out, const void *usrData, uint32_t x, uint32_t y) {
    // 内核函数的实现
}- void blur(...):定义了一个名为blur的内核函数。
- const uchar4 *v_in 和 uchar4 *v_out:是输入和输出参数的指针。
- const void *usrData:是传递给内核的任意用户数据。
- uint32_t x, uint32_t y:是内核的当前执行位置(例如,像素坐标)。
4.根函数
根函数是RenderScript脚本的入口点。当RenderScript运行时加载脚本时,会调用根函数。
void root() {
    // 初始化代码或调用其他内核函数
}
5.访问全局变量
在.rs脚本中,可以定义全局变量,并在内核函数中访问它们。
float mGlobalData;

void blur(...) {
    // 使用 mGlobalData
}
6.调用其他内核
可以在根函数或其他内核函数中调用其他内核。
void blur(...) {
    // 另一个内核的实现
}

void root() {
    // 调用另一个内核
    blur(...);
}
7.分配和访问内存
RenderScript使用Allocation对象来管理内存。在Java代码中,会创建Allocation对象,并将其传递给RenderScript内核。在.rs脚本中,可以使用rsGetAllocationAddress函数来获取指向这些分配的内存的指针。
const uchar4 *in = rsGetAllocationAddress(inAllocation);
uchar4 *out = rsGetAllocationAddress(outAllocation);
8.内置函数和API
RenderScript提供了一些内置函数和API,用于执行常见的操作,如数学运算、内存操作、类型转换等。
9.编译和链接
.rs 脚本文件在构建过程中会被编译成字节码,并与应用一起打包。当应用运行时,RenderScript运行时会加载这些字节码,并在适当的硬件上执行它们。
10.注意事项
- 确保你的RenderScript脚本遵循Android NDK的C/C++编码规范。
- 由于RenderScript是并行执行的,要避免在内核函数中使用可能导致竞态条件的全局变量或状态。
- 对于涉及复杂计算或大量数据的任务,RenderScript可以显著提高性能,也要小心管理内存和避免不必要的复制操作。
使用RenderScript实现模糊效果
在Android中实现模糊效果通常使用RenderScript或者自定义的OpenGL着色器。RenderScript和OpenGL都是相对底层的API,需要一定的图形编程知识。对于更简单的模糊效果,可以考虑使用第三方库,如Glide或Picasso,提供了更高级的API来实现图像模糊和其他效果。
下面使用RenderScript实现模糊效果。
添加RenderScript支持:
android {

    //高版本Studio
    buildFeatures {
        renderScript true
    }

    defaultConfig {
        renderscriptTargetApi 21
        renderscriptSupportModeEnabled true
    }

}
使用RenderScript实现图片高斯模糊效果
public static Bitmap scriptBlur(Context context, Bitmap origin, int outWidth, int outHeight, float radius) {
    if (origin == null || origin.isRecycled()) {
        return null;
    }
    mStartTime = System.currentTimeMillis();
    RenderScript renderScript = RenderScript.create(context.getApplicationContext(), RenderScript.ContextType.NORMAL, RenderScript.CREATE_FLAG_NONE);
    Allocation blurInput = Allocation.createFromBitmap(renderScript, origin);
    Allocation blurOutput = Allocation.createTyped(renderScript, blurInput.getType());
    ScriptIntrinsicBlur blur = null;
    try {
        blur = ScriptIntrinsicBlur.create(renderScript, blurInput.getElement());
    } catch (RSIllegalArgumentException e) {
        if (e.getMessage().contains("Unsuported element type")) {
            blur = ScriptIntrinsicBlur.create(renderScript, Element.U8_4(renderScript));
        }
    }
    if (blur == null) {
        //脚本模糊失败
        return null;
    }
    blur.setRadius(range(radius, 0, 20));
    blur.setInput(blurInput);
    blur.forEach(blurOutput);

    Bitmap result = Bitmap.createBitmap(outWidth, outHeight, Bitmap.Config.ARGB_8888);
    blurOutput.copyTo(result);

    //释放
    renderScript.destroy();
    blurInput.destroy();
    blurOutput.destroy();

    origin.recycle();
    long time = (System.currentTimeMillis() - mStartTime);
    Log.i("BlurUtils", "模糊用时:[" + time + "ms]");
    return result;
}
调用高斯模糊方法
val bitmap = BitmapFactory.decodeResource(resources, R.mipmap.image_beauty)

val bitmap1 = BlurUtils.scriptBlur(this, bitmap, bitmap.getWidth(), bitmap.getHeight(), 10f)
val bitmap2 = BlurUtils.scriptBlur(this, bitmap, bitmap.getWidth(), bitmap.getHeight(), 15f)
val bitmap3 = BlurUtils.scriptBlur(this, bitmap, bitmap.getWidth(), bitmap.getHeight(), 20f)
val bitmap4 = BlurUtils.scriptBlur(this, bitmap, bitmap.getWidth(), bitmap.getHeight(), 25f)

imageView1.setImageBitmap(bitmap)
imageView2.setImageBitmap(bitmap2)
imageView3.setImageBitmap(bitmap3)
imageView4.setImageBitmap(bitmap4)
运行效果:

在Android中,RenderScript .rs 脚本是一种用C99语法编写的文件,定义了可以在设备上并行执行的计算任务。通常用于图形和计算密集型任务,例如图像处理、物理模拟等。.rs 脚本编译后会生成二进制代码,代码可以在Android设备的CPU或GPU上执行。
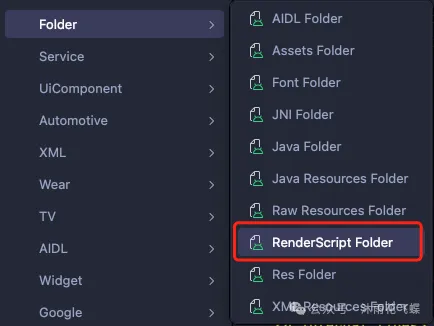
Android Studio创建rs脚本目录:
(1) 编写.rs脚本
#pragma version(1)
#pragma rs java_package_name(com.reathin.renderscript)

// 输入图像
rs_allocation inImage;
// 输出图像
rs_allocation outImage;
// 模糊半径
float blurRadius;

// 定义模糊函数
void blur(const uchar4 *v_in, uchar4 *v_out, const void *usrData, uint32_t x, uint32_t y) {
    // 计算模糊后的颜色值
    float4 sum = 0.0f;
    int count = 0;
    for (float dx = -blurRadius; dx <= blurRadius; dx++) {
        for (float dy = -blurRadius; dy <= blurRadius; dy++) {
            int newX = x + (int)dx;
            int newY = y + (int)dy;
            if (newX >= 0 && newX < rsAllocationGetDimX(inImage) && newY >= 0 && newY < rsAllocationGetDimY(inImage)) {
                sum += rsUnpackColor8888(*v_in + rsAllocationGetElementPtr(inImage, newX, newY));
                count++;
            }
        }
    }
    *v_out = rsPackColor8888(sum / count);
}

// 根函数,RenderScript执行时的入口点
void root() {
    // 获取输入和输出图像的指针
    const uchar4 *in = rsGetAllocationAddress(inImage);
    uchar4 *out = rsGetAllocationAddress(outImage);

    // 执行模糊操作
    blur(in, out, NULL, 0, 0);
}
将 .rs 文件放在项目的 src/main/rs 目录下。在Java或Kotlin代码中加载这个脚本并设置输入和输出 Allocation 对象,最后调用RenderScript的内核来执行模糊操作。
(2) 调用RenderScript内核进行调用
import android.content.Context;
import android.graphics.Bitmap;
import android.renderscript.Allocation;
import android.renderscript.Element;
import android.renderscript.RenderScript;
import android.renderscript.ScriptC;

public Bitmap applyBlur(Context context, Bitmap inputBitmap, float blurRadius) {
    // 创建RenderScript实例
    RenderScript rs = RenderScript.create(context);

    // 创建输入和输出Allocation
    Allocation inputAllocation = Allocation.createFromBitmap(rs, inputBitmap);
    Allocation outputAllocation = Allocation.createTyped(rs, inputAllocation.getType());

    // 加载RenderScript脚本
    ScriptC_Blur blurScript = new ScriptC_Blur(rs);
    blurScript.set_inImage(inputAllocation);
    blurScript.set_outImage(outputAllocation);
    blurScript.set_blurRadius(blurRadius);

    // 执行模糊操作
    blurScript.invoke_root();

    // 创建输出位图并复制数据
    Bitmap outputBitmap = Bitmap.createBitmap(inputBitmap.getWidth(), inputBitmap.getHeight(), inputBitmap.getConfig());
    outputAllocation.copyTo(outputBitmap);

    // 销毁资源和清理
    inputAllocation.destroy();
    outputAllocation.destroy();
    rs.destroy();

    return outputBitmap;
}
ScriptC_Blur是根据.rs脚本文件自动生成的类。需要用实际的类名替换ScriptC_Blur应该与.rs文件名相同(去掉.rs扩展名,并将下划线_替换为驼峰命名法的大写字母)。
完整示例代码: https://github.com/Reathin/Sample-Android
Recommend
About Joyk
Aggregate valuable and interesting links.
Joyk means Joy of geeK